Use Data Transmission Service (DTS) to migrate data from a self-managed PostgreSQL database to a PolarDB for PostgreSQL (Compatible with Oracle) cluster. Full data migration combined with incremental data migration keeps your application running throughout the process, minimizing downtime.
Prerequisites
Before you begin, make sure that you have:
-
A PolarDB for PostgreSQL (Compatible with Oracle) cluster. For more information, see Create a PolarDB for PostgreSQL (Compatible with Oracle) cluster
-
Enough available storage space in the destination cluster (must exceed the total data size of the source database)
-
The required database accounts and permissions (see Permissions required)
Choose a migration type
Select the migration type based on your downtime tolerance.
| Migration type | What DTS does | Downtime required | Cost |
|---|---|---|---|
| Full data migration | Migrates existing data at a point in time | Yes — stop all writes to the source before migration | Free |
| Full data migration + incremental data migration | Migrates existing data, then continuously syncs changes until you cut over | Minimal — services stay running during migration | Charged for incremental phase |
Recommended: Select both Full Data Migration and Incremental Data Migration to keep your application running during migration. If you select full migration only, stop all writes to the source database before starting — otherwise data inconsistency will occur.
Permissions required
| Database | Schema migration | Full data migration | Incremental data migration |
|---|---|---|---|
| Self-managed PostgreSQL | USAGE on pg_catalog |
SELECT on objects to be migrated |
superuser |
| PolarDB for PostgreSQL (Compatible with Oracle) | Database owner | ||
Specify the database owner when you create the destination database.
For instructions on creating accounts and granting permissions, see:
-
Self-managed PostgreSQL: CREATE USER and GRANT
-
PolarDB for PostgreSQL (Compatible with Oracle): Create database accounts
Billing
| Migration type | Instance configuration fee | Internet traffic fee |
|---|---|---|
| Full data migration | Free | Charged only when data is migrated from Alibaba Cloud over the Internet. See Billing overview. |
| Incremental data migration | Charged. See Billing overview. | — |
SQL operations supported for incremental migration
| Operation type | SQL statements |
|---|---|
| DML | INSERT, UPDATE, DELETE |
| DDL | CREATE TABLE, DROP TABLE, ALTER TABLE (RENAME TABLE, ADD COLUMN, ADD COLUMN DEFAULT, ALTER COLUMN TYPE, DROP COLUMN, ADD CONSTRAINT, ADD CONSTRAINT CHECK, ALTER COLUMN DROP DEFAULT), TRUNCATE TABLE (PostgreSQL 11 or later), CREATE INDEX ON TABLE — available only when the source database account is a privileged account |
-
DDL migration is supported only for tasks created after October 1, 2020.
-
For tasks created before May 12, 2023: create a trigger and a function in the source database before configuring the task. See Use triggers and functions to implement incremental DDL migration for PostgreSQL databases.
-
Incremental data migration does not support the BIT data type.
-
DDL statements cannot include CASCADE or RESTRICT.
-
DDL statements from sessions where
SET session_replication_role = replicais executed are not migrated. -
If a batch submitted to the source database contains both DML and DDL statements, DTS skips the DDL statements.
-
DDL statements on objects not selected for migration are skipped.
-
The CREATE SEQUENCE statement is not supported.
Usage notes
During schema migration, DTS migrates foreign keys from the source database to the destination database.
During full and incremental data migration, DTS temporarily disables foreign key constraint checks and cascade operations at the session level. Performing CASCADE or DELETE operations on the source database during migration may cause data inconsistency.
Source database limits
| Limit | Details | Impact and workaround |
|---|---|---|
| Bandwidth | The source database server must have sufficient outbound bandwidth. | Insufficient bandwidth reduces migration speed. |
| Primary key or unique constraint | Tables to be migrated must have a PRIMARY KEY or UNIQUE constraint, with all fields unique. | Tables without these constraints may produce duplicate records in the destination database. Workaround: Add a primary key or unique constraint to the table before migration, or exclude those tables from migration. |
| Database name | The source database name cannot contain hyphens (-). Example of an invalid name: dts-testdata. |
The migration task fails to start if the name contains a hyphen. Rename the database before migration. |
| Table limit (when editing objects) | If you select tables and need to rename tables or columns, a single task supports up to 1,000 tables. | Exceeding this limit causes a request error. Workaround: Split the migration into multiple tasks, or migrate at the database level instead of selecting individual tables. |
wal_level parameter |
For incremental migration, set wal_level to logical in postgresql.conf. |
Incorrect wal_level prevents DTS from reading incremental changes. See Prepare the source database. |
| WAL log retention | For incremental migration only: retain WAL logs for at least 24 hours. For full + incremental migration: retain WAL logs for at least 7 days. After full migration completes, the 24-hour minimum applies. | If DTS cannot obtain WAL logs, the task fails and data inconsistency may occur. |
| Primary/secondary switchover | Do not perform a primary/secondary switchover on the source database during migration. | A switchover causes the migration task to fail. |
| DDL during full migration | Do not perform DDL operations during full data migration. | DDL operations during full migration cause the task to fail. |
| Long-running transactions | If the source database has long-running transactions during incremental migration, WAL logs generated before those transactions are committed are not cleared. | Uncommitted transactions cause WAL log accumulation, which may exhaust source database storage. Monitor and commit or roll back long-running transactions during migration. |
Other limits
| Limit | Details |
|---|---|
| Pre-create databases and tables | Create the target databases and tables in the destination cluster before configuring the migration task. |
| Newly created or renamed tables during incremental migration | If you create a table or run RENAME on a table in a schema selected for migration, execute ALTER TABLE schema.table REPLICA IDENTITY FULL; before writing data to that table. Replace schema and table with the actual names. |
| Temporary tables in the source database | DTS creates temporary tables in the source database: public.dts_pg_class, public.dts_pg_attribute, public.dts_pg_type, public.dts_pg_enum, public.dts_postgres_heartbeat, public.dts_ddl_command, and public.dts_args_session. Do not delete these tables during migration. They are automatically removed when the DTS instance is released. |
| Heartbeat table | DTS creates a heartbeat table named dts_postgres_heartbeat in the source database to track incremental migration latency. |
| Replication slot | DTS creates a replication slot prefixed with dts_sync_ in the source database, which retains incremental logs for up to 15 minutes. The slot is automatically cleared when the task is released or fails. If a primary/secondary switchover occurs on the source ApsaraDB for PostgreSQL instance, log in to the secondary instance to manually clear the replication slot. |
| One database per task | A single migration task migrates data from one database only. To migrate multiple databases, create a separate task for each. |
| Performance impact | Full data migration uses read and write resources on both the source and destination databases, increasing server load. Schedule migration during off-peak hours. |
| Tablespace growth | Concurrent INSERT operations during full migration cause table fragmentation in the destination database. Expect the destination tablespace to be larger than the source after migration. |
| FLOAT/DOUBLE precision | DTS retrieves FLOAT and DOUBLE values using ROUND(COLUMN, PRECISION). Default precision: 38 digits for FLOAT, 308 digits for DOUBLE. Verify these defaults meet your requirements and adjust if needed. |
| Failed task retry | DTS retries failed tasks for up to 7 days. Before switching workloads to the destination database, stop or release any failed tasks. Alternatively, execute REVOKE to remove DTS write permissions on the destination database — otherwise source data may overwrite destination data when the failed task resumes. |
| Sequence metadata | DTS does not validate sequence metadata. After switching workloads, sequences in the destination database do not automatically continue from the maximum value in the source. Before the cutover, query the current maximum sequence values in the source database and set them as the starting values in the destination database. Use the following SQL to get the setval statements: |
do language plpgsql $$
declare
  nsp name;
  rel name;
  val int8;
begin
  for nsp,rel in select nspname,relname from pg_class t2 , pg_namespace t3 where t2.relnamespace=t3.oid and t2.relkind='S'
  loop
    execute format($_$select last_value from %I.%I$_$, nsp, rel) into val;
    raise notice '%',
    format($_$select setval('%I.%I'::regclass, %s);$_$, nsp, rel, val+1);
  end loop;
end;
$$;
Prepare the source database
Follow the steps for your PostgreSQL version.
PostgreSQL 10.1 or later
The following steps use Linux.
-
Log in to the server where the source PostgreSQL database is running.
-
Set
wal_leveltologicalinpostgresql.conf.After editing
postgresql.conf, runSELECT pg_reload_conf();or restart PostgreSQL for the change to take effect.
-
Add the CIDR blocks of DTS servers to
pg_hba.conf. Add only the CIDR blocks for the region where the destination database resides. See Add the CIDR blocks of DTS servers to the security settings of on-premises databases for the CIDR block list.For
pg_hba.confsyntax, see The pg_hba.conf file. Skip this step if you have already set the IP address to0.0.0.0/0.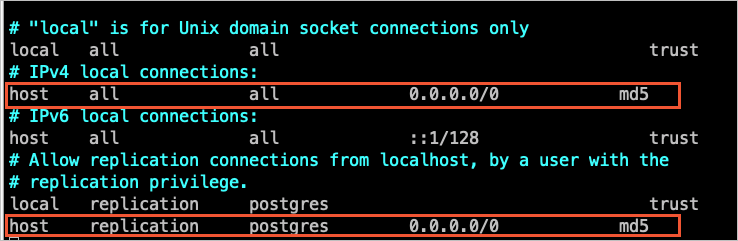
-
Create the corresponding database and schema in the destination cluster to match the objects you plan to migrate.
PostgreSQL 9.4.8 to 10.0
-
Download and install PostgreSQL from source.
-
Download the source code matching your PostgreSQL version from the PostgreSQL official website.
-
Run the following commands in sequence to configure, compile, and install:
sudo ./configure
sudo make
sudo make install
Important- The PostgreSQL source code must be compiled with a GCC version that matches the operating system version. - If
sudo ./configurefails, adjust the command based on the error. For example, if the error isreadline library not found, runsudo ./configure --without-readline. - If you installed PostgreSQL by other means, compile theali_decodingplugin in a test environment with the same OS version and GCC version. -
-
Download, compile, and install the
ali_decodingplugin provided by DTS.-
Download ali_decoding.
-
Copy the
ali_decodingdirectory to thecontribdirectory of your PostgreSQL installation.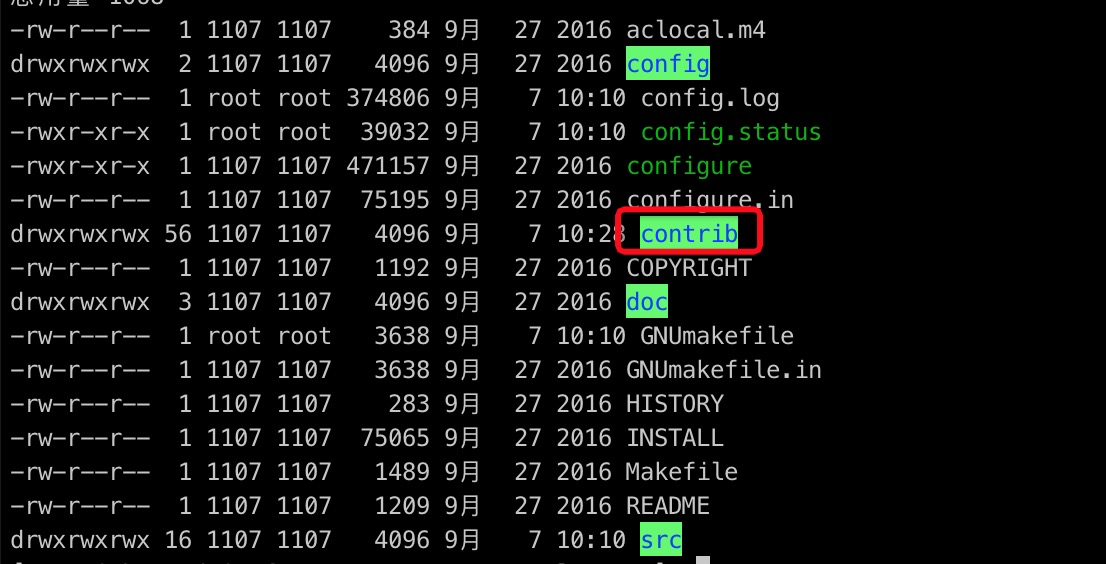
-
In the
ali_decodingdirectory, replace the contents ofMakefilewith the following:# contrib/ali_decoding/Makefile MODULE_big = ali_decoding MODULES = ali_decoding OBJS = ali_decoding.o DATA = ali_decoding--0.0.1.sql ali_decoding--unpackaged--0.0.1.sql EXTENSION = ali_decoding NAME = ali_decoding #subdir = contrib/ali_decoding #top_builddir = ../.. #include $(top_builddir)/src/Makefile.global #include $(top_srcdir)/contrib/contrib-global.mk #PG_CONFIG = /usr/pgsql-9.6/bin/pg_config #pgsql_lib_dir := $(shell $(PG_CONFIG) --libdir) #PGXS := $(shell $(PG_CONFIG) --pgxs) #include $(PGXS) # Run the following commands to install the source code: ifdef USE_PGXS PG_CONFIG = pg_config PGXS := $(shell $(PG_CONFIG) --pgxs) include $(PGXS) else subdir = contrib/ali_decoding top_builddir = ../.. include $(top_builddir)/src/Makefile.global include $(top_srcdir)/contrib/contrib-global.mk endif -
In the
ali_decodingdirectory, compile and install the plugin:sudo make sudo make install -
Copy the output files to the required locations.

-
-
Create the corresponding database and schema in the destination cluster to match the objects you plan to migrate.
Configure the migration task
-
Go to the Data Migration Tasks page.
-
Log in to the Data Management (DMS) console.
-
In the top navigation bar, click DTS.
-
In the left-side navigation pane, choose DTS (DTS) > Data Migration.
- Navigation varies by DMS console mode. See Simple mode and Customize the layout and style of the DMS console. - Alternatively, go directly to the Data Migration Tasks page of the new DTS console.
-
-
From the drop-down list next to Data Migration Tasks, select the region where the data migration instance resides.
In the new DTS console, select the region in the upper-left corner.
-
Click Create Task. Configure the source and destination databases using the following parameters.
WarningAfter selecting the source and destination instances, read the limits displayed at the top of the page before proceeding.
Source database
Parameter Description Database Type Select PostgreSQL. Access Method Select Express Connect, VPN Gateway, or Smart Access Gateway. For network preparation, see Preparation overview. Instance Region The region where the source database resides. Replicate Data Across Alibaba Cloud Accounts Select No for this scenario. Connected VPC The virtual private cloud (VPC) connected to the source database. IP Address The IP address of the source database server. Port Number The service port of the source database. Default: 5432. Database Name The name of the source database. Database Account The account for the source database. See Permissions required. Database Password The password for the database account. Destination database
Parameter Description Database Type Select PolarDB (Compatible with Oracle). Access Method Select Express Connect, VPN Gateway, or Smart Access Gateway. Instance Region The region where the destination PolarDB cluster resides. Connected VPC The VPC connected to the destination cluster. Find the VPC ID on the cluster's Overview page. Domain Name or IP Address The IP address of the primary node in the destination cluster. Run pingagainst the cluster endpoint to get the IP address.Port Number The service port of the destination database. Default: 1521. Database Name The name of the database in the destination cluster. Database Account The account for the destination cluster. See Permissions required. Database Password The password for the database account. -
If the source database has an IP address whitelist, add the DTS server CIDR blocks to it. Then click Test Connectivity and Proceed.
WarningAdding DTS server CIDR blocks to a database whitelist or ECS security group introduces security risks. Before proceeding, take preventive measures: strengthen account passwords, restrict exposed ports, authenticate API calls, regularly audit IP whitelists and security group rules, and remove unauthorized CIDR blocks. Use Express Connect, VPN Gateway, or Smart Access Gateway to connect the database to DTS where possible.
-
Configure migration objects and advanced settings.
Migration types and objects
Parameter Description Migration Types Select Full Data Migration for a one-time migration with downtime. Select both Full Data Migration and Incremental Data Migration to minimize downtime. If you do not select Incremental Data Migration, stop writes to the source database during migration to ensure data consistency. Processing Mode of Conflicting Tables Precheck and Report Errors: checks whether the destination contains tables with the same names as the source. If identical names exist, the precheck fails and the task cannot start. Use object name mapping to rename destination tables if needed. Ignore Errors and Proceed: skips the duplicate-name check. WarningThis may cause data inconsistency. Records with the same primary key values are not migrated, and schema differences may cause partial migration or task failure.
Source Objects Select objects from the Source Objects section and click the arrow icon to move them to Selected Objects. Selectable granularity: columns, tables, or schemas. Selecting tables or columns excludes views, triggers, and stored procedures. Selected Objects To rename a single object in the destination, right-click it in Selected Objects. See Map the name of a single object. To rename multiple objects at once, click Batch Edit. See Map multiple object names at a time. NoteRenaming an object may cause dependent objects to fail migration. To filter rows, right-click a table and specify WHERE conditions. See Use SQL conditions to filter data.
-
Click Next: Advanced Settings and configure the following parameters.
Parameter Description Set Alerts No: disables alerting. Yes: enables alerting. Specify an alert threshold and alert contacts. See Configure monitoring and alerting. Retry Time for Failed Connections The retry window for failed connections. DTS retries immediately within this window. Range: 10–1,440 minutes. Default: 120 minutes. Set this to at least 30 minutes. If DTS reconnects within the window, the task resumes; otherwise, the task fails. NoteIf multiple tasks share the same source or destination database and have different retry windows, the shortest window applies. DTS charges for the instance during retry periods.
Retry time for other issues The retry window for failed DML or DDL operations after the task starts. Range: 1–1,440 minutes. Default: 10 minutes. Set this to at least 10 minutes. ImportantThis value must be less than Retry Time for Failed Connections.
Configure ETL Yes: enables the extract, transform, and load (ETL) feature. Enter data processing statements in the code editor. See Configure ETL in a data migration or data synchronization task and What is ETL?. No: disables ETL. -
Click Next: Save Task Settings and Precheck.
- To preview the OpenAPI parameters for this task, hover over Next: Save Task Settings and Precheck and click Preview OpenAPI parameters. - DTS runs a precheck before starting the task. The task can only start after passing the precheck. - If the precheck fails, click View Details next to each failed item. Fix the issues based on the error messages, then run the precheck again. - If the precheck raises an alert: if the alert cannot be ignored, fix the issue and rerun the precheck. If the alert can be ignored, click Confirm Alert Details > Ignore > OK, then click Precheck Again. Ignoring alerts may cause data inconsistency.
-
Wait until the success rate reaches 100%, then click Next: Purchase Instance.
-
On the Purchase Instance page, configure the instance class.
Parameter Description Resource Group The resource group for the migration instance. Default: default resource group. See What is Resource Management?. Instance Class The instance class determines migration speed. Select based on your requirements. See Specifications of data migration instances. -
Read and accept the Data Transmission Service (Pay-as-you-go) Service Terms by selecting the check box.
-
Click Buy and Start. Monitor the task progress in the task list.
Verify and cut over
Before switching production traffic to the destination cluster, complete the following steps.
Verify data consistency
For incremental migration, confirm that the source database has no pending incoming changes before you cut over:
-
In the DTS task list, check that the migration task shows no errors and that the incremental migration latency is near zero.
-
Stop new writes to the source database temporarily.
-
Confirm that the incremental migration latency drops to zero and no new changes are being applied.
Reset sequence values
DTS does not carry over sequence metadata. After the cutover, sequences in the destination database start from their migrated values, not from the maximum value in the source. To prevent sequence conflicts:
-
Run the following SQL on the source database to get the current maximum sequence values:
do language plpgsql $$ declare nsp name; rel name; val int8; begin for nsp,rel in select nspname,relname from pg_class t2 , pg_namespace t3 where t2.relnamespace=t3.oid and t2.relkind='S' loop execute format($_$select last_value from %I.%I$_$, nsp, rel) into val; raise notice '%', format($_$select setval('%I.%I'::regclass, %s);$_$, nsp, rel, val+1); end loop; end; $$; -
Run the generated
setvalstatements on the destination database to set each sequence to the correct starting value.
Stop or release failed tasks
DTS retries failed tasks for up to 7 days. Before switching workloads, stop or release any failed tasks. Alternatively, execute REVOKE to remove DTS write permissions on the destination database — otherwise source data may overwrite destination data when a failed task resumes.
Switch workloads
Update your application connection strings to point to the destination PolarDB cluster.