Use DTS to migrate data from a PolarDB for PostgreSQL cluster to a self-managed Oracle database for data backflow and functional testing.
Prerequisites
- Each table to migrate in the source PolarDB for PostgreSQL cluster has a primary key or UNIQUE NOT NULL index.
- The self-managed Oracle database runs version 9i, 10g, 11g, 12c, 18c, or 19c.
- The required schemas (tables, etc.) exist in the destination Oracle database.
- The destination Oracle database has more storage than the source PolarDB for PostgreSQL database.
Limitations
- Only full and incremental data migration are supported. Schema migration is not supported.
- Full data migration consumes read and write resources of both databases, which may increase server loads. Evaluate impact and migrate during off-peak hours.
-
If the self-managed Oracle database is deployed in a Real Application Cluster (RAC) architecture and is connected to DTS over an Alibaba Cloud virtual private cloud (VPC), you must connect the Single Client Access Name (SCAN) IP address of the Oracle RAC and the virtual IP address (VIP) of each node to the VPC and configure routes. The settings ensure that your DTS task can run as expected. For more information, see Connect a data center to DTS through VPN Gateway.
ImportantWhen you configure the source Oracle database in the DTS console, you can specify the SCAN IP address of the Oracle RAC as the database endpoint or IP address.
- Each task migrates one database. Create separate tasks for multiple databases.
- If you create or rename a table within a migrated schema, run
ALTER TABLE schema.table REPLICA IDENTITY FULL;before writing data to that table.Note Replaceschemaandtablewith your actual schema and table names. - DTS adds a heartbeat table named
dts_postgres_heartbeatto the source database for latency tracking. The table schema is shown below.
- During incremental migration, long-running transactions prevent WAL cleanup and can exhaust disk space.
Billing
| Migration type | Task configuration fee | Internet traffic fee |
| Full data migration | Free of charge. | Charges apply when data is migrated out of Alibaba Cloud over the internet. Billing overview. |
| Incremental data migration | Charged. Billing overview. |
SQL operations supported for incremental migration
INSERT, UPDATE, and DELETE
Database account permissions
| Database | Required permission |
| PolarDB for PostgreSQL | Permissions of a privileged account |
| Self-managed Oracle database | Permissions of the schema owner |
Procedure
-
Log on to the DTS console.
NoteIf you are automatically redirected to the Data Management (DMS) console, you can click the
 icon in the lower-right corner and then click
  to return to the classic DTS console.
 -
In the left-side navigation pane, click Data Migration.
-
At the top of the Migration Tasks page, select the region of the destination cluster.
-
In the upper-right corner of the page, click Create Data Migration Task.
- Configure the source and destination databases.
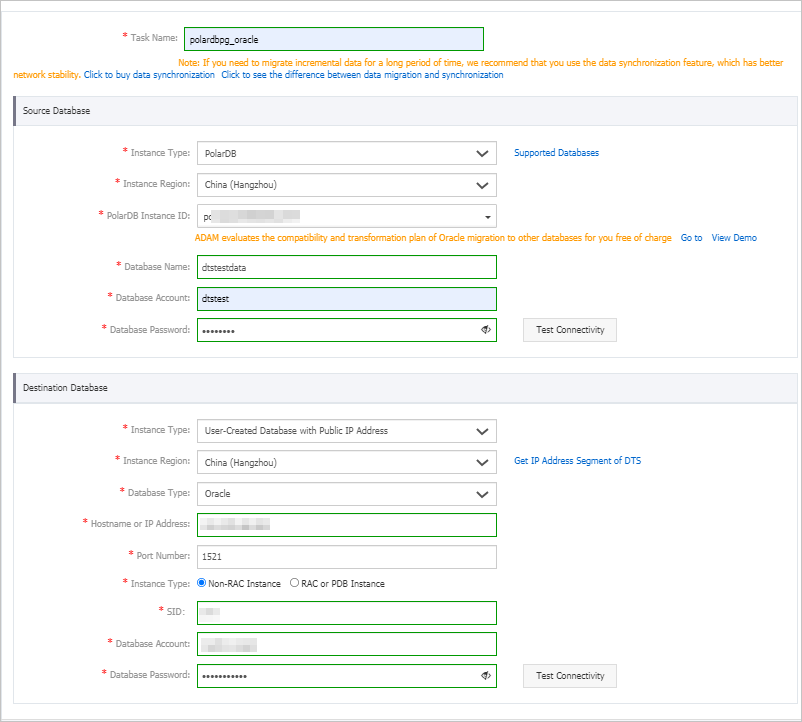
Section Parameter Description N/A Task Name DTS auto-generates a name. Specify a descriptive name for easy identification. Uniqueness is not required. Source Database Instance Type Select PolarDB. Instance Region Select the region of the source PolarDB for PostgreSQL cluster. PolarDB Instance ID Select the source PolarDB for PostgreSQL cluster ID. Database Account Enter the database account for the PolarDB for PostgreSQL cluster. Required permissions: Database account permissions. Database Password Enter the password for the database account. Note After configuring the source database, click Database Password next to Test Connectivity to verify that the connection details are correct. If the connection is successful, a Passed message appears. If the connection fails, a Failed message appears. Click Failed next to Diagnose and adjust the settings based on the diagnostic report.Destination Database Instance Type Select the instance type. This example uses User-Created Database with Public IP Address. Note For other instance types, complete the preparations in Preparation overview.Instance Region Not applicable. Database Type Select Oracle. Hostname or IP Address The IP address used to access the self-managed Oracle database. In this example, the public IP address is used. Port Number The service port of the database. Enter 1521 in this example. Instance Type - If you select Non-RAC Instance, you must also provide the SID.
- If you select RAC or PDB Instance, you must also provide the Service Name.
SID The system ID (SID) of the destination database. Database Account Enter the database account for the self-managed Oracle database. Required permissions: Database account permissions. Database Password Enter the password for the database account. Note After configuring the destination database, click Database Password next to Test Connectivity to verify that the connection details are correct. If the connection is successful, a Passed message appears. If the connection fails, a Failed message appears. Click Failed next to Diagnose and adjust the settings based on the diagnostic report. - Click Set Whitelist and Next.
If the source or destination database is an Alibaba Cloud database instance, such as ApsaraDB RDS for MySQL or ApsaraDB for MongoDB, DTS automatically adds the IP addresses of its servers in the corresponding region to the instance's IP address whitelist. If the database is a self-managed database on an ECS instance, DTS automatically adds the IP addresses of its servers in the corresponding region to the security rules of the ECS instance. You must also ensure that the self-managed database allows access from the ECS instance. If the database is a cluster deployed across multiple ECS instances, you must manually add the DTS server IP addresses of the corresponding region to the security rule of each ECS instance. If the database is in an on-premises data center or on another cloud platform, you must manually add the DTS server IP addresses of the corresponding region to allow access. For the IP address ranges of DTS servers, see IP address ranges of DTS servers.Warning
Adding public IP addresses of DTS servers may introduce security risks. By using this product, you acknowledge and accept these risks. Implement basic security measures such as strong passwords, restricted ports, API authentication, regular network segment reviews, or private connections through Express Connect, VPN Gateway, or Smart Access Gateway.
- Select migration types, migration policy, and objects to migrate.
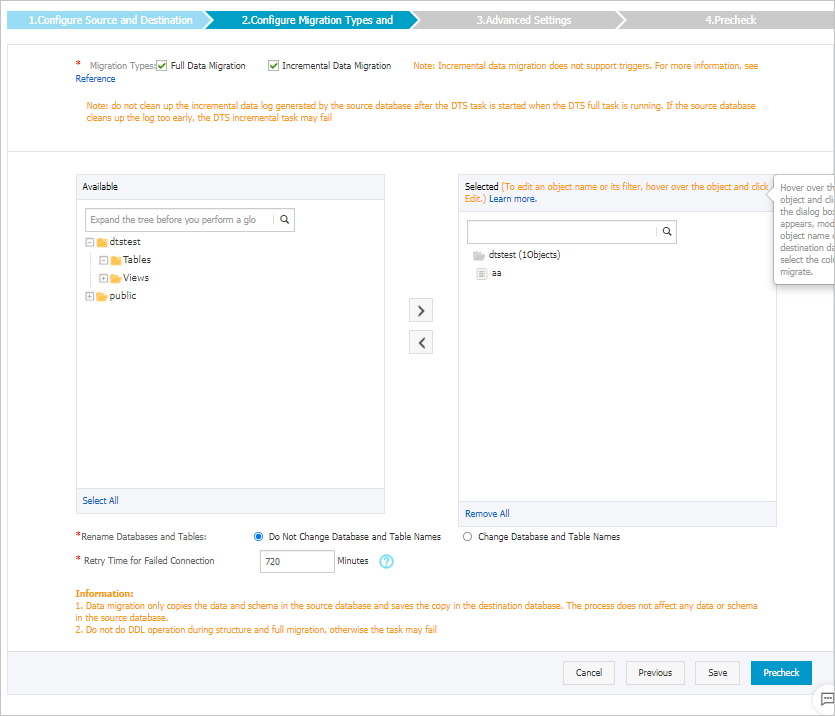
Setting Description Specify whether to rename objects Rename migrated objects using database, table, and column mapping. Specify the retry time range for failed connections to the source or destination database DTS retries failed connections for up to 720 minutes (12 hours) by default. You can customize this period. If DTS reconnects within the specified period, the task resumes. Otherwise, the task fails. Note You are charged during the retry period. Set this value based on your needs and release the instance if the databases are no longer available. After you complete the configuration, click Precheck and Start in the lower-right corner of the page.
Note-
Before the migration task starts, DTS runs a precheck. The task can start only after it passes the precheck.
-
If the precheck fails, click the
 icon next to the failed item to view details.
-
Fix the issues as prompted and run the precheck again.
-
If you do not need to fix the warning items, you can select Ignore and then click Ignore Warnings and Rerun Precheck to run the precheck again.
-
-
-
After the task passes the precheck, click Next.
-
In the Confirm Settings dialog box that appears, select a Instance Class and select the Data Transmission Service (pay-as-you-go) Service Terms checkbox.
- Click Buy and Start to start the migration task.
- Full data migration
Do not stop the task manually. Wait for it to complete automatically.
- For a task with both full and incremental data migration:
The task does not stop automatically. You must stop it manually.
Important Stop the task during off-peak hours or before switching traffic to the destination database.- Wait until the task progress changes to Incremental Data Migration and the status shows as Undelayed. Then, stop writes to the source database for a few minutes. The Incremental Data Migration status may temporarily show a latency.
- Wait for the Incremental Data Migration status to return to Undelayed, and then manually stop the task.
- Full data migration