Data Transmission Service (DTS) allows you to migrate data from PolarDB for MySQL to a self-managed MySQL database for data analysis, functional testing, or other scenarios.
Prerequisites
Incremental data migration requires binary logging (binlog) to be enabled for the source PolarDB for MySQL cluster. For more information, see Enable binary logging.
Usage notes
-
During a full data migration, DTS consumes read and write resources on the source and destination databases, increasing their load. If your databases have poor performance, low specifications, or high workloads (for example, if the source database has many slow SQL queries or tables without primary keys, or if deadlocks occur in the destination database), the increased load can strain your databases or even cause service interruptions. Perform the data migration during off-peak hours, such as when the CPU utilization of both databases is below 30%.
- If a source table lacks a primary key, unique constraint, or any field combination that ensures uniqueness, DTS may generate duplicate data in the destination.
- Full data migration uses concurrent INSERT operations that cause table fragmentation. The destination tablespace will be larger than the source after migration.
- DTS automatically recovers failed tasks. Before switching workloads to the destination, stop or release the migration task to prevent it from resuming and overwriting destination data.
- You cannot adjust the rate of a full data migration.
Limitations
- DTS supports schema migration for tables, views, triggers, stored procedures, and stored functions. Note During schema migration, DTS changes the
DEFINERfor views, stored procedures, or functions toINVOKER. - DTS does not migrate user information. To call views, stored procedures, or functions in the destination, grant read and write permissions to the caller.
Migration types
DTS supports schema migration, full data migration, and incremental data migration. For more information, see Key concepts.
By using all three migration types together, you can achieve a smooth, zero-downtime database migration.
Billing
|
Migration type |
Task configuration fee |
Internet traffic fee |
|
Schema migration and full data migration |
Free of charge. |
Fees apply only when data is migrated over the internet from Alibaba Cloud. For more information, see Billing overview. |
|
Incremental data migration |
Charged. For more information, see Billing overview. |
SQL operations for incremental migration
|
Operation type |
SQL statement |
|
DML |
INSERT, UPDATE, DELETE, and REPLACE |
|
DDL |
|
Permissions required for database accounts
| Database | Required permissions |
| PolarDB for MySQL (source) | The read permissions on the objects to be migrated |
| Self-managed MySQL database | The read and write permissions on the objects to be migrated |
For information about how to create and grant permissions to database accounts, see Create a database account for PolarDB for MySQL and Create a database account for a self-managed MySQL database.
Procedure
-
Log on to the DTS console.
NoteIf you are automatically redirected to the Data Management (DMS) console, you can click the
 icon in the lower-right corner and then click
  to return to the classic DTS console.
 -
In the left-side navigation pane, click Data Migration.
-
At the top of the Migration Tasks page, select the region of the destination cluster.
-
In the upper-right corner of the page, click Create Data Migration Task.
- Configure the source and destination databases.
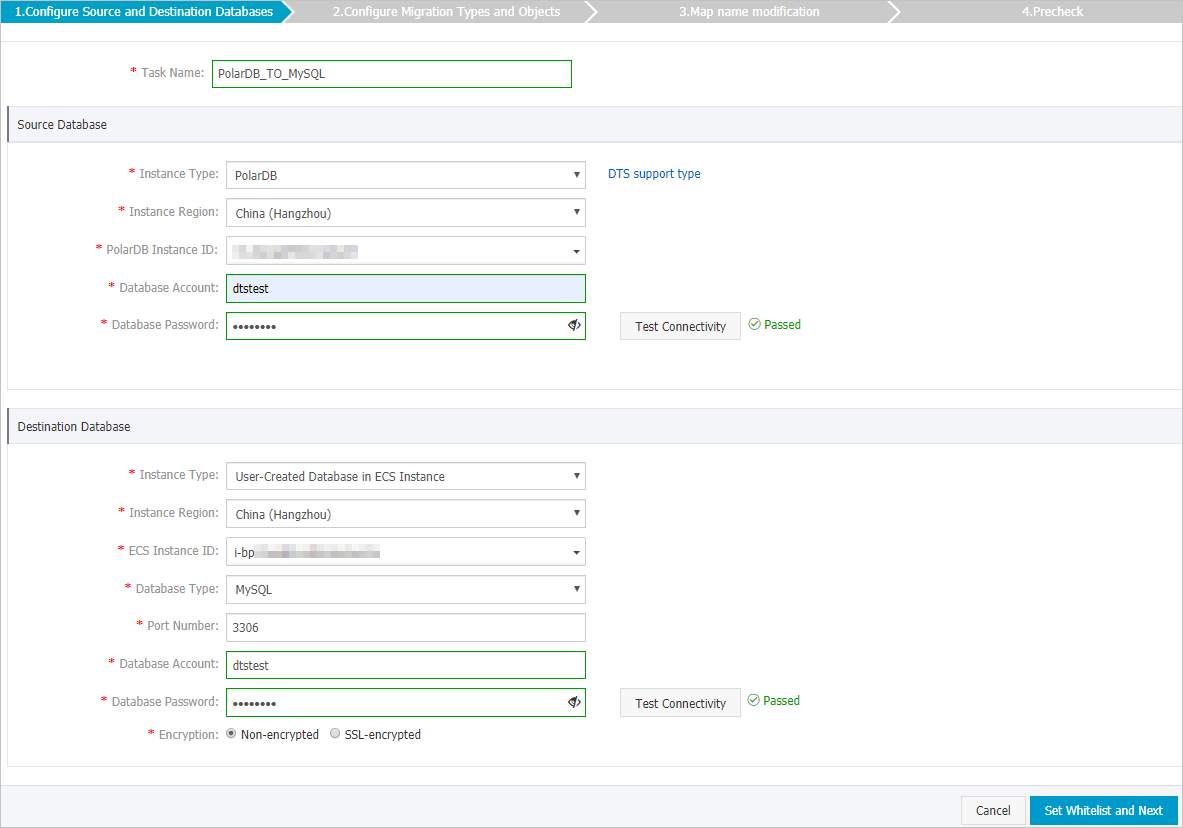
Section Parameter Description N/A Task Name DTS automatically generates a task name. Specify an informative name for easy identification. The task name does not need to be unique. Source Database Instance Type Select PolarDB. Instance Region Select the region of the source PolarDB for MySQL cluster. PolarDB Instance ID Select the ID of the source PolarDB for MySQL cluster. Database Account Enter the database account for the PolarDB for MySQL cluster. For permission requirements, see Permissions required for database accounts. Database Password Enter the password for the database account. Note After you configure the source database, click Database Password next to the Test Connectivity field to verify your settings. A Passed message confirms a successful connection. If the connection fails, a Failed message appears. Click Failed next to the Diagnose message and modify the settings as prompted.Destination Database Instance Type Select an instance type based on the deployment location of your destination database. This topic uses Self-managed Database with Public IP: ECS Instance as an example. Note If your self-managed database uses a different instance type, additional preparation steps are required. For more information, see Preparations overview.Instance Region Select the region where the ECS instance resides. ECS Instance ID Select the ID of the ECS instance that hosts the self-managed MySQL database. Database Type Select MySQL. Port Number Enter the port number of the database service. In this example, enter 3306. Database Account Enter the database account for the self-managed MySQL database. For permission requirements, see Permissions required for database accounts. Database Password Enter the password for the database account. Note After you configure the destination database, click Database Password next to the Test Connectivity field to verify your settings. A Passed message confirms a successful connection. If the connection fails, a Failed message appears. Click Failed next to the Diagnose message and modify the settings as prompted.Encryption Select Non-encrypted or SSL-encrypted based on your requirements. In this example, Non-encrypted is selected. - In the lower-right corner of the page, click Set Whitelist and Next.
If the source or destination is an Alibaba Cloud database instance, such as ApsaraDB for MySQL or ApsaraDB for MongoDB, DTS automatically adds the IP addresses of its servers in the corresponding region to the instance's whitelist. If the source or destination is a self-managed database on an ECS instance, DTS automatically adds its IP addresses to the security rules of the ECS instance. You must also ensure that the self-managed database does not restrict access from the ECS instance. If the database is a cluster deployed across multiple ECS instances, you must manually add the DTS IP addresses to the security rules for each ECS instance. If the source or destination is a database in an on-premises data center or on another cloud, you must manually add the DTS IP addresses for the corresponding region to allow access from DTS servers. For a list of DTS server IP addresses, see DTS server IP addresses.
WarningAdding the public CIDR blocks of DTS servers, whether automatically or manually, may introduce security risks. By using this product, you acknowledge and accept these potential risks. You are responsible for implementing basic security measures, including but not limited to using strong passwords, restricting open ports, using authentication for internal API calls, regularly reviewing and restricting unnecessary network segments, or connecting through private networks such as Express Connect, VPN Gateway, or Smart Access Gateway.
-
Select the migration types and the objects to be migrated.
Parameter
Description
Migration types
-
To perform only a full migration, select both Schema Migration and full data migration.
-
To perform a migration with minimal downtime, select Schema Migration, full data migration, and incremental data migration.
NoteIf you do not select incremental data migration, do not write new data to the source database during migration to ensure data consistency.
Migration objects
In the Available box, click the objects that you want to migrate, and then click the
 icon to move them to the Selected Objects box.Note
-
You can select databases, tables, and columns as migration objects.
-
By default, object names in the destination database are the same as in the source database. To rename an object in the destination database, use the object name mapping feature. For more information, see Object name mapping.
-
If you use the object name mapping feature, dependent objects might fail to migrate.
Mapped name change
To rename migration objects in the destination instance, use the object name mapping feature. For more information, see Object name mapping.
Retry time for failed connection to source or destination database
By default, if DTS cannot connect to the source or destination database, it retries for 720 minutes (12 hours). You can customize the retry time. If DTS reconnects within the specified time, the migration task automatically resumes. Otherwise, the migration task fails.
NoteYou are charged for the task while DTS retries the connection. We recommend that you set the retry time based on your business needs or release the DTS instance as soon as possible after the source and destination database instances are released.
Replicate temporary table to destination during online DDL in source table by DMS
If you use Data Management (DMS) to perform online DDL operations on the source database, choose whether to migrate the temporary tables generated by these operations.
-
Yes: Migrate the data from the temporary tables generated by online DDL operations.
NoteIf the temporary tables generated by online DDL operations contain a large amount of data, the migration task may be delayed.
-
No: Do not migrate data from temporary tables. Only the original DDL data from the source database is migrated.
NoteThis option may cause tables in the destination database to be locked.
-
After you complete the configuration, click Precheck and Start in the lower-right corner of the page.
Note-
Before the migration task starts, DTS runs a precheck. The task can start only after it passes the precheck.
-
If the precheck fails, click the
 icon next to the failed item to view details.
-
Fix the issues as prompted and run the precheck again.
-
If you do not need to fix the warning items, you can select Ignore and then click Ignore Warnings and Rerun Precheck to run the precheck again.
-
-
-
After the task passes the precheck, click Next.
-
In the Confirm Settings dialog box that appears, select a Instance Class and select the Data Transmission Service (pay-as-you-go) Service Terms checkbox.
-
Click Buy and Start to begin the migration.
-
Schema migration + Full data migration
Allow the task to complete automatically. Stopping it manually may result in incomplete data.
-
Schema migration + Full data migration + Incremental data migration
The migration task does not stop automatically. You must stop it manually.
ImportantChoose an appropriate time to stop the task manually, such as during off-peak hours or when you are ready to switch your business to the destination cluster.
-
Wait until the migration task enters the Incremental Data Migration phase and the status shows Undelayed. Then, stop writing data to the source database for several minutes. During this time, the status of Incremental Data Migration may show a latency.
-
Wait for the Incremental Data Migration status to show Undelayed again. Then, manually stop the migration task.

-
-