You can use the Data Detection and Response feature of Data Security Center (DSC) to detect plaintext access key pairs (consisting of an AccessKey ID and an AccessKey Secret, hereinafter referred to as AKs) and abnormal access to your Object Storage Service (OSS) data. When DSC detects an abnormal access event, it triggers an alert. By reviewing these alerts and events, you can promptly identify and remediate leaked AKs, mitigate the risks of AK abuse, and prevent unauthorized access to your OSS data.
Solution overview
This topic uses a simulated scenario to demonstrate how to use Data Detection and Response to detect and remediate alerts for leaked access keys and abnormal access in an OSS bucket. The scenario involves detecting a plaintext AK in an OSS bucket and then using the leaked AK to access a public-read object, which triggers an alert. This process enhances your OSS data security.
Alerting on and remediating abnormal AK access to OSS data involves five steps:
-
Create an OSS bucket and upload objects: Create an OSS bucket and upload sample objects. This includes a file containing AK information and a sample directory with an object to access, which are used to simulate an AK leak and an abnormal access scenario.
-
Connect the OSS bucket to DSC: Authorize your OSS bucket for the Data Detection and Response feature in DSC. This allows DSC to scan the bucket for AK leaks and abnormal access.
-
Configure risk event levels and alert notifications: This step involves configuring detection policies to generate risk events and receive alert notifications.
-
View abnormal access alert notifications: Simulate abnormal access to an OSS object. After the alert event is triggered, view the alert notification and take prompt action.
-
View and handle AK leak risk events: DSC generates a risk event when it detects a leaked AK. Review the event details and take timely action.
Prerequisites
-
You have purchased a Data Security Center instance and granted DSC permissions to access other Alibaba Cloud resources.
Data Detection and Response is a value-added service of DSC. Auditing abnormal AK access to an OSS bucket consumes OSS protection capacity and log storage. For this tutorial, when you purchase DSC, set the Version to Value-added Plan, enable Data Detection and Response and Log Storage Capacity, and purchase sufficient Data Detection and Response - OSS Protection Capacity and Log Storage Capacity.
-
You have activated Object Storage Service (OSS).
-
This tutorial simulates an AK leak and an abnormal access alert. You must have a RAM user with a configured access key pair (AccessKey ID and AccessKey Secret). For more information, see Create a RAM user.
Step 1: Create an OSS bucket and upload objects
Create an OSS bucket
-
In the OSS console, go to the Buckets page and click Create Bucket.
-
In the Create Bucket panel, configure the following parameters, use the default settings for the others, and then click Create.
Set the Region to China (Shanghai), ensure that Block Public Access is disabled, and set the Bucket ACL to public-read.
Upload objects to the OSS bucket
-
Create a file named test.txt. Enter the AccessKey ID and AccessKey Secret of the RAM user from the prerequisites, and then save the file.
accessKey: LTAxxxxxxxxxxxxxxxxxxxxx accessSecret: xxxxxxxxxxxxxxxxxxxxxxxxxxxxxxxx -
In the OSS console, go to the Buckets page and click the name of your OSS bucket.
-
On the Files page, click Upload Object.
-
Set File ACL to Private, click Select Files, select the saved test.txt file, and click Upload Object. Wait for the upload to complete.
-
On the Files page, click Create Directory, enter a Directory Name (for example,
exampledir), and click OK. -
Navigate into the
exampledirdirectory and click Upload Object. -
Click Select Files, select a sample file from your local machine, such as userdata.csv, and click Upload Object. Wait for the upload to complete.
Step 2: Connect the OSS bucket to DSC
-
Log on to the Data Security Center console.
-
In the left-side navigation pane, choose .
-
On the Overview tab, find the Storage Authorization Statistics section in the upper-right corner and click Authorize.
-
In the Asset Authorization Configuration panel, click Asset synchronization.
-
On the Not authorized tab, find your target bucket in the list and click Authorization in the Actions column.
During the first month after you enable Data Detection and Response, DSC automatically creates and runs a sensitive data identification scan. This scan uses the primary template, which is the Internet Industry Classification and Categorization Template by default, to classify and categorize sensitive information.
Step 3: Configure risk levels and alerts
Policy Management
To detect risk events related to AK leaks, in DSC, you must enable the corresponding event type and configure its risk level.
-
In the left-side navigation pane, choose .
-
On the Policy Management tab, set the Risk Event Type to AccessKey Pair Leak, configure the Risk Event Level, enable the Risk Event Status, and then click Save.
Note-
By default, this risk event is enabled, and the AccessKey Pair Leak event type is set to a High-risk Items level.
-
Disabling a risk event type prevents new alerts from being generated for that event type. Existing events are not affected.
-
If you adjust the risk level of an event type, the risk level for all existing events of that type is updated.
-
Set up abnormal AK access alerts
-
In the left-side navigation pane, choose .
-
On the Alert Notification tab, click Create Alert Configuration.
-
In the Create Alert Rule panel, select Mailbox or Text Message as the alert method, configure the settings, and then click OK. For detailed instructions, see Configure alert notifications by email, SMS, and phone call.
In the Available Recipients list, select the target recipients and click the > button to move them to the Selected Recipients list. In the alert configuration section, select the Abnormal AK Access Alert checkbox.
Step 4: View AK leak alerts
After you simulate access to the OSS bucket, an alert event and alert notification are generated. You can view them the next day (T+1).
Download an OSS object using an AK
This tutorial uses the ossutil command-line tool in a Linux environment to access an OSS object. For more installation instructions, see Install ossutil.
-
Install and configure ossutil.
-
On a Linux operating system, run the following command to download and install ossutil.
sudo -v ; curl https://gosspublic.alicdn.com/ossutil/install.sh | sudo bashNote-
You must have a decompression tool, such as unzip or 7z, installed to extract the package.
-
After installation, ossutil is located in the /usr/bin/ directory.
-
-
Run the configuration command:
ossutil config. -
Press Enter at the prompts to use the default path for the configuration file and set the tool's language to EN.
-
When prompted, set the endpoint, AccessKey ID, and AccessKey Secret parameters. The STSToken parameter can be left empty.
You can find the endpoint in the access port section of your OSS bucket's Overview page. Use the AccessKey ID and AccessKey Secret from the RAM user you prepared earlier.
-
-
Run the following command to access the
/exampledir/userdata.csvobject in your target OSS bucket.ossutil cp oss://examplebucket/exampledir/userdata.csv /optThe following output indicates that the target object was successfully accessed and downloaded.
Succeed: Total num: 1, size: 205. OK num: 1(download 1 objects).
average speed 0(byte/s)
5.095039(s) elapsed
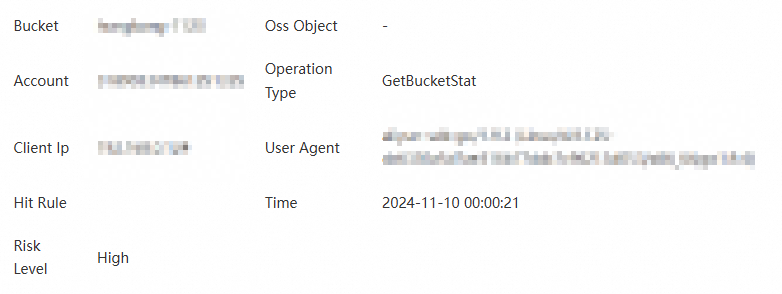
View the email alert
The contact for alert notifications will receive an email similar to the following:
Step 5: View and handle AK leak events
-
In the left-side navigation pane, choose .
-
In the Risk Type section, click AccessKey Pair Leak.
-
Find the target risk event and click Details in the Actions column.
-
On the Details page, review the information for the risk event and take action.
AccessKey pair information
View information such as AccessKey ID, Account of AccessKey Pair, AccessKey Pair Status, First Detection Time, Latest Detection Time, and Intelligence Source.
-
Click Handle.
-
In the Manage AccessKey Pair panel, select Disable or Rotate.
-
Disable: You are redirected to the Resource Access Management (RAM) console to disable the AccessKey pair for the current primary account and its RAM users. For more information, see Disable an AccessKey pair of a RAM user.
-
Rotate:
-
If KMS is integrated: Click Confirm. KMS rotates the AccessKey pair.
WarningThis action cannot be undone. Proceed with caution.
-
If KMS is not integrated: You are redirected to the Key Management Service (KMS) console to store the AccessKey pair credential in KMS. If you have not activated KMS, you must first purchase and enable a KMS instance.
-
-
AccessKey pair leak details
View the leak details, which vary by intelligence source. You can then handle or whitelist the risk event accordingly.
-
GitHub Leak Amount: The AccessKey pair information is found in public source code on GitHub.
This list includes a Time column (which shows the last detection time, first detection time, and file update time) and a Status column.
-
Click a File Name, Username, or Repository Name to navigate to the corresponding page on GitHub.
-
In the Actions column, click Add to Whitelist to add the target file to the whitelist. Whitelisted files no longer generate AccessKey pair leak risk events.
-
-
Public Plaintext Storage/Private Plaintext Storage: This event is triggered when an AccessKey pair is found in a plaintext file within an authorized OSS bucket.
The table on the Public Plaintext Storage tab includes columns such as Bucket name, File Name, File path, Time (including last detection time, first detection time, and file update time), File ACL, File deletion status, Status, and Actions.
-
Modify ACL: Click the drop-down arrow in the File ACL column to modify the ACL of the corresponding file.
-
Delete: In the Actions column, click Delete File to remove the corresponding file from the bucket.
-
Whitelist: In the Actions column, click Add to Whitelist to add the target file to the whitelist. Whitelisted files no longer generate AccessKey pair leak risk events.
-
-
For leak events from threat intelligence or Self-managed Intelligence sources, you can whitelist the related threat source or the user who entered the intelligence.
Note-
The day after a file is deleted (T+1), the Status is automatically updated to Deleted, and the event Status is updated to Disposed.
-
The day after a file is whitelisted (T+1), the event Status is automatically updated to Added to Whitelist.
Accessed bucket details
If a leaked AccessKey pair accessed a bucket, you can view the list of accessed files, configure bucket access permissions, and set a POP gateway blocking policy to protect your data.
This page displays alert records in a table with columns for AccessKey ID, Bucket name/Sensitivity level, Actions, Alert Time, Owning account, and File count/Sensitivity level.
-
Threat Tracing: Click the target AccessKey ID or Bucket Name/Sensitivity Level to view a visualization of the access path for the AccessKey pair and bucket.
-
ViewFiles: In the Actions column of a target record, click Files to view information about the accessed files. You can also directly modify the file ACL.
-
Handle: In the Actions column of a target record, click Handle to configure bucket access permissions and set a POP gateway blocking policy.
The bucket ACL supports three permission options: Public Read, Public Read/Write, and Private.
-
Bucket Permission Configuration: Click Configure to set the bucket ACL and block public network requests, and then click OK.
-
POP Gateway Blocking Policy: Click Configure to go to the RAM console and create a custom policy to restrict access based on IP addresses and permissions for sensitive files. For more information, see Create a custom policy.
-
-
Related documents
In addition to AccessKey Pair Leak events in OSS buckets, DSC also detects other risk events, such as Database Account Leak, Shared Account, and Public Storage of Sensitive Information. For more information, see Risk overview and self-managed intelligence.