All Products
Search
Document Center

Elasticsearch:Use Canal to synchronize data from MySQL to Alibaba Cloud Elasticsearch

Last Updated:Aug 19, 2026

You can use Canal to synchronize incremental data from MySQL to an Alibaba Cloud Elasticsearch cluster in real time.

Background information

Canal is an open source product provided by Alibaba Group that parses incremental log data in MySQL and provides data subscription and consumption capabilities. For more information, see Canal. In this example, Canal acts as a secondary node of an ApsaraDB RDS for MySQL instance, receives binary logs for incremental data changes, and uses a RESTful API to write the data to an Alibaba Cloud Elasticsearch cluster.

Prerequisites

An ApsaraDB RDS for MySQL instance, an Alibaba Cloud Elasticsearch cluster, and an Elastic Compute Service (ECS) instance are created. We recommend creating them in the same virtual private cloud (VPC).

Limits

  • This solution synchronizes only incremental MySQL data to an Alibaba Cloud Elasticsearch cluster.

  • The Java Development Kit (JDK) version must be 1.8.0 or later.

  • Canal 1.1.4 cannot be used to synchronize data to an Elasticsearch V7.X cluster.

    You need to use Canal 1.1.5 to synchronize data to an Elasticsearch V7.X cluster and use Canal 1.1.7 to synchronize data to an Elasticsearch V8.X cluster. You can also use a method such as Logstash or Data Transmission Service (DTS) to synchronize MySQL data.

  • You can customize index mappings for data synchronization. The field names and data types in the index mappings must match those in the ApsaraDB RDS for MySQL database.

  • Canal must remain available during data synchronization. Ensure that synchronization is not interrupted by events such as ECS instance restarts or unexpected Canal exits.

  • The Canal adapter cannot connect to an Alibaba Cloud Elasticsearch cluster over HTTPS.

Procedure

Step 1: Prepare a MySQL data source

Log on to the ApsaraDB RDS console, and create an ApsaraDB RDS for MySQL database and a table. For more information, see General workflow to use ApsaraDB RDS for MySQL. In this example, the following statement is used to create a table:

-- create table
CREATE TABLE `es_test` (
    `id` bigint(32) NOT NULL,
    `name` text NOT NULL,
    `count` text NOT NULL,
    `color` text NOT NULL,
    PRIMARY KEY (`id`)
) ENGINE=InnoDB
DEFAULT CHARACTER SET=utf8;

Step 2: Create an index and configure mappings for the index

  1. Log on to the Kibana console of the Elasticsearch cluster. For more information, see Log on to the Kibana console.

    Note

    In this example, an Elasticsearch V6.7.0 cluster is used. Operations on clusters of other versions may differ.

  2. In the left navigation menu, choose Management > Dev Tools.

  3. In the console, run the following command to create an index.

    In this example, an index named es_test is created. The index contains the following fields: count, id, name, and color.

    Important

    You must make sure that the names and data types of fields that are defined in the mappings for the index are the same as the names and data types of the fields that are prepared in Step 1: Prepare a MySQL data source.

    PUT es_test?include_type_name=true
    {
    
        "settings" : {
          "index" : {
            "number_of_shards" : "5",
            "number_of_replicas" : "1"
          }
        },
        "mappings" : {
            "_doc" : {
                "properties" : {
                  "count": {          
                       "type": "text"       
                   },
                  "id": {
                       "type": "integer"
                   },
                   "name": {
                        "type" : "text",
                        "analyzer": "ik_smart"                   
                    },
                    "color" : {
                        "type" : "text"                    
                    }
                }
            }
        }
    }

    After the index is created and the mappings are configured, the following result is returned:

    {
      "acknowledged" : true,
      "shards_acknowledged" : true,
      "index" : "es_test"
    }

Step 3: Install the JDK

  1. Connect to the ECS instance.

    For more information, see Connect to a Linux instance by using a password or key.

    Note

    In this example, a regular user is used.

  2. View available JDK packages.

    sudo yum search java | grep -i --color JDK
  3. Install the JDK of the required version.

    This topic uses java-1.8.0-openjdk-devel.x86_64 as an example.

    sudo yum install java-1.8.0-openjdk-devel.x86_64
  4. Configure environment variables.

    1. Open the profile file in the etc folder.

      vim ~/.bash_profile
    2. Add the following environment variables to the file:

      export JAVA_HOME=/usr/lib/jvm/java-1.8.0-openjdk-1.8.0.362.b08-1.el7_9.x86_64
      export CLASSPATH=.:$JAVA_HOME/jre/lib/rt.jar:$JAVA_HOME/lib/dt.jar:$JAVA_HOME/lib/tools.jar
      export PATH=$PATH:$JAVA_HOME/bin
      Important

      When you use the environment variables, you must replace JAVA_HOME with the installation path of your JDK. You can run the find / -name 'java' command to query the installation path of your JDK.

    3. Press the Esc key, enter :wq to save the file and exit the vi editor. Then, run the following command to apply the changes:

      source ~/.bash_profile
  5. Run the following command to check whether the JDK is installed:

    java -version

    If the following result is returned, the JDK is installed:

    openjdk version "1.8.0_362"
    OpenJDK Runtime Environment (build 1.8.0_362-b08)
    OpenJDK 64-Bit Server VM (build 25.362-b08, mixed mode)

Step 4: Install and start the Canal server

  1. Download the Canal server package.

    In this example, a Canal 1.1.4 server is used.

    wget https://github.com/alibaba/canal/releases/download/canal-1.1.4/canal.deployer-1.1.4.tar.gz
    Note
    • Canal 1.1.5 supports Elasticsearch V7.0 clusters. If you are using an Elasticsearch V7.0 cluster, you need to download the Canal 1.1.5 package. For more information, see Canal release note.

    • You must download the Canal server and Canal adapter packages over the Internet. Make sure that your ECS instance can access the Internet.

  2. Run the following command to decompress the package:

    tar -zxvf canal.deployer-1.1.4.tar.gz
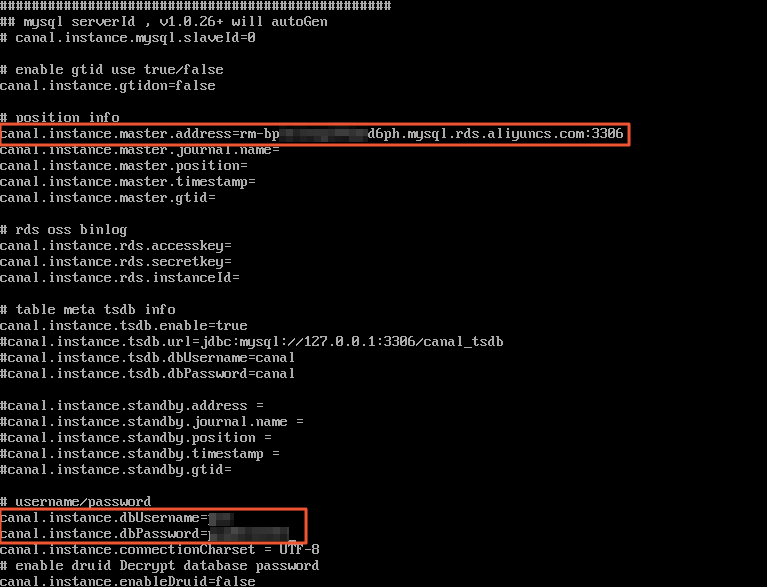
  3. Run the following command to modify the instance.properties file in the conf/example/ directory:

    vi conf/example/instance.properties
    
    #################################################
    ## mysql serverId , v1.0.26+ will autoGen
    # canal.instance.mysql.slaveId=0
    
    # enable gtid use true/false
    canal.instance.gtidon=false
    
    # position info
    canal.instance.master.address=rm-bpxxxd6ph.mysql.rds.aliyuncs.com:3306
    canal.instance.master.journal.name=
    canal.instance.master.position=
    canal.instance.master.timestamp=
    canal.instance.master.gtid=
    
    # rds oss binlog
    canal.instance.rds.accesskey=
    canal.instance.rds.secretkey=
    canal.instance.rds.instanceId=
    
    # table meta tsdb info
    canal.instance.tsdb.enable=true
    #canal.instance.tsdb.url=jdbc:mysql://127.0.0.1:3306/canal_tsdb
    #canal.instance.tsdb.dbUsername=canal
    #canal.instance.tsdb.dbPassword=canal
    
    #canal.instance.standby.address =
    #canal.instance.standby.journal.name =
    #canal.instance.standby.position =
    #canal.instance.standby.timestamp =
    #canal.instance.standby.gtid=
    
    # username/password
    canal.instance.dbUsername=xxx
    canal.instance.dbPassword=xxx
    canal.instance.connectionCharset = UTF-8
    # enable druid Decrypt database password
    canal.instance.enableDruid=false

    Parameter

    Description

    canal.instance.master.address

    Set this parameter to <internal endpoint of the ApsaraDB RDS for MySQL instance>:<Internal port>. You can obtain this information from the Basic Information page of your ApsaraDB RDS for MySQL instance. Example: rm-bp1u1xxxxxxxxx6ph.mysql.rds.aliyuncs.com:3306.

    canal.instance.dbUsername

    The username for your ApsaraDB RDS for MySQL database. You can obtain this from the Accounts page of your instance.

    canal.instance.dbPassword

    The password that is used to log on to the ApsaraDB RDS for MySQL database.

  4. Press the Esc key and enter :wq to save the file and exit the vi editor.

  5. Start the Canal server and query logs.

    ./bin/startup.sh
    cat logs/canal/canal.log
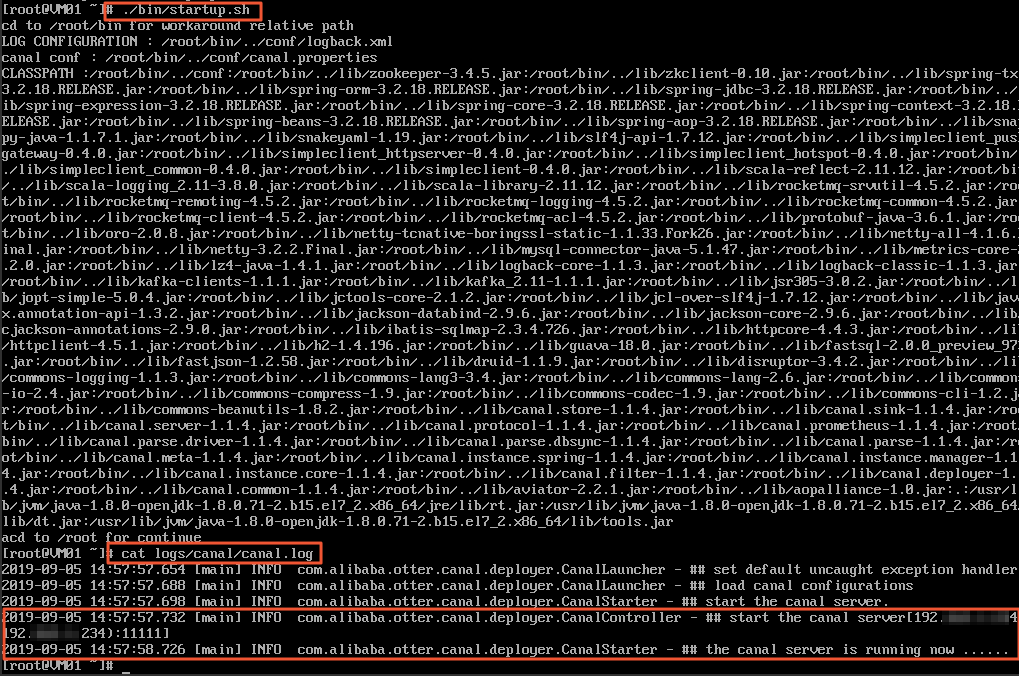
    
    [root@VM01 ~]# ./bin/startup.sh
    cd to /root/bin for workaround relative path
    LOG CONFIGURATION : /root/bin/../conf/logback.xml
    canal conf : /root/bin/../conf/canal.properties
    CLASSPATH :/root/bin/../conf:/root/bin/../lib/zookeeper-3.4.5.jar:/root/bin/../lib/zkclient-0.10.jar:/root/bin/../lib/spring-tx-3.2.18.RELEASE.jar:/root/bin/../lib/spring-orm-3.2.18.RELEASE.jar:/root/bin/../lib/spring-jdbc-3.2.18.RELEASE.jar:/root/bin/../lib/spring-expression-3.2.18.RELEASE.jar:/root/bin/../lib/spring-core-3.2.18.RELEASE.jar:/root/bin/../lib/spring-context-3.2.18.RELEASE.jar:/root/bin/../lib/spring-beans-3.2.18.RELEASE.jar:/root/bin/../lib/spring-aop-3.2.18.RELEASE.jar:/root/bin/../lib/snakeyaml-1.19.jar:/root/bin/../lib/slf4j-api-1.7.12.jar:/root/bin/../lib/simpleclient_pushgateway-0.4.0.jar:/root/bin/../lib/simpleclient_httpserver-0.4.0.jar:/root/bin/../lib/simpleclient_hotspot-0.4.0.jar:/root/bin/../lib/simpleclient_common-0.4.0.jar:/root/bin/../lib/simpleclient-0.4.0.jar:/root/bin/../lib/scala-reflect-2.11.12.jar:/root/bin/../lib/scala-logging_2.11-3.8.0.jar:/root/bin/../lib/scala-library-2.11.12.jar:/root/bin/../lib/rocketmq-srvutil-4.5.2.jar:/root/bin/../lib/rocketmq-remoting-4.5.2.jar:/root/bin/../lib/rocketmq-logging-4.5.2.jar:/root/bin/../lib/rocketmq-common-4.5.2.jar:/root/bin/../lib/rocketmq-client-4.5.2.jar:/root/bin/../lib/rocketmq-acl-4.5.2.jar:/root/bin/../lib/protobuf-java-3.6.1.jar:/root/bin/../lib/oro-2.0.8.jar:/root/bin/../lib/netty-tcnative-boringssl-static-1.1.33.Fork26.jar:/root/bin/../lib/netty-all-4.1.6.Final.jar:/root/bin/../lib/netty-3.2.2.Final.jar:/root/bin/../lib/mysql-connector-java-5.1.47.jar:/root/bin/../lib/metrics-core-2.2.0.jar:/root/bin/../lib/lz4-java-1.4.1.jar:/root/bin/../lib/logback-core-1.1.3.jar:/root/bin/../lib/logback-classic-1.1.3.jar:/root/bin/../lib/kafka-clients-1.1.1.jar:/root/bin/../lib/kafka_2.11-1.1.1.jar:/root/bin/../lib/jsr305-3.0.2.jar:/root/bin/../lib/jopt-simple-5.0.4.jar:/root/bin/../lib/jctools-core-2.1.2.jar:/root/bin/../lib/jcl-over-slf4j-1.7.12.jar:/root/bin/../lib/jackson-databind-2.9.6.jar:/root/bin/../lib/jackson-core-2.9.6.jar:/root/bin/../lib/jackson-annotations-2.9.0.jar:/root/bin/../lib/ibatis-sqlmap-2.3.4.726.jar:/root/bin/../lib/httpcore-4.4.3.jar:/root/bin/../lib/httpclient-4.5.1.jar:/root/bin/../lib/h2-1.4.196.jar:/root/bin/../lib/guava-18.0.jar:/root/bin/../lib/fastsql-2.0.0_preview_97.jar:/root/bin/../lib/fastson-1.2.58.jar:/root/bin/../lib/druid-1.1.9.jar:/root/bin/../lib/disruptor-3.4.2.jar:/root/bin/../lib/commons-logging-1.1.3.jar:/root/bin/../lib/commons-lang3-3.4.jar:/root/bin/../lib/commons-lang-2.6.jar:/root/bin/../lib/commons-io-2.4.jar:/root/bin/../lib/commons-compress-1.9.jar:/root/bin/../lib/commons-codec-1.9.jar:/root/bin/../lib/commons-cli-1.2.jar:/root/bin/../lib/commons-beanutils-1.8.2.jar:/root/bin/../lib/canal.store-1.1.4.jar:/root/bin/../lib/canal.sink-1.1.4.jar:/root/bin/../lib/canal.server-1.1.4.jar:/root/bin/../lib/canal.protocol-1.1.4.jar:/root/bin/../lib/canal.prometheus-1.1.4.jar:/root/bin/../lib/canal.parse.driver-1.1.4.jar:/root/bin/../lib/canal.parse.dbsync-1.1.4.jar:/root/bin/../lib/canal.parse-1.1.4.jar:/root/bin/../lib/canal.meta-1.1.4.jar:/root/bin/../lib/canal.instance.spring-1.1.4.jar:/root/bin/../lib/canal.instance.manager-1.1.4.jar:/root/bin/../lib/canal.instance.core-1.1.4.jar:/root/bin/../lib/canal.filter-1.1.4.jar:/root/bin/../lib/canal.deployer-1.1.4.jar:/root/bin/../lib/canal.common-1.1.4.jar:/root/bin/../lib/aviator-2.2.1.jar:/root/bin/../lib/aopalliance-1.0.jar::/usr/lib/jvm/java-1.8.0-openjdk-1.8.0.71-2.b15.el7_2.x86_64/jre/lib/rt.jar:/usr/lib/jvm/java-1.8.0-openjdk-1.8.0.71-2.b15.el7_2.x86_64/lib/dt.jar:/usr/lib/jvm/java-1.8.0-openjdk-1.8.0.71-2.b15.el7_2.x86_64/lib/tools.jar
    acd to /root for continue
    [root@VM01 ~]# cat logs/canal/canal.log
    2019-09-05 14:57:57.654 [main] INFO  com.alibaba.otter.canal.deployer.CanalLauncher - ## set default uncaught exception handler
    2019-09-05 14:57:57.688 [main] INFO  com.alibaba.otter.canal.deployer.CanalLauncher - ## load canal configurations
    2019-09-05 14:57:57.698 [main] INFO  com.alibaba.otter.canal.deployer.CanalStarter - ## start the canal server.
    2019-09-05 14:57:57.732 [main] INFO  com.alibaba.otter.canal.deployer.CanalController - ## start the canal server[192.   4.192      234):11111]
    2019-09-05 14:57:58.726 [main] INFO  com.alibaba.otter.canal.deployer.CanalStarter - ## the canal server is running now ......
    [root@VM01 ~]#

Step 5: Install and start the Canal adapter

  1. Download the Canal adapter package.

    In this example, a Canal 1.1.4 adapter is used.

    wget https://github.com/alibaba/canal/releases/download/canal-1.1.4/canal.adapter-1.1.4.tar.gz
    Note
    • Canal 1.1.5 supports Elasticsearch V7.0 clusters. If you are using an Elasticsearch V7.0 cluster, you need to download the Canal 1.1.5 package. For more information, see Canal release note.

    • You must download the Canal server and Canal adapter packages over the Internet. Make sure that your ECS instance can access the Internet.

  2. Run the following command to decompress the package:

    tar -zxvf canal.adapter-1.1.4.tar.gz
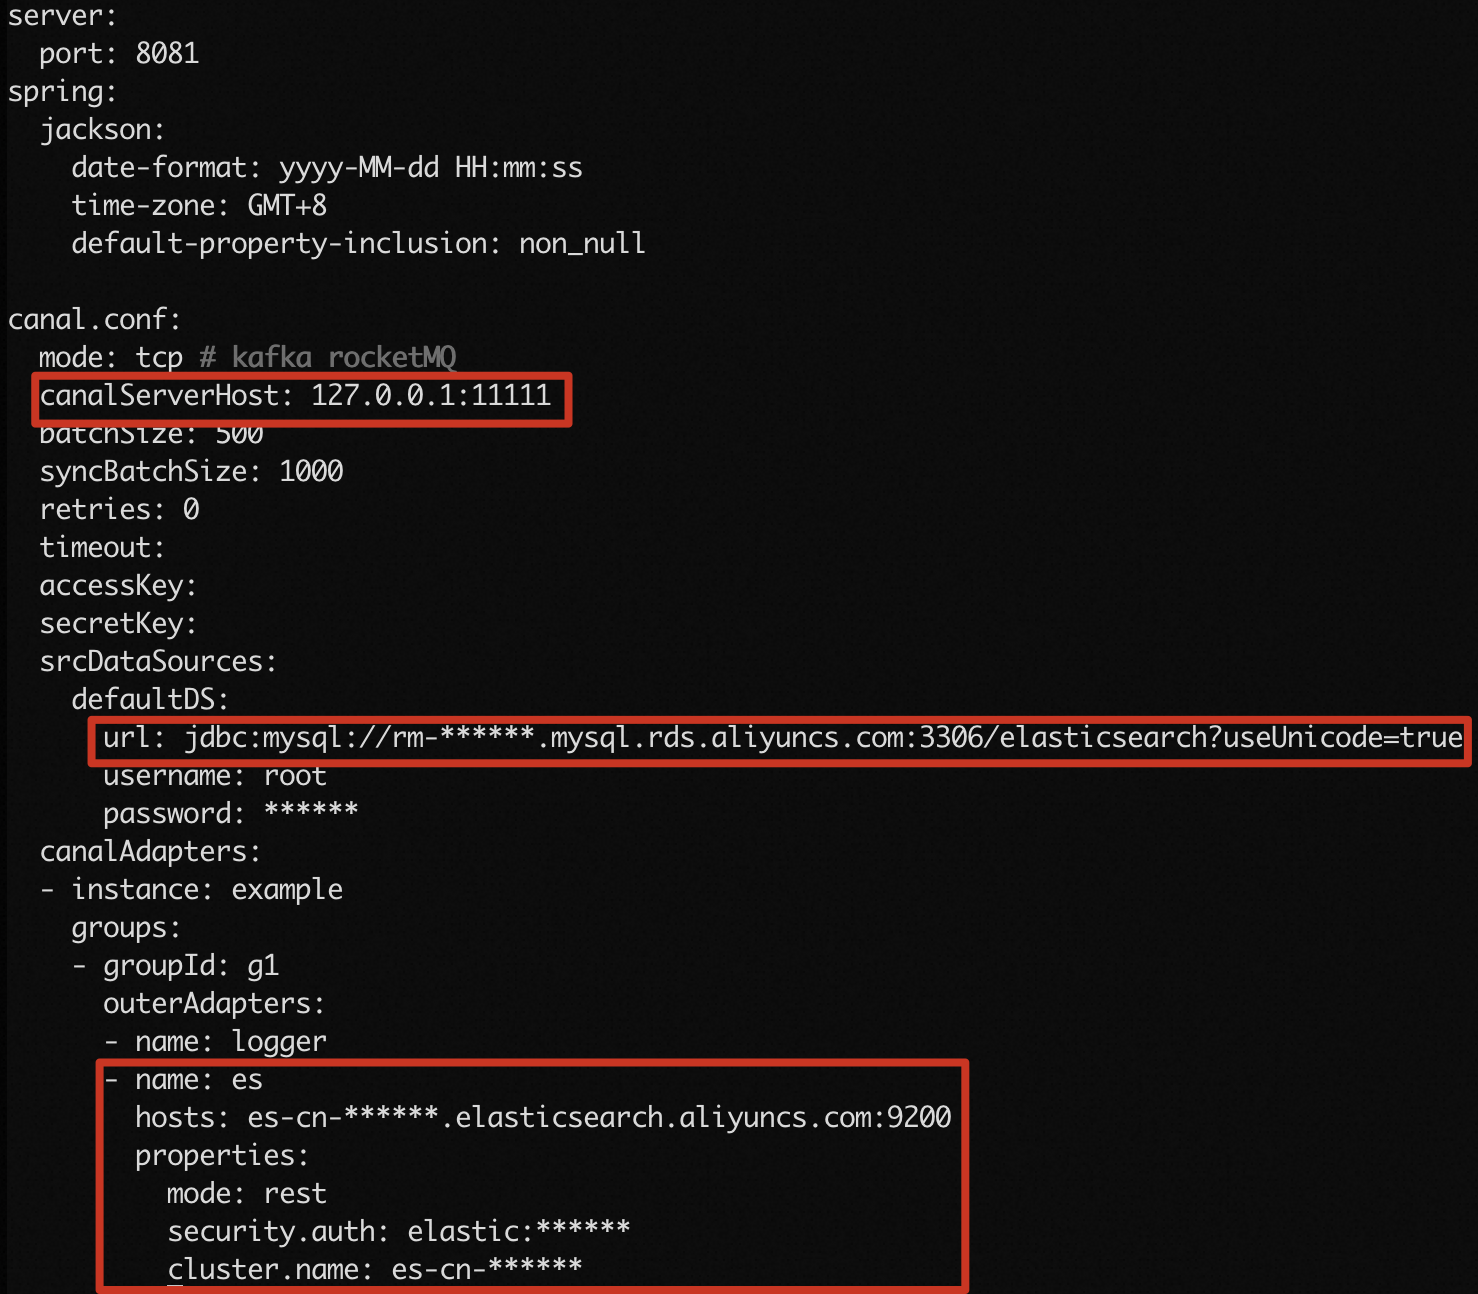
  3. Run the following command to modify the application.yml file in the conf/ directory:

    vi conf/application.yml
    
    server:
      port: 8081
    spring:
      jackson:
        date-format: yyyy-MM-dd HH:mm:ss
        time-zone: GMT+8
        default-property-inclusion: non_null
    
    canal.conf:
      mode: tcp # kafka rocketMQ
      canalServerHost: 127.0.0.1:11111
      batchSize: 500
      syncBatchSize: 1000
      retries: 0
      timeout:
      accessKey:
      secretKey:
      srcDataSources:
        defaultDS:
          url: jdbc:mysql://rm-******.mysql.rds.aliyuncs.com:3306/elasticsearch?useUnicode=true
          username: root
          password: ******
      canalAdapters:
      - instance: example
        groups:
        - groupId: g1
          outerAdapters:
          - name: logger
          - name: es
            hosts: es-cn-******.elasticsearch.aliyuncs.com:9200
            properties:
                mode: rest
                security.auth: elastic:******
                cluster.name: es-cn-******

    Parameter

    Description

    canal.conf.canalServerHost

    The address of the Canal deployer. Retain the default value 127.0.0.1:11111.

    canal.conf.srcDataSources.defaultDS.url

    Set this parameter to jdbc:mysql://<internal endpoint of the ApsaraDB RDS for MySQL instance>:<Internal port>/<Database name>?useUnicode=true. You can obtain this information from the Basic Information page of your ApsaraDB RDS for MySQL instance. Example: jdbc:mysql://rm-bp1xxxxxxxxxnd6ph.mysql.rds.aliyuncs.com:3306/elasticsearch?useUnicode=true.

    canal.conf.srcDataSources.defaultDS.username

    The username for your ApsaraDB RDS for MySQL database. You can obtain this from the Accounts page of your ApsaraDB RDS for MySQL instance.

    canal.conf.srcDataSources.defaultDS.password

    The password that is used to log on to the ApsaraDB RDS for MySQL database.

    canal.conf.canalAdapters.groups.outerAdapters.hosts

    Find name:es and set hosts to a value in the format of <Internal endpoint of the Elasticsearch cluster>:<Internal port>. You can obtain the required information on the Basic Information page of the Elasticsearch cluster. Example: es-cn-v64xxxxxxxxx3medp.elasticsearch.aliyuncs.com:9200.

    canal.conf.canalAdapters.groups.outerAdapters.mode

    Set this parameter to rest.

    canal.conf.canalAdapters.groups.outerAdapters.properties.security.auth

    You must set this parameter to a value in the format of <Username of the Elasticsearch cluster>:<Password that corresponds to the username>. Example: elastic:es_password.

    canal.conf.canalAdapters.groups.outerAdapters.properties.cluster.name

    The ID of the Elasticsearch cluster. You can obtain the ID on the Basic Information page of the Elasticsearch cluster. Example: es-cn-v64xxxxxxxxx3medp.

  4. Press the Esc key and enter :wq to save the file and exit the vi editor.

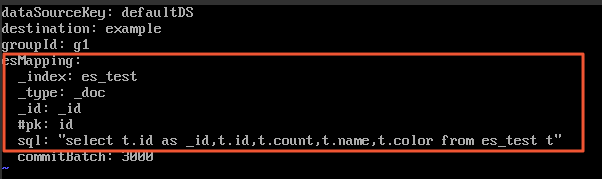
  5. Repeat the preceding steps to modify the *.yml file in the conf/es/ directory and specify the fields that you want to map from the ApsaraDB RDS for MySQL database to the Elasticsearch cluster.

    
    dataSourceKey: defaultDS
    destination: example
    groupId: g1
    esMapping:
      _index: es_test
      _type: _doc
      _id: _id
      #pk: id
      sql: "select t.id as _id,t.id,t.count,t.name,t.color from es_test t"
      commitBatch: 3000

    Parameter

    Description

    esMapping._index

    The name of the index that you created in your Alibaba Cloud Elasticsearch instance in Step 2: Create an index. This topic uses es_test as an example.

    esMapping._type

    The type of the index that you created in your Alibaba Cloud Elasticsearch instance in Step 2: Create an index. This topic uses _doc as an example.

    esMapping._id

    The ID of the document to be synchronized to the Elasticsearch instance. You can customize this value. This topic uses _id as an example.

    esMapping.sql

    The SQL statement that is used to query the fields that you want to synchronize to the Elasticsearch cluster. In this example, the select t.id as _id,t.id,t.count,t.name,t.color from es_test t statement is used.

  6. Start the Canal adapter and query logs.

    ./bin/startup.sh
    cat logs/adapter/adapter.log

    Note

    In this example, an ApsaraDB RDS for MySQL instance that runs MySQL 5.7 is used. If you use an ApsaraDB RDS for MySQL instance that runs MySQL of another version, you must make sure that the version of the MySQL driver in the Canal adapter is consistent with the MySQL version of the ApsaraDB RDS for MySQL instance that you want to connect. Otherwise, the Canal adapter fails to be started. For more information, see the FAQ section in this topic.

    If ## ES mapping config loaded and ## the canal client adapters are running now ...... appear in the logs, the Canal adapter has started successfully. The expected log output is as follows:

    
    2019-09-05 20:16:22.918 [Thread-2] INFO  com.alibaba.druid.pool.DruidDataSource - {dataSource-2} inited
    2019-09-05 20:16:24.928 [Thread-2] INFO  c.a.o.canal.adapter.launcher.loader.CanalAdapterService - ## start the canal client adapters.
    2019-09-05 20:16:24.929 [Thread-2] INFO  c.a.o.canal.adapter.launcher.loader.CanalAdapterLoader - Load canal adapter: logger succeed
    2019-09-05 20:16:24.929 [Thread-2] INFO  c.a.o.canal.client.adapter.es.config.ESSyncConfigLoader - ## Start loading es mapping config ...
    2019-09-05 20:16:24.943 [Thread-2] INFO  c.a.o.canal.client.adapter.es.config.ESSyncConfigLoader - ## ES mapping config loaded
    2019-09-05 20:16:25.182 [Thread-2] INFO  c.a.o.canal.adapter.launcher.loader.CanalAdapterLoader - Load canal adapter: es succeed
    2019-09-05 20:16:25.185 [Thread-2] INFO  c.a.o.canal.adapter.launcher.loader.CanalAdapterLoader - Start adapter for canal instance: example succeed
    2019-09-05 20:16:25.185 [Thread-2] INFO  c.a.o.canal.adapter.launcher.loader.CanalAdapterService - ## the canal client adapters are running now ......
    2019-09-05 20:16:25.185 [Thread-2] INFO  c.a.o.canal.adapter.launcher.monitor.ApplicationConfigMonitor - ## adapter application config reloaded.
    2019-09-05 20:16:25.186 [Thread-8] INFO  c.a.o.canal.adapter.launcher.loader.CanalAdapterWorker - =============> Start to connect destination: example <=============
    2019-09-05 20:16:25.186 [Thread-8] INFO  c.a.o.canal.adapter.launcher.loader.CanalAdapterWorker - =============> Start to subscribe destination: example <=============
    2019-09-05 20:16:25.232 [Thread-8] INFO  c.a.o.canal.adapter.launcher.loader.CanalAdapterWorker - =============> Subscribe destination: example succeed <=============
    2019-09-05 20:16:27.432 [pool-5-thread-1] INFO  c.a.o.canal.client.adapter.logger.LoggerAdapterExample - DML: {"data":null,"type":"mysql","destination":"example","es":1,"sql":"/* rds internal mark */ CREATE TABLE IF NOT EXISTS mysql.ha_health_check (\n  id   BIGINT  DEFAULT 0,\n  type CHAR(1) DEFAULT '0',\n  PRIMARY KEY (type)\n)\n/*CREATE*/"}

Step 6: Verify the synchronization result of incremental data

  1. In your ApsaraDB RDS for MySQL database, add, modify, or delete data in the es_test table.

    insert `ES`.`es_test`(`count`,`id`,`name`,`color`) values('11',2,'canal_test2','red');
  2. Log on to the Kibana console of the Elasticsearch cluster. For more information, see Log on to the Kibana console.

  3. In the left navigation menu, choose Management > Dev Tools.

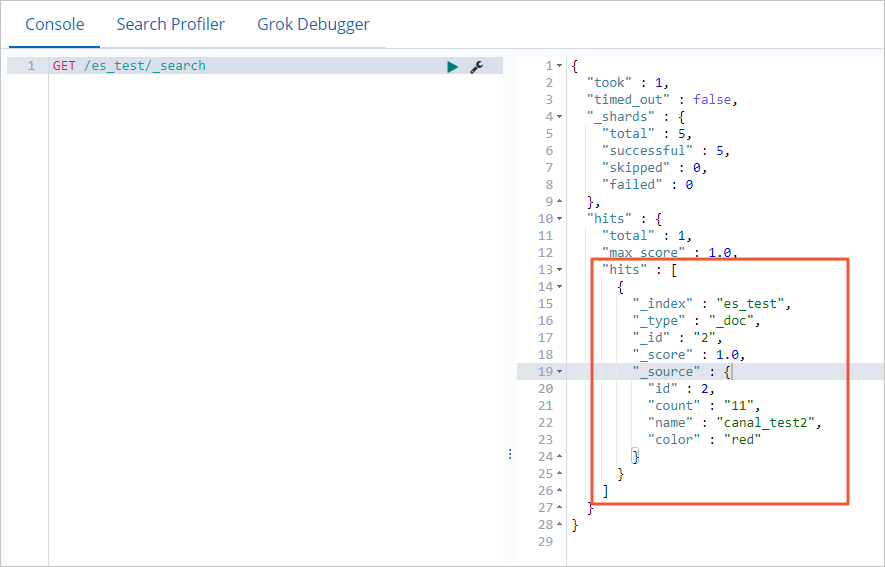
  4. In the console, run the following command to query the synchronized data.

    GET /es_test/_search

    If the data synchronization is successful, the following result is returned:

    
    GET /es_test/_search
    
    {
      "took" : 1,
      "timed_out" : false,
      "_shards" : {
        "total" : 5,
        "successful" : 5,
        "skipped" : 0,
        "failed" : 0
      },
      "hits" : {
        "total" : 1,
        "max_score" : 1.0,
        "hits" : [
          {
            "_index" : "es_test",
            "_type" : "_doc",
            "_id" : "2",
            "_score" : 1.0,
            "_source" : {
              "id" : 2,
              "count" : "11",
              "name" : "canal_test2",
              "color" : "red"
            }
          }
        ]
      }
    }
    Important

    Canal synchronizes only incremental data.

FAQ

Q: What do I do if the following error message is returned in the logs generated for the Canal adapter when I start the adapter: java.lang.RuntimeException: java.lang.RuntimeException: java.lang.ClassCastException: com.alibaba.druid.pool.DruidDataSource cannot be cast to com.alibaba.druid.pool.DruidDataSource

at com.alibaba.otter.canal.client.adapter.es7x.ES7xAdapter.init(ES7xAdapter.java:54) ~[client-adapter.es7x-1.1.5-jar-with-dependencies.jar:na]

A: Replace client-adapter.es7x-1.1.5-jar-with-dependencies.jar in the canal.adapter-1.1.5\plugin directory with the related file for canal-1.1.5-alpha-2.

Note

For more information, Canal issues.

In this example, the root user is used.

  1. Download the package of canal-1.1.5-alpha-2. For more information, see Canal release note.

    wget https://github.com/alibaba/canal/releases/download/canal-1.1.5-alpha-2/canal.adapter-1.1.5-SNAPSHOT.tar.gz
  2. Decompress the package.

    tar -zxvf canal.adapter-1.1.5-SNAPSHOT.tar.gz
  3. Copy client-adapter.es7x-1.1.5-SNAPSHOT-jar-with-dependencies.jar in the plugin folder for canal-1.1.5-alpha-2 to the canal.adapter-1.1.5\plugin directory.

    Note

    The directory of the file that you need to copy may differ. The actual directory prevails.

    cp canal.adapter-1.1.5-SNAPSHOT/plugin/client-adapter.es7x-1.1.5-SNAPSHOT-jar-with-dependencies.jar canal/canal.adapter/plugin
  4. Delete client-adapter.es7x-1.1.5-jar-with-dependencies.jar from the canal.adapter-1.1.5\plugin directory.

    rm -rf client-adapter.es7x-1.1.5-jar-with-dependencies.jar
  5. Modify the file name.

    mv client-adapter.es7x-1.1.5-SNAPSHOT-jar-with-dependencies.jar client-adapter.es7x-1.1.5-jar-with-dependencies.jar 

Q: What do I do if the following error message is returned in the logs generated for the Canal adapter when I start the adapter: java.sql.SQLException: Unknown system variable 'query_cache_size'?

A: A possible reason is that the MySQL driver version in the Canal adapter is incompatible with the MySQL version of your ApsaraDB RDS instance. For example, Canal adapter 1.1.4 includes MySQL driver 5.1.40, which is incompatible with MySQL 8.x. Replace the MySQL driver in the Canal adapter with a version that matches your ApsaraDB RDS for MySQL version.

Q: I want to synchronize data from an ApsaraDB RDS for MySQL instance that runs MySQL 8.0 to an Elasticsearch cluster. How do I change the existing MySQL driver to the MySQL 8.0 driver?

A: In this example, the root user is used.

  1. Download the package of the MySQL 8.0 driver.

    wget https://dev.mysql.com/get/Downloads/Connector-J/mysql-connector-java-8.0.29.zip
  2. Decompress the package:

    unzip mysql-connector-java-8.0.29.zip
  3. Copy the obtained file to the lib directory of the Canal adapter.

    mv mysql-connector-java-8.0.29/mysql-connector-java-8.0.29.jar lib/
  4. Add permissions.

    chmod 777 lib/mysql-connector-java-8.0.29.jar
    chmod +st lib/mysql-connector-java-8.0.29.jar
  5. Delete the MySQL 5.x driver.

    rm -rf lib/mysql-connector-java-5.1.40.jar

References