Restore an Oracle database within seconds
Data Disaster Recovery mounts a physical backup snapshot directly to the destination server, bringing terabytes of Oracle data online in under 10 seconds—with full read and write access. Use this capability for data restoration for incorrect operations, restoration rehearsals, emergency disaster recovery, DevOps, and data analysis.
This document covers three tasks:
-
Switch the backup set mode to Sandbox instance mount backup (skip if already configured)
-
Enable second-level restoration on a backup schedule
-
Start a second-level restoration task
Prerequisites
Before you begin, make sure you have:
-
An Oracle database backed up by Data Disaster Recovery, with Backup Storage Type set to DBS built-in storage. See Back up an Oracle instance.
-
The Backup set mode set to Sandbox instance mount backup. If the database was backed up in Non-intrusive streaming backup mode, complete the first task below before proceeding.
-
The FUSE module installed on the server where the destination database will be restored.
-
A destination database running on a self-managed Elastic Compute Service (ECS) instance in a virtual private cloud (VPC). To create a VPC, see Create and manage a VPC.
Usage notes
Switching backup set modes triggers a new full backup and a new incremental backup, and creates a gap in the available restore time range. Avoid switching modes unless necessary.
Switch the backup set mode to Sandbox instance mount backup
Skip this section if the Oracle database was already backed up using Sandbox instance mount backup mode.
Data Disaster Recovery supports two backup set modes:
| Mode | How it works | Impact |
|---|---|---|
| Non-intrusive streaming backup | Uses the Oracle System Backup to Tape (SBT) interface to stream backup sets through a virtual tape to the cloud | No impact on the source database; uses less storage |
| Sandbox instance mount backup | Uses mount points to back up data | Negatively impacts the destination environment; requires the FUSE module on the destination server; required for second-level restoration |
To switch from Non-intrusive streaming backup to Sandbox instance mount backup:
-
Log on to the DMS console V5.0.
-
In the top navigation bar, choose Security and Specifications (DBS) > Disaster Recovery for Data (DBS) > Backup Plan.
If you use the DMS console in simple mode, move the pointer over the
 icon in the upper-left corner and choose All Features > Security and Specifications (DBS) > Disaster Recovery for Data (DBS) > Backup Plan.
 -
On the Backup Schedules page, find the target backup schedule and click Manage in the Actions column.
-
On the Configure Task page, click Backup Time and Advanced Settings in the upper-right corner of the Basic Information section.
-
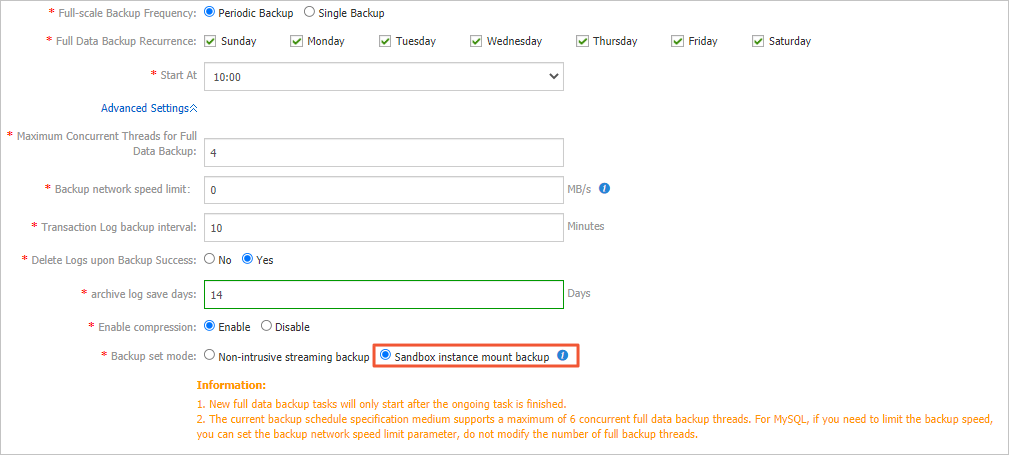
On the Edit Backup Source page, set Backup set mode to Sandbox instance mount backup and click Save.
Enable second-level restoration
-
Log on to the DMS console V5.0.
-
In the top navigation bar, choose Security and Specifications (DBS) > Disaster Recovery for Data (DBS) > Backup Plan.
If you use the DMS console in simple mode, move the pointer over the
icon in the upper-left corner and choose All Features > Security and Specifications (DBS) > Disaster Recovery for Data (DBS) > Backup Plan. -
On the Backup Schedules page, find the target backup schedule and click Manage in the Actions column.
-
On the Configure Task page, click Set up second level recovery in the upper-right corner of the Task Running Information section.
-
In the Set up second level recovery dialog box, set Second level recovery to Enable and click OK.
After enabling, the Second recovery time range field shows Data preparing
Start a second-level restoration task
-
Log on to the DMS console V5.0.
-
In the top navigation bar, choose Security and Specifications (DBS) > Disaster Recovery for Data (DBS) > Backup Plan.
If you use the DMS console in simple mode, move the pointer over the
icon in the upper-left corner and choose All Features > Security and Specifications (DBS) > Disaster Recovery for Data (DBS) > Backup Plan. -
On the Backup Schedules page, find the target backup schedule and click Manage in the Actions column.
-
On the Configure Task page, click Second level recovery database in the upper-right corner.
-
On the Create second level recovery task page, configure the following parameters:
Basic settings
Parameter Description Task Name A name for the restoration task. An auto-generated name is provided. Unique names are not required. Set time restored to
Parameter Description Time Range Available to Restore The available restore window, displayed automatically based on your backup data. Restore To The target point in time. Must fall within the Time Range Available to Restore. Second-level recovery information settings
Parameter Description Instance Region The region where the destination database resides. Peer VPC The ID of the VPC where the backup gateway of the destination database resides. Peer vSwitch The vSwitch connected to the backup gateway of the destination database. Backup Gateway The backup gateway for the destination database. The backup gateway used for restoration must be on a different server than the one used for the original backup, to prevent overwriting the production environment. Address The endpoint for connecting to the destination database. Default: localhost.Port Number The port for connecting to the destination database. Default: 1521.SID The system identifier (SID) of the destination database. Database program directory The absolute path specified by the ORACLE_HOMEenvironment variable on the destination server. -
Click Recover immediately.
To monitor the task, click Second level recovery task in the left-side navigation pane.