Physically back up and restore a cross-cloud or self-managed Oracle database
Database Backup (DBS) supports physical backups for Oracle databases that run on Windows or Linux operating systems. You can back up Oracle databases with various architectures, such as single-instance databases, Data Guard physical standby databases, and Real Application Clusters (RAC) databases.
Oracle logical backups are covered in Logical backup and recovery for a cross-cloud or self-managed Oracle database.
Supported Oracle architectures for physical backup
Single-instance, single-instance Automatic Storage Management (ASM), Oracle Data Guard physical standby, and Oracle RAC.
-
Before starting the backup, verify control files, parameter files, data files, archived logs, and redo log files as described in Query Oracle RAC files.
-
To back up the entire RAC database, you only need to deploy a backup gateway on any instance machine in the RAC and provide the Oracle system ID (SID) for that instance.
Prerequisites
-
The ARCHIVELOG mode is enabled for the Oracle database.
-
The Oracle SID is obtained.
-
A backup gateway is installed on the Oracle database server. Install a backup gateway.
-
The database program directory is obtained.
-
The Oracle RAC files are obtained.
To ensure a successful backup, check the control files, parameter files, data files, archived logs, and redo log files before you back up an Oracle RAC. This check is not required for other architectures.
-
Query redo log files
SELECT member FROM v$logfile WHERE type='ONLINE';Sample response:
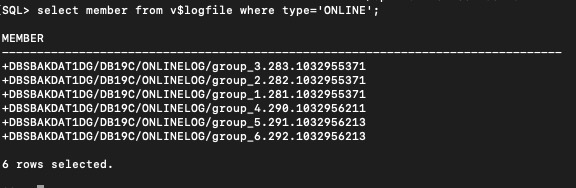 The value in the MEMBER column starts with a plus sign (
+). The ASM isDBSBAKDAT1DG. -
Querying archived log files
SELECT name FROM v$archived_log WHERE DELETED='NO';A sample response is shown below:
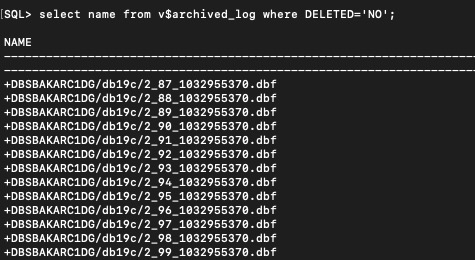 In this example, the value of NAME starts with
 +and the ASM isDBSBAKDAT1DG. -
Querying data files
SELECT name FROM v$datafile;Sample response:
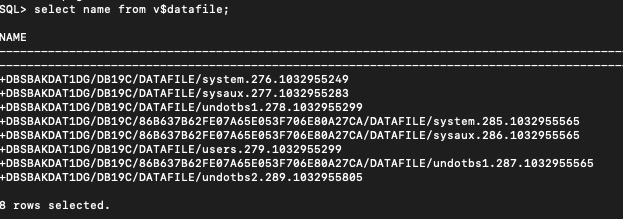 The value for VALUE starts with a plus sign (
+) and the value for ASM isDBSBAKDAT1DG. -
Querying parameter files
SHOW parameter spfile;Sample response:
 The value in the VALUE column starts with a plus sign (
+). The ASM isDBSBAKDAT1DG. -
Querying control files
SHOW parameter control_files;Sample response:
 The value for VALUE starts with a plus sign (
+). The ASM isDBSBAKDAT1DG.
-
Limits
DBS Oracle physical backups rely on RMAN and control files for metadata management. Note the following limits when using DBS for physical backup or restore:
-
Do not configure two or more backup plans for the same Oracle database. This can cause the restoration to fail.
-
When you restore an Oracle database to a specific point in time, do not delete the latest full backup set that was created before that point in time. Deleting this backup set may cause the restoration to fail.
Step 1: Create a backup plan
When you purchase a backup schedule, set the Data Source Type parameter to Oracle and the Backup Method parameter to Physical Backup.
Step 2: Configure the backup plan
-
Log on to the Data Management (DMS) console.
-
In the top navigation bar, choose .
NoteIf you use the DMS console in simple mode, move the pointer over the
 icon in the upper-left corner of the DMS console and choose .
 -
Find the Backup Schedule ID for the schedule that you want to configure, and click Configure Backup Schedule in the Actions column.
-
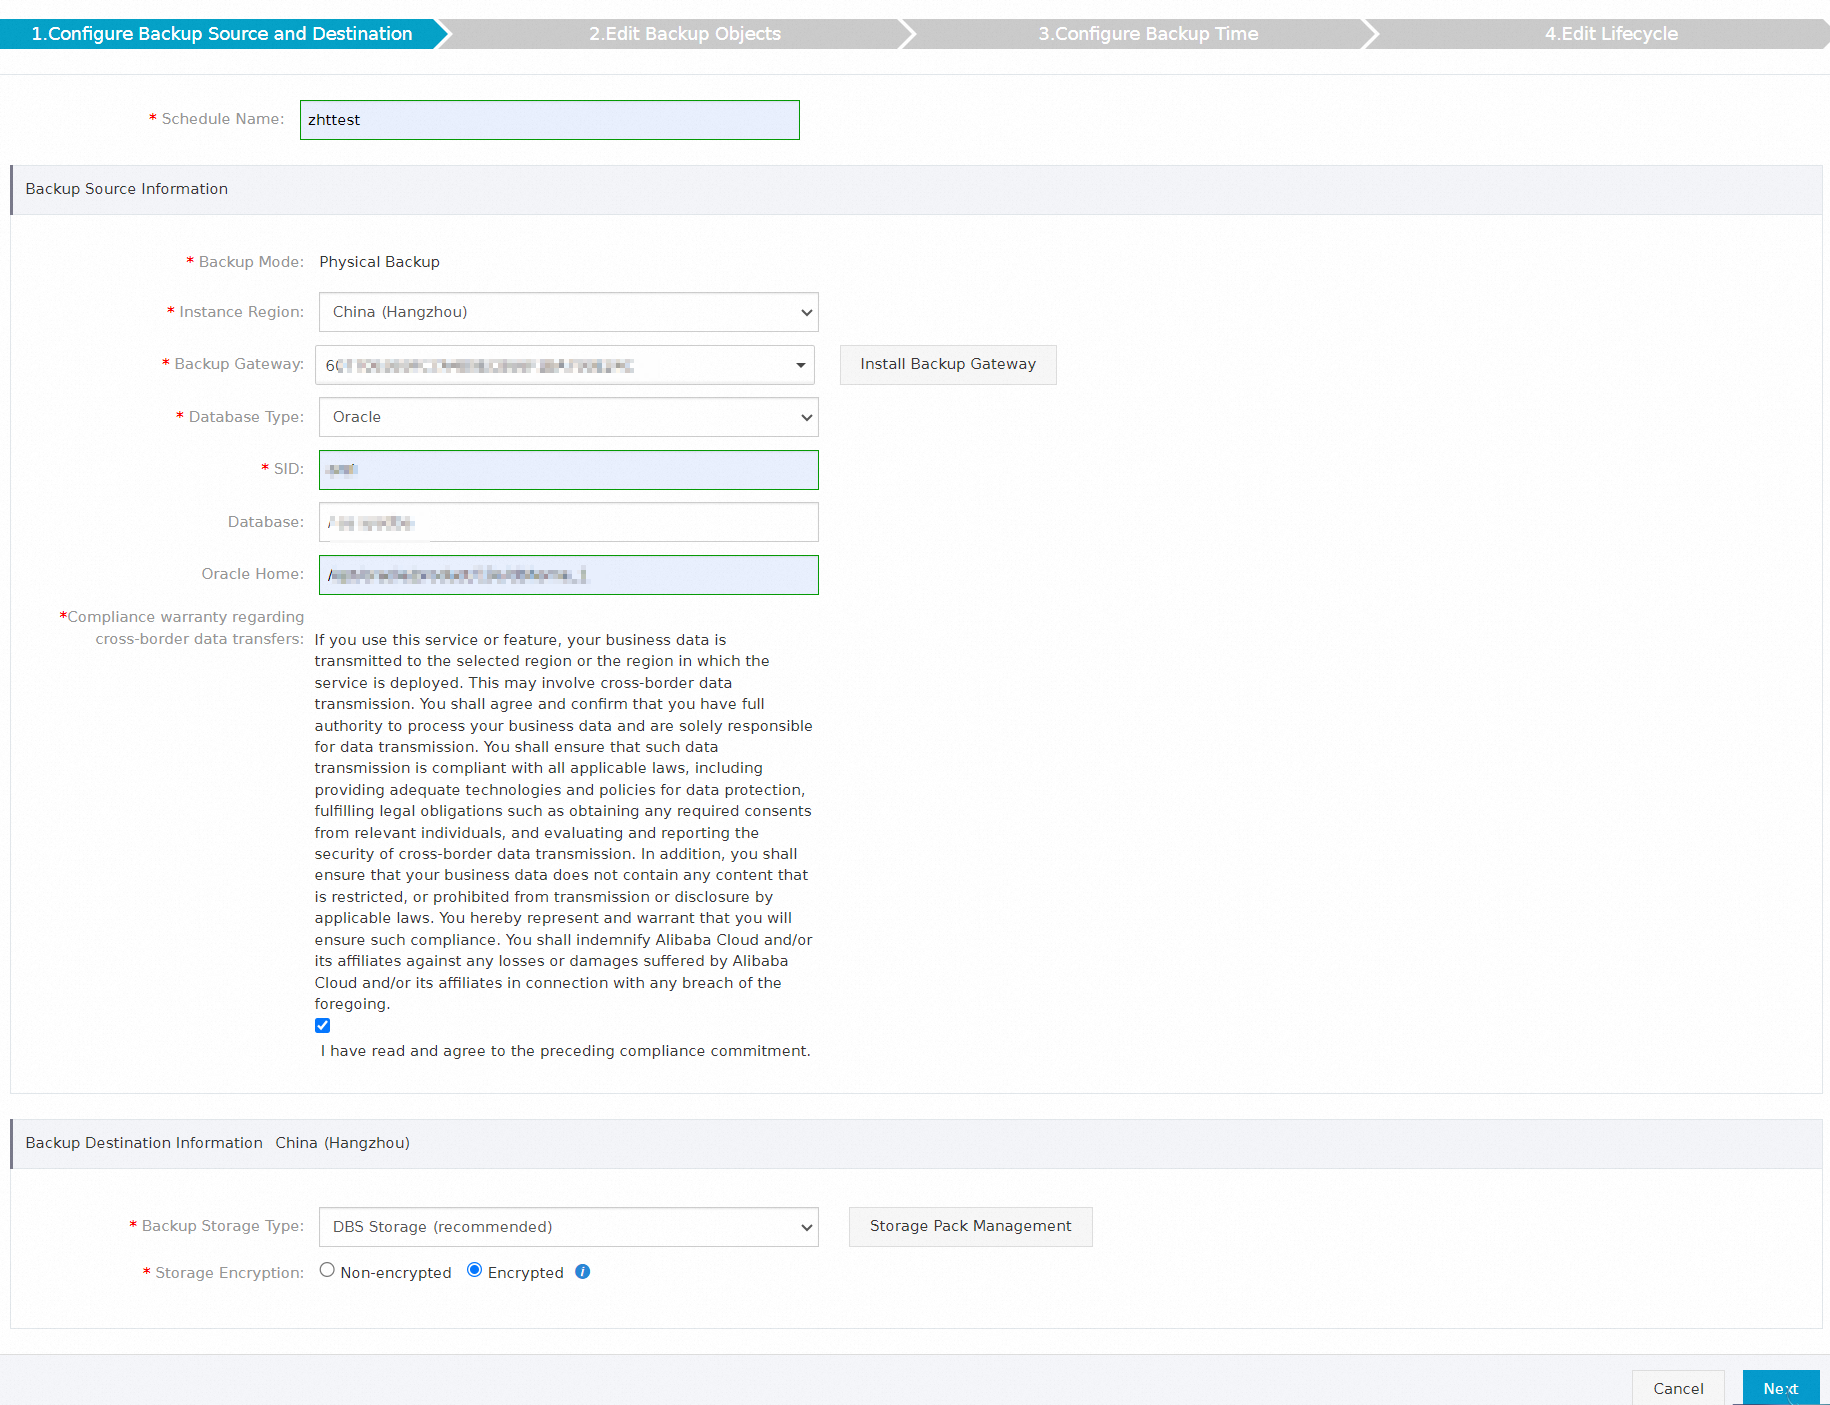
On the Configure Backup Source and Destination page, specify the backup source and destination, and then click Next.
Category
Configuration
Description
None
Backup Plan Name
DBS auto-generates a name. Specify a descriptive name for easy identification. Uniqueness is not required.
Backup Source Information
Backup Mode
Defaults to the method selected during plan creation. This document covers Oracle physical backup.
Instance Region
Select the region where the instance that you want to back up is located.
Backup Gateway
Select the backup gateway for the destination database. Add a backup gateway.
Database Type
The default value is Oracle.
SID
Enter the Oracle SID of the destination database. Obtain the Oracle SID.
Database Logon
Enter the SQL*Plus command to log on to the database. The format is
database account/password@instance name as sysdba. For example,sys/password@orcl as sysdba.NoteYou can also enter
/ as sysdba. If operating system authentication is disabled in the database environment, you cannot log on. In this case, use thedatabase account/password@instance name as sysdbaformat to log on.Oracle Home
Enter the absolute path of ORACLE_HOME. The database program directory is obtained.
NoteThis parameter is optional.
Compliance Warranty Regarding Cross-border Data Transfers
Read and select the compliance commitment.
Backup Destination Information
Backup Storage Class
The storage type for the backup destination. The following options are supported:
-
DBS Built-in Storage (Recommended): No bucket required. Data is stored automatically in DBS built-in storage. Billed by data volume stored in DBS. Storage fees.
-
OSS For User: Requires a pre-created OSS bucket. Create a bucket in the console.
Note-
In this example, built-in storage is selected. If you select User OSS, you must also configure the OSS Bucket Name parameter. Only the OSS Standard storage class is supported.
-
For large data volumes, a DBS subscription storage plan offsets DBS built-in storage fees and is more cost-effective than pay-as-you-go.
Storage Type
The storage method. The following options are supported:
-
Encrypted (Recommended): Uses the industry-standard Advanced Encryption Standard (AES) 256 algorithm for encrypted storage.
OSS encrypts objects on upload and decrypts them on download automatically. Server-side encryption.
-
Non-encrypted: Encryption is not enabled.
-
-
On the Configure Backup Objects page, Back Up Entire Instance is selected by default. Click Next.
NoteIf you back up the entire database, permissions and stored procedures are also backed up.
-
On the Configure Backup Time page, configure the backup schedule and other parameters, and then click Next.
Configuration
Description
Full Backup Frequency
Select Periodic Backup or Single Backup as needed.
Full Backup Cycle
The days of the week on which DBS runs the backup schedule. You can select one or more days of a week. Select at least one day of the week.
Start At
The start time of the backup. We recommend that you specify a point in time during off-peak hours. Example: 01:00.
NoteIf a previous full data backup is not finished at the start time of the next backup, DBS skips the next backup.
Incremental Backup
Specifies whether to enable incremental backup.
NoteWhen you enable this parameter, make sure that binary logging (binlog) is enabled for the destination database. Binlog is enabled by default for ApsaraDB RDS for MySQL instances. For self-managed databases, you must manually enable binlog.
This parameter is displayed only when you set the Full Backup Frequency parameter to Periodic Backup.
Maximum Concurrent Threads For Full Backup
The maximum number of concurrent threads that are available for a full backup. You can configure this parameter to adjust the backup speed. For example, you can reduce the number of backup threads to minimize impacts on the database.
Backup Network Speed Limit
The limit on the network bandwidth. You can specify the limit based on your business requirements. Default value:
0, which indicates that the network bandwidth is not limited.Incremental Backup Interval
The interval at which incremental backup is performed. DBS performs incremental backup based on your configurations. If you set the interval to 10 minutes, DBS performs an incremental backup every 10 minutes.
Delete Logs Upon Backup Success
Specifies whether to delete the successfully backed up archived logs from the self-managed database after a backup is successful. The following options are supported:
-
Enable: After a successful backup, automatically deletes archived logs older than the Archive Log Save Days threshold (default: 7 days) from the self-managed database.
-
No: Do not delete the archived logs from the self-managed database.
Enable Compression
Select whether to enable compression. The following options are supported:
-
Enable: recommended. Data is compressed during backup to reduce storage space.
-
Disable: Data is not compressed during backup.
Backup Set Mode
Select a non-intrusive stream backup mode or a mount backup mode for restoration within seconds. The following options are supported:
-
Non-intrusive Stream Backup Mode: Uses Oracle System Backup to Tape (SBT) to stream backups to the cloud through a virtual tape interface. Non-intrusive to the source database and uses less storage space.
-
Sandbox Instance Mount Backup: Performs RMAN image copy backups streamed to OSS through FUSE without writing to local disk. With the sandbox feature enabled, backup data can be mounted within seconds.
NoteYou must install FUSE on your server. Otherwise, the backup will fail.
-
-
On the Edit Lifecycle page, enter the retention period for full backup data in the built-in storage.
If you enabled Incremental Backup in the previous step, also configure the retention period for incremental backup data. Manage lifecycles.
-
After the preceding configurations are complete, click Precheck in the lower-right corner of the page.
-
After the precheck succeeds, click Start Now in the dialog box that appears.
Note-
The backup plan is successfully configured when its Status changes to Running.
-
If the backup plan becomes abnormal, troubleshoot using How to fix an abnormal backup plan. If the issue persists, contact us via DingTalk group 35585947.
-
 icon in the upper-left corner of the DMS console and choose
Data restoration
DBS supports restoring data to its original location, a new location on the same machine, or a different machine.
-
Log on to the Data Management (DMS) console.
-
In the top navigation bar, choose .
NoteIf you use the DMS console in simple mode, move the pointer over the
icon in the upper-left corner of the DMS console and choose . -
Find the backup plan that you want to manage and click Manage in the Actions column.
-
On the Configure Task page, click Restore Database in the upper-right corner.
-
On the Set Time Restored To page, configure the following information and click Next.
Category
Configuration
Description
None
Task Name
Auto-generated. Specify a descriptive name for easy identification. Uniqueness is not required.
Set Time Restored To
Restorable Time Range
The time range from the point in time when the first full backup set is created to the point in time when the latest full backup set is created. The database can be restored to a point in time within the time range.
Selected Restore Time Point
Select a recovery point in time that is within the Recoverable Time Range.
Note-
If incremental log backup is enabled, you can restore to any point in time after the backup.
-
If incremental log backup is not enabled, you can restore to the point in time of a full backup set.
Recover Target Database
Instance Region
Select the region where the destination backup gateway is located.
Backup Gateway
Select the destination backup gateway for restoration. Install a backup gateway.
Database Type
The default value is Oracle.
Endpoint
The endpoint of the destination database. The default value is
localhost.Port
The port of the destination database. The default value is
1521.SID
Enter the corresponding SID name.
NoteYou can customize a parameter file in the
ORACLE_HOME/dbsdirectory based on the SID name. If no parameter file is created, the system automatically creates a minimal usable parameter file to restore the Oracle database.Database Restore Directory
Enter the database restore directory.
NoteAllocate Storage Space (GB) of at least 1.3× the source instance size or 5–6× the full backup set size (backups are compressed).
Log on to the console. On the page, click the backup plan name. On the page, view the size of the full backup set. For more information, see View a backup plan.
Database Program Directory
Enter the absolute path of
ORACLE_HOME.Data Cross-border Compliance Commitment
Read and select the compliance commitment.
-
-
On the Configure Objects to Restore page, select Restore Entire Instance and then click Precheck in the lower-right corner.
NoteCurrently, physical backup only supports restoring the entire instance.
-
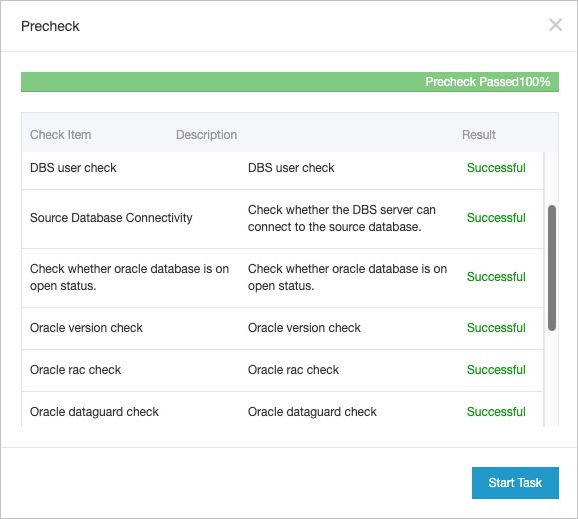
After the Precheck dialog box shows Precheck Passed, click Start Task and wait for the database restoration to complete.
NoteRestoration time depends on backup plan specifications and database size. Higher-spec plans restore faster. Performance tests for logical and physical backups.
-
Optional: Access the database and run the following command to start the database.
ALTER database OPEN RESETLOGS;
The Oracle database is restored.
FAQ
Q: Can I back up an Oracle database to different regions at the same time for multi-region storage?
A: No. DBS uses RMAN, and RMAN metadata does not support simultaneous backups to different regions.