Data Management Service (DMS) lets you mark database columns as sensitive, control how masked data appears to different users, and manage access to sensitive data through an approval workflow. This topic walks through all three tasks in the order you typically complete them.
Workflow overview:
| Step | Task | Required role |
|---|---|---|
| 1 | Configure sensitive fields — mark columns as sensitive and set their sensitivity level | DMS administrator, DBA, or security administrator |
| 2 | Configure data masking rules — change which masking algorithm applies to each sensitive column | Any DMS user |
| 3 | Apply for permissions on sensitive fields — request query, export, or change access to specific columns | Any DMS user |
After step 1 is approved, DMS applies full redaction by default. Use step 2 to change the masking algorithm. All users, including administrators and database administrators (DBAs), must complete step 3 before they can view underlying data.
Prerequisites
Before you begin, ensure that you have:
One of the following roles: DMS administrator, database administrator (DBA), or security administrator.
The sensitive data protection feature enabled. For more information, see Enable the sensitive data protection feature.
Access to the DMS console V5.0.
To check your role in DMS, hover over theicon in the upper-right corner of the console.
Supported databases:
| Category | Databases |
|---|---|
| Relational databases | MySQL, SQL Server, PostgreSQL, MariaDB, PolarDB for PostgreSQL (Compatible with Oracle), PolarDB for Xscale, ApsaraDB for OceanBase, Oracle, DB2, Dameng (DM), Lindorm_CQL, Lindorm_SQL, OpenGauss |
| Data warehouses | AnalyticDB for MySQL, AnalyticDB for PostgreSQL, Data Lake Analytics (DLA), ClickHouse, MaxCompute, Hologres, Hive |
Configure sensitive fields
This feature is available only for administrators.
Log on to the Data Management (DMS) 5.0 console.
In the Database instance section of the left-side navigation pane, search for the database you want to manage.
Right-click the database and select Tables to open the Table List page.
Alternatively, open the SQLConsole tab. In the top navigation bar, choose SQL Console > SQL Console, select the database, and click Confirm. Then click the
 icon in the upper-right corner to go to the Table List page.
Click the
 icon to the left of the table you want to manage, then click Adjust on the Column tab. In the Adjust Sensitivity Level dialog box, set the sensitivity level for one or more fields.
Click Submit for Security Department Approval. DMS navigates you to the SensitivityTicket Details page. Click Approve to execute the task.
The ticket can be approved by any user with the DMS administrator, DBA, or security administrator role.
Return to the SQLConsole tab, double-click the table, and verify that the adjusted fields are masked. The default masking algorithm is full redaction.
All DMS users — including administrators and DBAs — must apply for permissions on sensitive fields before they can view the underlying data. See Apply for permissions on sensitive fields.
Configure data masking rules
Log on to the DMS console V5.0.
In the top navigation bar, choose Security and disaster recovery (DBS) > Sensitive Data > Sensitive Data Assets.
In simple mode, hover over the
 icon in the upper-left corner and choose All Features > Security and disaster recovery (DBS) > Sensitive Data > Sensitive Data Assets.
On the Sensitive Data Assets page, click Global Sensitive Data in the upper-right corner.
On the Field Control tab, select one or more fields and click Adjust Data Masking Algorithm.
Select an existing masking rule or create a new one:
Use an existing rule: Select a rule from the drop-down list and click Save.
Create a new rule: Click Create Data Masking Rule. On the Data Masking Rule page, click Create Data Masking Rule and fill in the rule name and masking algorithm on the Create Rule page. For details, see Manage data masking algorithms.
Apply for permissions on sensitive fields
All DMS users — including administrators and DBAs — must submit a permission application before querying sensitive field data.
Log on to the DMS console V5.0.
In the top navigation bar, choose Security and disaster recovery (DBS) > Permission Center > Permission Tickets.
In simple mode, hover over the
icon in the upper-left corner and choose All Features > Security and disaster recovery (DBS) > Permission Center > Permission Tickets.In the upper-right corner, choose Access apply > Sensitive Column-Permission.
On the permission application ticket page, enter the database name in the search box, click Search, and select the sensitive field.
Click Add. The field appears in the Selected Databases/Tables/Columns section.
In the Select Permission section, configure the following parameters and click Submit.
After submitting, wait for approval. To check the status, click Submitted Tickets in the My Tickets section on the DMS homepage.
Parameter Description Permission The permission types to apply for. Select one or more: Query, Export, or Change. Data Masking Method How sensitive data is displayed to you after approval. Semi-sensitization shows data in the format produced by the configured masking algorithm. Plain Text shows data without masking. If you select Export with Semi-sensitization, the exported data is also partially masked. Duration The validity period of the permissions. Reason The business context and reason for your request. A clear reason speeds up the approval process. 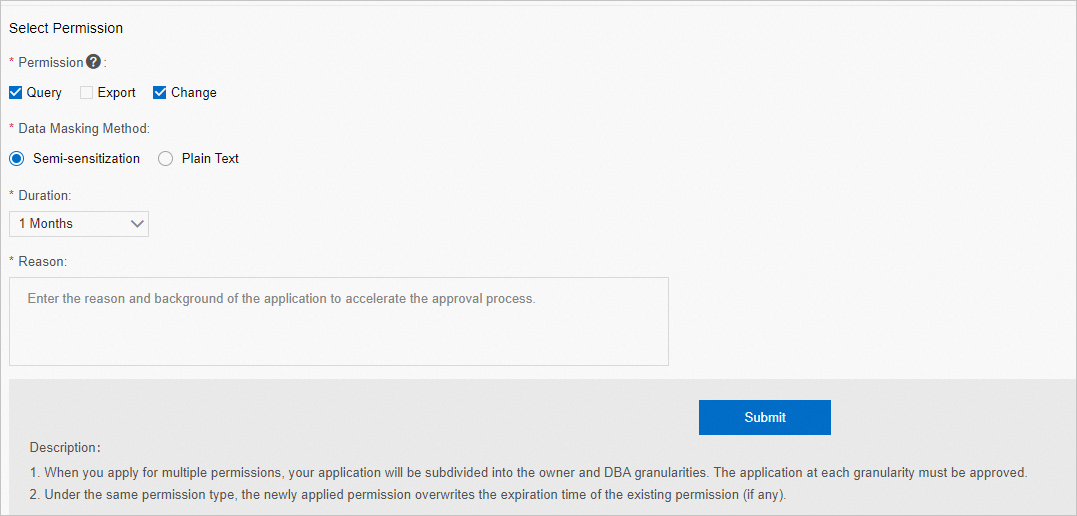
After the ticket is approved, query the sensitive field data on the SQLConsole tab.