Reverse modeling: Create models from physical tables
If you need to centrally manage many physical tables from your compute engine, you can use reverse modeling. This feature creates models in DataWorks Dimensional Modeling directly from your existing physical tables, saving you significant time by eliminating redundant work. This topic explains how to use reverse modeling.
The data modeling feature in DataWorks follows the Kimball dimensional modeling methodology. Design and create dimension tables, fact tables, aggregate tables, and application tables, publish models to development engines, and reverse-model existing physical tables into logical models.
Modeling perspective
Dimensional modeling organizes model tables into three levels: Common layer, Application layer, and Uncategorized. The Common layer is used to build reusable unified metrics, dimensions, and detailed fact data, and supports management from either data domain or business category perspectives. The Application layer addresses business-specific statistical needs and supports only the business category perspective. After selecting a level, you can create and manage model tables in the corresponding directory tree.
Prerequisites
-
The compute engine already contains a large number of physical tables and has created a data source in the target DataWorks workspace. For more information about creating data sources, see Data source management.
-
Data warehouse layers have been created to determine the layer to which a model belongs. For more information, see Define data warehouse layers.
-
The common layer processes and integrates public data from the data import layer, to establish unified dimensions and metrics, and build reusable fact and aggregate data for analysis and statistics. The application layer uses data processed and integrated by the common layer to generate customized statistics for specific applications or products based on actual requirements.
Models can belong to the Common Layer or the Application Layer. You must complete the corresponding preparations for each layer:
-
Common Layer:
-
A data domain is created. The data domain defines the scope of business data that the model covers. For more information, see Data Domain.
-
A business process is created. The business process defines the specific business activity that the model analyzes. For more information, see Business Process.
-
-
Application Layer:
-
A data mart is created. The data mart defines the category of data for a specific application scenario or product. For more information, see Data Mart.
-
A subject area is created. The subject area defines the specific business data subject that the model covers. For more information, see Subject Area.
-
-
Limitations
Reverse modeling is supported only for tables in the production environment of MaxCompute and E-MapReduce (EMR) Hive.
Modeling process
Reverse modeling imports existing physical tables from a big data compute engine and converts them into models within DataWorks Dimensional Modeling.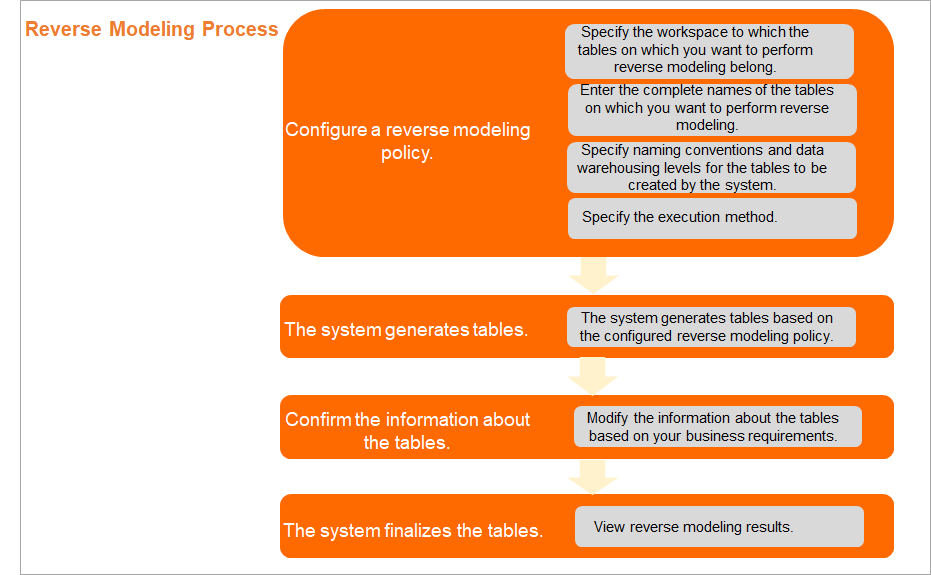
-
Configure a reverse modeling policy.
-
Define the modeling scope: Before you create models, determine which tables you want to reverse model based on your business requirements.
Specify the workspace and compute engine instance, and choose a table name matching method: exact match or fuzzy match. The matched tables are then converted into models.
-
Define modeling rules: Specify the data warehouse layer and naming convention for the generated models.
You can use a checker or a custom method to standardize model names. A consistent naming convention helps clarify a model's business type and data granularity. For more information about checkers, see Configure data warehouse layer checkers and Use checkers.
-
Choose an execution method: Decide whether to perform a full update, which creates all target models, or an incremental update, which creates only the models that do not already exist in Dimensional Modeling.
NoteReverse modeling is irreversible. Once used to generate models, a policy cannot be modified. Plan your policy carefully based on your business requirements.
For more information, see Configure a reverse modeling policy.
-
-
Parse and match models.
DataWorks parses your tables and identifies the models to be created based on your policy.
-
Confirm model information.
The initial models generated by DataWorks may require adjustments. You must review and modify basic model information, such as the Data Domain and Business Process, to align with your business requirements. For more information, see Confirm model information.
-
Generate the final models.
After the models are generated, you can view their status and details. If a model fails to generate, you can check the error information to quickly identify and resolve the issue.
Note-
Successfully generated models are automatically materialized to the corresponding compute engine. You do not need to publish them.
-
Successfully generated models are stored in Dimensional Modeling. You can go to the Dimensional Modeling page to view and manage them. For more information, see Model management.
-
Procedure
-
Go to the Reverse Modeling page.
-
Log on to the DataWorks console. In the target region, click in the left-side navigation pane. Select a workspace from the drop-down list and click Go to Data Modeling.
-
In the top navigation bar of the Data Modeling page, click Dimensional Modeling to go to the Dimensional Modeling page.
-
In the left-side navigation pane of the Dimensional Modeling page, click Reverse Modeling to go to the Reverse Modeling page.
-
-
Start modeling.
-
If this is your first time using reverse modeling, click Start Now in the center of the Reverse Modeling page to start.
-
If you have used reverse modeling before, click Start Reverse Modeling in the upper-right corner of the Modeling Tasks page.
-
-
Configure a reverse modeling policy.
NoteReverse modeling is irreversible. Once used to generate models, a policy cannot be modified. Plan your policy carefully based on your business requirements.
-
Configure the policy settings.
Parameter
Description
Workspace
Select the DataWorks workspace that contains the tables you want to reverse model.
NoteYou can select only DataWorks workspaces where the current user is a member. To select a different workspace, add the user as a member to that workspace. For more information, see Manage permissions on workspace-level services.
Compute Engine Type
Reverse modeling is supported only for physical tables from MaxCompute and E-MapReduce (EMR) Hive projects in the production environment.
Compute Engine Instance
Select the compute engine instance that contains the tables you want to reverse model.
Table Name Matching Rule
Select a method to match tables in the target compute engine. The matched tables are then reverse modeled. The available methods are:
-
Fuzzy Match: Enter a keyword to match all tables whose names contain that keyword.
-
Exact Match: Enter the full, exact name of one or more tables.
Note-
To specify multiple table names, separate them with a semicolon (;) without a space after the semicolon.
-
If no tables are matched, the task fails and no models are generated.
Data Layer of Model After Reverse Modeling
-
Common Layer: Select this layer to create fact tables, dimension tables, or aggregate tables.
-
Application Layer: Select this layer to create application tables or dimension tables.
Table Naming Rule
This feature is used to parse the names of tables that are matched by the Table Name Matching Rule. This process standardizes model names after reverse modeling and mounts the models to the corresponding data warehouse layers. The details are as follows:
-
Parsing rule
-
The system parses the names of matched tables and the underscores (_) within them.
A table name can contain up to nine underscores. The segments between underscores can be configured to represent information such as Business Process, Data Domain, or Custom content.
-
If a table name contains an identifier for a data warehouse layer, the generated model is automatically assigned to that layer.
NoteIf a table name does not contain the required layer identifiers, such as Data Domain or Business Process, the model's layer assignment will be empty. You can assign the layer later in the Confirm Model Information step.
-
-
Parsing method
-
Table Name Checker: Select a pre-configured checker to parse table names. To learn how to create a checker, see Configure data warehouse layer checkers and Use checkers.
-
Custom Rule: Create a custom naming convention by combining elements such as Business Process, Data Domain, Business Category, and Custom content to parse table names.
-
Execution Method
Select a method for creating models:
-
Full Update: DataWorks creates models for all matched tables in Dimensional Modeling.
Select this method to regenerate all matched tables as new models.
NoteIf a model for a matched table already exists in Dimensional Modeling, selecting Full Update deletes the existing model and creates a new one.
-
Incremental Update: DataWorks performs the following actions on the matched tables:
-
Identifies and filters out tables that already have corresponding models in Dimensional Modeling.
-
Creates new models only for matched tables that do not already have a model in Dimensional Modeling.
Select this method to avoid recreating existing, unchanged models.
-
-
-
Click Create Model to parse the tables based on the policy.
-
-
Confirm model information.
-
Confirm the model information.
DataWorks generates initial models based on your policy. You can adjust information such as the Table Type and its associated Data Layer and Data Domain. You can also delete tables that you do not want to model.
-
Click Generate Model to create the models.
-
-
View the results.
After the models are generated, you can view the number of successfully created models of each type and the details of any failed models. Click Error Logs to quickly identify and troubleshoot issues.
Note-
Successfully generated models are automatically materialized to the corresponding compute engine. You do not need to publish them.
-
Successfully generated models are stored in Dimensional Modeling. You can go to the Dimensional Modeling page to view and manage them. For more information, see Model management.
-
View modeling tasks
On the page, you can view the details and operation logs of your created tasks.
|
Area |
Description |
|
Filter area |
Filter tasks by Task ID, Operated By, or Operation Date. |
|
Task list area |
This area displays details for each task, such as its rules and results.
|
Next steps
After reverse modeling is complete, you can perform the following operations:
-
View the created models in the model directory on the Dimensional Modeling page. For more information, see Materialize a logical model.
-
Use DataStudio to perform related data development tasks. For an overview of DataStudio features, see DataStudio feature guide.