This tutorial walks you through batch-synchronizing data from a MaxCompute table to ApsaraDB for ClickHouse using Data Integration in DataStudio. It covers data source configuration, network connectivity, task parameter tuning, and scheduling.
ApsaraDB for ClickHouse overview
ApsaraDB for ClickHouse is a column-oriented database designed for Online Analytical Processing (OLAP). Data Integration supports synchronizing data from ApsaraDB for ClickHouse to other destinations and from other sources to ApsaraDB for ClickHouse.
Limitations
Single-table batch synchronization is supported only for ApsaraDB for ClickHouse.
Prerequisites
Before you begin, ensure that you have:
-
A MaxCompute data source and an ApsaraDB for ClickHouse data source configured in Data Integration. See Data source configuration.
-
Network connectivity between the resource group and both data sources. See Network connectivity solution.
Synchronize a MaxCompute table to ClickHouse
The following steps use the DataStudio (new version) UI.
Step 1: Create a node
For general steps on creating and configuring a node in the codeless UI, see Configure a node in the codeless UI.
Step 2: Configure the source and destination
In the data source and resource sections, set Source to your MaxCompute data source and Destination to your ApsaraDB for ClickHouse data source. Select a Resource Group and test the connectivity.
Source (MaxCompute) parameters
| Parameter | Description |
|---|---|
| Tunnel Resource Group | Defaults to Public Transmission Resource. If you have an exclusive Tunnel Quota, select it from the drop-down list. |
| Table | The MaxCompute table to synchronize. In a standard DataWorks workspace, the table must exist in both the development and production environments with the same name and schema. If the table is missing from development, it won't appear during configuration. If it's missing from production, the task fails after publishing. If schemas differ between environments, field mappings may be inconsistent, causing incorrect data to be written. |
| Filtering method | Supports Partition Filtering and Data Filter. |
| Partition | Required when Filtering method is set to Partition Filtering. Accepts a fixed value (e.g., ds=20220101), a scheduling parameter (e.g., ds=${bizdate}), or multiple partitions. When the task runs, scheduling parameters are automatically replaced with their corresponding values. |
| If partitions do not exist | Applies when Filtering method is set to Partition Filtering. Valid values: Error or the partitions are ignored and tasks are normally run. |
| Data Filter | Specifies source data using a SQL WHERE clause. Do not include the WHERE keyword. |
Destination (ApsaraDB for ClickHouse) parameters
| Parameter | Description |
|---|---|
| Table | The ApsaraDB for ClickHouse table to write data to. The table list is pulled from the development environment. If table definitions differ between development and production, the task may fail after publishing with a "table or column not found" error. Keep table schemas identical across environments. |
| Primary or Unique Key Conflict Handling | When insert into is selected, the integration task validates primary key and unique key constraint conflicts at runtime. |
| Statement Run Before Writing | SQL statements to run before the data sync starts. Use this to clear a daily partition before writing new data, for example. |
| Statement Run After Writing | SQL statements to run after the data sync completes. |
| Batch Insert Size (Bytes) and Data Records Per Write | Set Batch Insert Size (Bytes) to 16777216 (16 MB) as the primary trigger for batch writes. Set Data Records Per Write to a value greater than Batch Insert Size (Bytes) divided by your single record size in bytes, so that byte size — not record count — triggers each write. For example, if a single record is 1 KB, set Data Records Per Write to 20000 (which exceeds 16 MB / 1 KB = 16,384). |
| If a batch write fails | Determines how the task handles batch write errors. See Batch write failure options below. |
Batch write failure options
Choose based on your tolerance for ClickHouse load impact and data completeness:
| Option | Behavior | When to use |
|---|---|---|
| Try single-row write. If it still fails, record it as dirty data. | Retries each record individually to isolate dirty data. Single-row writes significantly increase ClickHouse load. | Use with caution — only when identifying individual bad records is critical. |
| Exit on Sync Task Failure | Stops the task immediately when a write error occurs. | Use when ClickHouse stability is the priority. Configure alerts so you're notified and can intervene manually. |
| Count batch write failures as dirty data. | Marks failed batches as dirty data and lets the task run to completion. Use the dirty data limit to control task exit behavior. | Use when task completion matters more than preserving every batch. |
Step 3: Configure field mapping
After selecting a source and destination, map source columns to destination columns. Use one of the following options:
-
Map Fields with the Same Name
-
Map Fields in the Same Line
-
Delete All Mappings
-
Auto Layout
Step 4: Configure advanced settings
In Advanced Settings, configure Expected Maximum Concurrency, Policy for Dirty Data Records, and other options. This tutorial sets Policy for Dirty Data Records to Disallow Dirty Data Records and leaves all other settings at their default values. For parameter details, see Codeless UI configuration.
Step 5: Run and verify
-
Click Run Configuration on the right side of the Batch Synchronization node edit page. Configure the Resource Group and Script Parameters for the debug run, then click Run in the top toolbar to test the synchronization link.
-
After the run completes, verify the data in the destination table:
-
Click
 in the left navigation bar, then click the new icon to the right of Personal Directory to create a SQL file.
 -
Run the following query:
SELECT * FROM <your_clickhouse_destination_table_name> LIMIT 20; -
Click Run Configuration on the right side of the
.sqlfile editing page. Specify the data source Type, Computing Resources, and Resource Group, then click Run.
NoteTo query data this way, first bind ApsaraDB for ClickHouse as a computing resource in DataWorks.
-
Step 6: Schedule and publish
Click Scheduling Settings to the right of the offline synchronization task. After configuring the Scheduling Configuration parameters, click Publish in the top toolbar and follow the prompts to complete the publication.
Appendix: Adjust memory parameters
If increasing concurrency doesn't improve synchronization throughput, manually increase the JVM heap memory for the task.
-
Click Code Editor on the top toolbar of the Offline Synchronization Task page to switch from the codeless UI to the code editor.

-
In the
settingsection of the JSON script, add thejvmOptionparameter using the format-Xms${heapMem} -Xmx${heapMem} -Xmn${newMem}.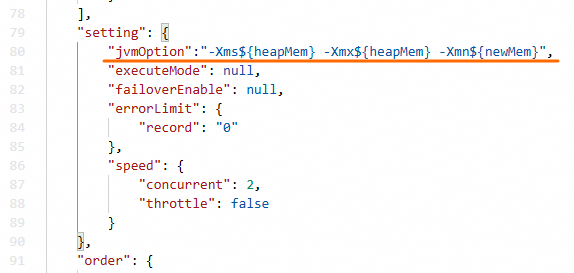
The codeless UI calculates ${heapMem} as 768 MB + (concurrency level - 1) x 256 MB. In the code editor, set ${heapMem} to a larger value and set ${newMem} to one-third of ${heapMem}.
Example: At concurrency level 8, the default ${heapMem} is 2,560 MB. To increase it, set jvmOption to -Xms3072m -Xmx3072m -Xmn1024m.