DataWorks lets you build a MaxCompute custom image at the same time you create a DataWorks custom image from a personal development environment. Instead of packaging and uploading resources manually for each job, you install third-party dependencies once — such as jieba or any custom Python library — then publish the environment as a reusable image that MaxCompute SQL UDF, PyODPS, and MaxFrame jobs can reference directly.
How it works
Two image types are involved. Understanding how they relate helps you follow the build-and-publish flow.
| Image type | What it is | Where it lives |
|---|---|---|
| DataWorks custom image | A container image built from a personal development environment in Data Studio | Alibaba Cloud Container Registry (ACR) and DataWorks Image Management |
| MaxCompute custom image | An image derived from the DataWorks image, used in SQL UDF, PyODPS, and MaxFrame jobs | MaxCompute Image Management |
The two images are created in a single workflow: you save the DataWorks image first, then publish it. Publishing syncs the image to both DataWorks and MaxCompute automatically.
Prerequisites
Before you begin, make sure you have:
-
A workspace that uses the new version of Data Studio, with MaxCompute computing resources attached
-
A Serverless resource group created and associated with the workspace
-
Alibaba Cloud Container Registry (ACR) activated, with a Standard Edition or higher ACR instance, a namespace, and an image repository. See Create an Enterprise instance, Create a namespace, and Create an image repository
-
VPC access control configured for the ACR instance. See Configure access control for a VPC
-
Permissions to manage ACR and MaxCompute custom images. See Custom images
Limitations
Review these constraints before you start:
| Constraint | Limit |
|---|---|
| Maximum image size | 10 GB per image |
| Maximum images per tenant | 10 images |
| Required Python version | Python 3.11 (images must run in a Python 3.11 environment) |
| Required base image | dataworks-maxcompute:py3.11-ubuntu20.04 (required to create a MaxCompute custom image) |
| Required ACR tier | Standard Edition or higher (lower tiers cannot build MaxCompute custom images) |
| VPC consistency | The VPC attached to the Serverless resource group used for testing and publishing must match the VPC configured in ACR |
Create a MaxCompute custom image
Step 1: Create a personal development environment instance
Create a personal development environment instance using the dataworks-maxcompute:py3.11-ubuntu20.04 base image. This is the only base image that supports MaxCompute custom image creation.
-
Go to Data Studio.
-
Go to the Workspaces page in the DataWorks console. In the top navigation bar, select a region. Find your workspace and choose Shortcuts > Data Studio in the Actions column.
-
On the Data Studio page, click the
 icon in the left navigation pane to go to the Data Studio page.
-
-
At the top of the page, click Personal development environment and open the instance creation page.
-
If you have no existing instance, click New Instance.
-
If you already have an instance, click Management Environment, then click New Instance in the instance list.
-
-
Configure the instance. For other parameters, see Create a personal development environment instance.
Parameter Required value Notes Image Configuration dataworks-maxcompute:py3.11-ubuntu20.04Required for MaxCompute custom image creation. A DataWorks custom image built from this base image also supports MaxFrame jobs in Notebook, General Python, and Shell nodes. Network Settings The VPC configured for the ACR instance Allows the instance to push images to ACR.
Step 2: Install dependencies
In the terminal of the personal development environment, install the third-party dependencies needed for MaxCompute development. The following example installs jieba.
-
At the top of the Data Studio page, click Personal development environment and select the instance you created in Step 1.
-
In the toolbar at the bottom of Data Studio, click the
 icon to open the terminal.
 -
Run the following commands to install and verify
jieba.# Install the third-party dependency. pip install jieba; # View the third-party dependency. pip show jieba;
Step 3: Save the custom image
Save the personal development environment as a DataWorks image. The system automatically uploads the generated image to the ACR instance managed by the same account.
-
Go to the personal development environment instance management page.
-
At the top of the page, click the name of your personal development environment instance.
-
In the dialog box, select Management Environment to go to the Personal Development Environment Instances page.
-
-
Find your instance and click Create Image in the Actions column.
-
Configure the image parameters, then click Confirm.
Parameter Description Image Name The custom name of the DataWorks image. If synced to MaxCompute, this name is also used as the MaxCompute image name. Example: image_jieba.Image Instance Select a Standard Edition or higher ACR instance. See Create an Enterprise instance. Only Standard Edition or higher instances support MaxCompute custom image creation. Namespace Select a namespace for the ACR instance. See Create a namespace. Image Repository Select an image repository for the ACR instance. See Create an image repository. Image Version The custom image version. Sync To MaxCompute Select Yes to build a MaxCompute image alongside the DataWorks image when publishing. This option is only available when Image Instance is Standard Edition or higher. Task Type Select the node types that can use this image: Notebook, Python, Shell. -
To display the image status column, click the
 icon to the right of the instance list and select the Image checkbox.
 -
Wait for the image to be created. When the status shows Saved, hover over the
 icon and click Here in the pop-up to go to Image Management.
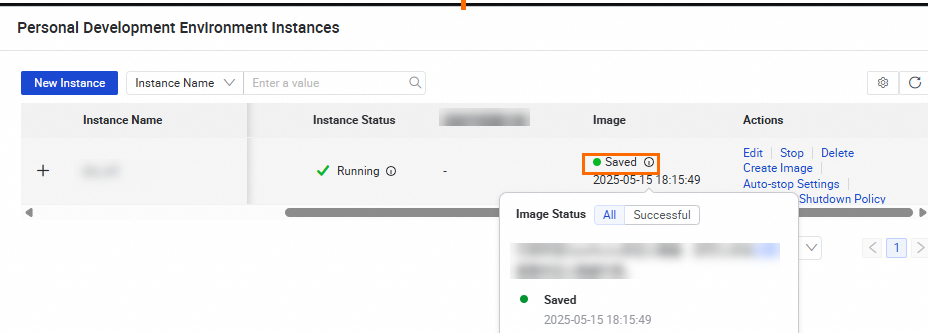
Step 4: Publish the custom image
Publishing syncs the image from ACR to both DataWorks and MaxCompute, generating a DataWorks custom image and a MaxCompute custom image. The test and publish steps typically take a few minutes.
-
Go to the DataWorks workspace list and select the target region.
-
In the left navigation pane, go to Image Management > Custom Images. Click Test for the image, and after the test succeeds, click Publish.
When testing: - Select a Serverless resource group for Test Resource Group. - The VPC attached to the selected Serverless resource group must match the VPC configured in ACR. - If the test fails and your custom image fetches packages from the internet, check that the VPC attached to the Test Resource Group has internet access. To enable internet access, see Use the SNAT feature of an Internet NAT gateway to access the internet.
-
Refresh the page and confirm that Publishing Status changes to Published.
-
In the Actions column, click
 > Change Workspace to attach the image to a workspace.
Step 5: Confirm the MaxCompute image status
Publishing a DataWorks image automatically creates a corresponding MaxCompute image. Once Publishing Status shows Published in the DataWorks console, go to the MaxCompute console and follow the steps in Add a custom image to MaxCompute to view the new MaxCompute custom image.
Use a MaxCompute custom image
To use the image in MaxFrame jobs, the MaxFrame service must be included in the image and the image must be built in a Python 3.11 environment.
For MaxFrame job development in DataWorks, the task must run in a DataWorks image that includes a MaxFrame runtime environment:
| Node type | Supported images |
|---|---|
| Notebook node | Official image dataworks-notebook:py3.11-ubuntu22.04, or a DataWorks custom image built from it or from dataworks-maxcompute:py3.11-ubuntu20.04 |
| PyODPS 3 node | Official image dataworks_pyodps_py311_task_pod, or a DataWorks custom image built from it |
| Python node | Create a personal development environment based on dataworks-maxcompute:py3.11-ubuntu20.04 and save it as a DataWorks custom image that supports Python task types |
| Other nodes | Any DataWorks custom image that includes a MaxFrame runtime environment and is built in Python 3.11 |
Go to Data Development
-
Go to the Workspaces page in the DataWorks console. In the top navigation bar, select a region. Find your workspace and choose Shortcuts > Data Studio in the Actions column.
-
On the Data Studio page, click the
icon in the left navigation pane to go to the Data Development page.
Use the image in a Notebook node
The following example shows how to use the jieba package from a MaxCompute custom image in a Notebook node for MaxFrame development.
-
Create a Notebook node.
-
At the top of the page, click Personal development environment and select the instance you created.
-
To the right of Workspace Directories, click the
 icon and choose Create Node > Notebook. The Create Node dialog box appears.
 -
Enter a Name for the node and click OK.
-
-
Add the following code to the node.
# -*- coding: utf-8 -*- from odps import ODPS from maxframe.session import new_session import maxframe.dataframe as md # Make sure that the maxframe.dataframe module is correctly imported. from maxframe import config # Prepare the dataset. test_data = [ "Grass growing on the old plain" ] # Define a function to process data using the jieba package from the MaxCompute custom image. # Use the MaxCompute custom image. def image_test(): config.options.sql.settings = { "odps.session.image": "image_jieba" # In this example, the MaxCompute image is named image_jieba. You can view the image name in the MaxCompute console. } def process(row): import jieba result = jieba.cut(row, cut_all=False) return "/".join(result) # Establish a MaxFrame connection. odps = %odps session = new_session(odps) # Print the logview URL to view execution details. logview = session.get_logview_address() print("logview:", logview) # Create a MaxFrame DataFrame. # Encapsulate local test data, such as ["Grass growing on the old plain"], into a MaxFrame DataFrame object. df = md.DataFrame(test_data, columns=["raw_text"]) # Apply the tokenization function to process the data in the DataFrame object. df["processed_text"] = df["raw_text"].map(process, dtype='object') print("Output:",df.execute().fetch()) image_test() print("Data processing completed!") -
On the left side of the node editing page, click the
 icon. In the dialog box, select Python 3.11 for Kernel, then run the node and view the log.
Use the image in a PyODPS 3 node
The following example shows how to use the jieba package from a MaxCompute custom image in a PyODPS 3 node for MaxFrame development.
-
Create a PyODPS 3 node.
-
To the right of Workspace Directories, click the
icon and choose Create Node > MaxCompute > PyODPS 3. The Create Node dialog box appears. -
Enter a Name for the node and click OK.
-
-
Add the following code to the node. All examples use
execute(image='image_jieba')to specify the MaxCompute custom image at runtime.# -*- coding: utf-8 -*- from odps import ODPS, options from odps.df import DataFrame import pandas as pd # Prepare table data. options.sql.settings = {"odps.isolation.session.enable": True} # Create a test table. table = o.create_table('jieba_work_tb', 'col string', if_not_exists=True) # Add instance data. instance = o.run_sql("insert into table jieba_work_tb values ('Grass growing on the old plain')") instance.wait_for_success() # Define a function to process data using the jieba package from the MaxCompute custom image. def image_test(): def process(row): import jieba result = jieba.cut(row, cut_all=False) return "/".join(result) # Encapsulate the table as a DataFrame object. df = o.get_table("jieba_work_tb").to_df() # Apply the tokenization function to process the data in the DataFrame object. df = df.col.map(process).execute(image='image_jieba') # In this example, the MaxCompute image is named image_jieba. You can view the image name in the MaxCompute console. print("Output:",df) image_test() print("Data processing completed!") -
Configure the node. On the right side of the node editing page, click Debugging Configurations and set the following parameters.
Parameter Description Computing Resource Select the MaxCompute computing resource you attached. Resource Group Select the Serverless resource group you attached. Image Select dataworks_pyodps_py311_task_pod:prod_20241210. -
In the toolbar at the top of the node editing page, click the
icon to run the node.