Configure an ACR Enterprise Edition instance to automatically build and push container images whenever you commit code to a connected repository. After setup, every code change triggers a build and push to your image repository.
Prerequisites
Before you begin, ensure that:
You have created a Container Registry Enterprise Edition instance. For more information, see the "Step 1: Create a Container Registry Enterprise Edition instance" section of the Push an image to a Container Registry Enterprise Edition instance and pull an image from the instance topic.
You have a Dockerfile in your source repository for building images.
Background information
The ACR Enterprise Edition image build service provides the following capabilities:
Security: Each build task runs in an environment exclusive to your Alibaba Cloud account, ensuring strong isolation between tenants.
Stability: Build tasks run in your dedicated environment, so build times remain consistent across multiple builds from the same source code repository.
Intelligent acceleration:
ACR uses BuildKit by default, which has robust capabilities for multi-stage build scenarios and supports rich build features.
ACR hosts common base images locally, so builds do not need to pull them from external sources, reducing build time.
ACR uses remote caches to further accelerate image building.
Supported code hosting platforms
The following table lists the code hosting platforms supported by Container Registry Enterprise Edition:
ACR supports the following code hosting platforms:
Code hosting platform
Version
Authentication method for binding
Limit on triggering image builds
Gitee
All versions
Gitee OAuth authentication
None
GitHub
GitHub developer version
GitHub OAuth authentication
None
GitLab
All versions
Personal access token
None
Bitbucket
All versions
Gitee OAuth authentication
None
NotePersonal Edition instances cannot be bound to Gitee.
Accelerated image generation: After you push a container image, ACR can automatically generate an accelerated version of it. For more information, see Load resources of a container image on demand.
Step 1: Bind your instance to a code hosting platform
Bind the instance to a code hosting platform so that ACR can access your source code and trigger builds when code changes. For detailed instructions, see Bind a source code hosting platform.
You cannot build images from an on-premises code repository.
To bind a private GitLab code repository in a virtual private cloud (VPC), see Build a container image in a VPC.
Step 2: Create a namespace
Create a namespace to organize your image repositories. Enabling automatic repository creation lets you configure default settings applied to all repositories under this namespace.
Log on to the Container Registry console.
In the top navigation bar, select a region.
In the left-side navigation pane, click Instances.
On the Instances page, click the Enterprise Edition instance for which you want to create a namespace.
In the left-side navigation pane, choose Repository > Namespace.
On the Namespace page, click Create Namespace.
In the Create Namespace sidebar, configure Namespace and set Automatically Create Repository to On or Off. Then click Confirm.
If you set Automatically Create Repository to On, configure the following parameters:
Parameter
Description
Repository Type
Select Public or Private. Public: By default, public images require users to log on to the instance before they can be pulled. To allow anonymous pulls, enable the instance's public anonymous pull setting. Because public repositories can be pulled by unauthorized users, set repositories to Private to protect your data.Private: Users must log on to the instance and have Pull permission authorization before they can pull private images.
Immutable Image Tags
Select Flexible or Immutable. When set to Immutable, all image tags except latest cannot be overwritten.
Accelerated Images
When enabled, an accelerated version of each image is automatically generated after the image is pushed. The accelerated image has an _accelerated suffix appended to its tag.
Step 3: Create an image repository
Accelerated images can only be built on Container Registry Standard Edition or Advanced Edition instances. Upgrade Basic Edition instances to Standard Edition or Advanced Edition before building accelerated images.
Create an image repository and bind it to a source code repository. All images built from that source code repository are pushed to this image repository.
Log on to the Container Registry console.
In the top navigation bar, select a region.
In the left-side navigation pane, click Instances.
On the Instances page, click the Enterprise Edition instance you want to manage.
In the left-side navigation pane, choose Repository > Repositories.
On the Repositories page, click Create Repository.
In the Repository Info step, configure Namespace, Repository Name, Repository Type, Tags, Accelerated Image, Summary, and Description. Then click Next.
In the Code Source step, configure Code Source, Build Settings, and Build Rules, and then click Create Repository.
The following table describes the Build Settings parameters:
Parameter
Description
Automatically Build Images When Code Changes
When enabled, the build rule is automatically triggered when code is committed to a branch.
Build With Servers Deployed Outside Chinese Mainland
Enable this if your code source is on GitHub or Bitbucket, or if your Dockerfile downloads dependencies from outside China and the cross-border network connection is unstable. ACR uses an accelerated link to pull external data sources during the build. This option is available only in specific regions. If the option is not displayed when you create an image repository, the current region does not support this feature.
Build Without Cache
When enabled, ACR pulls the base image from the source each time, ignoring cached layers. This may slow down builds. Disable this option to use cached layers and accelerate builds.
On the Repositories page, click the created image repository. If Build is displayed in the left-side navigation pane of the repository management page, the image repository is bound to the source code repository.
Step 4: Build an image
Configure build rules to define how and when ACR builds images from your repository, then trigger a build and verify the result.
If you cannot find Build in the repository management page, the instance is not bound to the code hosting platform. Return to Step 1 to rebind the instance.
Log on to the Container Registry console.
In the top navigation bar, select a region.
In the left-side navigation pane, click Instances.
On the Instances page, click the Enterprise Edition instance you want to manage.
-
In the left-side navigation pane of the instance details page, choose .
On the Repositories page, find the image repository you created and click Manage in the Actions column.
In the left-side navigation pane, click Build. In the Build Rules section, click Add Build Rule. In the Build Information step, configure the following parameters and then click Next.
Parameter
Description
Type
The type of the source code repository. Valid values: Branch and Tag.
Branch/Tag
Select or enter a branch or tag. Regular expressions are supported. For example, if you enter release-(?<imageTag>\w*) , ACR automatically builds an image when source code in the release-v1 branch is updated. For more information on named capturing groups, see Use regular expressions in named capturing groups .
NoteWhen you use a regular expression, only ACR can trigger builds. Manual builds are not supported.
Build Context Directory
The directory containing the Dockerfile, relative to the branch or tag root. For example, if the branch is master and the Dockerfile sits at the branch root, set this to /.
Dockerfile Filename
The name of the Dockerfile. The default name is Dockerfile.
In the Tag step, configure the following parameters, click Save, and then click Next.
NoteClick Add Configuration to add image tags. You can add up to three image tags.
Parameter
Description
Image Tag
The tag for the built image, for example latest. Named capturing groups are supported. If you defined a named capturing group in Branch/Tag, reference the captured value here.
Build Time
(Optional) The time (UTC+8) at which source code is pushed. Accepted formats: 20201015 or 202010151613 .
NoteIf you set this parameter, only ACR can trigger builds. Manual builds are not supported.
Commit ID
(Optional) The number of characters to use from the commit ID of the most recently pushed code. By default, the first six characters are used. Adjust the slider to change the number.
NoteIf you set this parameter, only ACR can trigger builds. Manual builds are not supported.
In the Build Configurations step, configure the following parameters and then click Next.
Parameter
Description
Build Architecture
Select one or more target architectures. If you select multiple architectures, ACR generates a separate image for each architecture under the same tag.
Build Parameters
Key-value pairs passed to the build process. Parameter names are case-sensitive. Configure up to 20 build parameters by clicking Add Configuration.
Trigger a build using one of the following methods:
In the Build Rules section of the Build page, find the build rule and click Build in the Actions column.
Push a code commit to the configured branch of the source code repository to trigger the build rule automatically.
Monitor the build: In the Build Log section, find the image build task and click Log in the Actions column to view the build log. To stop a running build, click Cancel in the Actions column.
Verify the result: In the left-side navigation pane, click Image Tag. If the image you built is listed, the build succeeded.
In the left-side navigation pane, click Image Tag. If the image that you created is displayed, the image is built.
Examples
The following two examples illustrate common build rule configurations. Example 1 is a simple setup that supports both manual and automatic builds. Example 2 uses a regular expression to create versioned image tags from release branch names, and supports automatic builds only.
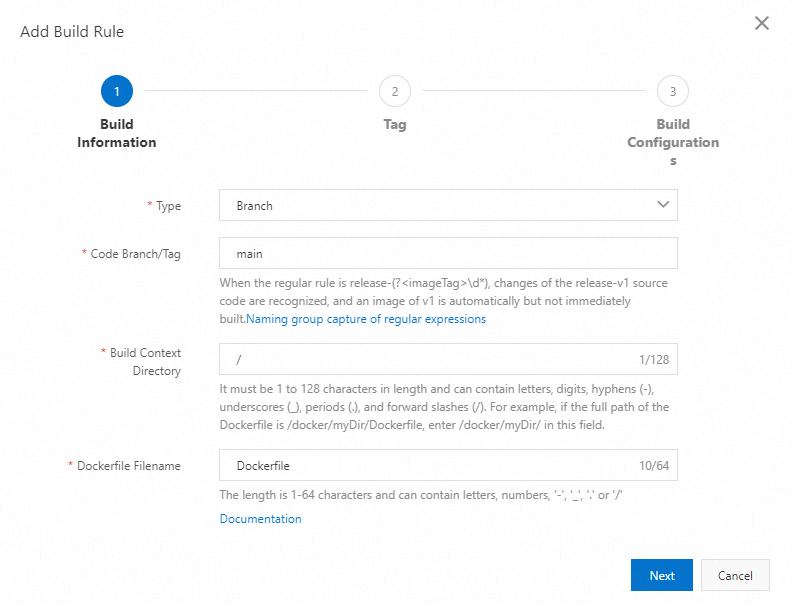
Example 1: Build from the main branch (manual builds allowed)
Goal: Build an image tagged latest from the main branch, triggerable manually or automatically on code push.
Parameter | Value |
Type | Branch |
Branch/Tag | main |
Build Context Directory | / |
Dockerfile Filename | Dockerfile |
Image Tag | latest |
Result: When you click Build or when source code in the main branch is updated, ACR builds the image using the Dockerfile in the root directory of the main branch. The built image is tagged latest.
Because Build Time and Commit ID are not configured, you can trigger builds manually.
Example 2: Build from a regex-matched branch (manual builds not allowed)
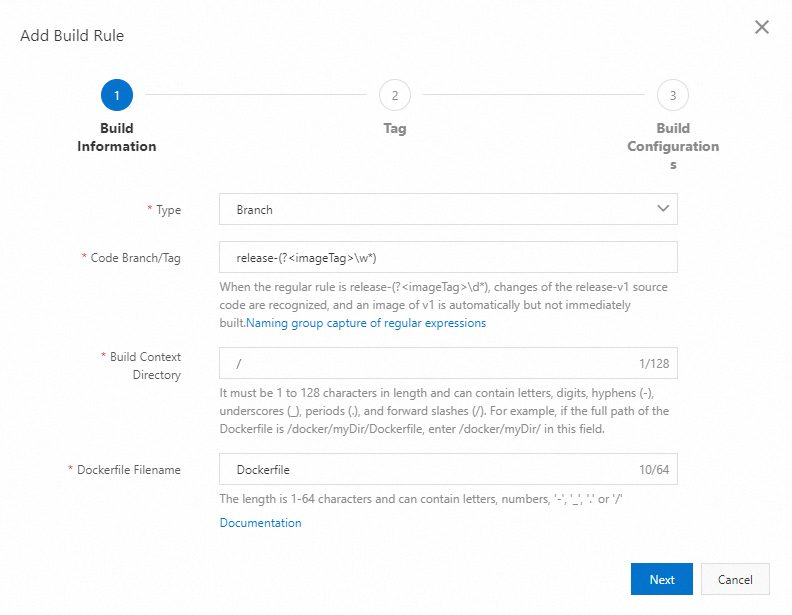
Goal: Automatically build versioned images from release branches, where the branch name determines the image tag.
Parameter | Value |
Type | Branch |
Branch/Tag | release-(?<imageTag>\w*) |
Build Context Directory | / |
Dockerfile Filename | Dockerfile |
Image Tag | ${imageTag} |
Build Time | yyyyMMddHHmm |
Commit ID | 30 |
Result: When source code in a branch whose name starts with release- is updated, ACR automatically builds an image. The regular expression release-(?<imageTag>\w*) captures the version portion of the branch name and assigns it to the imageTag variable, which is then used in the image tag.
For example, a push to the release-v1 branch captures v1 as imageTag. Combined with the build time and commit ID, the resulting image tag is: v1-202010151625-d4ef3dc3b77a011a5779eec7efdd45.
Because Build Time and Commit ID are configured, only ACR can trigger this build. Manual builds are not supported.
What to do next
After the image is built, use it in Container Service for Kubernetes (ACK) clusters in any of the following ways:
Pull images without secrets: Use the aliyun-acr-credential-helper add-on to authenticate automatically. For more information, see Use the aliyun-acr-credential-helper component to pull images without using a Secret.
Deploy the image as an application: Create a Deployment to run your image in an ACK cluster. For more information, see Create a stateless application by using a Deployment.
Accelerate image pulling: Use the P2P acceleration feature to speed up image distribution across nodes. For more information, see Use the P2P acceleration feature in ACK Serverless and ACK clusters.