Data Integration allows you to perform full and incremental synchronization of entire databases from sources such as ApsaraDB for OceanBase, MySQL, Oracle, and PolarDB to MaxCompute. This process combines an initial full data migration with ongoing real-time synchronization of incremental data. The incremental data is then merged into the destination daily (T+1). This topic uses a MySQL to MaxCompute example to demonstrate how to create a full and incremental synchronization task.
How it works
A full and incremental synchronization task uses a unified process to perform an initial full load of historical data and then continuously synchronizes incremental data. After the task starts, the system automatically creates and coordinates offline and real-time subtasks to merge the data into a destination table, called the base table.
The core process consists of three phases:
-
Initial full load: When the task starts, a batch synchronization task runs first. It migrates the table structures and historical data from all tables in the source database to the destination base table in MaxCompute. After the initial full load is complete, this batch synchronization task is suspended.
-
Incremental data synchronization: After the full migration, the system starts a real-time synchronization task. This task continuously captures incremental data changes (Insert, Update, and Delete operations) from the source database, for example, from the MySQL binary log (binlog). It then writes these changes to a temporary log table in MaxCompute in near real-time.
-
Periodic merge: The system automatically runs a Merge task every day (T+1). This task merges the incremental data accumulated in the log table from the previous day (T) with the full data in the base table. This process generates the latest full snapshot of the data for day T and writes it to a new partition in the base table. The merge task runs once per day.
The following diagram illustrates the data flow when writing to a partitioned table:

This task has the following features:
-
Many-to-many or many-to-one table mapping: You can synchronize multiple source tables to their corresponding destination tables. You can also merge data from multiple source tables into a single destination table using mapping rules.
-
Task composition: A full and incremental synchronization task consists of a batch synchronization subtask for the initial full load, a real-time synchronization subtask for incremental data, and a Merge task for data consolidation.
-
Destination table support: You can write data to both partitioned and non-partitioned tables in MaxCompute.
Limitations
-
Resource requirements: The task requires a Serverless resource group. For instance-based synchronization, the minimum resource specification is an 8-core, 16 GB exclusive resource group for Data Integration and 2 CUs for the Serverless resource group.
-
Network connectivity: Ensure network connectivity between the Data Integration resource group and both the source (for example, MySQL) and destination (for example, MaxCompute) data sources. For more information, see Network connectivity solutions.
-
Region restrictions: Synchronization is supported only to a user-created MaxCompute data source that is in the same Region as the current DataWorks workspace. When you use a user-created MaxCompute data source, you must still bind a MaxCompute compute resource in the Data Development section of your DataWorks workspace. Otherwise, you cannot create MaxCompute SQL nodes, and the creation of the full synchronization 'done' node will fail.
-
Scheduling resource group restrictions: The task uses the configured Serverless resource group as the scheduling resource group.
-
Destination table type restrictions: You cannot synchronize data to a MaxCompute external table.
Important
-
Primary key requirement: Tables without a primary key cannot be synchronized. For tables that do not have a primary key, you must manually specify one or more columns as a business primary key using the Specify Primary Key option during configuration.
-
Data visibility delay: After you configure a full and incremental synchronization task to MaxCompute, only the historical data is available for query on the same day. Incremental data becomes queryable in MaxCompute only after the Merge task completes on the following day. For more information, see the periodic merge description in the How it works section.
-
Storage and lifecycle: The full and incremental synchronization task creates a new full partition daily. To prevent excessive storage consumption, the MaxCompute tables that the synchronization task automatically creates have a default lifecycle of 30 days. If this duration does not meet your business requirements, you can modify the lifecycle by clicking the corresponding MaxCompute table name during task configuration. For more information, see Edit the destination table structure (optional).
-
SLA: Data Integration uses the MaxCompute data channel for data uploads and downloads. For more information about the service-level agreement (SLA) of the synchronization data channel, see Scenarios and tools for Data Transfer Service (Upload). Evaluate your technical choices based on the SLA of the MaxCompute data channel.
-
Binlog retention policy: Real-time synchronization depends on the binary log (binlog) of the source MySQL database. Ensure that the binlog retention period is sufficient to prevent synchronization failures. If a task is paused for a long time or retries after a failure, it may fail to locate its starting position if the required binlog has been purged.
Billing
-
A full and incremental synchronization task includes a batch synchronization task for the full load phase, a real-time synchronization task for the incremental phase, and a periodic task for the periodic merge phase. These three tasks are billed separately. All three phases consume CUs from a resource group. For more information about billing, see Billing of Serverless resource groups. The periodic task also incurs scheduling fees. For more information, see Scheduling instance fees.
-
In addition, the synchronization process to MaxCompute requires periodic merging of full and incremental data, which consumes MaxCompute compute resources. These charges are billed directly by MaxCompute and are proportional to the size of the full dataset and the merge frequency. For more information, see Billing items and pricing.
Procedure
Step 1: Select the synchronization task type
Go to the Data Integration page.
Log on to the DataWorks console. In the top navigation bar, select the desired region. In the left-side navigation pane, choose . On the page that appears, select the desired workspace from the drop-down list and click Go to Data Integration.
-
In the left-side navigation pane, click Synchronization Task. At the top of the page, click Create Synchronization Task and configure the following parameters:
-
Source Type:
MySQL. -
Destination Type:
MaxCompute. -
Specific Type:
Full and Incremental for Entire Database. -
Sync Procedure: Schema Migration, Incremental Sync, Full Synchronization, and Periodic Merge.
-
Step 2: Configure data sources and resource groups
-
For Source Information, select a
MySQLdata source. For Destination, select aMaxComputedata source. -
In the Running Resources section, select the Resource Group for the synchronization task and allocate Resource Group for the CU. You can set CUs separately for full and incremental synchronization to control resources precisely and prevent waste.
NoteDataWorks submits batch synchronization tasks to a Data Integration execution resource group via a scheduling resource group. Consequently, the offline task consumes resources from both the execution resource group and the scheduling resource group, with the latter incurring scheduling fees.
-
Ensure that both the source and destination data sources pass the Connectivity Check check.
Step 3: Select source tables
In the Source Table area, select the tables to sync from the source data source. Click the ![]() icon to move the tables to the Selected Tables list.
icon to move the tables to the Selected Tables list.
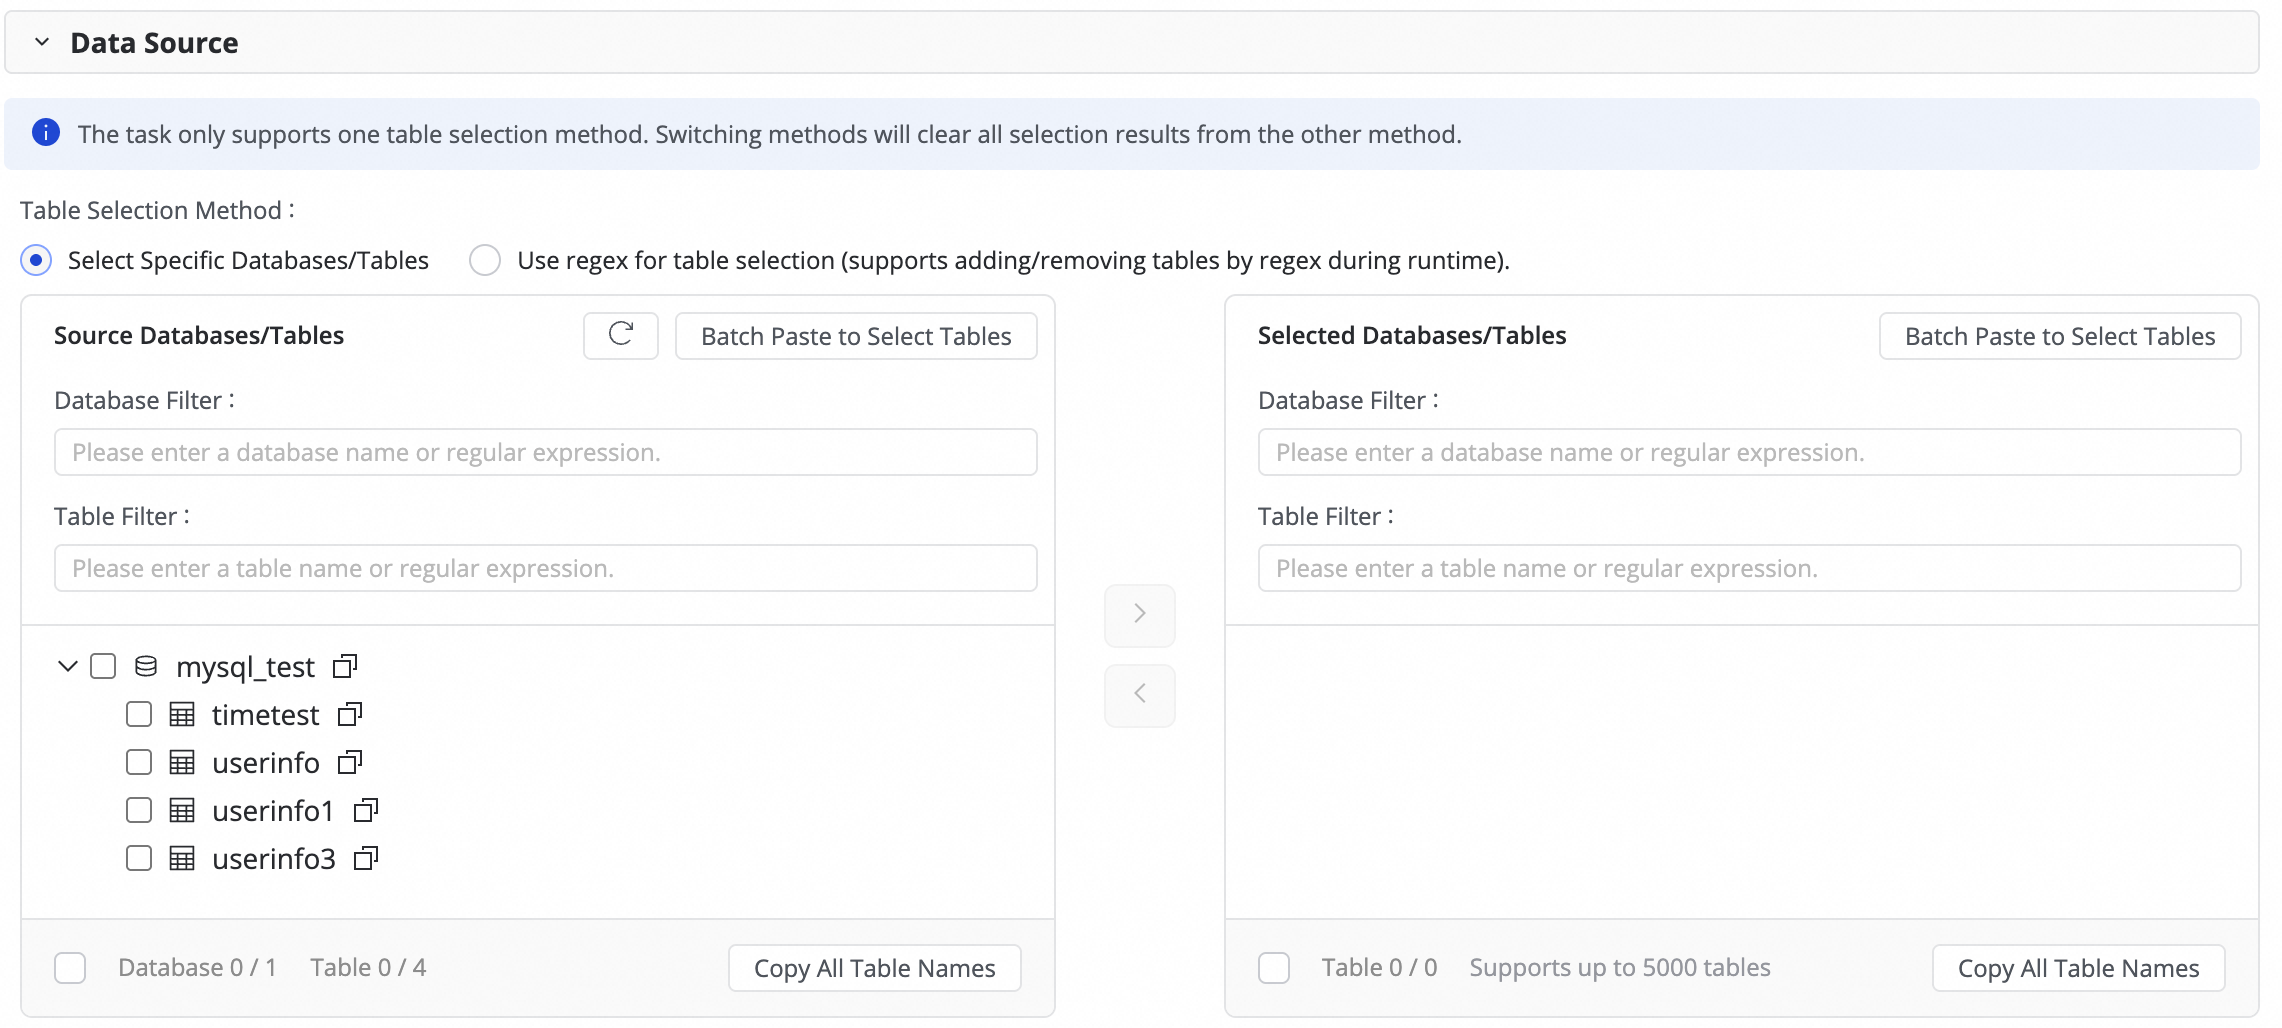
If you have a large number of tables, you can use Database Filtering, Search for Tables, or configure a regular expression to select the required tables.
Step 4: Configure task settings
-
Log table time range: This parameter defines the time range for querying data from the log table to merge into the destination partition.
To prevent cross-day partitioning errors caused by data latency, extend this range slightly. This ensures that all data for the partition is correctly merged.
-
Merge task scheduling: Set the schedule for the daily Merge task. For more information about how to configure scheduling, see Scheduling configuration.
-
Periodic scheduling parameters: Set scheduling parameters that can be used later to assign values to partitions. This allows you to create partitions automatically based on date.
-
Table partition settings: Configure partitions for the destination table. You can set key parameters such as the partition column name and value assignment method. For the assignment column, you can use scheduling parameters to automatically generate partitions based on date.
Step 5: Configure destination table mapping
In this step, you define the mapping rules between source and destination tables. You also specify rules for primary keys, dynamic partitions, and DDL/DML configurations to determine how data is written.
|
Actions |
Description |
||||||||||||
|
Refresh |
The system automatically lists the source tables you selected. However, you must refresh the mapping for the destination table properties to take effect.
|
||||||||||||
|
Customize Mapping Rules for Destination Table Names (Optional) |
The system has a default table naming rule:
This feature supports the following scenarios:
|
||||||||||||
|
Edit Mapping of Field Data Types (Optional) |
The system provides a default mapping between source and destination field data types. You can click Edit Mapping of Field Data Types in the upper-right corner of the table to customize the mapping. After configuration, click Apply and Refresh Mapping. When you edit the data type mapping, ensure that the conversion rules are correct. An incorrect rule can cause type conversion failures, generate dirty data, and disrupt task execution. |
||||||||||||
|
Edit Destination Table Structure (Optional) |
The system automatically creates a destination table if it does not exist, or uses an existing table with the same name, based on your custom table name mapping rules. DataWorks automatically generates the destination table structure based on the source table structure. In most cases, no manual intervention is required. You can also modify the table structure in the following ways:
For existing tables, you can only add fields. For new tables, you can add fields, partition fields, and set table types or properties. For more information, see the editable sections in the UI. |
||||||||||||
|
Value assignment |
Native fields are automatically mapped based on matching field names between the source and destination tables. You must manually assign values to any new fields that you added in the previous step. To do this:
You can assign constants or variables. Switch the type in the Value Type dropdown list. The following methods are supported:
|
||||||||||||
|
Source Split PK |
From the Source Split PK dropdown list, you can select a field from the source table or select Not Split. When the synchronization task runs, the task splits into multiple subtasks based on this field to read data concurrently. Use a field with evenly distributed data, such as a primary key, as the split column. String, float, and date types are not supported. Currently, the Source Split PK feature is supported only when the source is MySQL. |
||||||||||||
|
Execute Full Synchronization |
If you have configured full data synchronization in step 3, you can clear this option to skip the full data synchronization for a specific table. This is useful if you have already synchronized the full dataset to the destination using another method. |
||||||||||||
|
Full condition |
Apply a filter condition to the source during the full load phase. Enter only the WHERE clause content, without the |
||||||||||||
|
Configure DML Rule |
Use DML message processing to filter and control the captured data changes ( |
||||||||||||
|
Full Data Merge Cycle |
Currently, only daily merging is supported. You can configure the specific scheduling time for the merge task in the Custom merge time setting. |
||||||||||||
|
Merge Primary Key |
You can define a primary key by selecting one or more columns from the table.
|
 icon and combining options from Manual Input and Built-in Variable. The variables include the source data source name, source database name, and source table name.


 icon in the Destination Table Name column to add a field.
Step 6: Configure advanced settings
Advanced parameter configuration
To fine-tune the task and meet custom synchronization needs, go to the Advanced Parameters tab to modify advanced parameters.
-
In the upper-right corner of the page, click Advanced configuration to go to the advanced parameter configuration page.
-
Modify the parameter values based on the tooltips. The explanation for each parameter is displayed next to its name.
-
You can also use AI-powered configuration. Enter a command in natural language, such as adjusting the task concurrency, and an AI model generates recommended parameter values. You can then choose whether to accept the AI-generated parameters.
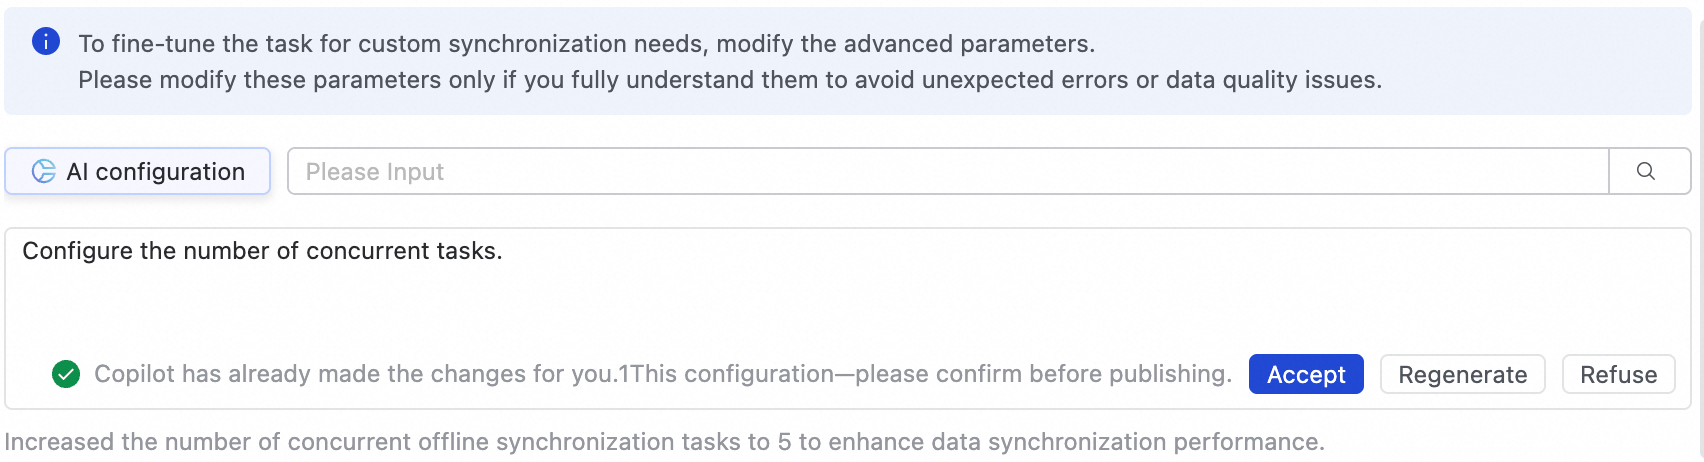
Modify these parameters only if you fully understand their purpose. Incorrect changes can lead to unexpected issues such as task delays, excessive resource consumption that blocks other tasks, or data loss.
DDL capability configuration
Some real-time synchronization pipelines can detect metadata changes in the source table structure and notify the destination. The destination can then update accordingly or take other actions, such as sending an alert, ignoring the change, or terminating the task.
In the upper-right corner of the page, click Configure DDL Capability to set a handling policy for each type of change. The supported policies vary depending on the channel.
-
Normal: The destination processes the DDL change from the source.
-
Ignore: The change message is ignored, and the destination is not modified.
-
Error: The real-time synchronization task for the entire database is terminated, and its status is set to Error.
-
Alert: An alert is sent to the user when this type of change occurs at the source. You must configure a DDL notification rule in the Configure Alert Rule settings.
When a new column is added at the source and also created at the destination through DDL synchronization, the system does not backfill data for existing rows in the destination table.
Step 7: Run the synchronization task
-
After the configuration of the synchronization task is complete, click Complete in the lower part of the page.
-
In the Synchronization Task section of the Data Integration page, find the created synchronization task and click Deploy in the Operation column. If you select Start immediately after deployment, the task will run immediately after you click Confirm; otherwise, you need to start it manually.
NoteData Integration tasks must be deployed to the production environment to run, so any newly created or edited tasks will only take effect after being deployment.
-
Click the Name/ID of the synchronization task in the Tasks section and view the detailed running process of the synchronization task.
Next steps
After you configure the task, you can manage it, add or remove tables, configure monitoring and alerts, and view key operational metrics. For more information, see O&M for full and incremental synchronization tasks.
FAQ
Q: Why is the data in the base table not updated as expected?
A: This can happen for several reasons. See the table below for common causes and solutions.

|
Symptom |
Cause |
Solution |
|
The data output check for the T-1 partition of the incremental log table failed. |
The failure of the real-time synchronization task prevented data from being generated for the T-1 partition of the incremental log table. |
|
|
The data output check for the T-2 partition of the destination base table fails. |
|
|