A branch node is a control flow node in Data Studio. You can use it to define branch logic and direct the execution of downstream nodes based on different conditions.
Usage notes
-
To use the branch node feature, you must purchase DataWorks Standard Edition or higher. For more information, see DataWorks edition comparison.
-
A branch node can have a maximum of 50 branches.
-
A branch node is typically used with an assignment node. For more information, see Assignment node.
-
If a branch condition is not met at runtime, the downstream nodes of that branch enter the dry run state. The runtime log displays a message similar to
It's set condition-skip by task.
Create a branch node
Log on to the DataWorks console. In the target region, click in the left-side navigation pane. Select a workspace from the drop-down list and click Go to Data Development.
-
Hover over the
 icon and choose .
Alternatively, you can open the target workflow, right-click a blank area, and choose .
-
In the Create Node dialog box, enter a node name and select a path.
- Click Confirm.
-
Define the branch logic.
-
On the Definition page, click Add Branch.
-
In the Branch Definition dialog box, configure the parameters.
Parameter
Description
Condition
Specifies the condition for the branch. Keep in mind the following rules:
-
You can only use Python comparison operators to define the logical condition.
-
If the expression evaluates to true at runtime, the corresponding branch condition is met.
-
If an error occurs while parsing the expression at runtime, the entire branch node fails.
-
You can use global variables and parameters defined in the node context in branch conditions. For example, ${input} can be an input parameter defined on the branch node.
Associated Node Output
Defines the output used by downstream nodes for dependencies:
-
Downstream nodes use this output to establish dependencies.
-
When a branch condition is met, downstream nodes that depend on the associated output run, provided their other upstream dependencies are also met.
-
If a branch condition is not met, the downstream nodes that depend on the corresponding output do not run. DataWorks sets these nodes to the
Not run because the branch condition is not metstate.
Description
Enter a brief description of the branch. For example, you can define two branches with the conditions ${input}==1 and ${input}>2.
The following example shows how to configure the Associated Node Output parameter.
For example, a branch node has two downstream nodes named qqqq and wwww. When the branch condition is 1, the logic of the qqqq node runs. When the branch condition is 2, the logic of the wwww node runs. When you configure the branch node, you can set the node outputs as required. For example, if the output for Branch 1 is 1234 and the output for Branch 2 is 2324, both are used as output names for this branch node. The downstream qqqq node must reference the output name 1234, and the wwww node must reference the output name 2324.
-
-
Click OK.
After you add a branch, you can Edit or Delete it.
-
Click Edit to modify the branch settings. DataWorks updates the related dependencies accordingly.
-
Click Delete to remove the branch. DataWorks also updates the related dependencies.
-
-
-
In the right-side pane, click Scheduling Settings to configure the scheduling properties for the node.
After you define the branch conditions, DataWorks automatically adds the output names to the Output Name of Current Node section on the tab. Downstream nodes can use these output names to declare dependencies.
Note-
Because the dry run property propagates to downstream nodes, do not place self-dependent tasks on a branch path. For more information about whether to inherit the dry run property from an upstream node, see Inherit the dry run property from upstream nodes.
-
If you create a dependency by drawing a line to establish a node context and the output name does not appear in Scheduling Settings, you must manually enter the output name.
-
-
Commit and deploy the node.
-
Click the
 icon on the toolbar to save the node.
 -
Click the
 icon on the toolbar to commit the node.
 -
In the Submission dialog box, enter a Change Description.
-
Click OK.
If you use a workspace in standard mode, you must deploy the task to the production environment after you commit it. Click Deploy Task in the upper-left corner of the top menu bar. For more information, see Deploy tasks.
-
-
View scheduled tasks.
-
In the upper-right corner of the editor, click O&M Personnel to open the production environment's Operation Center.
-
View the scheduled tasks that are running. For more information, see Manage scheduled tasks.
To view more details about scheduled tasks, click Operation Center in the top menu bar. For more information, see Operation Center overview.
-
Example: Downstream node dependency
When a downstream node depends on a branch node, you can select a specific output from the branch node to control when the downstream node runs. For example, in the workflow shown in the following figure, Branch 1 and Branch 2 are two downstream nodes of the branch node.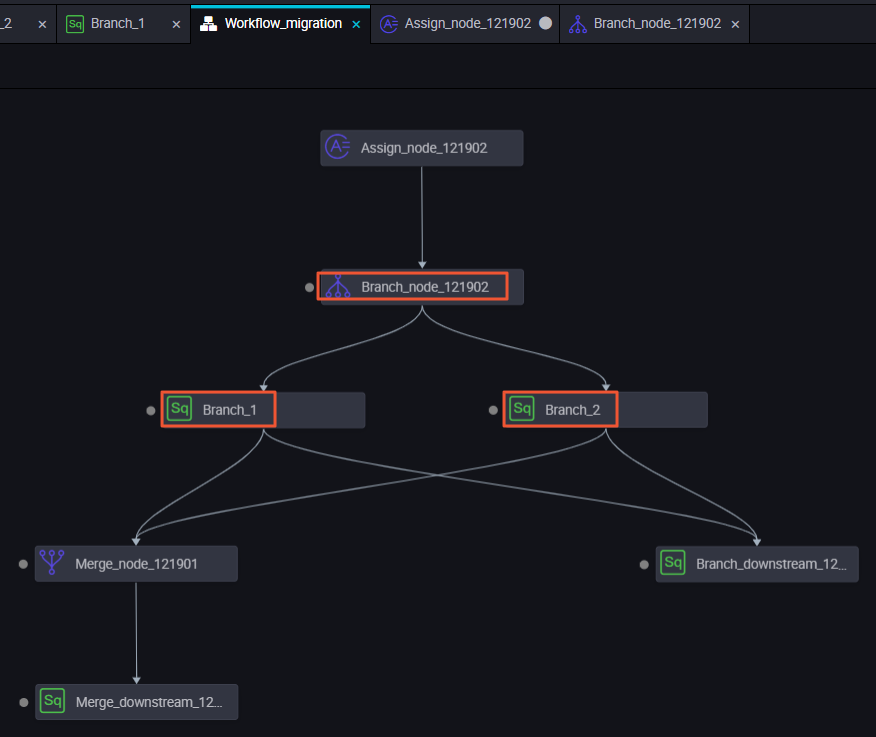
Branch 1: Depends on the autotest.fenzhi121902_1 output. In the Scheduling Dependency panel for the Branch 1 node, the Output Name of Parent Node for the upstream node is set to autotest.fenzhi121902_1. The corresponding node name is branch node 121902, and the source is Manually Added.
Branch 2: Depends on the autotest.fenzhi121902_2 output.
After you submit the workflow to Operation Center, assume the condition for the branch that depends on autotest.fenzhi121902_1 is met. The log shows the following:
-
In the Operational Logs, you can view the status of the downstream node that ran because its branch condition was met.
-
In the Operational Logs, you can see that the downstream node for the unmet branch condition is skipped, with a status of
It's set condition-skip by task. For a skipped node like Branch 2, its runtime log shows a yellow message:It's set condition-skip by task(9760933771-branch node 121902). This message indicates the branch node skipped the node's execution, and its runtime duration is 0s.
Supported Python comparison operators
The following examples assume that variable a is 10 and variable b is 20.
|
Operator |
Description |
Example |
|
== |
Equal to: Checks whether two objects are equal. |
(a == b) returns false. |
|
!= |
Not equal to: Checks whether two objects are not equal. |
(a != b) returns true. |
|
<> |
Not equal to: Checks whether two objects are not equal. |
(a <> b) returns true. This operator is similar to !=. |
|
> |
Greater than: Checks whether x is greater than y. |
(a > b) returns false. |
|
< |
Less than: Checks whether x is less than y. |
(a < b) returns true. |
|
>= |
Greater than or equal to: Checks whether x is greater than or equal to y. |
(a >= b) returns false. |
|
<= |
Less than or equal to: Checks whether x is less than or equal to y. |
(a <= b) returns true. |