Branch nodes are a type of logical control node in Data Studio. A branch node can define the branch logic and the direction of branches under different logical conditions.
Node introduction
Branch nodes can use Python comparison operators to evaluate the output parameters obtained from ancestor nodes and generate multiple branch nodes. In this case, the descendant nodes can be run in different conditions based on the parameter results of ancestor nodes.
Prerequisites
The RAM user that you want to use is added to your workspace.
If you want to use a RAM user to develop tasks, you must add the RAM user to your workspace as a member and assign the Develop or Workspace Administrator role to the RAM user. The Workspace Administrator role has more permissions than necessary. Exercise caution when you assign the Workspace Administrator role. For more information about how to add a member and assign roles to the member, see Add workspace members and assign roles to them.
A serverless resource group is associated with your workspace. For more information, see the topics in the Use serverless resource groups directory.
A branch node is created before you develop a task on the branch node. For more information, see Create a task node.
Precautions
Only DataWorks Standard Edition and a more advanced edition support branch nodes. For information about DataWorks editions, see Differences among DataWorks editions.
A maximum of 50 branches can be attached to a branch node.
In most cases, branch nodes need to be used together with assignment nodes.
If descendant nodes of a branch node do not meet specific conditions, the descendant nodes are dry run, and the message
It's set condition-skip by taskis displayed.
Step 1: Use a branch node to develop a task
Go to the configuration tab of the branch node. In the Definition section of the configuration tab, customize the branch logic.
In the Definition section, click Add Branch.
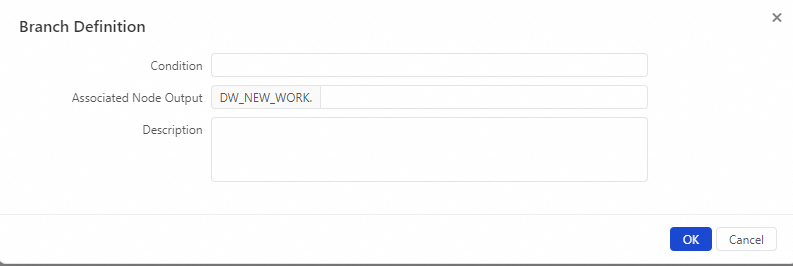
In the Branch Definition dialog box, configure the parameters.
Parameter
Description
Condition
The following information describes the branch conditions:
You can use only Python comparison operators to define logical conditions for the branch node.
If the result of the expression is true when the node is running, the corresponding branch condition is met.
If the expression fails to be parsed when the node is running, the whole branch node fails.
To define branch conditions, you can use global variables and the parameters that are defined in the node context. For example, the
${input}variable can be used as an input parameter of the branch node.
Associated Node Output
The following information describes the associated node output:
The node output is used to configure dependencies between the child nodes and the branch node.
If the branch condition is met, the child node that depends on the node output is run. If the child node also depends on the output of other nodes, the status of these nodes also matters.
If the branch condition is not met, the child node that depends on the node output is not run. The child node is set to the
Not Runningstate because the branch condition is not met.
Description
The description of the branch. For example, the branches ${input}==1 and ${input}>2 are defined.
Configure the descendant nodes of the branch node.
You can configure multiple types of child nodes for a branch node. In this example, MySQL nodes are configured as descendant nodes.
Create two MySQL nodes named
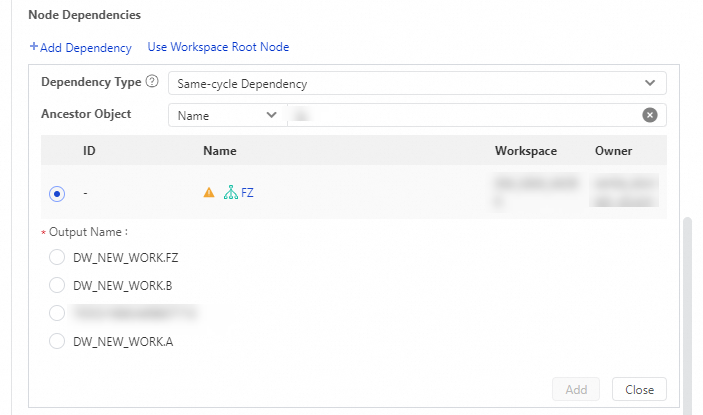
Branch 1andBranch 2and go to the configuration tab of the nodes.In the right-side navigation pane of the configuration tab of the MySQL node, click Properties. In the Scheduling Dependencies section of the Properties tab, click Add Dependency and select the branch node for Ancestor Object. Then, configure the Output Name parameter and click Add.
After you develop a branch node and its child nodes, configure scheduling properties for the nodes to enable the system to periodically schedule the nodes.
Step 2: Deploy the branch node and perform O&M operations
After the node code and scheduling settings are configured, deploy the nodes to the production environment. For more information, see Deploy nodes.
After the deployment is complete, go to the Auto Triggered Nodes page in Operation Center to view the deployed nodes and perform O&M operations on the nodes. The system periodically runs the nodes based on the scheduling settings that you configure. For more information, see Getting started with Operation Center.
Appendix: Supported Python comparison operators
For example, the value of Variable a is 10 and the value of Variable b is 20 in the following table.
Operator | Description | Example |
== | Equal: checks whether two objects are equal. | (a==b) returns false. |
!= | Not equal: checks whether two objects are not equal. | (a!=b) returns true. |
<> | Not equal: checks whether two objects are not equal. | (a<>b) returns true. This operator is similar to !=. |
> | Greater than: checks whether x is greater than y. | (a>b) returns false. |
< | Less than: checks whether x is less than y. The returned result is 1 or 0. 1 indicates true and 0 indicates false. The results 1 and 0 are equivalent to the special variables true and false. | (a<b) returns true. |
>= | Greater than or equal to: checks whether x is greater than or equal to y. | (a>=b) returns false. |
<= | Less than or equal to: checks whether x is less than or equal to y. | (a<=b) returns true. |