DataWorks DataStudio lets you add data push nodes to a workflow to deliver query results automatically to DingTalk, Lark, WeCom, Microsoft Teams, or Email on a schedule. This topic walks through five push methods using a sales order dataset as the example.
Choose a push method
Select the method that matches how your upstream nodes produce data.
| Method | When to use | Key node types | Notes |
|---|---|---|---|
| Simple data push | One SQL query feeds one push node | MySQL node → data push node | Baseline pattern; all other methods build on it |
| Combined data push | Multiple SQL queries feed one push node | Multiple MySQL nodes → one data push node | Each upstream node gets a distinct named input: inputs1, inputs2 |
| Script data push | Data needs transformation before pushing | MySQL node → assignment node → data push node | Assignment node transforms raw query output before passing it to the push node |
| Conditional data push | Push different content based on a threshold | MySQL node → branch node → MySQL nodes → data push nodes | Branch conditions reference SQL output as a two-dimensional array: ${inputs[0][0]} |
| MaxCompute data push | Query data from a MaxCompute data source | Assignment node (ODPS SQL) → data push node | ODPS SQL nodes cannot pass output parameters directly; always use an assignment node |
Placeholder syntax
In the Body field of each data push node, use placeholders that reference column values from the upstream node. The push node substitutes these placeholders with actual query results at runtime.
| Upstream node type | Syntax | Example |
|---|---|---|
| SQL query node (MySQL) — position-based | ${inputs[row][column]} | ${inputs[0][0]} — first row, first column |
| SQL query node (MySQL) — column name | Column name as returned by the SQL statement | total_amount, category, diff |
| Assignment node (Python or ODPS SQL) | Column name as returned by the assignment node | order_id, sales, pt |
| Combined push (multiple inputs) | Prefixed with input name: ${inputs1[row][column]}, ${inputs2[row][column]} | ${inputs1[0][0]} for the first upstream node |
Example — simple push:
Yesterday's total sales: ${inputs[0][0]}Example — combined push (two input sources):
Total sales (yesterday): ${inputs1[0][0]}
Category sales changes:
- ${inputs2[0][0]}: ${inputs2[0][1]}
- ${inputs2[1][0]}: ${inputs2[1][1]}
For full body configuration options, see Configure the push content.
Prerequisites
Before you begin, make sure you have:
DataWorks activated. See Purchase guide
A DataWorks workspace. See Create a workspace
An ApsaraDB RDS for MySQL instance created and a MySQL data source added to the workspace. See Data source management
A MaxCompute data source added to the workspace. See Associate a MaxCompute computing resource
A serverless resource group. Only serverless resource groups can run data push nodes. See Use serverless resource groups
This topic uses a MySQL data source and a MaxCompute data source as examples. Add different data source types based on your requirements.
Limits
Data size limits per destination:
| Destination | Limit |
|---|---|
| DingTalk | 20 KB per message |
| Lark | 20 KB per message; images must be less than 10 MB |
| WeCom | 20 messages per minute per chatbot |
| Microsoft Teams | 28 KB per message |
| One email body per data push task; follows the SMTP limits of your email service |
Regional availability:China (Hangzhou), China (Shanghai), China (Beijing), China (Shenzhen), China (Chengdu), China (Hong Kong), Singapore, Malaysia (Kuala Lumpur), US (Silicon Valley), US (Virginia), and Germany (Frankfurt). The data push feature is available only in the following regions: China (Hangzhou), China (Shanghai), China (Beijing), China (Shenzhen), China (Chengdu), China (Hong Kong), Singapore, Malaysia (Kuala Lumpur), US (Silicon Valley), US (Virginia), and Germany (Frankfurt).
Usage notes
Only serverless resource groups can run data push nodes. If this is your first time using a data push node, submit a ticket to upgrade your resource group.
`outputs` parameter: The key mechanism for passing data between nodes. Each upstream node exposes an
outputsparameter that becomes theinputsparameter of the next node.Array dimensions in branch node conditions: When the ancestor node is an SQL query node, reference its output as a two-dimensional array:
${inputs[0][0]}. When the ancestor node is a Python-based assignment node, use a one-dimensional array:${inputs[0]}.MaxCompute limitation: ODPS SQL nodes cannot use output parameters to send data to a push node. Use an assignment node (with ODPS SQL language) to query MaxCompute data and pass results via
outputs.
Prepare data
This section creates a test orders table and populates it with random order data. Skip this section if you already have a data source.
Create a workflow
Create nodes in the workflow
Double-click the DataPushDemo workflow. On the workflow canvas, click the ![]() icon to create the nodes listed below. Name nodes exactly as shown — these names are referenced throughout this topic.
icon to create the nodes listed below. Name nodes exactly as shown — these names are referenced throughout this topic.
| Push method | Node name | Node type | Purpose |
|---|---|---|---|
| Conditional | SalesAmountPreMonth | MySQL node | Queries total sales for the previous month; passes results to the branch node via outputs |
| Conditional | Condition | Branch node | Evaluates a threshold condition; routes compliant and non-compliant data to separate MySQL nodes |
| Conditional | CompliantData | MySQL node | Receives compliant data from the branch node; queries top-3 categories; passes results via outputs |
| Conditional | NonCompliantData | MySQL node | Receives non-compliant data from the branch node; queries bottom-3 categories; passes results via outputs |
| Conditional | Top3Categories | Data push node | Receives output from CompliantData; pushes compliant data to a destination |
| Conditional | Bottom3Categories | Data push node | Receives output from NonCompliantData; pushes non-compliant data to a destination |
| Script | SalesAmountPreWeek | MySQL node | Queries top-3 categories by sales for the previous week; passes results via outputs |
| Script | Top3CategoryList | Assignment node | Receives MySQL output; formats data as a message string; passes results via outputs |
| Script | Top3CategoriesPreWeek | Data push node | Receives output from Top3CategoryList; pushes data to a destination |
| Combined | SalesAmountPreDay | MySQL node | Queries total sales and day-over-day growth for yesterday (shared with the simple push method) |
| Combined | SalesGrowthPreDay | MySQL node | Queries sales growth by category for yesterday; passes results via outputs |
| Combined | CombinedPush | Data push node | Receives output from both MySQL nodes; pushes combined data to a destination |
| Simple | SalesAmountPreDay | MySQL node | Same node as above — reused for the simple push method |
| Simple | PushSalesAmountPreDay | Data push node | Receives output from SalesAmountPreDay; pushes total sales to a destination |
| MaxCompute | MaxComputeDataSync | Batch synchronization | Syncs MySQL orders data to MaxCompute |
| MaxCompute | MaxComputeDataQuery | Assignment node | Queries top-3 orders by sales from MaxCompute; passes results via outputs |
| MaxCompute | MaxComputeDataPush | Data push node | Receives output from MaxComputeDataQuery; pushes data to a destination |
Create a test table
In the DataStudio left-side navigation pane, click the
 icon. In the Ad Hoc Query pane, hover over the
  icon and choose Create > MySQL. Set Name to
 TableCreation.Create a test table named
orders:
CREATE TABLE orders (
    order_id INT NOT NULL AUTO_INCREMENT,
    category VARCHAR(100) NOT NULL, -- Product category
    sales DOUBLE NOT NULL,          -- Order sales amount
    datetime DATETIME NOT NULL,     -- Payment time
    PRIMARY KEY (order_id),
    INDEX (category)
);
Create a stored procedure
Create the following stored procedure in the MySQL client. It generates random order data for the previous two months.
DELIMITER $$

CREATE PROCEDURE InsertOrders(IN num_orders INT)
BEGIN
  DECLARE v_category VARCHAR(100);
  DECLARE v_sales DOUBLE;
  DECLARE v_datetime DATETIME;
  DECLARE v_category_list VARCHAR(255);
  DECLARE v_index INT;
  DECLARE i INT DEFAULT 0;

  -- Define comma-separated categories
  SET v_category_list = 'Electronics,Books,Home & Kitchen,Fashion,Toys,Baby,Computers,Electronics,Games,Garden,Clothing,Grocery,Health,Jewelry,Kids';
  SET v_index = ROUND((RAND() * (CHAR_LENGTH(v_category_list) - CHAR_LENGTH(REPLACE(v_category_list, ',', '')) + 1)));

  WHILE i < num_orders DO
    -- Pick a random category
    SET v_index = FLOOR(1 + (RAND() * (CHAR_LENGTH(v_category_list) - CHAR_LENGTH(REPLACE(v_category_list, ',', '')) + 1)));
    SET v_category = SUBSTRING_INDEX(SUBSTRING_INDEX(v_category_list, ',', v_index), ',', -1);

    -- Generate a random sales amount (1,000-30,000)
    SET v_sales = 1000 + FLOOR(RAND() * 29000);

    -- Generate a random date in the previous two months
    SET v_datetime = NOW() - INTERVAL FLOOR(RAND() * 61) DAY;

    INSERT INTO orders (category, sales, datetime) VALUES (v_category, v_sales, v_datetime);

    SET i = i + 1;
  END WHILE;
END$$

DELIMITER ;
Write test data
Call the stored procedure to insert 1,000 order records:
CALL InsertOrders(1000);Configure push flows
The following sections configure each push flow inside the DataPushDemo workflow.
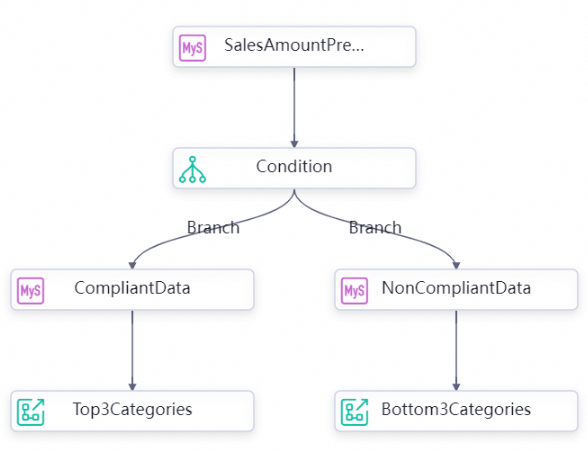
Conditional data push
In a conditional data push flow, a branch node evaluates a condition and routes data to different query nodes. Unlike the simple method, there are two separate push nodes — one for each branch outcome.
Step 1: Build the flow
On the DataPushDemo workflow canvas, connect nodes in this order:
SalesAmountPreMonth → Condition → CompliantData → Top3Categories
and
Condition → NonCompliantData → Bottom3Categories
Step 2: Configure the SQL query node
Double-click
SalesAmountPreMonth. Write the following query:
-- Query total sales for the previous month
SELECT SUM(sales) AS sales_amount
FROM orders
WHERE datetime BETWEEN DATE_FORMAT(CURRENT_DATE - INTERVAL 1 MONTH, '%Y-%m-01 00:00:00')
                    AND DATE_FORMAT(LAST_DAY(CURRENT_DATE - INTERVAL 1 MONTH), '%Y-%m-%d 23:59:59');
On the Properties tab, configure:
Scheduled time:
08:00Resource Group: Select a serverless resource group
Parent Nodes: Select Add Root Node
Output Parameters: In Input and Output Parameters, click Add assignment parameter next to Output Parameters to expose the
outputsparameter.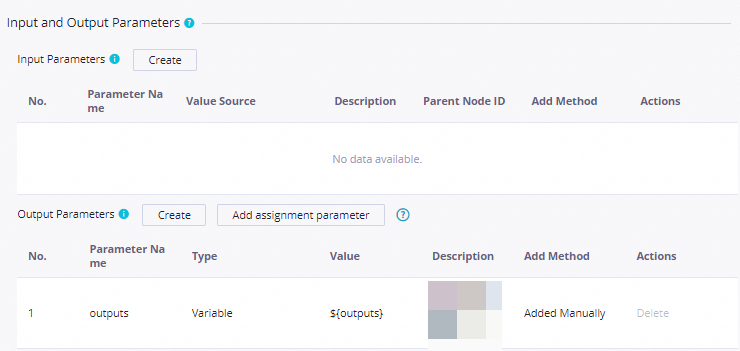
Step 3: Configure the branch node
Double-click
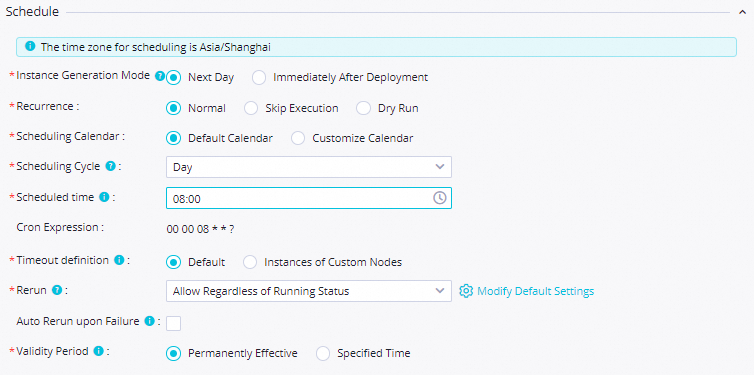
Condition. In the Definition section, click Add Branch and configure two branches:Parameter Compliant branch Non-compliant branch Condition ${inputs[0][0]}>=500000${inputs[0][0]}<500000Associated node output Compliant Non-compliant Description Sales meets threshold Sales below threshold On the Properties tab, configure:
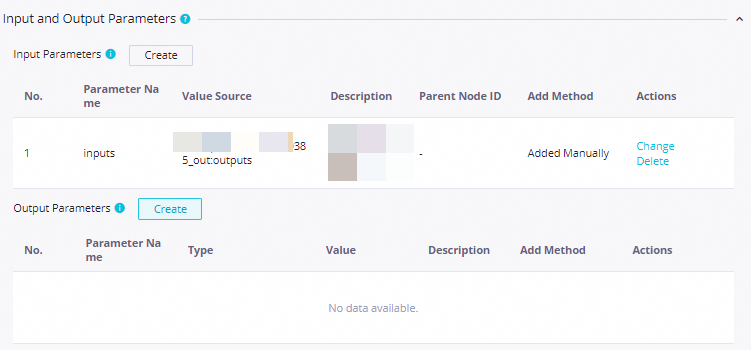
Setting Value Scheduling cycle Day Scheduled time 08:00Rerun Allow Regardless of Running Status Resource Group Select an existing resource group for scheduling Input Parameters Parameter Name: inputs; Value Source:outputsofSalesAmountPreMonthOutput Parameters Added automatically by the system Save the configuration by clicking the
 icon.
icon.
Step 4: Configure the child nodes
Both CompliantData and NonCompliantData are child nodes of the branch node. Each queries a subset of the data and exposes an outputs parameter for its downstream push node.
Double-click
CompliantDataand write the following query:
SET @all_cat_sales_volume_month := 0.0;
SELECT SUM(sales) INTO @all_cat_sales_volume_month
FROM orders
WHERE datetime BETWEEN DATE_FORMAT(CURRENT_DATE - INTERVAL 1 MONTH, '%Y-%m-01 00:00:00')
                    AND DATE_FORMAT(LAST_DAY(CURRENT_DATE - INTERVAL 1 MONTH), '%Y-%m-%d 23:59:59');

-- Temporary table for top-3 categories
CREATE TEMPORARY TABLE IF NOT EXISTS temp_array (
  category VARCHAR(255),
  sales DOUBLE,
  all_cat_sales_volume_month DOUBLE
);

INSERT INTO temp_array (category, sales, all_cat_sales_volume_month)
SELECT category, SUM(sales) AS amount, @all_cat_sales_volume_month
FROM orders
WHERE datetime BETWEEN DATE_FORMAT(CURRENT_DATE - INTERVAL 1 MONTH, '%Y-%m-01 00:00:00')
                    AND DATE_FORMAT(LAST_DAY(CURRENT_DATE - INTERVAL 1 MONTH), '%Y-%m-%d 23:59:59')
GROUP BY category
ORDER BY amount DESC
LIMIT 3;

SELECT category, sales, all_cat_sales_volume_month FROM temp_array;
Double-click
NonCompliantDataand write the following query:
SET @all_cat_sales_volume_month := 0.0;
SELECT SUM(sales) INTO @all_cat_sales_volume_month
FROM orders
WHERE datetime BETWEEN DATE_FORMAT(CURRENT_DATE - INTERVAL 1 MONTH, '%Y-%m-01 00:00:00')
                    AND DATE_FORMAT(LAST_DAY(CURRENT_DATE - INTERVAL 1 MONTH), '%Y-%m-%d 23:59:59');

-- Temporary table for bottom-3 categories
CREATE TEMPORARY TABLE IF NOT EXISTS temp_array (
  category VARCHAR(255),
  sales DOUBLE,
  all_cat_sales_volume_month DOUBLE
);

INSERT INTO temp_array (category, sales, all_cat_sales_volume_month)
SELECT category, SUM(sales) AS amount, @all_cat_sales_volume_month
FROM orders
WHERE datetime BETWEEN DATE_FORMAT(CURRENT_DATE - INTERVAL 1 MONTH, '%Y-%m-01 00:00:00')
                    AND DATE_FORMAT(LAST_DAY(CURRENT_DATE - INTERVAL 1 MONTH), '%Y-%m-%d 23:59:59')
GROUP BY category
ORDER BY amount ASC
LIMIT 3;

SELECT category, sales, all_cat_sales_volume_month FROM temp_array;
For each node, on the Properties tab, configure:
Scheduled time:
08:00Resource Group: Select a serverless resource group
Parent Nodes: Verify the dependency from the branch node. Check that Output Name of Ancestor Node is Compliant for
CompliantDataand Non-compliant forNonCompliantDataOutput Parameters: Click Add assignment parameter to expose the
outputsparameter
Save each node's configuration.
Step 5: Configure the data push nodes
Double-click
Top3Categories. On the Properties tab, configure: Screenshots:

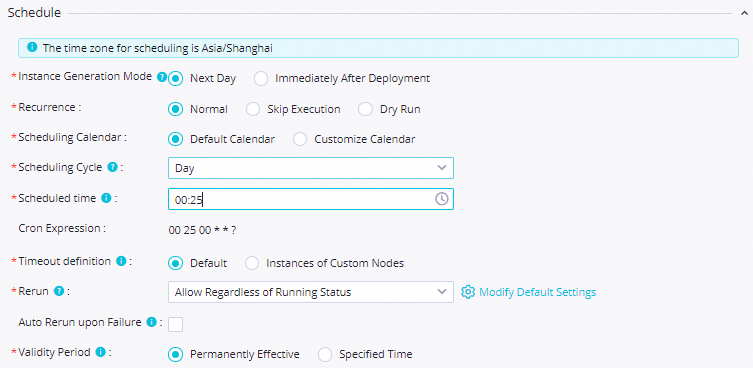
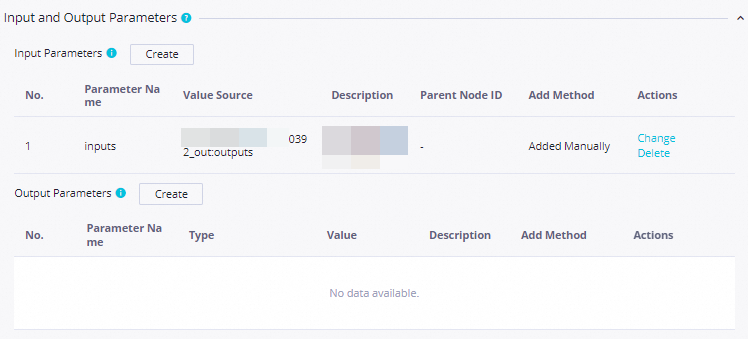
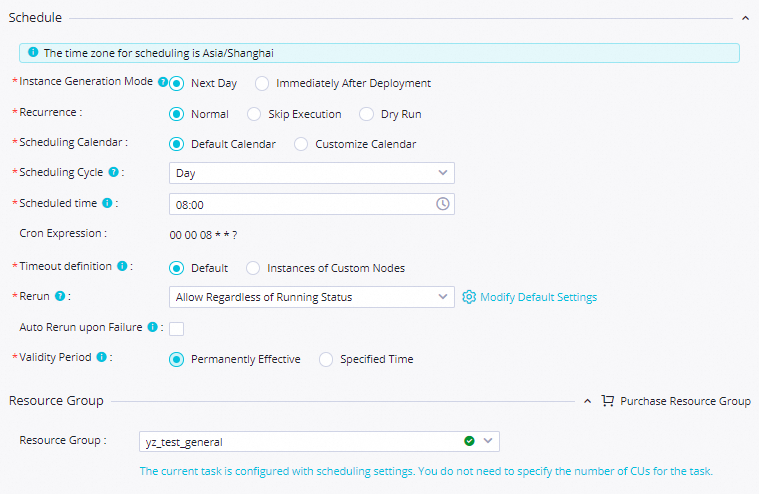
Setting Value Scheduling parameter name curdateParameter value $[yyyymmddhh:mi:ss]Scheduling cycle Day Scheduled time 08:00Rerun Allow Regardless of Running Status Resource Group Select an existing resource group for scheduling Input Parameters Parameter Name: inputs; Value Source:outputsofCompliantDataApply the same settings to
Bottom3Categories, with Input Parameters pointing tooutputsofNonCompliantData.
For each push node, configure the push destination and content:
Destination: Select from the Destination drop-down, or click Create Destination and fill in:
Parameter
Description
Type
DingTalk, Lark, WeCom, Microsoft Teams, or Email
Name
A name for this destination
Webhook
The webhook URL from the target platform. For Lark, see Configure a Lark webhook trigger. For Teams, see Create incoming webhooks for Microsoft Teams
Title:
Top3Categories:Categories whose sales amount ranks the top threeBottom3Categories:Categories whose sales amount ranks the bottom three
Body: Use column names returned by the SQL query as placeholders. See Configure the push content for placeholder syntax and examples. Sample configurations:


Save each node's configuration.

Step 6: Test the flow
Double-click the
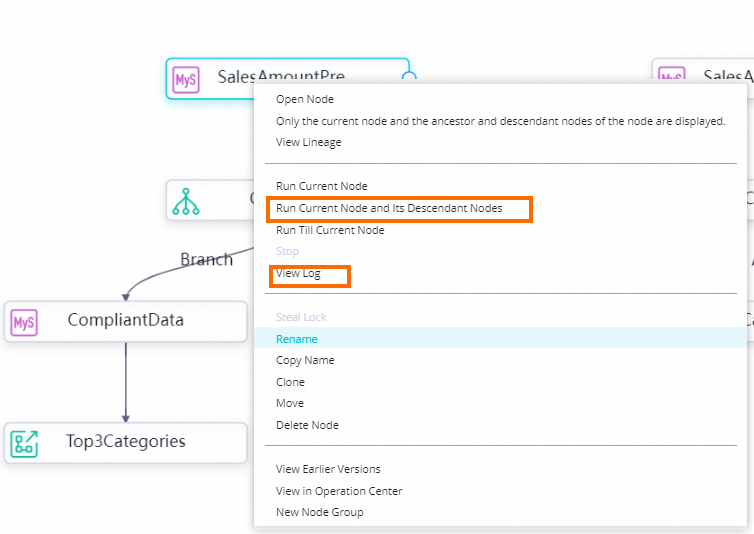
DataPushDemoworkflow.Right-click
SalesAmountPreMonthand select Run Current Node and Its Descendant Nodes.
If a node fails, right-click it and select View Log to inspect the logs.
Script data push
In a script data push flow, an assignment node sits between the SQL query node and the push node. Unlike the simple method, the assignment node transforms the raw query output — for example, to format a multi-line message — before passing it to the push node.
Step 1: Build the flow
Connect nodes in this order:
SalesAmountPreWeek → Top3CategoryList → Top3CategoriesPreWeek

Step 2: Configure the SQL query node
Double-click
SalesAmountPreWeek. Write the following query:
-- Query top-3 categories by total sales for the previous week
SELECT category, SUM(sales) AS amount
FROM orders
WHERE datetime BETWEEN DATE_FORMAT(DATE_SUB(CURDATE(), INTERVAL 1 WEEK), '%Y-%m-%d 00:00:00')
                    AND DATE_FORMAT(DATE_SUB(CURDATE(), INTERVAL 1 DAY), '%Y-%m-%d 23:59:59')
GROUP BY category
ORDER BY amount DESC
LIMIT 3;
On the Properties tab, configure:
Scheduled time:
08:00Resource Group: Select a serverless resource group
Parent Nodes: Select Add Root Node
Output Parameters: Click Add assignment parameter to expose the
outputsparameter
Save the configuration.

Step 3: Configure the assignment node
The assignment node reads the SQL query output and formats it as a human-readable message string. The formatted string becomes the outputs parameter passed to the push node.
Double-click
Top3CategoryList. Set Language to Python and write the following code:
def main():
    from datetime import date
    today = date.today()
    formatted_date = today.strftime('%Y-%m-%d')

    msg = 'Stat date: ' + formatted_date + ' \n\n ' \
    '- 1: ${inputs[0][0]}, sales: ${inputs[0][1]} \n\n ' \
    '- 2: ${inputs[1][0]}, sales: ${inputs[1][1]} \n\n ' \
    '- 3: ${inputs[2][0]}, sales: ${inputs[2][1]} \n\n '

    print(msg)


if __name__ == "__main__":
    import sys
    main()
On the Properties tab, configure:
Scheduled time:
08:00Resource Group: Select an existing resource group for scheduling
Input Parameters: Parameter Name:
inputs; Value Source:outputsofSalesAmountPreWeekOutput Parameters: Added automatically by the system
Save the configuration.
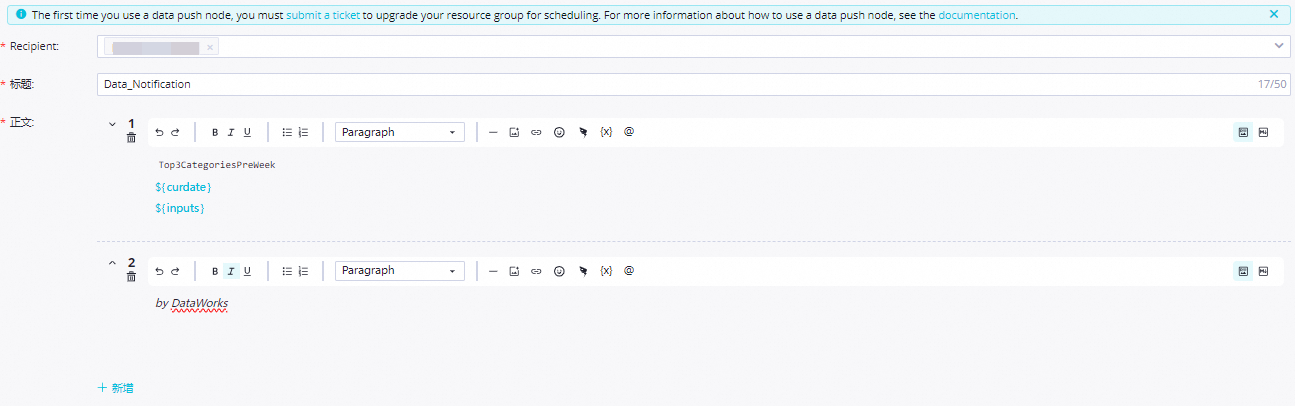
Step 4: Configure the data push node
Double-click
Top3CategoriesPreWeek. On the Properties tab, configure: Screenshots: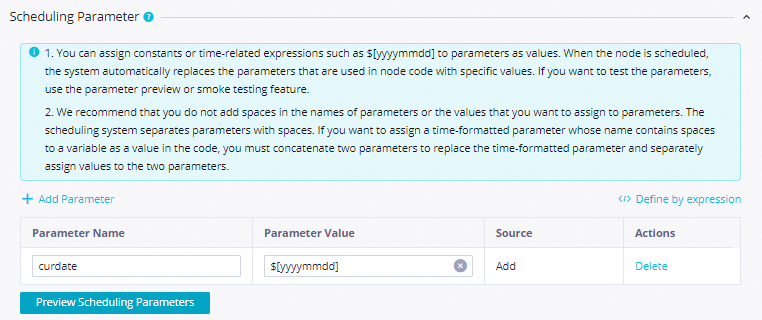

Setting Value Scheduling parameter name curdateParameter value $[yyyymmddhh:mi:ss]Scheduling cycle Day Scheduled time 08:00Rerun Allow Regardless of Running Status Resource Group Select an existing resource group for scheduling Input Parameters Parameter Name: inputs; Value Source:outputsofTop3CategoryListConfigure the push destination and content:
Destination: Select or create a destination (DingTalk, Lark, WeCom, or Teams)
Title:
Categories whose sales amount ranks the top three in the previous weekBody: Use the field names from the assignment node output as placeholders. See Configure the push content for details
Save the configuration.

Step 5: Test the flow
Double-click the
DataPushDemoworkflow.Right-click
SalesAmountPreWeekand select Run Current Node and Its Descendant Nodes.
If a node fails, right-click it and select View Log to inspect the logs.

Simple data push
In a simple data push flow, one SQL query node feeds one push node directly via output parameters. This is the baseline pattern — all other methods build on it.
Step 1: Build the flow
Connect nodes in this order:
SalesAmountPreDay → PushSalesAmountPreDay

Step 2: Configure the SQL query node
Double-click
SalesAmountPreDay. Write the following query:
-- Create a temporary table for yesterday's total sales
CREATE TEMPORARY TABLE IF NOT EXISTS temp_array (
  total_amount DOUBLE
);

-- Write yesterday's total sales to the temporary table
INSERT INTO temp_array (total_amount)
SELECT SUM(sales)
FROM orders
WHERE datetime BETWEEN DATE_FORMAT(DATE_SUB(CURDATE(), INTERVAL 1 DAY), '%Y-%m-%d 00:00:00')
                    AND DATE_FORMAT(DATE_SUB(CURDATE(), INTERVAL 1 DAY), '%Y-%m-%d 23:59:59');

SELECT total_amount FROM temp_array;
On the Properties tab, configure:
Scheduled time:
08:00Resource Group: Select a serverless resource group
Parent Nodes: Select Add Root Node
Output Parameters: In Input and Output Parameters, click Add assignment parameter next to Output Parameters to expose the
outputsparameter
Save the configuration.
Step 3: Configure the data push node
Double-click
PushSalesAmountPreDay. On the Properties tab, configure: Screenshots: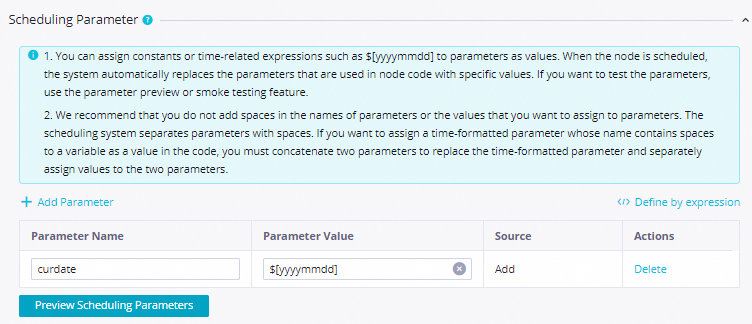
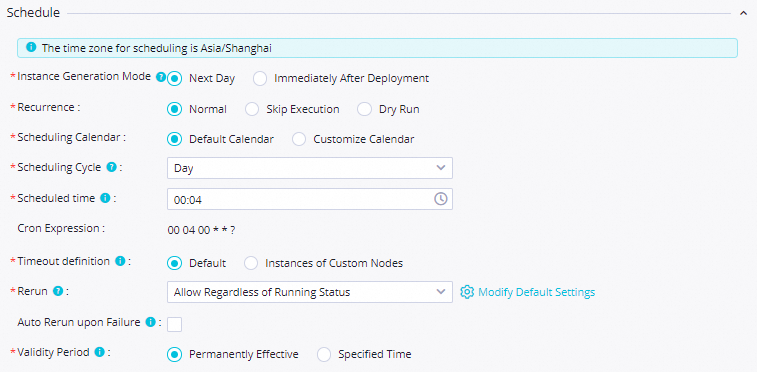

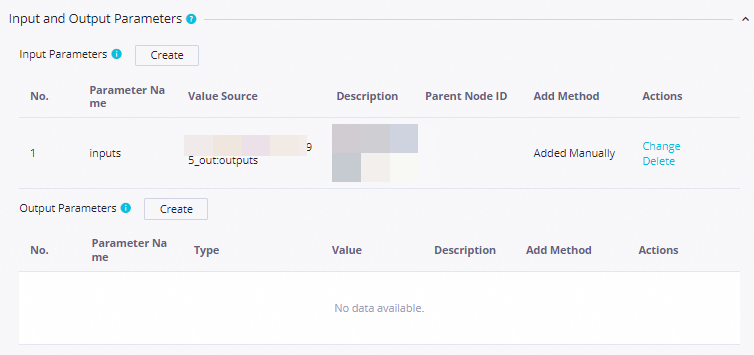
Setting Value Scheduling parameter name curdateParameter value $[yyyymmddhh:mi:ss]Scheduling cycle Day Scheduled time 08:00Rerun Allow Regardless of Running Status Resource Group Select an existing resource group for scheduling Input Parameters Parameter Name: inputs; Value Source:outputsofSalesAmountPreDayConfigure the push destination and content:

Destination: Select or create a destination
Title:
Total sales amount for yesterdayBody: Use
total_amountas a placeholder to include the query result. See Configure the push content
Save the configuration.

Step 4: Test the flow
Double-click the
DataPushDemoworkflow.Right-click
SalesAmountPreDayand select Run Current Node and Its Descendant Nodes.
If a node fails, right-click it and select View Log to inspect the logs.

Combined data push
In a combined data push flow, multiple SQL query nodes each expose an outputs parameter that feeds into the same push node. Unlike the simple method, each upstream node gets a distinct named input (inputs1, inputs2), letting you consolidate results from independent queries into a single notification.
Step 1: Build the flow
Connect nodes in this order:
SalesAmountPreDay → CombinedPush
SalesGrowthPreDay → CombinedPush
SalesAmountPreDay is shared with the simple push flow.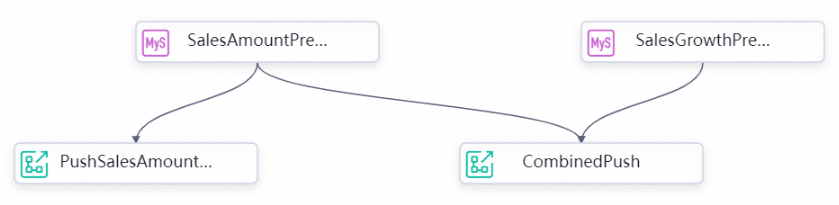
Step 2: Configure the SQL query node
Double-click
SalesGrowthPreDay. Write the following query:
-- Collect the day-before-yesterday's sales by category
CREATE TEMPORARY TABLE IF NOT EXISTS temp_array1 (
  category VARCHAR(255),
  sales DOUBLE
);
INSERT INTO temp_array1 (category, sales)
SELECT category, SUM(sales)
FROM orders
WHERE datetime BETWEEN DATE_FORMAT(DATE_SUB(CURDATE(), INTERVAL 2 DAY), '%Y-%m-%d 00:00:00')
                    AND DATE_FORMAT(DATE_SUB(CURDATE(), INTERVAL 2 DAY), '%Y-%m-%d 23:59:59')
GROUP BY category;

-- Collect yesterday's sales by category
CREATE TEMPORARY TABLE IF NOT EXISTS temp_array2 (
  category VARCHAR(255),
  sales DOUBLE
);
INSERT INTO temp_array2 (category, sales)
SELECT category, SUM(sales)
FROM orders
WHERE datetime BETWEEN DATE_FORMAT(DATE_SUB(CURDATE(), INTERVAL 1 DAY), '%Y-%m-%d 00:00:00')
                    AND DATE_FORMAT(DATE_SUB(CURDATE(), INTERVAL 1 DAY), '%Y-%m-%d 23:59:59')
GROUP BY category;

-- Calculate day-over-day sales growth
CREATE TEMPORARY TABLE IF NOT EXISTS result (
  category VARCHAR(255),
  diff DOUBLE
);
INSERT INTO result (category, diff)
SELECT temp_array2.category, temp_array2.sales - temp_array1.sales AS diff
FROM temp_array1
LEFT JOIN temp_array2 ON temp_array1.category = temp_array2.category;

SELECT category, diff FROM result;
On the Properties tab, configure:
Scheduled time:
08:00Resource Group: Select a serverless resource group
Parent Nodes: Select Add Root Node
Output Parameters: Click Add assignment parameter to expose the
outputsparameter
Save the configuration.

Step 3: Configure the data push node
Double-click
CombinedPush. On the Properties tab, configure: Screenshots:
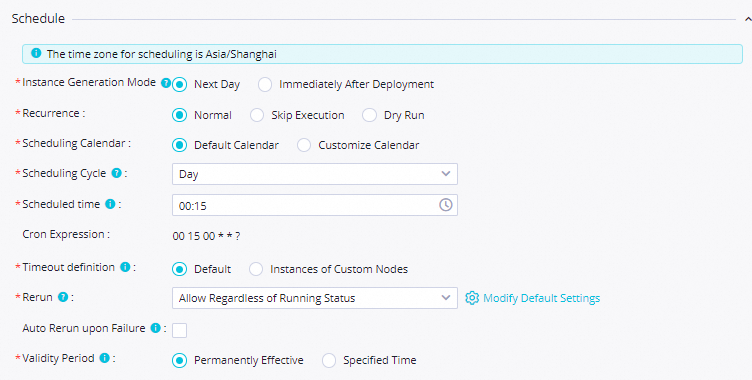

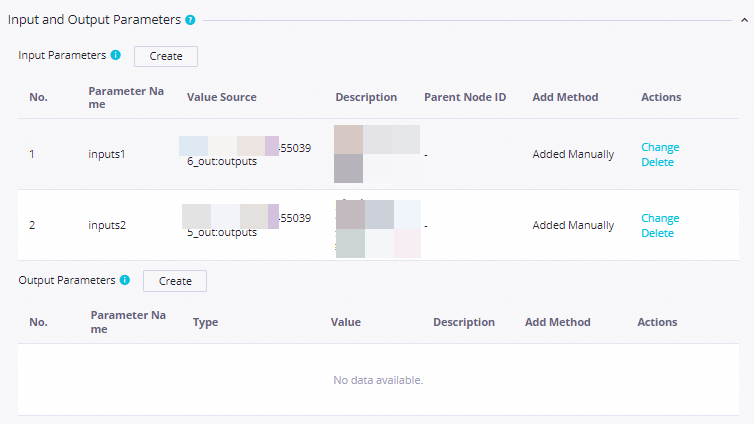
Setting Value Scheduling parameter name curdateParameter value $[yyyymmddhh:mi:ss]Scheduling cycle Day Scheduled time 08:00Rerun Allow Regardless of Running Status Resource Group Select an existing resource group for scheduling Input parameter 1 Parameter Name: inputs1; Value Source:outputsofSalesAmountPreDayInput parameter 2 Parameter Name: inputs2; Value Source:outputsofSalesGrowthPreDayConfigure the push destination and content:

Destination: Select or create a destination
Title:
Sales amount and the sales amount growth for yesterdayBody: Use column names (
total_amount,category,diff) as placeholders. See Configure the push content
Save the configuration.
Step 4: Test the flow
Double-click the
DataPushDemoworkflow.Right-click
CombinedPushand select Run Current Node and Its Descendant Nodes.
If a node fails, right-click it and select View Log to inspect the logs.

MaxCompute data push
MaxCompute data sources require an assignment node with ODPS SQL to query data and expose output parameters. A direct ODPS SQL node cannot pass output parameters to a push node.
The flow synchronizes MySQL data to MaxCompute, queries MaxCompute via an assignment node, and pushes the results.
Step 1: Build the flow
Connect nodes in this order:
MaxComputeDataSync → MaxComputeDataQuery → MaxComputeDataPush
Step 2: Configure the batch synchronization node
Double-click
MaxComputeDataSync. Configure the source and destination: After the connectivity test passes, click Next.Section Parameter Value Source Source MySQL Data source name Select the MySQL data source you added Resource group Select a serverless resource group Destination Destination MaxCompute (ODPS) Data source name Select the MaxCompute data source added to your workspace 
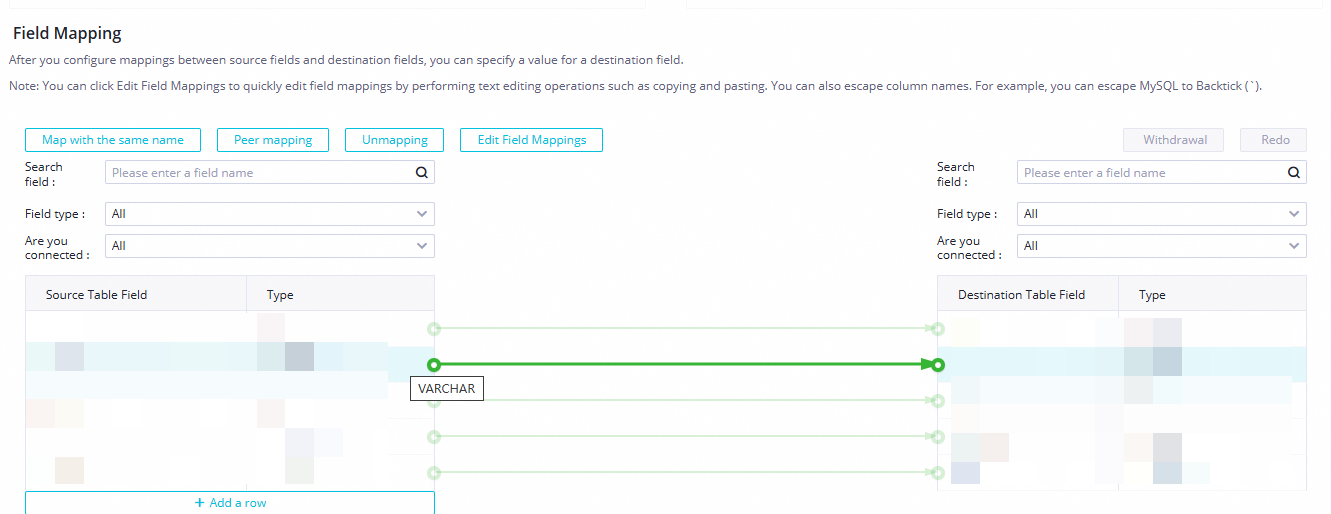
Configure source and destination details: Screenshots:
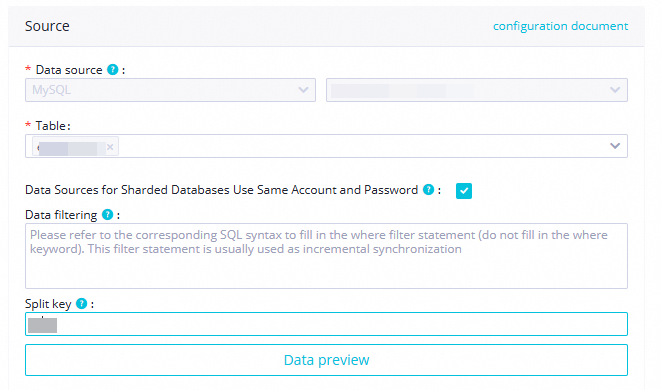

Section Parameter Value Source Data source MySQL (retain default); select the MySQL data source Table ordersData filtering Leave blank Split key Use the primary key column or an indexed column Destination Data source MaxCompute (retain default); select the MaxCompute data source Tunnel resource group Shared transmission resources Table Click Generate Destination Table Schema Partition information Set ptto${bizdate}for daily incremental partitionsWrite mode Clean up existing data before writing (INSERT OVERWRITE) Map source fields to destination fields with matching names.
Configure channel control:

Task expected maximum concurrency:
2Synchronization rate: No current limit
Policy for dirty data records: Disallow Dirty Data Records
Distributed execution: Off (turn on only if concurrency >= 8)
On the Properties tab, configure scheduling:
Scheduling parameter name:
bizdate; Parameter value:$[yyyymmdd-1]Scheduled time:
08:00Rerun: Allow Regardless of Running Status
Resource Group: Select an existing resource group
Dependencies: Select Add Root Node
Save the configuration.

Step 3: Configure the assignment node
The assignment node queries the MaxCompute data and exposes the results via outputs.
Double-click
MaxComputeDataQuery. Set Language to ODPS SQL and write the following query:
-- Use DENSE_RANK() to rank orders by sales within each partition,
-- then return the top-3 orders per partition date.
--
-- PARTITION BY pt: groups rows by the partition date field
-- ORDER BY sales DESC: ranks rows from highest to lowest sales
-- WHERE rank <= 3: keeps only the top-3 rows per partition

SELECT
  order_id,   -- Order ID
  category,   -- Product category
  sales,      -- Sales amount
  datetime,   -- Payment time
  pt          -- Partition date
FROM (
  SELECT
    order_id,
    category,
    sales,
    datetime,
    pt,
    DENSE_RANK() OVER (PARTITION BY pt ORDER BY sales DESC) AS rank
  FROM orders
  WHERE pt = '${bizdate}'
) AS ranked_orders
WHERE rank <= 3;
On the Properties tab, configure:

Scheduled time:
08:00Resource Group: Select a serverless resource group
Dependent Upstream Node: Verify that Ancestor Node Name is
MaxComputeDataSyncOutput Parameters: Click Create next to Output Parameters to expose the
outputsparameter
Save the configuration.

Step 4: Configure the data push node
Double-click
MaxComputeDataPush. On the Properties tab, configure: Screenshots: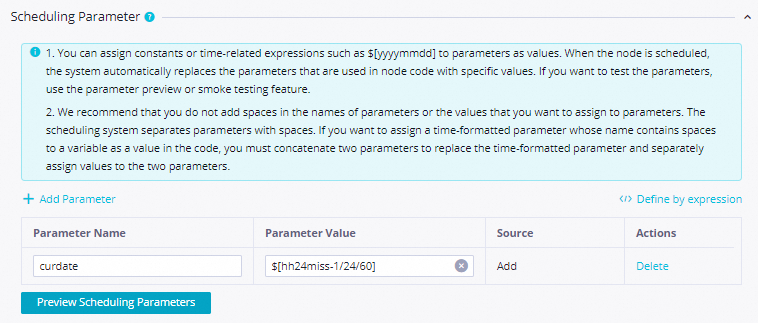


Setting Value Scheduling parameter name curdateParameter value $[yyyymmddhh:mi:ss]Scheduling cycle Day Scheduled time 08:00Rerun Allow Regardless of Running Status Resource Group Select a serverless resource group created after June 28, 2024 (the release date of the data push feature). If your resource group was created before this date, submit a ticket to upgrade it. See Release records for details Input Parameters Parameter Name: inputs; Value Source:outputsofMaxComputeDataQueryConfigure the push destination and content:
Destination: Select or create a destination
Title:
MaxCompute dataBody: Use the column names returned by the assignment node (
order_id,category,sales,datetime,pt) as placeholders. See Configure the push content
Save the configuration.

Step 5: Test the flow
Double-click the
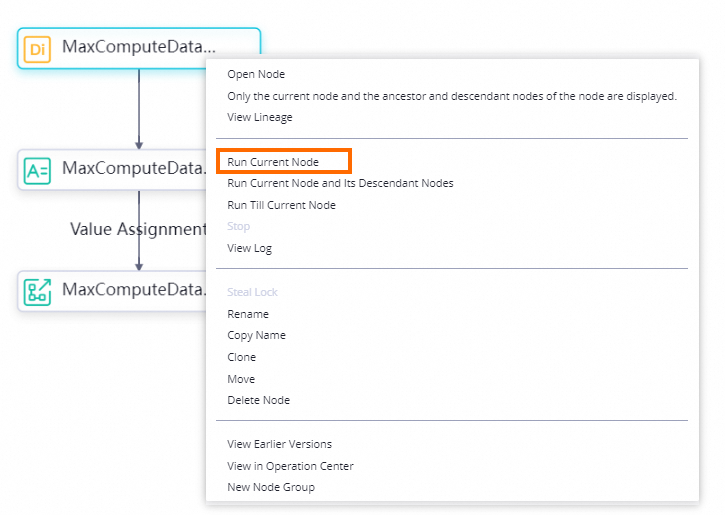
DataPushDemoworkflow.Right-click
MaxComputeDataSyncand select Run Current Node and Its Descendant Nodes.
If a node fails, right-click it and select View Log to inspect the logs.
Commit and deploy
After all push flows pass testing, commit and deploy the workflow.
On the
DataPushDemoworkflow canvas, click the icon to run the full workflow.
After the
 icon appears next to all nodes, click the
  icon to commit the workflow.
In the Commit dialog box, select the nodes to commit, enter a description, and select Ignore I/O Inconsistency Alerts.
Click Confirm.
Deploy the nodes. See Publish tasks.
What's next
The workflow runs on the configured scheduling cycle. Manage and monitor deployed nodes in Operation Center. See Perform basic O&M operations on scheduled tasks.