This topic describes how to use an assignment node and a for-each node of DataWorks to synchronize data from multiple second-level partitions in a MaxCompute table to MySQL tables at a time. The MaxCompute table is partitioned by date and region. The names of MySQL tables end with a suffix in the _Date_Region format, in which the date is in the YYYYMMDD format.
Use scenarios
In actual business scenarios, a large amount of data is generated in the MaxCompute data warehouse every day. In most cases, the data is partitioned by date and region and needs to be synchronized to MySQL tables whose names end with a suffix in the _Date_Region format for business processing. This business requirement cannot be met by using only standard batch synchronization nodes of DataWorks. Instead, you can use an assignment node to obtain information about the second-level partitions by region in the related MaxCompute table every day, and use a for-each node to pass the information in loops to the script of a batch synchronization node as parameters. Then, the batch synchronization node synchronizes the data in the second-level partitions to the related MySQL tables based on the partition parameter information that is obtained.
Prerequisites
A MaxCompute data source is added to your DataWorks workspace on the Data Sources page. The MaxCompute data source is used as the source.
NoteIn this example, test data is used. For more information about the test data, see the Sample MaxCompute data section in this topic.
For more information about the data synchronization capabilities that are supported by a MaxCompute data source, see MaxCompute data source.
A MySQL data source is added to your DataWorks workspace on the Data Sources page. The MySQL data source is used as the destination.
NoteFor more information about the data synchronization capabilities that are supported by a MySQL data source, see MySQL data source.
SQL statements are executed in the MySQL data source to create tables whose names end with a suffix in the
_Date_Regionformat. For more information, see the SQL statements used to create MySQL tables section in this topic.A serverless resource group is purchased, associated with your DataWorks workspace, and configured with network settings.
NoteThe batch synchronization node that is created in this example can run only on a serverless resource group.
For more information about how to purchase and configure a serverless resource group, see Use serverless resource groups.
Business implementation logic
The following figure shows the business implementation logic.
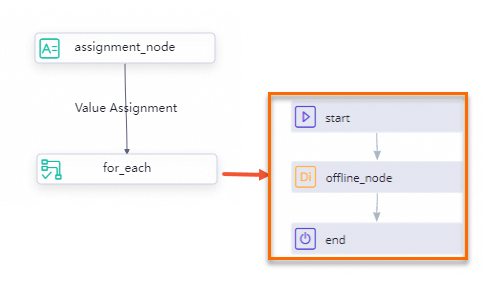
Use an assignment node to obtain information about all second-level partitions of the current date in a MaxCompute table.
Use a for-each node to pass the partition information obtained from the assignment node in loops to a batch synchronization node that is contained in the loop body of the for-each node as parameters.
Configure settings for dynamic partitioning for the batch synchronization node by using the code editor. This can enable the node to synchronize data from the second-level partitions of the MaxCompute table to specific MySQL tables.
Procedure
Step 1: Create an assignment node
Log on to the DataWorks console. In the left-side navigation pane, choose Data Development and O&M > Data Development. On the Data Development page, select the desired workspace from the drop-down list and click Go to Data Development to go to the DataStudio page.
Create an assignment node.
In the Scheduled Workflow pane of the DataStudio page, click Business Flow, find the desired workflow, right-click the workflow name, and then choose .
In the Create Node dialog box, configure the Name, Node Type, and Path parameters. Click Confirm to go to the configuration tab of the assignment node.
Configure scheduling settings for the assignment node.
In the right-side navigation pane of the configuration tab of the assignment node, click the Properties tab.
In the Scheduling Parameter section of the Properties tab, enter
dt_timein the field of the Parameter Name column and selectCurrent Day $[yyyymmdd]from the drop-down list in the Parameter Value column to assign the current date to thedt_timeparameter as the value.In the Dependencies section of the Properties tab, select Add Root Node to configure the root node of the workspace as the ancestor node of the assignment node.
Develop a task based on the assignment node.
Assignment nodes allow you to use the ODPS SQL, SHELL, or Python language to develop tasks. In this example, the ODPS SQL language is used.
SELECT region FROM sales_data WHERE dt = ${dt_time} GROUP BY region;NoteThe
dt_timedynamic parameter is used to obtain the date information in the YYYYMMDD format for each day. This helps you obtain information about all region-based partitions every day.By default, the output parameter of the assignment node is
outputs, which is displayed in the Output Parameters section of the Properties tab. DataWorks automatically obtains the value of the outputs parameter and passes the value to the for-each node.If you have added multiple MaxCompute data sources to the workspace, you must select the MaxCompute data source that you want to use from the Engine Instance MaxCompute drop-down list on the configuration tab of the assignment node.
Save and commit the assignment node.
In the top toolbar of the configuration tab of the assignment node, click the
 icon to save the SQL statement.
 In the top toolbar of the configuration tab of the assignment node, click the
 icon to commit the assignment node.
NoteIf the workspace that you use is in standard mode, you must also click Deploy in the top toolbar of the configuration tab of the assignment node to deploy the node.
Step 2: Create a for-each node
Create a for-each node.
In the Scheduled Workflow pane of the DataStudio page, click Business Flow, find the desired workflow, right-click the workflow name, and then choose .
In the Create Node dialog box, configure the Name, Node Type, and Path parameters. Click Confirm to go to the configuration tab of the for-each node.
Configure scheduling settings for the for-each node.
In the right-side navigation pane of the configuration tab of the for-each node, click the Properties tab.
In the Parent Nodes subsection of the Dependencies section of the Properties tab, select Node Name from the drop-down list, enter the name of the assignment node that is created in Step 1, select the assignment node whose name is suffixed with
_out, and then click Create.Click the drop-down arrow to the right of Input and Output Parameters to expand the Input Parameters and Output Parameters subsections. In the Input Parameters subsection, find the
loopDataArrayparameter and click Change in the Actions column. Select an option from the drop-down list in the Value Source column of the loopDataArray parameter and click Save in the Actions column.
By default, the system supports a maximum of 128 loops. If more than 128 loops are required in your business, you can click Change in the prompt message that is displayed on the configuration tab of the for-each node to change the default upper limit.
Step 3: Create a batch synchronization node
Create a batch synchronization node.
In the Data Integration section of the configuration tab of the for-each node, click Offline synchronization.
In the Create Node dialog box, configure the Node Name parameter and click Create.
Configure network connections and a resource group for the batch synchronization node.
On the configuration tab of the for-each node, right-click the name of the batch synchronization node, and then select Open Node to go to the Configure Network Connections and Resource Group step that is displayed on the configuration tab of the batch synchronization node.
Select
MaxCompute(ODPS)from the Source drop-down list and the MaxCompute data source that you add to the workspace from the Data Source Name drop-down list.Select the resource group that you purchase from the resource group drop-down list.
Select
MySQLfrom the Destination drop-down list and the MySQL data source that you add to the workspace from the Data Source Name drop-down list.
Configure information about the source and destination.
Click Next to go to the Configure tasks step.
In the Source subsection of the Configure Source and Destination section, select a schema that you create from the schema drop-down list and a table name from the Table drop-down list. In this example, the table name
sales_datais selected.In the Destination subsection of the Configure Source and Destination section, select a table name from the Table drop-down list. In this example, the table name
prefix_20240913_beijingis selected.
Configure parameters for dynamic partitioning.
In the top toolbar of the configuration tab of the batch synchronization node, click the Conversion script icon. In the Tips message, click OK.
In the code that is displayed, find the
partitionparameter and change the valuedt=${bizdate},region=todt=${offline_time},region=${dag.foreach.current}. dt=${offline_time},region=${dag.foreach.current} indicates a dynamic partition name.NoteIn the loop body of the for-each node, you can use the
${dag.foreach.current}parameter to obtain the traversal value.Find the MySQL table name
prefix_20240912_shanghaiin the code and change the table name toprefix_${offline_time}_${dag.foreach.current}. prefix_${offline_time}_${dag.foreach.current} indicates a dynamic table name.In the right-side navigation pane of the configuration tab of the batch synchronization node, click the Properties tab. In the Scheduling Parameter section of the Properties tab, enter the scheduling parameter
offline_timein the field of the Parameter Name column and selectCurrent Day $[yyyymmdd]from the drop-down list in the Parameter Value column to assign the current date in the YYYYMMDD format to theoffline_timescheduling parameter as the value.In the Parent Nodes subsection of the Dependencies section, enter
outin the drop-down list, select theNode Name: startnode, and then click Create.
In the top toolbar of the configuration tab of the batch synchronization node, click the
icon to save the node.
Step 4: Save and commit the for-each node
Go to the configuration tab of the for-each node that is created in Step 2.
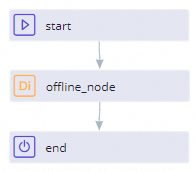
Draw lines to connect the start node and end node to the batch synchronization node, as shown in the following figure.
In the top toolbar of the configuration tab, click the
icon to save the for-each node. In the top toolbar of the configuration tab, click the
icon. In the Commit dialog box, select all the nodes and click OK to commit the nodes.
If the workspace that you use is in standard mode, you must also click Deploy in the top toolbar of the configuration tab of the for-each node to deploy the node.
Step 5: Run tasks on the nodes
In the top navigation bar of the DataStudio page, click Operation Center to go to Operation Center. In the left-side navigation pane of the Operation Center page, choose .
On the Auto Triggered Tasks page, find the assignment node that you create, click Backfill Data in the Actions column, and then select Current and Descendant Nodes Retroactively to go to the Backfill Data panel. In the Select Descendant Tasks table of the Backfill Data panel, select the descendant node of the assignment node and click Submit and Redirect.
NoteYou can view the running status of the nodes on the page to which you are redirected.
Verify results
After the tasks are successfully run, you can query the data in the prefix_20240913_beijing, prefix_20240913_shanghai, and prefix_20240913_hangzhou tables in the MySQL database and check whether the data in the MySQL tables is consistent with the data in the related second-level partitions in the MaxCompute table.
Data in the MaxCompute table:
You can execute the following SQL statement to query the data in the MaxCompute table:
SELECT * FROM sales_data where dt = '20240913';
Data in the MySQL tables:
You can execute the following SQL statements to query the data in the MySQL tables:
SELECT * FROM `prefix_20240913_beijing`;
SELECT * FROM `prefix_20240913_shanghai`;
SELECT * FROM `prefix_20240913_hangzhou`;


Sample data
Sample MaxCompute data
-- Create a partitioned table.
-- dt is the first-level partition field, which is used to partition data by date. region is the second-level partition field, which is used to partition data by region.
CREATE TABLE IF NOT EXISTS sales_data (
    id BIGINT,
    product_name STRING,
    quantity INT,
    price DECIMAL(10,2)
)
PARTITIONED BY (dt STRING, region STRING);

-- Insert test data into the table.
INSERT INTO TABLE sales_data PARTITION (dt='20240913', region='beijing')
VALUES (1, 'phone', 10, 99.99);

INSERT INTO TABLE sales_data PARTITION (dt='20240913', region='shanghai')
VALUES (2, 'book', 5, 70.00);

INSERT INTO TABLE sales_data PARTITION (dt='20240913', region='hangzhou')
VALUES (3, 'book', 5, 70.00);
SQL statements used to create MySQL tables
-- Create tables in the MySQL database.
-- Create tables whose names are in the prefix_Date_Region format.
CREATE TABLE IF NOT EXISTS prefix_20240913_beijing (
    id BIGINT,
    product_name varchar(100),
    quantity INT,
    price DECIMAL(10,2)
);

CREATE TABLE IF NOT EXISTS prefix_20240913_shanghai (
    id BIGINT,
    product_name varchar(100),
    quantity INT,
    price DECIMAL(10,2)
);

CREATE TABLE IF NOT EXISTS prefix_20240913_hangzhou (
    id BIGINT,
    product_name varchar(100),
    quantity INT,
    price DECIMAL(10,2)
);When you create MySQL tables, you must make sure that the tables are named in the prefix_Date_Region format and that the number of tables that you create is the same as the number of the second-level partitions for the current date in the MaxCompute table. Otherwise, an error is reported during data synchronization.