This guide covers how to improve development efficiency through engineering practices such as code reuse, dataset mounting, and parameter management, as well as best practices and debugging techniques for connecting to compute engines like MaxCompute Spark, EMR Serverless Spark, and AnalyticDB for Spark.
We recommend reading Basic notebook development first.
Development and production environments
DataWorks Notebook is a schedulable development and analysis tool. This means it operates in two distinct runtime environments:
Development environment: On the notebook node editing page in DataStudio, you can run cells to execute code directly in a personal development environment instance. This environment is for rapid validation and debugging of code logic.
Production environment: After you commit and publish a notebook node, its execution is triggered by periodic scheduling, data backfill, or other similar actions. The code runs in an isolated, ephemeral task instance. This environment is for stable and reliable production runs.
Understanding the significant feature differences between these two environments is key to efficient development.
Quick reference: development vs. production environments
Feature | Development environment (running a cell) | Production environment (scheduled runs) |
Referencing project resources ( |
| Takes effect automatically. |
Reading and writing datasets (OSS/NAS) | Mount the dataset in the personal development environment. | Mount the dataset in the scheduling configuration. |
Referencing workspace parameters ( | Supported. Text substitution is automatically performed before code execution. | Supported. Text substitution is automatically performed before task execution. |
Spark session management | By default, the Spark session is automatically released after 2 hours of inactivity. | A short-lived session is created for each task instance and destroyed along with it. |
Reuse code and data in production
Reference project resources (.py files)
To make your code more modular, reusable, and maintainable, group common functions or classes in standalone .py files. You can then reference these files as MaxCompute resources using the ##@resource_reference{"custom_name.py"} syntax.
Create and publish a Python resource
In the left navigation pane of DataWorks DataStudio, click
 and navigate to Resource Management.
In the Resource Management directory tree, right-click the target directory or click + in the upper-right corner. Select New Resource > MaxCompute Python and name the file
my_utils.py.In the Document Content section, click Online Editing, paste your utility function code into the code editor, and click Save.
# my_utils.py
def greet(name):
    return f"Hello, {name} from resource file!"
In the toolbar, click Save and then Publish the resource. This makes the resource available to tasks in both the development and production environments.
Reference the resource in a notebook
In the first line of a Python cell in your notebook, use the
##@resource_referencesyntax to reference the published resource.##@resource_reference{"my_utils.py"} # If the resource is in a subdirectory, such as my_folder/my_utils.py, reference it by filename only, without the directory path: ##@resource_reference{"my_utils.py"} from my_utils import greet message = greet('DataWorks') print(message)Debug in the development environment
Run the Python cell. The output is:
Hello, DataWorks from resource file!ImportantDuring debugging in the development environment, the system detects the
##@resource_referencedeclaration and automatically downloads the corresponding file from Resource Management to theworkspace/_dataworks/resource_referencespath in your personal directory, making it accessible to your code.If a
ModuleNotFoundErroroccurs, click the Restart button in the editor toolbar to reload the resource, and then try again.Publish to the production environment and verify
After you Save and Publish the notebook node, navigate to Operation and Maintenance Center > Auto Triggered Task and click Test to run the task. After the task succeeds, the output
Hello, DataWorks from resource file!appears in the logs.ImportantIf a
There is no file with id ...error occurs, ensure that you have published the Python resource to the production environment.
For more information, see MaxCompute resources and functions.
Read and write datasets (OSS/NAS)
When notebook tasks run, you can easily read from and write to large-scale files stored on OSS or NAS.
Development environment debugging
Mount the dataset: On your personal development environment's details page, navigate to Storage Settings > Datasets to configure it.
Access the dataset in your code: The dataset is mounted to a specific mount path in your personal development environment. You can read from or write to this path directly in your code.
# Assume the dataset is mounted to the /mnt/data/dataset path.
import pandas as pd

# Use the mount path directly.
file_path = '/mnt/data/dataset/testfile.csv'
df = pd.read_csv(file_path)

# Use PyODPS to write data to MaxCompute.
o = %odps
o.write_table('mc_test_table', df, overwrite=True)
print(f"Successfully wrote data to the MaxCompute table mc_test_table.")
Production environment deployment
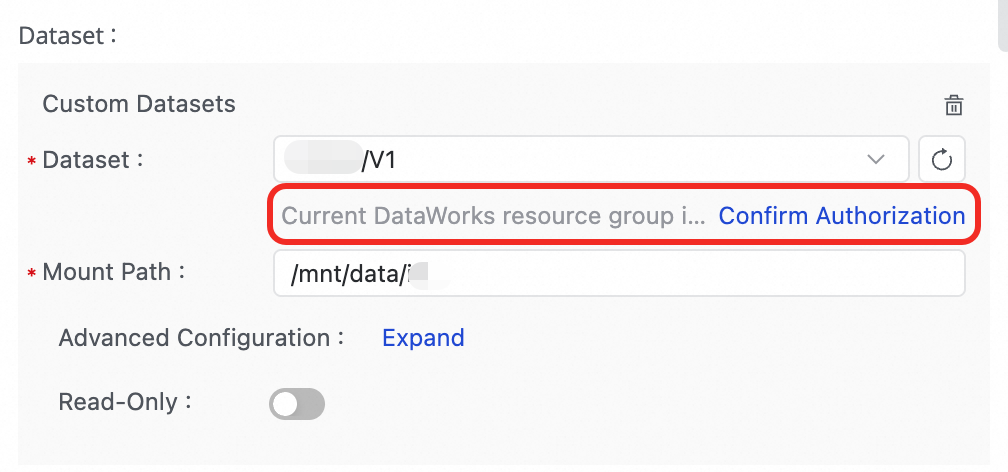
Mount the dataset: On the notebook node editing page, navigate to Scheduling Settings > Scheduling Policy in the right-hand navigation pane and add the same dataset.
Access the dataset in your code: After you commit and publish the node, the dataset is mounted in the production environment. Use the same mount path in your code to access it.
# Assume the dataset is mounted to the /mnt/data/dataset path.
import pandas as pd

# Use the mount path directly.
file_path = '/mnt/data/dataset/testfile.csv'
df = pd.read_csv(file_path)

# Use PyODPS to write data to MaxCompute.
o = %odps
o.write_table('mc_test_table', df, overwrite=True)
print(f"Successfully wrote data to the MaxCompute table mc_test_table.")
For more information, see Use datasets in a personal development environment.
Use workspace parameters
This feature is available only in DataWorks Professional Edition or higher.
DataWorks provides workspace parameters, which extend existing scheduling parameters. These parameters enable the reuse of global configurations and environment isolation across tasks and nodes. You can reference a workspace parameter in a SQL cell or Python cell using the ${workspace.param} format, where param is the name of your workspace parameter.
1. Create a workspace parameter: Before you start, navigate to Operation and Maintenance Center > Scheduling Settings > Workspace Parameters in DataWorks to create the required parameters.
2. Reference a workspace parameter:
Reference a workspace parameter in a SQL cell.
SELECT '${workspace.param}';When the cell runs, it prints the resolved value of the workspace parameter.
Reference a workspace parameter in a Python cell.
print('${workspace.param}')When the cell runs, it prints the resolved value of the workspace parameter.
For more details, see Use workspace parameters.
Use magic commands with compute engines
Magic commands are special commands prefixed with % or %% that simplify interactions between a Python cell and various compute resources.
Connect to MaxCompute
Before you connect to a MaxCompute compute resource, make sure that you have bound a MaxCompute compute resource.
%odps: Get a PyODPS entry objectThis command returns an authenticated PyODPS object bound to the current MaxCompute project. This method is recommended for interacting with MaxCompute because it avoids hard-coding AccessKeys in your code.
Use a magic command to create a MaxCompute connection. Enter
%odps. A MaxCompute compute resource selector appears in the lower-right corner and automatically selects a compute resource. Click the MaxCompute project name in the lower-right corner to switch projects.o=%odpsUse the retrieved MaxCompute compute resource to run a PyODPS script.
For example, to get all tables in the current project:
with o.execute_sql('show tables').open_reader() as reader:
    print(reader.raw)
%maxframe: Establish a MaxFrame connectionThis command creates a MaxFrame session, which provides distributed, pandas-like data processing capabilities for MaxCompute.
# Connect to and access a MaxCompute MaxFrame Session
mf_session = %maxframe

df = mf_session.read_odps_table('your_mc_table')
print(df.head())

# After development and debugging, manually destroy the session to release resources
mf_session.destroy()
Connect to Spark compute resources
DataWorks Notebook supports connections to multiple Spark engines. These engines differ in connection method, execution context, and resource management.
A single notebook node can use a magic command to connect to only one type of compute resource at a time.
Engine comparison
Feature | MaxCompute Spark | EMR Serverless Spark | AnalyticDB for Spark |
Command |
|
|
|
Note After you run the command, the execution context of the entire notebook kernel switches to the remote PySpark environment. You can then write PySpark code directly in subsequent cells. | |||
Prerequisites | Bind a MaxCompute compute resource. | Bind an EMR compute resource and create a Livy Gateway. | Bind an ADB Spark compute resource. |
Development mode | Automatically creates or reuses a Livy session. | Connects to an existing Livy Gateway and creates a session. | Automatically creates or reuses a Spark Connect Server. |
Production mode | Livy mode: Submits Spark jobs through the Livy service. | spark-submit batch mode: Pure batch processing; session state is not retained. | Spark Connect Server mode: Interacts through the Spark connection service. |
Resource release | The system automatically releases the session after the task instance ends. | The system automatically cleans up resources after the task instance ends. | The system automatically releases resources after the task instance ends. |
Use cases | General-purpose batch processing and ETL tasks that are tightly integrated with the MaxCompute ecosystem. | Complex analysis tasks that require flexible configurations and interaction with open-source big data ecosystems, such as Hudi and Iceberg. | High-performance interactive queries and analysis on C-Store tables in AnalyticDB for MySQL. |
MaxCompute Spark
Before you connect to a MaxCompute compute resource, make sure that you have bound a MaxCompute compute resource.
Connect to the Spark engine built into a MaxCompute project through Livy.
Establish connection: Run the following command in a Python cell. The system automatically creates or reuses a Spark session.
# Create a Spark Session.
%maxcompute_spark
Execute PySpark code: After the connection is established, use the
%%sparkcell magic in a new Python cell to execute PySpark code.# When using MaxCompute Spark, the Python cell must start with %%spark. %%spark df = spark.sql("SELECT * FROM your_mc_table LIMIT 10") df.show()Manually release the connection: After you finish debugging, you can manually stop or delete the session. When running in a production environment, the system automatically stops and deletes the Livy session for the current task instance, so no manual action is required.
# Clean up the Spark Session and stop Livy.
%maxcompute_spark stop

# Clean up the Spark Session, stop Livy, and then delete Livy.
%maxcompute_spark delete
EMR Serverless Spark
Before you establish a connection to the compute resource, bind an EMR Serverless Spark compute resource to your workspace and create a Livy Gateway.
Connect to a pre-existing Livy Gateway to interact with EMR Serverless Spark.
Establish a connection: Before running the command, select the EMR compute resource and Livy Gateway in the lower-right corner of the cell.
# Basic connection %emr_serverless_spark # Or, pass custom Spark parameters when connecting. Note that two percent signs (%%) # are required when you pass custom Spark parameters. %%emr_serverless_spark { "spark_conf": { "spark.emr.serverless.environmentId": "<EMR Serverless Spark runtime environment ID>", "spark.emr.serverless.network.service.name": "<EMR Serverless Spark network connection ID>", "spark.driver.cores": "1", "spark.driver.memory": "8g", "spark.executor.cores": "1", "spark.executor.memory": "2g", "spark.driver.maxResultSize": "32g" } }NoteRelationship between custom parameters and global configuration
Default behavior: Custom parameters defined here apply only to the current connection (session) and are one-time. If you do not provide custom parameters, the system uses the global parameters configured in the Admin Center.
Recommended usage: For configurations that need to be reused across multiple tasks or by multiple users, configure them globally in Admin Center > Serverless Spark > SPARK parameters to ensure consistency and simplify management.
Priority rule: When the same parameter is set in both custom parameters and the global configuration, which setting takes effect depends on the Global Configuration Priority option in the Admin Center.
Selected: The global configuration overrides the custom parameters for this session.
Not selected: The custom parameters for this session override the global configuration.
(Optional) Reconnect: If an administrator accidentally deletes the token from the Livy Gateway page, use this command to recreate it.
# Reconnect and refresh the Livy token for the current personal development environment.
%emr_serverless_spark refresh_token
Execute PySpark or SQL code: After the connection is established, the kernel switches. You can write PySpark code directly in a Python cell or write SQL in an EMR Spark SQL cell.
Submit and execute SQL code via an EMR Spark SQL cell
After you establish a connection with
%emr_serverless_spark, you can write SQL statements directly in an EMR Spark SQL cell without selecting a compute resource in the cell.The EMR Spark SQL cell reuses the
%emr_serverless_sparkconnection to submit the job to the target compute resource for execution.
Submit and execute PySpark code via a Python cell
After you establish a connection with
%emr_serverless_spark, you can submit and execute PySpark code in a new Python cell. You do not need to add the%%sparkprefix to the cell.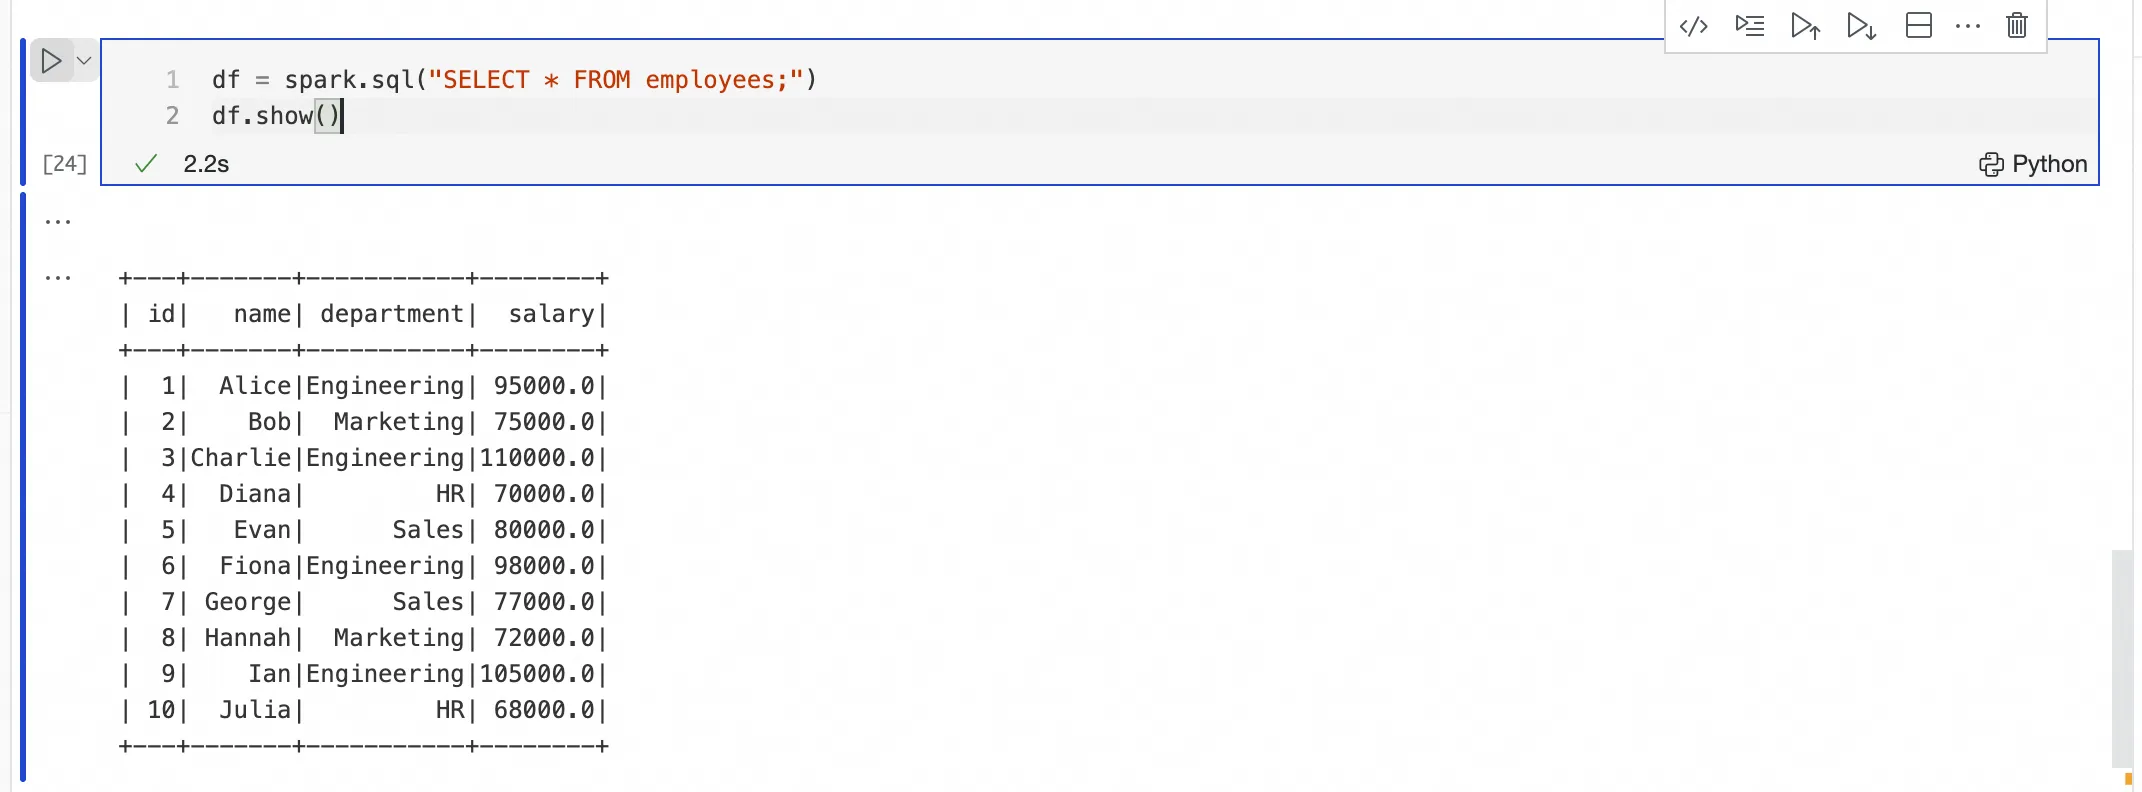
Manually release the connection
ImportantIf multiple users share a Livy Gateway, the
stopordeletecommand affects all users who are using that gateway. Use these commands with caution.# Clean up the Spark Session and stop Livy. %emr_serverless_spark stop # Clean up the Spark Session, stop Livy, and then delete Livy. %emr_serverless_spark delete
AnalyticDB for Spark
Before you establish a connection to the compute resource, bind an AnalyticDB for Spark compute resource to your workspace.
Connect to the AnalyticDB for Spark engine by creating a Spark Connect Server.
Establish a connection: To ensure network connectivity, you must correctly configure the vSwitch ID and security group ID in the connection parameters. Before you run the command, select the ADB Spark compute resource in the lower-right corner of the cell.
# You must configure the vSwitch ID and security group ID to establish a network connection. %adb_spark add \ --spark-conf spark.adb.version=3.5 \ --spark-conf spark.adb.eni.enabled=true \ --spark-conf spark.adb.eni.vswitchId=<vSwitch ID of ADB> \ --spark-conf spark.adb.eni.securityGroupId=<security group ID of the personal development environment>Execute PySpark code: After the connection is established, execute PySpark code in a new Python cell.
# You can run operations only on C-Store tables. df = spark.sql("SELECT * FROM my_adb_cstore_table LIMIT 10") df.show()Note: The AnalyticDB for Spark engine can currently process only C-Store tables that have the
'storagePolicy'='COLD'attribute.Manually release the connection: After you finish debugging in the development environment, manually clean up the connection session to save resources. When running in a production environment, the system automatically cleans up resources.
%adb_spark cleanup
Connect to Lindorm Ray
The RAY resource group of the Lindorm compute engine provides distributed computing services and supports end-to-end AI workloads. You can use a magic command to seamlessly connect to Lindorm Ray resources in a notebook for interactive development and debugging, and then publish the notebook as a scheduled production task.
Establish a connection: Run the
%lindorm_raycommand in a Python cell. A compute resource selector appears in the lower-right corner of the cell. Select your Lindorm compute resource and the created RAY resource group.# Connect to the specified Lindorm Ray resource group. %lindorm_rayImportantAfter you connect to a Lindorm Ray compute resource, you can no longer run SQL cells in the same notebook. The Lindorm Ray engine exclusively executes Python and Ray code.
If you run the same code cell multiple times, the system automatically terminates the previous Ray job and starts a new one. This helps prevent resource waste and task conflicts.
Execute Ray code: After the connection is established, you can write and execute Ray code directly in a new Python cell. Logs stream back to the cell's output area in real time, which facilitates interactive debugging.
The following example defines a simple remote task (using the
@ray.remotedecorator) that executes on a Ray cluster and returns the logs and final result to the output area of the cell.import ray import time @ray.remote def hello_world(): print("Hello from Lindorm Ray!") time.sleep(5) return "Task finished." # Submit the remote task result_ref = hello_world.remote() print(ray.get(result_ref))(Optional) Specify custom startup parameters: If you need to specify additional configurations for the Ray environment, such as installing third-party Python packages or uploading local code files, use the
%%lindorm_raycommand to establish the connection.Example 1: Install dependencies
Use the
pipparameter to install thejiebapackage in the Ray environment.%%lindorm_ray { "runtime_env": { "pip": ["jieba"] } }Once the environment is ready, import and use the package in subsequent Ray jobs. The following example shows how to call
jiebain a remote function to perform Chinese word segmentation:import ray @ray.remote def do_work(x): import jieba return "/".join(jieba.cut(x)) print(ray.get(do_work.remote("Welcome to the DataWorks+LindormRay solution")))Example 2: Upload and use DataWorks resources
The
working_dirparameter is used to upload resources from DataWorks Resource Management to a Ray cluster so that they can be imported and called in tasks.ImportantWhen you use
working_dirto upload resources, files are uploaded directly from your development environment to the Ray cluster and are subject to a 100 MB size limit. If a resource package is too large, the upload may fail or the Ray nodes may become unstable.
# Reference a resource uploaded in DataStudio Resource Management and declare its path.
%%lindorm_ray
{
    "runtime_env": {
        "working_dir": "/mnt/workspace/_dataworks/resource_references"
    }
}
Suppose you upload a ray_resource.py file to Resource Management in DataStudio. When you write and execute the following cell, the system automatically parses the
##@resource_referencedeclaration in the subsequent code and downloads the corresponding resource to the/mnt/workspace/_dataworks/resource_referencespath.ImportantIn a development environment, after you execute the cell that contains ##@resource_reference, you must rerun the
%%lindorm_raycell above to upload the downloaded resources in the working_dir to the Ray cluster. In a production environment, you do not need to rerun.import ray ##@resource_reference{"ray_resource.py"} @ray.remote def do_work(x): print('Ray says:', x) from ray_resource import fun fun() return x worker = do_work.remote("Welcome to the DataWorks+LindormRay solution") print(ray.get(worker))
Production scheduling and O&M: After development and debugging, you can commit and publish the notebook node. It will then be periodically scheduled as a Lindorm Ray node in a DAG.
Parameterization: Your code can use standard DataWorks scheduling parameters, such as
${bizdate}.Log viewing: In the production environment, to prevent excessive logs from affecting performance, the system loads only the first 1 MB of logs by default. If logs are truncated, the output includes a link that directs you to the Lindorm console to view the complete task logs.
Resource release: After a scheduled production task ends, the Lindorm Ray task enters a terminal state and no longer occupies resources. During interactive development, you can terminate the Lindorm Ray task by restarting the kernel or closing the notebook.
Appendix: Magic command quick reference
Magic command | Description | Compute engine |
| Get a PyODPS entry object | MaxCompute |
| Establish a MaxFrame connection | |
| Create a Spark session | MaxCompute Spark |
| Clean up the Spark session and stop Livy. | |
| Clean up the Spark session, then stop and delete Livy. | |
| In a Python cell, connect to an established Spark compute resource. | |
| Create a Spark session | EMR Serverless Spark |
| View detailed information about the Livy Gateway. | |
| Clean up the Spark session and stop Livy. | |
| Clean up the Spark session, then stop and delete Livy. | |
| Refresh the Livy token for the personal development environment. | |
| Create and connect to a reusable ADB Spark session. | AnalyticDB for Spark |
| View Spark session information. | |
| Stop and clean up the current Spark connection session. | |
| Establish a Lindorm Ray connection. | Lindorm Ray |
| Establish a Lindorm Ray connection and configure a custom runtime environment, such as by installing dependencies or uploading code. |
FAQ
Q: Why do I receive a
ModuleNotFoundErrororThere is no file with id ...error when referencing a workspace resource?A: Follow these steps to troubleshoot the issue:
Go to Data Development > Resource Management to ensure the MaxCompute Python resource has been saved. If this error occurs in the production environment, verify that the resource is published to it.
In the Notebook editor toolbar, click Restart to reload the resource.
Q: Why are the old resources still referenced after I update the workspace resources?
A: When you republish a modified resource, set the
Dataworks › Notebook › Resource Reference: Download Strategyto autoOverwrite in your Data Studio settings, and then click Restart Kernel in the Notebook toolbar.Q: Why do I receive a
FileNotFoundErrorerror in the development environment when referencing a dataset?A: Ensure that the dataset is mounted in the currently selected personal development environment.
Q: Why does referencing a dataset work in the development environment but fail in the production environment with an
Execute mount dataset exception! Please check your dataset configerror?A: Ensure that the dataset is mounted in the Scheduling Settings of the Notebook node and that you have granted the necessary permissions to the OSS dataset.
Q: How do I check the version of my personal development environment?
A: In your personal development environment, press
Cmd+Shift+Pand enterABOUTto view the current version. If an update to version 0.5.69 or later is required, an upgrade prompt appears. Click One-click Upgrade to update your instance.Q: Why does the connection to the Spark engine fail?
A: Follow these steps:
General checks: On the compute resource list of the workspace details page, confirm that the target compute resource (MaxCompute, EMR, or ADB) is correctly bound to your workspace and that your account has the necessary permissions.
EMR Serverless Spark: Verify that the Livy Gateway exists and is healthy.
AnalyticDB for Spark: Focus on network issues. Confirm that the
vswitchIdandsecurityGroupIdare correctly configured to ensure network connectivity between your personal development environment and the ADB Spark instance. Verify that your security group rules allow traffic on the required ports.