Data Management (DMS) provides row-level access control for all databases that are connected to DMS except NoSQL databases. Different users can access only the rows on which they are granted the access permissions in row-level control tables. For example, a sales manager can view only the data about the region for which the sales manager is responsible and cannot view the data about other regions.
Prerequisites
The database instance in which you want to configure row-level access control is managed in Security Collaboration mode. For more information, see View the control mode of an instance.
Background information
In most cases, field-level data protection and row-level data protection are used to ensure data security.
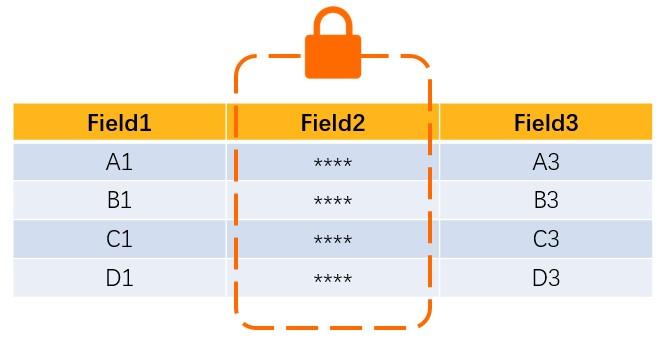
Field-level data protection is implemented by configuring access control on fields.
To protect sensitive fields, you can set different sensitivity levels for the fields and mask or partially mask these fields. For more information, see Manage sensitive data.
For example, employees who are responsible for statistical analysis cannot view the email addresses of customers in the order table.
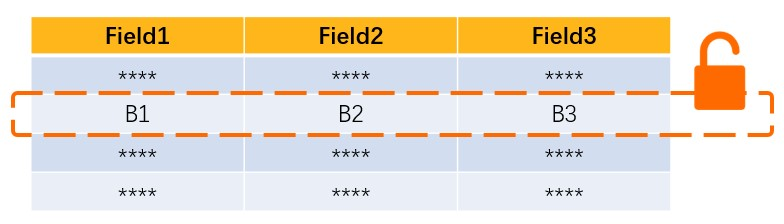
Row-level data protection is implemented by configuring access control on rows.
In a row-level control table, all rows are distinguished by one or more specific control values of a specified field. You can access a row only if you have the access permissions on the row.
For example, employees who work for a chain enterprise can view only the data about the region for which they are responsible and cannot view the data about other regions.
Limits
Only relational databases such as ApsaraDB RDS for MySQL and PolarDB databases support row-level access control.
Only DMS instances managed in Security Collaboration mode support row-level access control.
Only physical databases support row-level access control. Logical databases do not support row-level access control.
If you have the access permissions only on specific rows rather than all rows in a row-level control table, take note of the following limits when you execute SQL statements to query, modify, or delete data in the table:
You must specify the values of the control field in the SQL statements for filtering rows. The specified values must be within the value list of the control field.
You must comply with the following limits on filter conditions:
You can use only the
=andinoperators in the WHERE clause.You cannot use logical operators such as OR, XOR, and logical NOT.
Terms
Control table, control field, and control value
Row-level control table: a table on which you want to configure row-level access control.
Control field: a field based on which row-level access control is implemented in a row-level control table.
Control value: the value of the control field.
Row-level permissions: the permissions on rows. Access to rows is controlled based on the control values of the control field in a row-level control table.
Permissions on specific rows that map a single row value: Access to rows is controlled based on the one or more control values specified in the row value.
Permissions on all rows: Access to all rows of a row-level control table is allowed.
Control group: Control fields with the same control value in different tables can be added to a control group.
For example, Table A and Table B are row-level control tables, and they have the same control values. In this case, you can create a control group to manage row-level access control on Table A and Table B.
Configure row-level access control
To configure row-level access control, make sure that you are a DMS administrator, a database administrator (DBA), or a security administrator. For more information about user roles, see View system roles.
- Log on to the DMS console V5.0.
Move the pointer over the
 icon in the upper-left corner and choose . Note
If you use the DMS console in normal mode, choose in the top navigation bar.
In the upper-right corner of the page, click Global Sensitive Data to go to the Sensitive Data List page.
Click the Row Control tab.
Click Create Control Group.
In the Create Control Group dialog box, enter a control group name in the Control Group field.
Specify one or more row-level control tables and the control field. Then, click Add.
Click Add Row Configuration.
Select a database from the Enter a database name drop-down list. You can also enter one or more keywords to search for a database.
Select the table on which you want to configure row-level access control and the control field.
Optional:Click Add Row Configuration to add more row-level control tables that use the same control values.
After you configure row-level access control for a table, you cannot view data in the table on the SQLConsole tab before you apply for the required row-level permissions.
Optional:Specify one or more control values in a row value. This step is required if you need to apply for permissions on rows that map the row value in a row-level control table.
Find the control group that you want to manage and click Details in the Actions column.
In the Control Value Details panel, click Add Row Value.
In the Import Row Value dialog box, specify whether to append one or more control values to the row value or reset the row value.
Yes: appends one or more control values to the row value.
No: overwrites the original control values with new control values.
Enter one or more control values in the Row Value Content field.
NoteYou can specify multiple control values in a row value. Separate multiple control values with commas (,). After you apply for permissions on the row value, you can access multiple rows that map the control values specified in the row value.
For example, an employee is allowed to view the data of customers only in Beijing and Shanghai in China. In this case, you can enter
Beijing, Shanghaiin the Row Value Content field. After the employee applies for permissions on the row value, the employee can view the data of customers in Beijing and Shanghai.
Apply for row-level permissions
- Log on to the DMS console V5.0.
Move the pointer over the
icon in the upper-left corner and choose . NoteIf you use the DMS console in normal mode, choose in the top navigation bar.
In the upper-right corner of the page, choose .
Enter the database name.
NoteYou can use the percent sign (%) as a placeholder to search for a database in fuzzy match mode.
Select the row-level permission scope.
Single: You can apply for permissions on a single row value.
NoteA row value may contain multiple control values. After you apply for permissions on a row value, you are authorized to query, export, and modify multiple rows that map the control values specified in the row value.
A control value may map multiple rows in a table. If you have the permissions on the row value that contains the control value, you can query, export, and modify multiple rows that map the control value in the table.
All: You can access all rows of a row-level control table.
Click Search.
Select the row-level permissions for which you want to apply and click
 . Note
A hyphen (
-) displayed in the Row Value column indicates that you have permissions on all rows in the table.Select the types and validity period for the permissions for which you want to apply, and enter the application reason in the Reason field.
Click Submit.
After the application is approved, you can query, export, and modify data of specific or all rows in the control table.
 Note
NoteTo release row-level permissions, use one of the following methods:
If you are a regular user, go to the Permissions page and view and release your permissions as needed. For more information, see View owned permissions.
If you are an administrator, click in the top navigation bar. In the left-side navigation pane, click Users. On the page that appears, find the user for which you want to revoke permissions and choose in the Actions column to view and revoke the permissions of the user.