Store sensitive data—usernames, passwords, and certificates—in a Kubernetes Secret rather than hardcoding it in Pod specs or container images. This topic shows how to create a Secret in an Alibaba Cloud Container Compute Service (ACS) cluster and expose it to containers as a mounted volume or as environment variables.
Prerequisites
Before you begin, ensure that you have:
-
A Pod and a Secret in the same cluster and namespace
-
A kubectl client connected to the cluster. See Obtain a cluster kubeconfig file and use kubectl to connect to the cluster
Create a Secret
The following example creates a Secret named secret-test that holds a username and password.
Encode your credentials
Secret data must be Base64-encoded. Run the following commands to encode your values:
echo -n 'admin' | base64
# Output: YWRtaW4=

echo -n '12345' | base64
# Output: MTIzNDU=
Use the encoded output in the data field of your Secret manifest.
Create the Secret using kubectl
-
Apply the following manifest:
apiVersion: v1
kind: Secret
metadata:
  name: secret-test
type: Opaque
data:
  username: YWRtaW4=  # Base64-encoded value of "admin"
  password: MTIzNDU=  # Base64-encoded value of "12345"
kubectl apply -f secret-test.yamlAlternatively, skip the encoding step and create the Secret directly:
kubectl create secret generic secret-test \
  --from-literal='username=admin' \
  --from-literal='password=12345'
Create the Secret using the ACS console
For console-based creation, see Create a Secret.
Use a Secret as a volume
Mounting a Secret as a volume exposes each key as a file inside the container. In the following example, the username and password keys from secret-test are available as files under /srt.
Use kubectl
-
Create a file named
example0.yamlwith the following content:apiVersion: v1 kind: Pod metadata: name: pod0 spec: containers: - name: redis image: redis volumeMounts: - name: srt # must match the volume name below mountPath: "/srt" readOnly: true volumes: - name: srt # must match the volumeMount name above secret: secretName: secret-test -
Create the Pod:
kubectl apply -f example0.yaml -
Verify that the Secret is mounted at the API level:
kubectl describe pod pod0 | grep -A 4 VolumesExpected output:
Volumes: srt: Type: Secret (a volume populated by a Secret) SecretName: secret-test Optional: false -
Confirm the files are readable inside the container:
kubectl exec pod0 -- ls /srtExpected output:
password usernamekubectl exec pod0 -- cat /srt/username # Output: admin kubectl exec pod0 -- cat /srt/password # Output: 12345
Use the console
-
Log on to the ACS console. In the left-side navigation pane, click Clusters.
-
On the Clusters page, find the cluster you want to manage and click its ID. In the left-side navigation pane of the cluster details page, choose Workloads > Deployments.
-
On the Deployments tab, click Create from Image.
For parameter descriptions, see Create a stateless application (Deployment).
-
On the Basic Information step, configure the parameters and click Next.
-
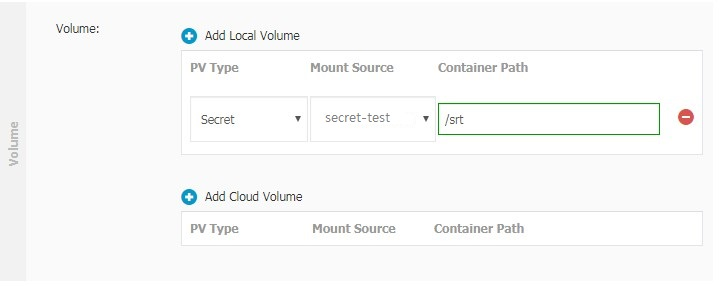
On the Container step, in the Volume section, click Add Local Storage. Set PV Type to Secret. For Mount Source, select the Secret you created earlier. For Container Path, enter the mount path inside the container. Click Next. The following figure shows a configuration example.
-
On the Advanced tab, configure the remaining parameters and click Create.
Use a Secret as environment variables
Injecting a Secret as environment variables makes each referenced key available as a named variable inside the container.
Use kubectl — reference specific keys
The following example sets USERNAME and PASSWORD from secret-test as environment variables in pod1.
-
Create a file named
example1.yamlwith the following content:apiVersion: v1 kind: Pod metadata: name: pod1 spec: containers: - name: redis image: redis env: - name: USERNAME valueFrom: secretKeyRef: name: secret-test # Secret name key: username # key within the Secret - name: PASSWORD valueFrom: secretKeyRef: name: secret-test key: password -
Create the Pod:
kubectl apply -f example1.yaml -
Verify the environment variables are set:
kubectl describe pod pod1 | grep -A 2 EnvironmentExpected output:
Environment: USERNAME: <set to the key 'username' in secret 'secret-test'> Optional: false PASSWORD: <set to the key 'password' in secret 'secret-test'> Optional: false -
Confirm the values are readable inside the container:
kubectl exec pod1 -- /bin/sh -c 'echo $USERNAME'
# Output: admin

kubectl exec pod1 -- /bin/sh -c 'echo $PASSWORD'
# Output: 12345
Use kubectl — inject all keys at once
If a Secret has many keys, use envFrom to expose all of them as environment variables in a single declaration. Each key in the Secret becomes an environment variable name in the Pod.
spec:
  containers:
  - name: redis
    image: redis
    envFrom:
    - secretRef:
        name: secret-test
Apply the manifest and the container will have both username and password available as environment variables.
Use the console
-
Log on to the ACS console. In the left-side navigation pane, click Clusters.
-
On the Clusters page, find the cluster you want to manage and click its ID. In the left-side navigation pane of the cluster details page, choose Workloads > Deployments.
-
On the Deployments page, click Create from Image.
For parameter descriptions, see Create a stateless application (Deployment).
-
On the Basic Information tab, configure the parameters and click Next.
-
On the Container tab, in the Environments section, click Add. Set Type to Secrets. For Value/ValueFrom, select the Secret you created earlier. Select the key to reference and enter a name for the variable.