Container Compute Service (ACS) supports the creation of stateless applications using container images, YAML orchestration templates, and the kubectl command line. This topic describes how to create a stateless application in an ACS cluster, using an Nginx application as an example.
Console
Create using an image
Step 1: Configure basic application information
-
Log on to the ACS console. In the left navigation pane, click Clusters.
-
On the Clusters page, click the name of the target cluster. In the left navigation pane, choose Workloads > Deployments.
-
On the Deployments page, click Create with Image.
In the Basic information configuration wizard, you can specify the basic information for your application.
Configuration item
Description
Application name
Enter a name for your application.
Number of replicas
The number of pods for your application. Default: 2.
Workload
Select Stateless (Deployment).
Labels
Add a label to identify your application.
Annotations
Add an annotation to your application.
Instance type
Select a compute type. For more information about compute types, see Overview of ACS pod instances.
QoS type
Select a Quality of Service (QoS) type.
Click Next to go to the Container configuration wizard page.
Step 2: Configure containers
On the Container configuration wizard page, configure the container image, resources, ports, environment variables, health checks, lifecycle, volumes, and logs.
To add multiple containers to your application's pod, click Add container on the right side of the Container 1 tab.
In the Basic configuration section, configure the container basics.
Configuration item
Description
Image name
Select an image.
Click Select image to choose your image.
Container Registry Enterprise Edition: Select enterprise edition images hosted in Container Registry (ACR). You must specify the region and ACR instance where the image resides. For more information about ACR, see What Is Container Registry (ACR)?.
Container Registry Personal Edition (must be enabled first): Select a personal edition image hosted in Container Registry (ACR). You must specify the region where the image resides and the ACR instance.
Artifact Center: Includes base OS images, language runtime images, and AI or big data related images. This example uses an Nginx image from Artifact Center. For more information about Artifact Center, see Artifact Center.
(Optional) Set the image pull policy.
Select an image pull policy from the Image pull policy drop-down list. By default, no policy is set, and Kubernetes uses IfNotPresent.
Use local image if present (IfNotPresent): If the image exists locally (previously pulled to the host), it will not be pulled again. If the image does not exist locally, it will be pulled.
Always pull image (Always): Pull the image every time you deploy or scale out. Do not use the local image.
Use only local image (Never): Use only the local image.
(Optional) Set the image secret.
Click Set image secret to secure private images with a secret.
For Container Registry Personal Edition instances, you can pull container images by setting an image secret. For more information about setting secrets, see Manage secrets.
For Container Registry Enterprise Edition instances, you can pull images using the passwordless component. For instructions, see Pull ACR images without passwords.
Required resources
Set resource quotas for the container.
CPU: Specify the CPU resource request and limit for the container. By default, the request and limit are equal. The billing method is pay-as-you-go. If you use a YAML template to set a resource limit that differs from the resource request, the resource request is automatically overridden to match the resource limit. For more information, see Resource specifications.
Memory: Specify the memory resource request and limit for the container. By default, the request and limit are equal. The billing method is pay-as-you-go. If you use a YAML template to set a resource limit that differs from the resource request, the resource request is automatically overridden to match the resource limit. For more information, see Resource specifications.
Container startup command
(Optional) Set the container startup command.
stdin: Send console input to the container.
tty: Use standard input console as the container's console input.
NoteYou typically select both stdin and tty. This binds the terminal (tty) to the container's standard input (stdin). For example, an interactive program reads standard input from users and displays output to the terminal.
Init container
(Optional) Select this option to create an init container.
An init container blocks or delays the startup of application containers. After the init container runs successfully, application containers in the pod start in parallel. For example, you can check the availability of dependent services. Init containers can include utilities and installation scripts not present in the application image. These tools initialize the application container's runtime environment, such as setting kernel parameters or generating configuration files. For more information, see Init Container.
(Optional) In the Port settings section, click Add to configure container ports.
Configuration item
Description
Name
Specify a name for the port.
Container port
Specify the port number to expose. Valid values are from 1 to 65535.
Protocol
Supports TCP and UDP.
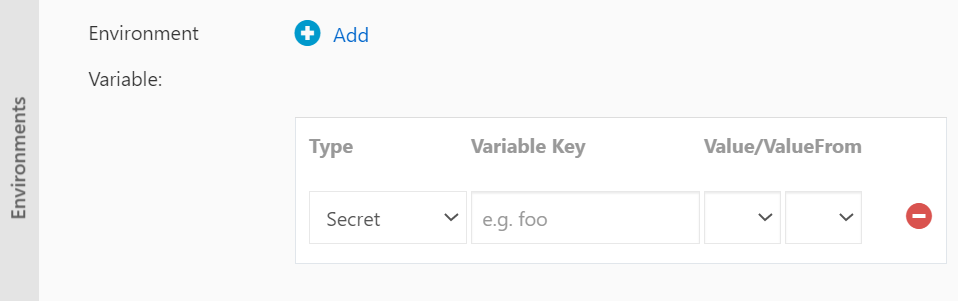
(Optional) In the Environment variables section, click Add to configure environment variables.
Configure environment variables for the pod using key-value pairs. You can use environment variables to add environment flags or pass configurations. For more information, see Pod Environment Variables.
Configuration item
Description
Type
Specifies the type of the environment variable.
Custom
Configuration item
Secret
Variable/variable reference
Resource reference
Configuration items and secrets support references to all files.
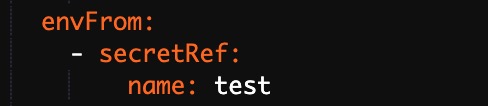
This example uses a secret. Select Secret as the type, and then select the target secret. By default, all files in the secret are referenced.
The corresponding YAML file also references the entire secret.
Variable name
The name of the environment variable.
Variable/variable reference
Set the value of the reference variable.
(Optional) In the Health checks section, you can enable Liveness probe, Readiness probe, and Startup probe as needed.
Liveness: Used to determine whether a container is running as normal. If a specified number of checks fail, the kubelet restarts the container. Liveness probes can detect issues that cause a container to remain in a running state but fail to respond, such as a deadlock.
Readiness: Used to determine whether a container is ready to accept traffic. A pod is attached to a service backend only after its readiness probe succeeds.
Startup: Executed only when the container starts to check whether it has started successfully. The Liveness Probe and Readiness Probe are executed only after the startup probe succeeds.
For more information, see Configure Liveness, Readiness, and Startup Probes.
Configuration item
Description
HTTP request
Sends an HTTP GET request to the container. The following parameters are supported:
Protocol: HTTP or HTTPS.
Path: The path to access on the HTTP server.
Port: The exposed port number or port name. The value must be in the range of 1 to 65535.
HTTP headers: The custom headers in the HTTP request. HTTP allows duplicate headers. You can configure the headers using key-value pairs.
Initial delay (seconds): initialDelaySeconds. The number of seconds to wait before the first probe is initiated after the container starts. The default value is 3.
Period (seconds): periodSeconds. The interval between probes. The default value is 10. The minimum value is 1.
Timeout (seconds): timeoutSeconds. The probe timeout duration. The default value is 1. The minimum value is 1.
Healthy threshold: The minimum number of consecutive successful probes required for the container to be considered healthy. The default value is 1. The minimum value is 1. For liveness probes, this value must be 1.
Unhealthy threshold: The minimum number of consecutive failed probes required for the container to be considered unhealthy. The default value is 3. The minimum value is 1.
TCP connection
Sends a TCP socket request to the container. Kubelet attempts to open a socket on the specified port. If the connection is successful, the container is considered healthy. If the connection fails, the container is considered unhealthy. The following parameters are supported:
Port: The exposed port number or port name. The value must be in the range of 1 to 65535.
Initial delay (seconds): initialDelaySeconds. The number of seconds to wait before the first probe is initiated after the container starts. The default value is 15.
Period (seconds): periodSeconds. The interval between probes. The default value is 10. The minimum value is 1.
Timeout (seconds): timeoutSeconds. The probe timeout duration. The default value is 1. The minimum value is 1.
Healthy threshold: The minimum number of consecutive successful probes required for the container to be considered healthy. The default value is 1. The minimum value is 1. For liveness probes, this value must be 1.
Unhealthy threshold: The minimum number of consecutive failed probes required for the container to be considered unhealthy. The default value is 3. The minimum value is 1.
Command line
Runs a command inside the container to check its health. The following parameters are supported:
Command line: The command that is used to check the health of the container.
Initial delay (seconds): initialDelaySeconds. The number of seconds to wait before the first probe is initiated after the container starts. The default value is 5.
Period (seconds): periodSeconds. The interval between probes. The default value is 10. The minimum value is 1.
Timeout (seconds): timeoutSeconds. The probe timeout duration. The default value is 1. The minimum value is 1.
Healthy threshold: The minimum number of consecutive successful probes required for the container to be considered healthy. The default value is 1. The minimum value is 1. For liveness probes, this value must be 1.
Unhealthy threshold: The minimum number of consecutive failed probes required for the container to be considered unhealthy. The default value is 3. The minimum value is 1.
(Optional) In the Lifecycle section, configure the container lifecycle.
Configure a post-start command, a pre-stop command, and a start command for the container. For more information, see Attach Handlers to Container Lifecycle Events.
Configuration item
Description
Start Execution
Specifies the commands and arguments to run before the container starts.
Post-start command
Specifies the commands to run after the container starts.
Stop Preprocessing
Specifies the commands to run before the container is stopped.
(Optional) In the Volumes section, attach volumes to the container.
Local storage: Mount ConfigMaps, secrets, and temporary directories to paths in the container. For more information, see Volumes.
Cloud storage: Supported volume types include disks and NAS. For more information, see Storage overview.
(Optional) In the Log configuration section, you can configure Collection configuration and Custom tags.
Configuration item
Description
Collection configuration
Logstore: Creates a Logstore in Simple Log Service to store collected logs.
Log path in container: Supports stdout and text logs.
Stdout: Collects the container’s standard output logs.
Text logs: Collects logs from a specified path in the container. In this example, collects all text logs under
/var/log/nginx. Wildcards are supported.
Custom tags
Add custom tags. When set, these tags are included with the container’s log output. Custom tags help you tag logs for statistics and filtering.
You can click Next to go to the Advanced configuration wizard page.
Step 3: Complete advanced configuration
On the Advanced configuration wizard page, you can configure access, scaling, scheduling, labels, and annotations.
In the Access settings section, configure how to expose backend pods.
You can choose how to expose the backend pods. This example uses a ClusterIP Service and an Ingress to create a publicly accessible Nginx application.
Configure a service: Click Create next to Service to configure service settings.
Configure Ingress: You can click Create next to Ingress to set routing rules for backend pods.
(Optional) In the Scaling configuration section, enable Metric-based scaling to meet your application’s needs under varying loads.
ACK supports metric-based pod scaling. This feature automatically adjusts the number of pods based on CPU and memory usage.
NoteTo enable autoscaling, you must specify resource requests for the container. Otherwise, autoscaling does not take effect.
Configuration item
Description
Metric
Supports CPU and memory usage. Must match the required resource type.
Trigger condition
The percentage of resource usage that triggers scaling. Scaling starts when usage exceeds this value.
Maximum number of replicas
The maximum number of pods for this workload.
Minimum number of replicas
The minimum number of pods for this workload.
ACK supports scheduled pod scaling. This feature scales the number of pods up or down at scheduled times. Before you enable scheduled scaling, you must install the ack-kubernetes-cronhpa-controller component. For more information, see CronHPA.
(Optional) In the Labels and annotations section, click Add to add labels and annotations to the pod.
Click Create.
Step 4: View application information
After creation succeeds, you land on the success page by default. You can click View application details to go to the Deployment details page.
You can also view the Deployment on the Stateless page. To open the details page, click the Deployment name or Actions > Details.
Create using YAML
When you use an ACK orchestration template, you must define the resource objects that your application requires. You can use label selectors and other mechanisms to combine these objects into a complete application.
This example shows how to create an Nginx application using an orchestration template. The template includes a Deployment and a Service. The Deployment creates the pod resources. The Service is bound to the backend pods to form a complete Nginx application.
-
Log on to the ACS console. In the left navigation pane, click Clusters.
-
On the Clusters page, click the name of the target cluster. In the left navigation pane, choose Workloads > Deployments.
-
On the Deployments page, click Create from YAML in the upper-right corner.
On the Create page, configure the template and click Create.
Sample template: ACS provides sample Kubernetes YAML templates for various resource types to help you deploy resources quickly. You can write your own templates following Kubernetes YAML format requirements to describe your desired resources.
Add workload: You can quickly define a YAML template using this feature.
Use existing template: You can import an existing orchestration template into the template configuration page.
Save template: Save your configured orchestration template.
The following is a sample YAML template for an Nginx application. You can use this template to quickly create an Nginx Deployment. By default, a Server Load Balancer (SLB) instance is created.
NoteACK supports Kubernetes YAML orchestration. Use
---to separate resource objects. This lets you create multiple resources using a single template.(Optional) When you mount a volume, existing files in the mount directory are overwritten by default. To preserve these files, configure the
subPathparameter.
After you click Create, the deployment status is displayed.
kubectl
You can use kubectl commands to create and view applications.
Connect to the cluster. For more information, see Connect to ACK clusters using kubectl or Use kubectl on Cloud Shell to manage ACK clusters.
Run the following command to start a container. In this example, an Nginx web server is started.
kubectl create deployment nginx --image=registry.cn-hangzhou.aliyuncs.com/acs-sample/nginx:latestRun the following command to create a Service for the container. Setting
--type=LoadBalancercreates an Alibaba Cloud Server Load Balancer (SLB) instance that routes traffic to the Nginx container.kubectl expose deployment nginx --port=80 --target-port=80 --type=LoadBalancerRun the following command to list the running Nginx containers.
kubectl get pod |grep nginxExpected output:
NAME                                   READY     STATUS    RESTARTS   AGE
nginx-2721357637-d****                 1/1       Running   1          9h