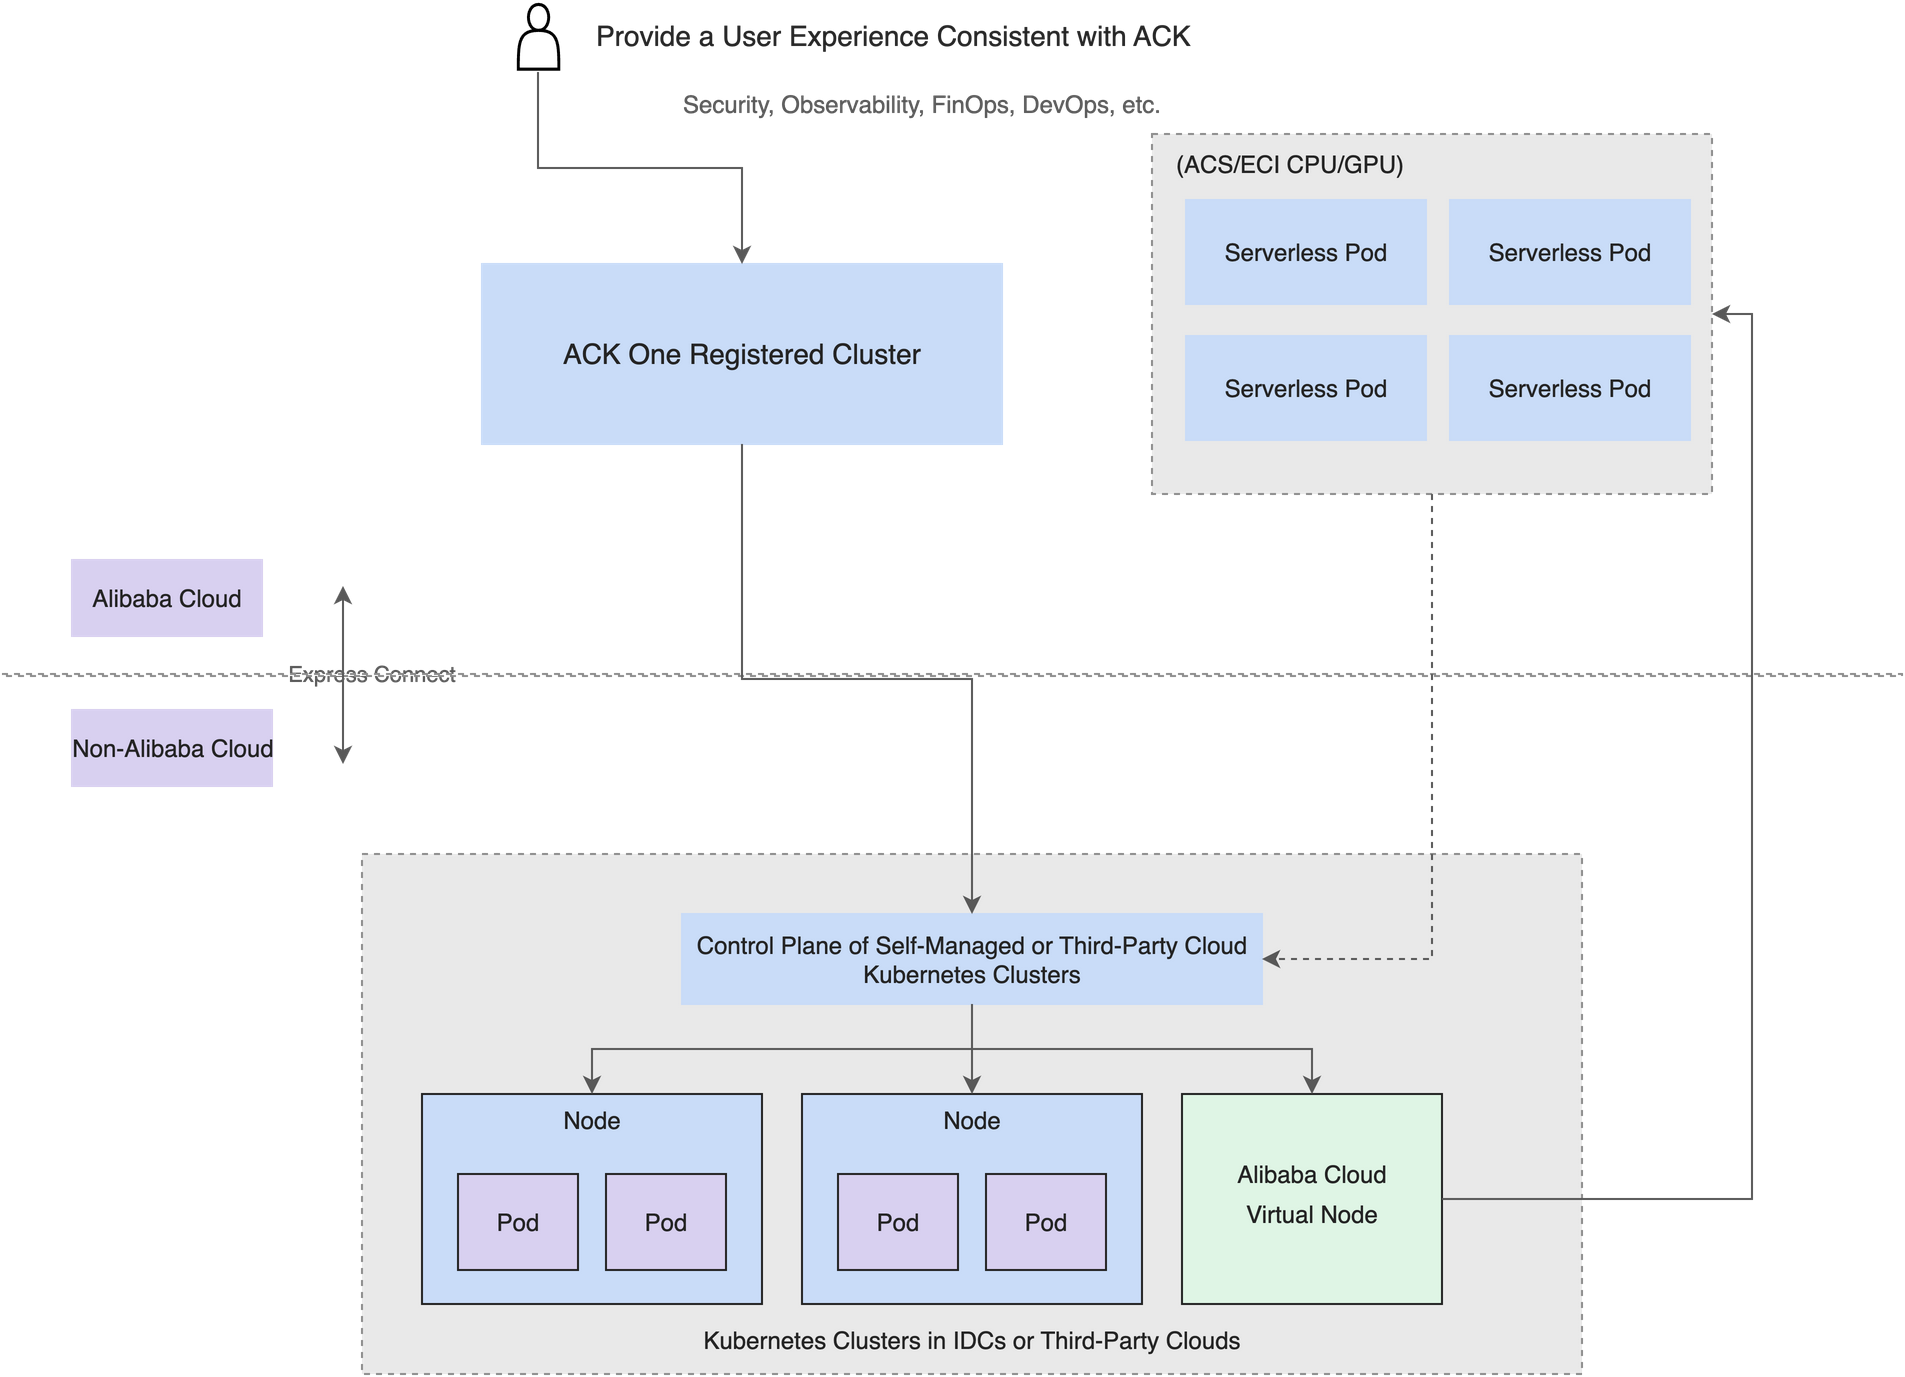
Container Compute Service (ACS) is integrated into an registered cluster through virtual nodes. Deploy virtual nodes in an registered cluster to access the container computing power that ACS provides, and create pods on demand without planning node compute capacity.
How virtual nodes provide ACS computing power
Container Compute Service (ACS) is a container service that uses Kubernetes as its user interface and provides computing resources that comply with container specifications. ACS uses a layered architecture that separates the Kubernetes control plane from the underlying container computing power. The ACS computing resource layer is responsible for scheduling and allocating resources for Pods, while Kubernetes manages application workloads such as Deployments, Services, StatefulSets, and CronJobs on top of this layer.
You can connect ACS container computing power to a Kubernetes cluster as a virtual node. This gives your cluster powerful elasticity, unconstrained by the computing capacity of its nodes. When ACS takes over the management of the underlying infrastructure for Pods, Kubernetes no longer needs to directly handle the placement and startup of individual Pods or monitor the resource status of underlying virtual machines. ACS ensures the required Pod resources are always available.
In an registered cluster, install the ack-virtual-node add-on from the Component Center to deploy virtual nodes and create ACS pods. When the cluster needs to scale out, create ACS pods on virtual nodes on demand, without planning the compute capacity of nodes. ACS pods can communicate over the network with the pods on the physical nodes of the cluster. For more information, see Registered clusters.
To use resources more efficiently, shorten scale-out times, and reduce costs, schedule long-running workloads whose traffic fluctuates elastically to virtual nodes. As traffic decreases, quickly release the pods on virtual nodes to reduce usage costs.
Pods on virtual nodes run in a secure, isolated container runtime environment on ACS. Each pod corresponds to one ACS instance.
Prerequisites
You have created an registered cluster and connected it to a Kubernetes cluster in a data center or on another cloud provider. Kubernetes 1.24 or later is recommended. For more information, see Create an ACK One registered cluster.
You have installed the
ack-virtual-nodecomponent, version 2.13.0 or later. For more information, see Grant RAM permissions to theack-virtual-nodecomponent and Install theack-virtual-nodecomponent.
Example: use ACS CPU computing power
As of version 2.13.0 or later, the ack-virtual-node add-on provides both ACS and Elastic Container Instance (ECI) computing power.
When you schedule a Pod to a virtual node, Elastic Container Instance (ECI) computing power is used by default unless you specify ACS.
To use ACS CPU computing power in an ACK One registered cluster, perform the following steps:
Create a file named
nginx.yamlwith the following content:apiVersion: apps/v1 kind: Deployment metadata: name: nginx labels: app: nginx spec: replicas: 2 selector: matchLabels: app: nginx template: metadata: labels: app: nginx alibabacloud.com/acs: "true" # Use ACS computing power. alibabacloud.com/compute-class: general-purpose # The compute class of the ACS pod. Default value: general-purpose. alibabacloud.com/compute-qos: default # The QoS class of the ACS pod. Default value: default. spec: containers: - name: nginx image: mirrors-ssl.aliyuncs.com/nginx:stable-alpine ports: - containerPort: 80 protocol: TCP resources: limits: cpu: 2 requests: cpu: 2Run the following command to create the NGINX application.
kubectl apply -f nginx.yamlRun the following command to check the pod status.
kubectl get pods -o wideExpected output:
NAME                     READY   STATUS    RESTARTS   AGE     IP               NODE                            NOMINATED NODE   READINESS GATES
nginx-54bcbc9b66-****   1/1     Running   0          3m29s   192.168.XX.XXX   virtual-kubelet-cn-shanghai-l   <none>           <none>
nginx-54bcbc9b66-****   1/1     Running   0          3m29s   192.168.XX.XXX   virtual-kubelet-cn-shanghai-l   <none>           <none>
These two Pods are scheduled to nodes labeled
type=virtual-kubeletthroughnodeSelector.Run the following command to view the details of the NGINX pod.
kubectl describe pod nginx-54bcbc9b66-****Expected output:
Annotations:  ProviderCreate: done
              alibabacloud.com/instance-id: acs-uf6008giwgjxlvn*****
              alibabacloud.com/pod-ephemeral-storage: 30Gi
              alibabacloud.com/pod-use-spec: 2-2Gi
              kubernetes.io/pod-stream-port: 10250
              network.alibabacloud.com/enable-dns-cache: false
              topology.kubernetes.io/region: cn-shanghai
The
alibabacloud.com/instance-id: acs-uf6008giwgjxlvn*****annotation in the output confirms that the pod is an ACS pod.
Example: use ACS GPU computing power
The process for using ACS GPU computing power is similar to that for ACS CPU computing power, but it requires specific component versions and some additional configuration.
ACS GPU computing power in an registered cluster is in invitational preview. To apply for access, submit a ticket.
Usage
...
     labels:
        # Declare the ACS GPU resource requirement in the labels.
        alibabacloud.com/compute-class: gpu     # For GPU types, use the fixed value 'gpu'.
        alibabacloud.com/compute-qos: default   # The QoS class. This has the same meaning as for regular ACS computing power.
        alibabacloud.com/gpu-model-series: example-model  # The GPU model series. Replace with your actual model, such as T4.
...For more information about ACS compute classes and computing power quality, see Mappings between compute types and computing power quality classes.
For available GPU models for
gpu-model-series, see Specify GPU models and driver versions for ACS GPU-accelerated Pods.
To use ACS GPU computing power in an ACK One registered cluster, perform the following steps:
Create a file named
gpu-demo.yamlwith the following content.apiVersion: apps/v1 kind: Deployment metadata: name: dep-node-selector-demo labels: app: node-selector-demo spec: replicas: 1 selector: matchLabels: app: node-selector-demo template: metadata: labels: app: node-selector-demo # ACS attributes alibabacloud.com/acs: "true" # Use ACS computing power. alibabacloud.com/compute-class: gpu alibabacloud.com/compute-qos: default alibabacloud.com/gpu-model-series: example-model # The GPU model series. Replace the value with the actual model, such as T4. spec: containers: - name: node-selector-demo image: registry-cn-hangzhou.ack.aliyuncs.com/acs/stress:v1.0.4 command: - "sleep" - "1000h" resources: limits: cpu: 1 memory: 1Gi nvidia.com/gpu: "1" requests: cpu: 1 memory: 1Gi nvidia.com/gpu: "1"Run the following command to create the GPU workload.
kubectl apply -f gpu-demo.yamlRun the following command to check the running status of the GPU workload.
kubectl get pod dep-node-selector-demo-9cdf7bbf9-s**** -o yamlExpected output:
phase: Running

    resources:
      limits:
        #other resources
        nvidia.com/gpu: "1"
      requests:
        #other resources
        nvidia.com/gpu: "1"