All Products
Search
Document Center

Container Compute Service:Build a Dify Q&A assistant on ACK

Last Updated:Jun 21, 2026

With Dify, you can integrate your corporate or personal knowledge base into large language model (LLM) applications to create highly customized AI Q&A solutions. You can then integrate these solutions into your business to improve R&D and management efficiency. Additionally, deploying Dify on a Container Compute Service (ACS) cluster enables seamless scaling to meet fluctuating business demands and accelerate your growth.

Solution overview

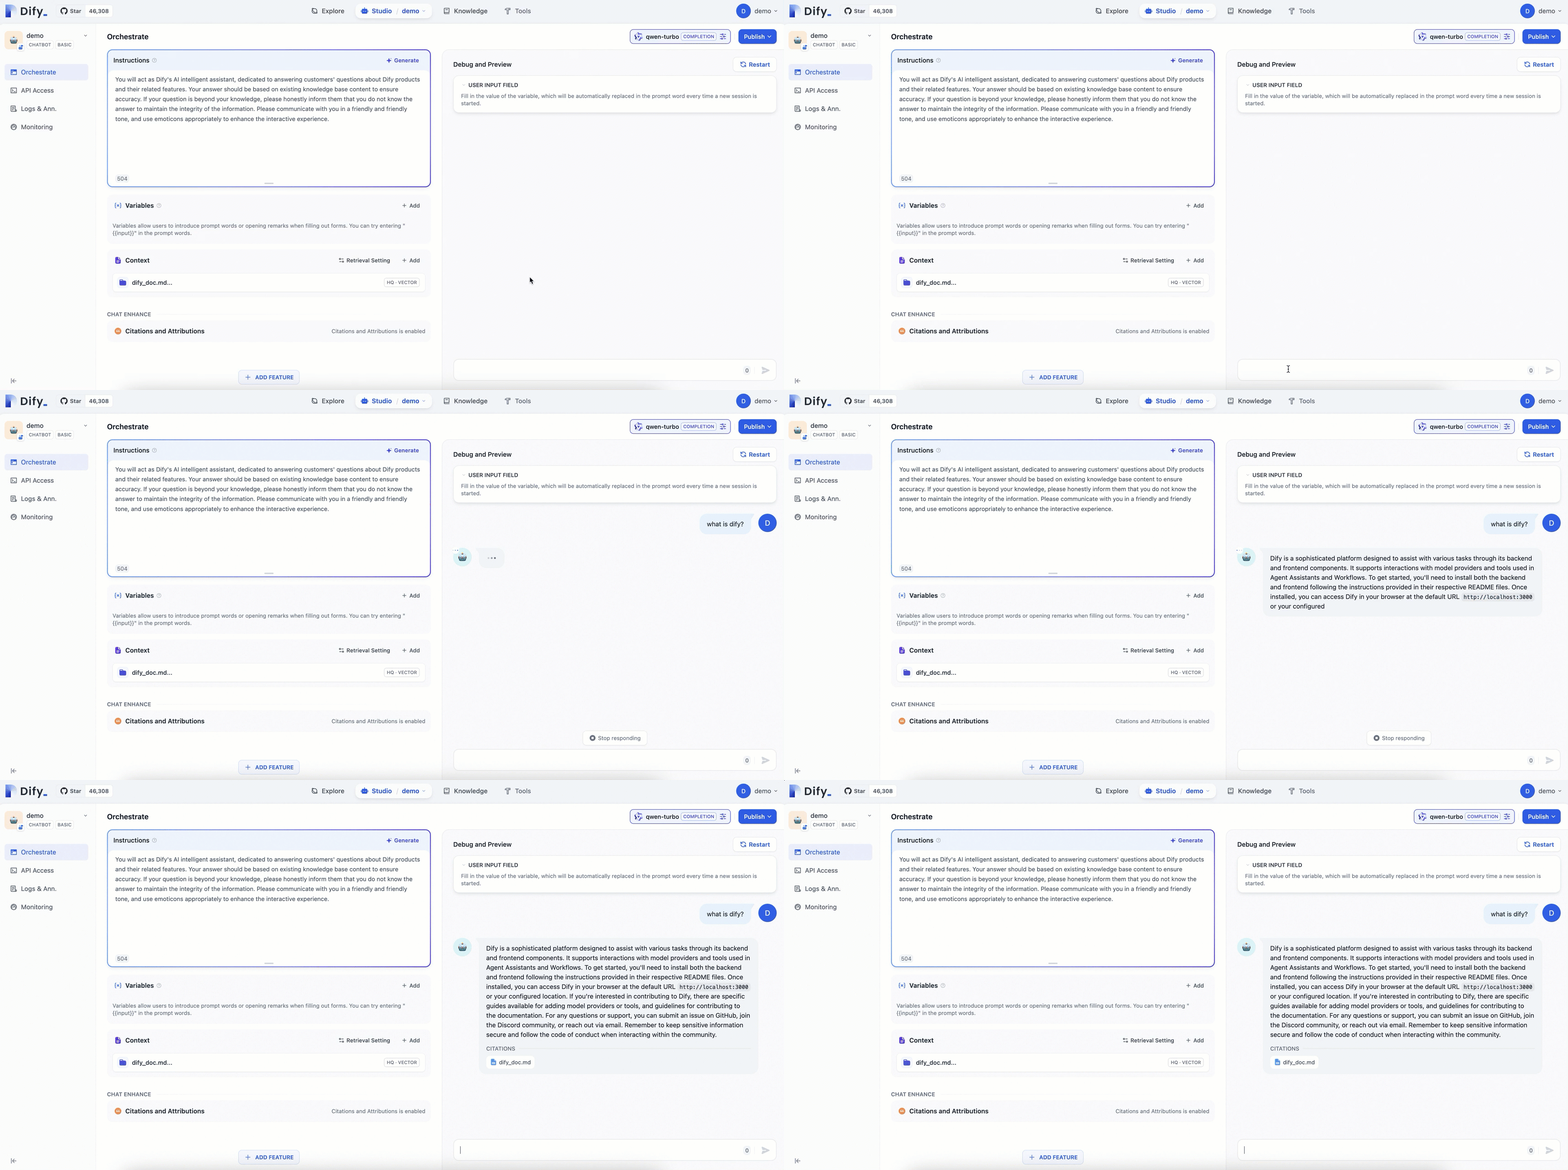
Dify custom AI application example

2024-08-21_16-01-26 (1)

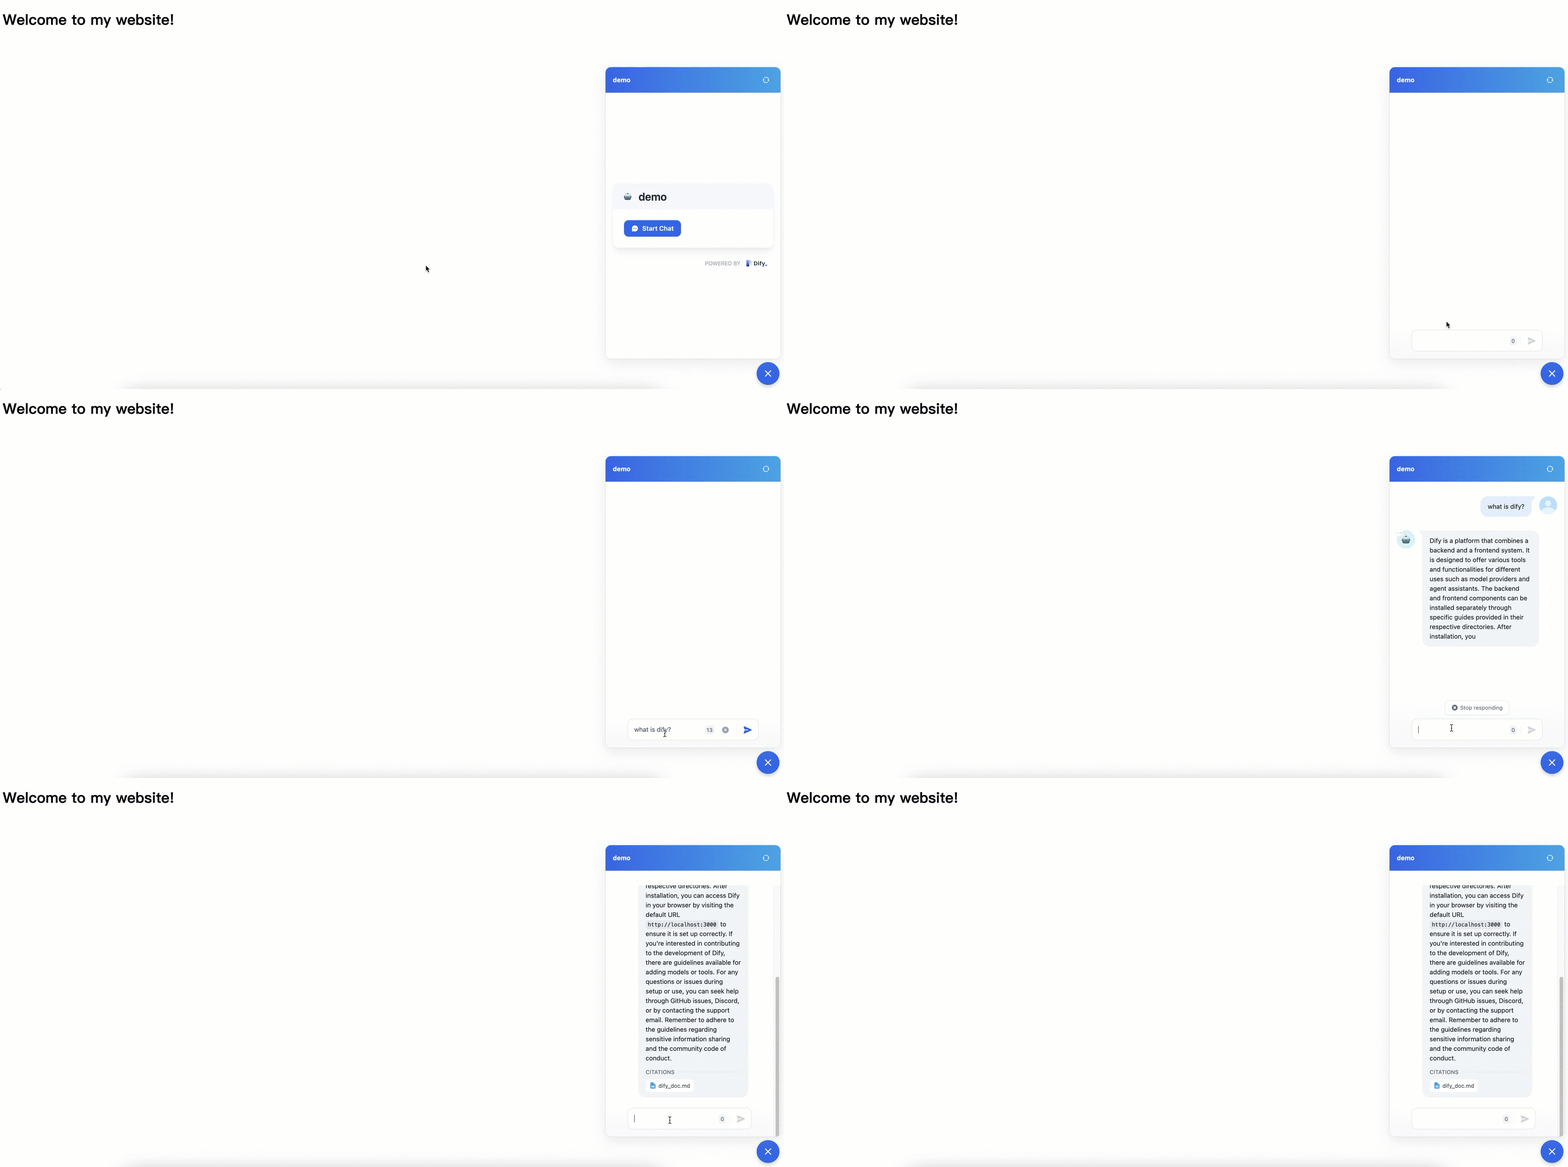
Web-integrated AI application example

2024-08-23_14-14-02 (1)

Set up a dedicated AI Q&A assistant in just three steps:

  1. Install the ack-dify component: Create an ACS cluster and install the ack-dify component.

  2. Add an AI Q&A assistant: Access Dify and add an AI Q&A assistant to your website.

  3. Customize the AI Q&A assistant: Prepare a dedicated knowledge base so the AI assistant can answer questions it could not answer accurately before, helping you handle professional inquiries more effectively.

Introduction to Dify

Dify is an open-source large language model (LLM) application development platform that combines Backend-as-a-Service (BaaS) and LLMOps. It enables both developers and non-technical users to build production-grade generative AI applications without reinventing core components.

Key components of Dify's architecture:

  1. Core technology components: Dify integrates essential components for creating LLM applications, including compatibility with numerous models, a user-friendly prompt design interface, a high-performance Retrieval-Augmented Generation (RAG) system, and a customizable Agent architecture.

  2. Visual orchestration and operations: Dify's intuitive interface enables visual orchestration of prompts, streamlined operational workflows, and efficient management of datasets. This significantly accelerates the AI application development process, allowing developers to deploy quickly or integrate LLMs into existing systems, and supports continuous operational optimization.

  3. Application templates and orchestration framework: Dify provides developers with out-of-the-box application templates and an orchestration framework, enabling them to rapidly develop generative AI applications based on large language models. The platform also supports instant, smooth scaling to meet changing business needs, driving business growth.

Together, these components provide a comprehensive platform for rapidly developing and deploying generative AI applications.

1. Install the ack-dify component

If you are already familiar with creating ACS clusters, you can proceed to create a cluster that suits your business needs.

1.1 Prerequisites

  1. An ACS cluster of version 1.26 or later.

  2. The cluster's kubeconfig file and a kubectl connection.

  3. Follow the steps to configure a dynamic NAS volume.

    1. Create a StorageClass.

      Procedure

      1. Modify the following YAML based on the parameter descriptions and save it as nas-sc.yaml.

        apiVersion: storage.k8s.io/v1
        kind: StorageClass
        metadata:
          name: alibabacloud-cnfs-nas
        mountOptions:
        - nolock,tcp,noresvport
        - vers=3
        parameters:
          volumeAs: filesystem
          fileSystemType: standard
          storageType: Performance
          regionId: cn-hangzhou
          zoneId: cn-hangzhou-g
          vpcId: "vpc-2ze2fxn6popm8c2mzm****"
          vSwitchId: "vsw-2zwdg25a2b4y5juy****"
          accessGroupName: DEFAULT_VPC_GROUP_NAME
          deleteVolume: "false"
        provisioner: nasplugin.csi.alibabacloud.com
        reclaimPolicy: Retain

        Parameter

        Description

        volumeAs

        Only filesystem is supported. This value indicates that a NAS file system is automatically created. Each NAS volume corresponds to a NAS file system.

        fileSystemType

        The type of the NAS file system.

        storageType

        The storage specification of the NAS file system.

        • For General-purpose NAS, valid values are:

          • Performance (default): Performance type.

          • Capacity: Capacity type.

        • For Extreme NAS, valid values are:

          • standard (default): Standard type.

          • advanced: Advanced type.

        regionId

        The region of the NAS file system. This must be the same as the region of your ACS cluster.

        zoneId

        The zone where the NAS file system resides. Select a zone based on the vSwitch that is used by the Pods in your ACS cluster. The zone of a NAS file system depends on its storage specification.

        Note

        A NAS file system can be mounted across zones within the same VPC, but we recommend using the same zone for better performance.

        vpcId, vSwitchId

        The VPC and vSwitch IDs for the NAS file system's mount target. The mount target must use the same VPC and vSwitch as your cluster's Pods.

        accessGroupName

        The permission group of the mount target for the NAS file system. The default value is DEFAULT_VPC_GROUP_NAME.

        provisioner

        The type of the provisioner. The value must be nasplugin.csi.alibabacloud.com, which indicates that the Alibaba Cloud NAS CSI plug-in is used.

        reclaimPolicy

        The reclaim policy of the persistent volume (PV). Only Retain is supported. This policy preserves the corresponding NAS file system and mount target when the PV is deleted.

      2. Create the StorageClass.

        kubectl create -f nas-sc.yaml
      3. Check the StorageClass.

        kubectl get sc

        Expected output:

        NAME                             PROVISIONER                       RECLAIMPOLICY   VOLUMEBINDINGMODE      ALLOWVOLUMEEXPANSION   AGE
        alibabacloud-cnfs-nas            nasplugin.csi.alibabacloud.com    Retain          Immediate              false                  13m
        ......
    2. Create a PersistentVolumeClaim (PVC).

      Procedure

      1. Save the following YAML content as nas-pvc-fs.yaml.

        kind: PersistentVolumeClaim
        apiVersion: v1
        metadata:
          name: nas-pvc-fs
        spec:
          accessModes:
            - ReadWriteMany
          storageClassName: alibabacloud-cnfs-nas
          resources:
            requests:
              storage: 20Gi

        The following table describes the parameters.

        Parameter

        Description

        accessModes

        The access modes.

        storage

        The storage capacity to be allocated to the Pod. This is the capacity of the NAS volume to be created.

        Note

        Extreme NAS file systems have a minimum capacity of 100 GiB. If the NAS file system type defined in the StorageClass is Extreme NAS, the value of storage must be greater than or equal to 100 GiB. Otherwise, the corresponding PV cannot be created.

        storageClassName

        The name of the StorageClass to be bound.

      2. Create the PVC.

        kubectl create -f nas-pvc-fs.yaml
      3. Check the PVC.

        kubectl get pvc

        The following sample output shows that the PVC is bound to an automatically created PV.

        NAME         STATUS   VOLUME                                     CAPACITY   ACCESS MODES   STORAGECLASS            VOLUMEATTRIBUTESCLASS  AGE
        nas-pvc-fs   Bound    nas-04a730ba-010d-4fb1-9043-476d8c38****   20Gi       RWX            alibabacloud-cnfs-nas   <unset>                14s

1.2 Deploy the component

Deploy the ack-dify component on your cluster for the Dify service.

  • Log on to the Container Compute Service (ACS) console and choose Clusters from the left-side navigation pane. Click the name of the target cluster to go to its details page.

    You do not need to configure the Application Name and Namespace for the component. After you click Next, a Confirm dialog box appears. Click Yes to use the default application name (ack-dify) and namespace (dify-system). Then, set Chart Version to 1.1.5 and click OK to complete the installation of the ack-dify component.

    On the cluster details page, in the left navigation bar, click Applications > Helm. On the Helm page, click the Create button. In the Create panel, on the Application Scenarios tab, select AIGC/LLM, and then select the ack-dify Chart.

  • Wait about one minute and run the following command. When all Pods in the dify-system namespace are in the Running state, the ack-dify component is installed.

    kubectl get pod -n dify-system

    If you find that a Pod is in the Pending state, your cluster may be missing the PVC dependency required by ack-dify. In this case, create a NAS StorageClass for the cluster as described in Prerequisites. For more information about how to troubleshoot Pod exceptions, see Troubleshoot Pod exceptions.

2. Add an AI Q&A assistant

2.1 Access the Dify service

  1. Enable public access for the ack-dify service.

    Note

    Public access is for demonstration purposes. For data security in a production environment, enable the Access Control feature.
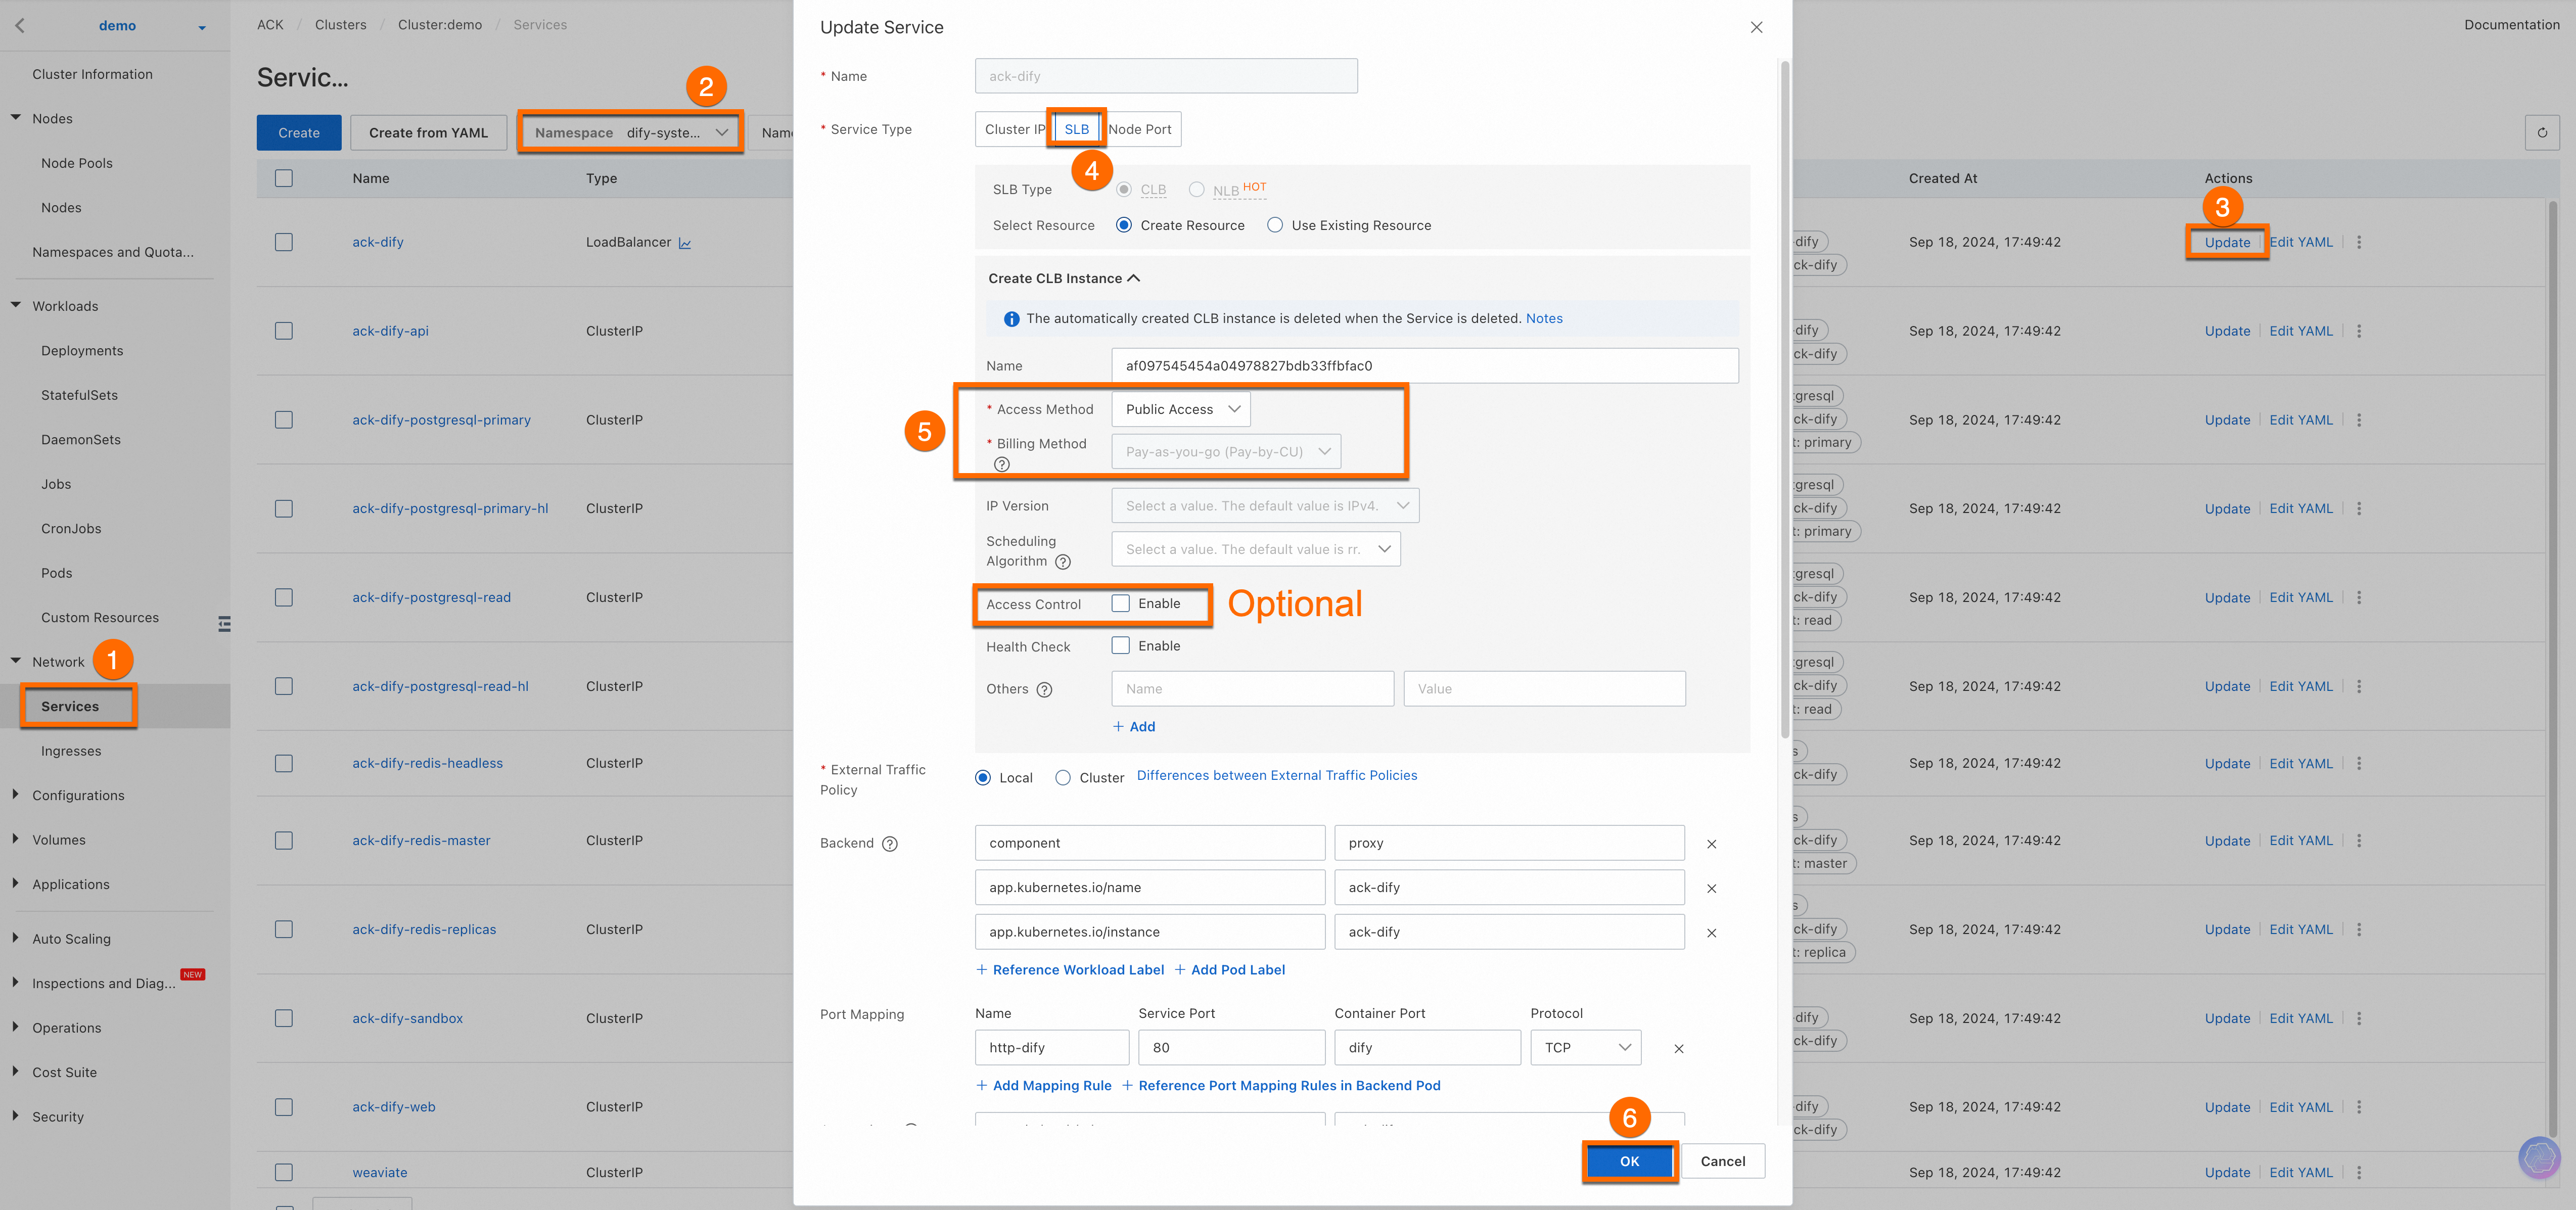
    image

  2. After configuration, choose Network > Services > ack-dify, set the namespace to dify-system. You will see the External IP of the ack-dify service. Open this IP in your browser to access Dify.

    image

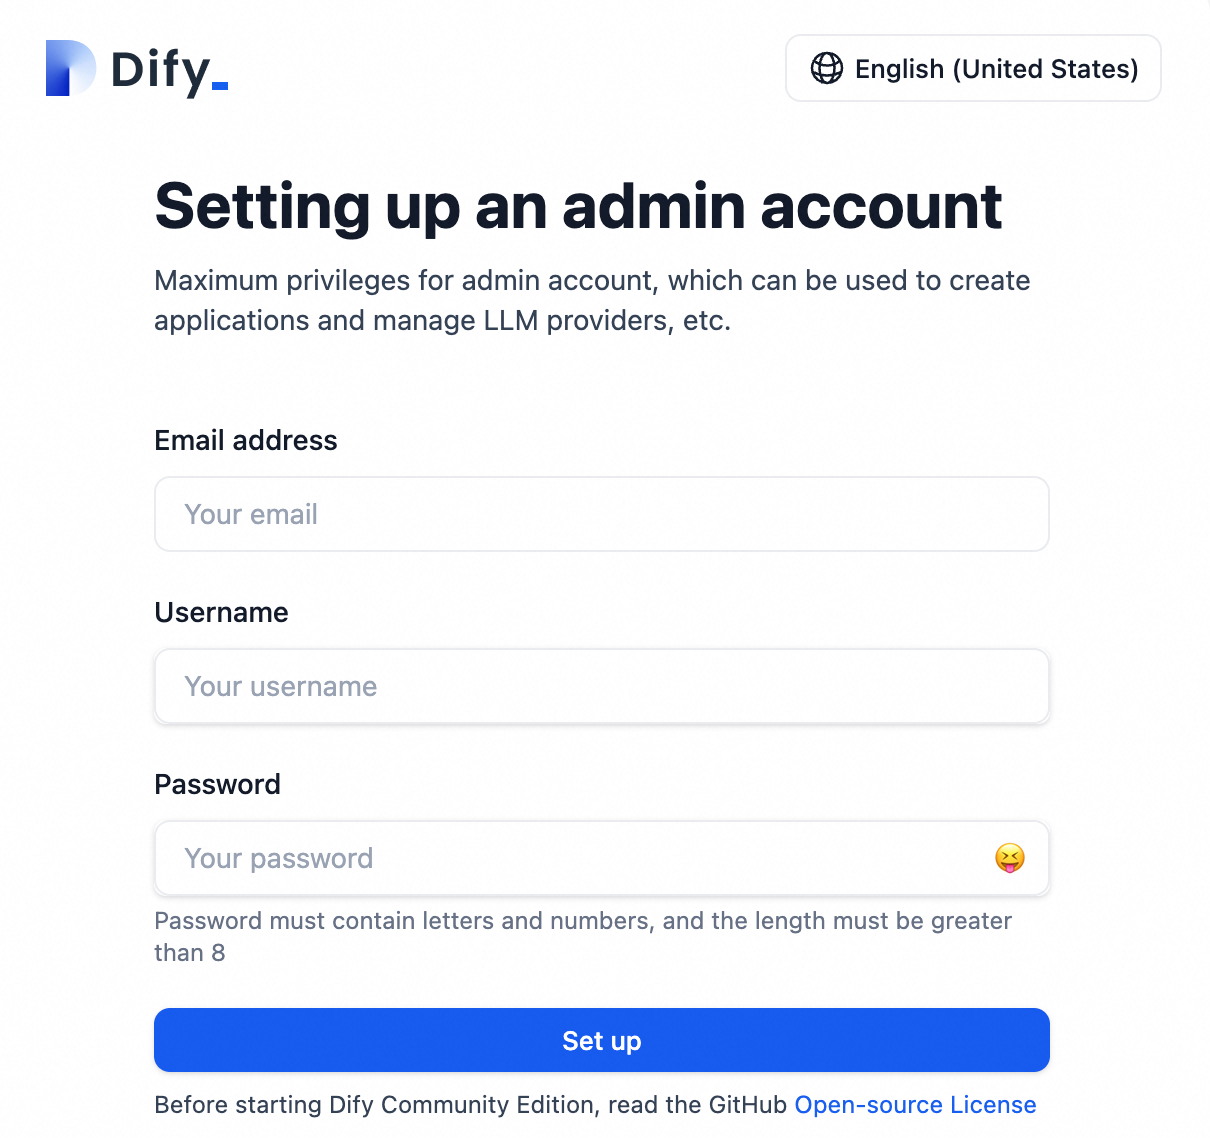
  3. Register an account.

    Access the External IP and follow the prompts to create an administrator account (email, username, password).
    image

2.2 Create an AI Q&A assistant

  1. Enter the External IP in your browser and log in to the Dify platform.

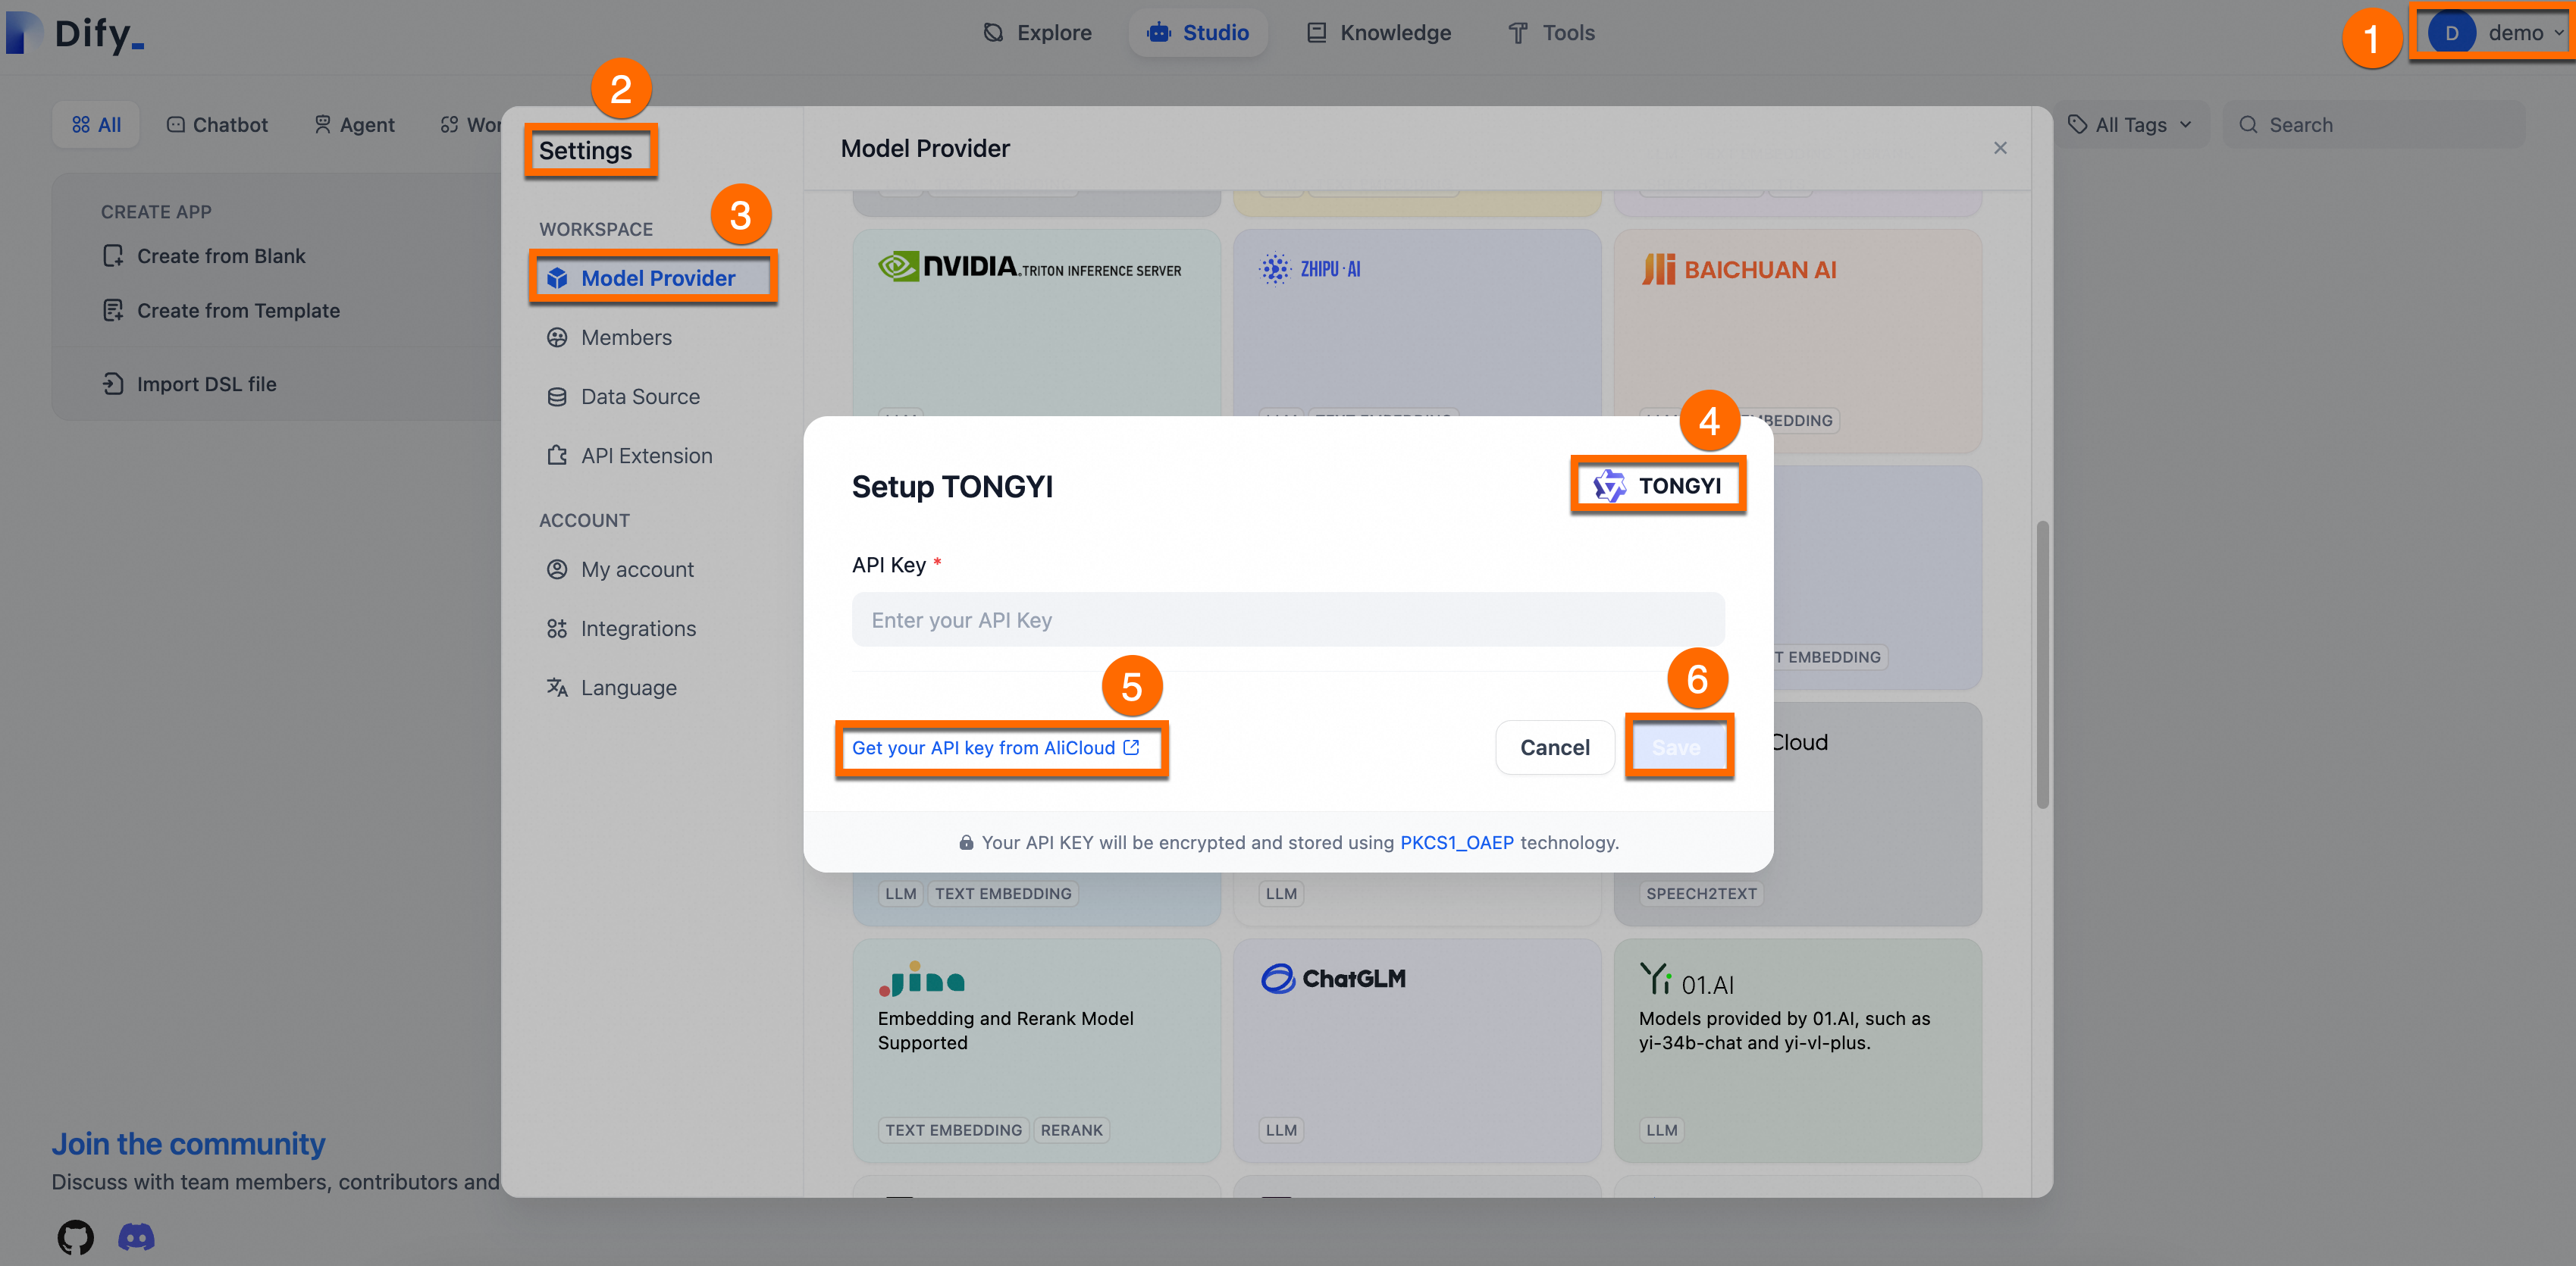
  2. Add an AI model (Qwen in this example) and set the API key from Alibaba Cloud. See the figure below:

    Once you exhaust the free Qwen quota, charges are based on token usage. This reduces upfront costs compared to self-hosting a model.

    1. Get API key: Choose Username > Settings > Model Provider > Install and set up the Qwen plugin > Get API Key From Alibaba Cloud.

    2. Enter the API key, then click Save.

    image

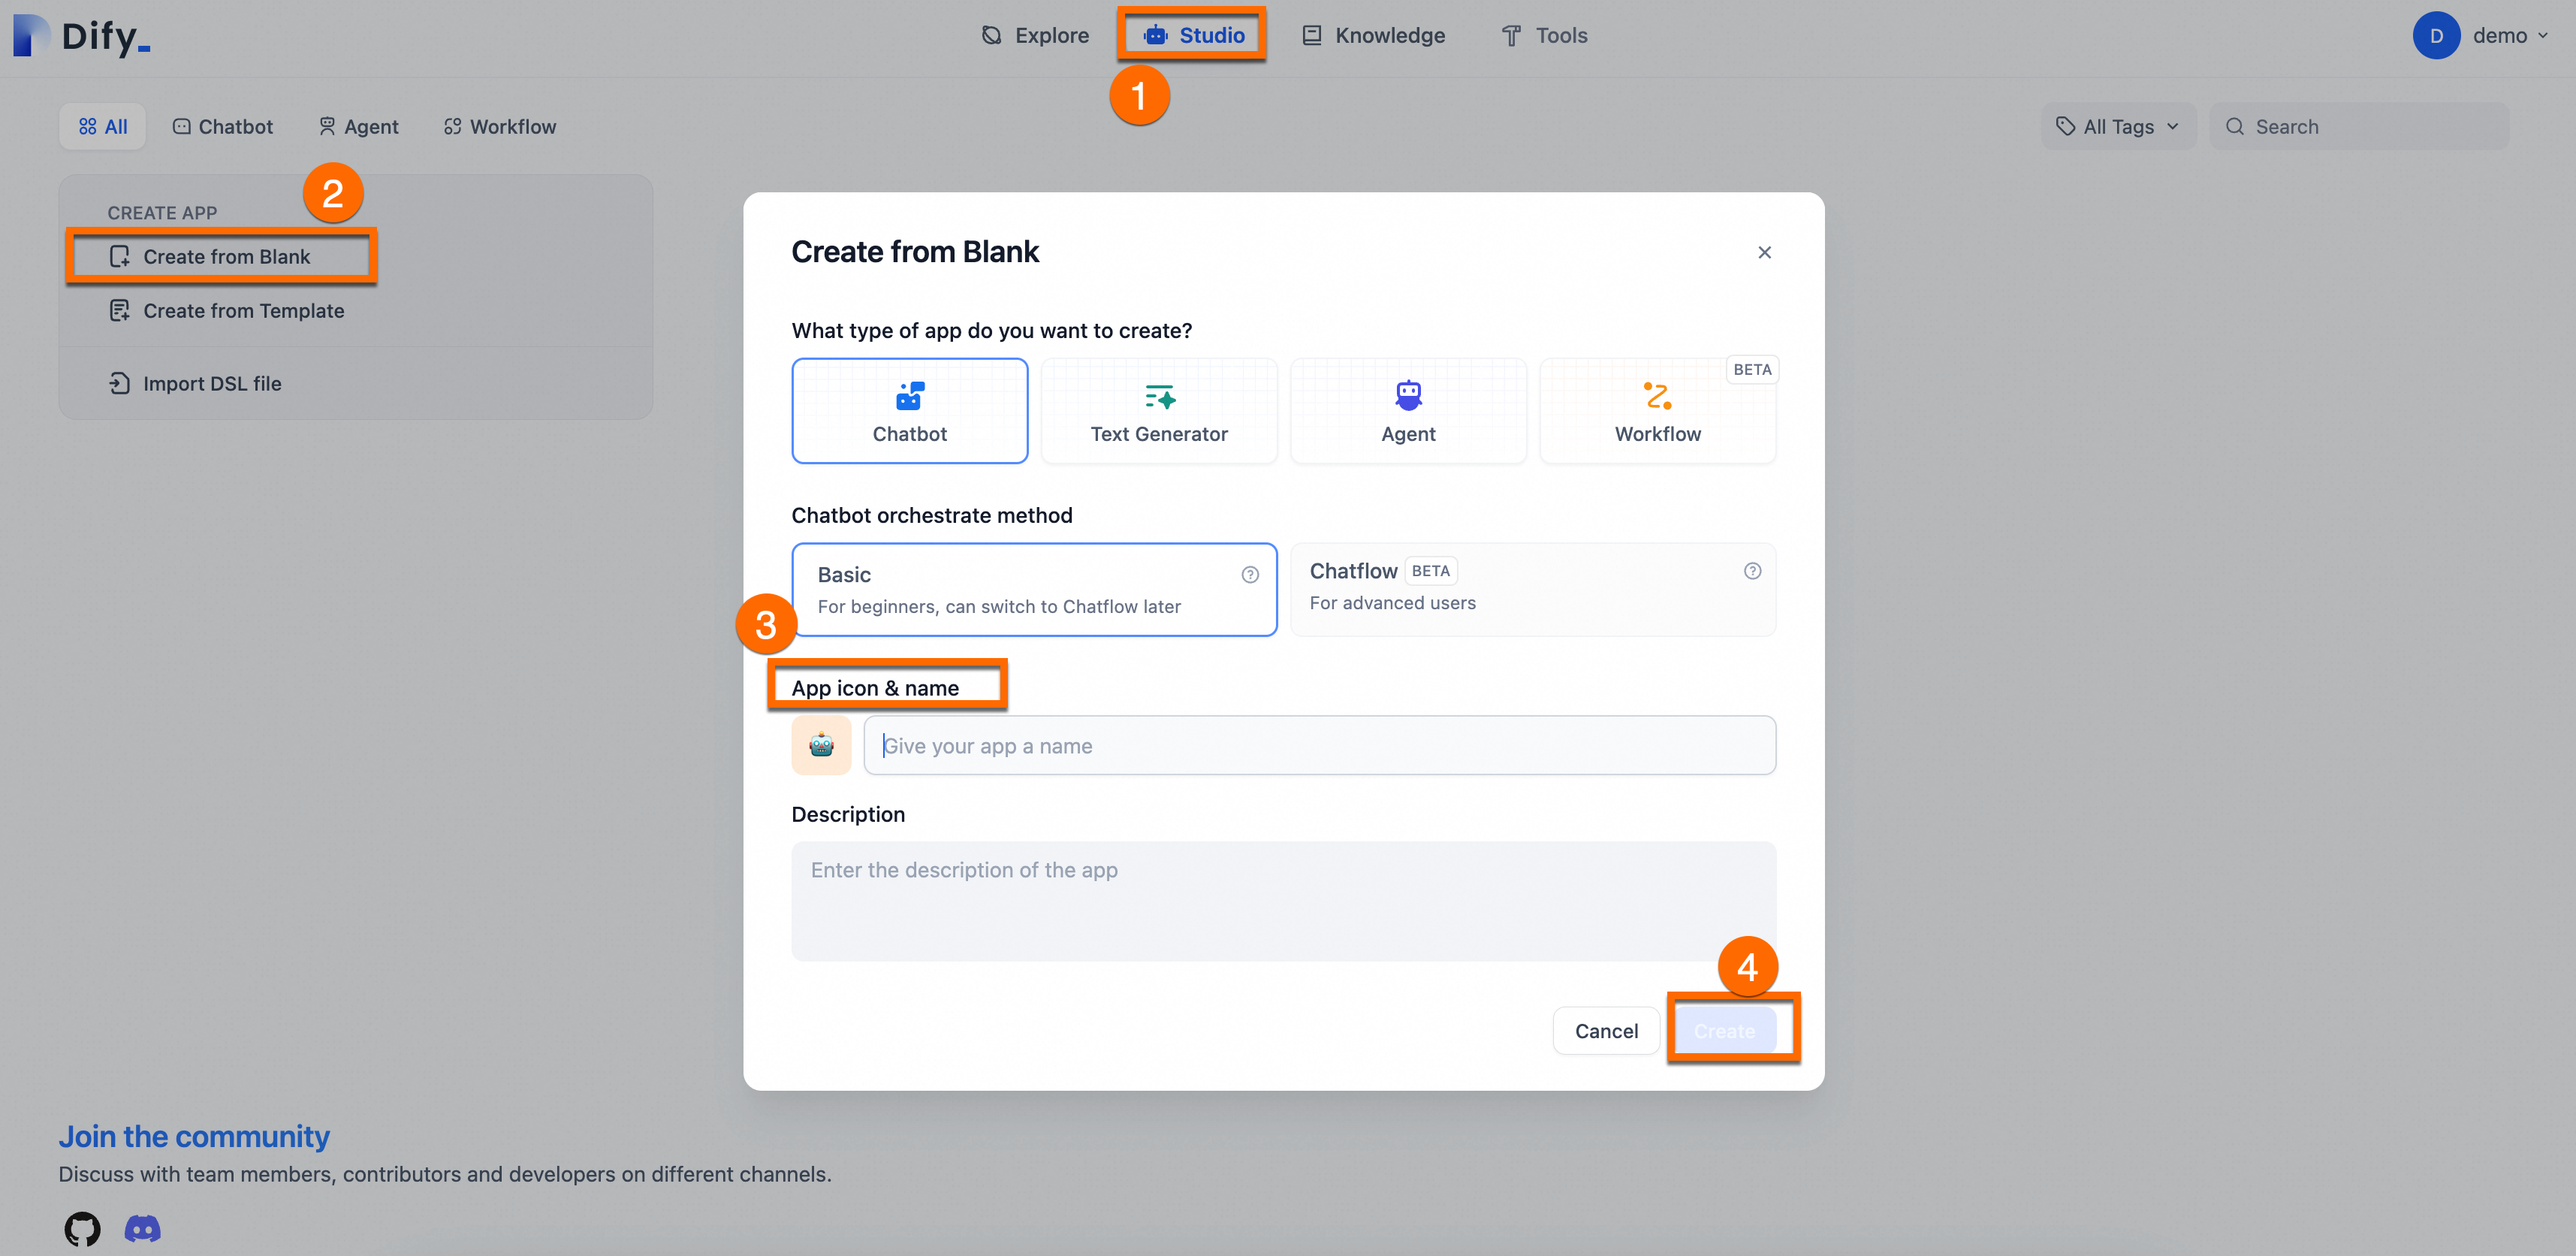
  3. Create a general-purpose AI Q&A assistant.

    Choose Studio > Create from Blank, and enter a Name and Description for the assistant. Keep other parameters at defaults.
    image

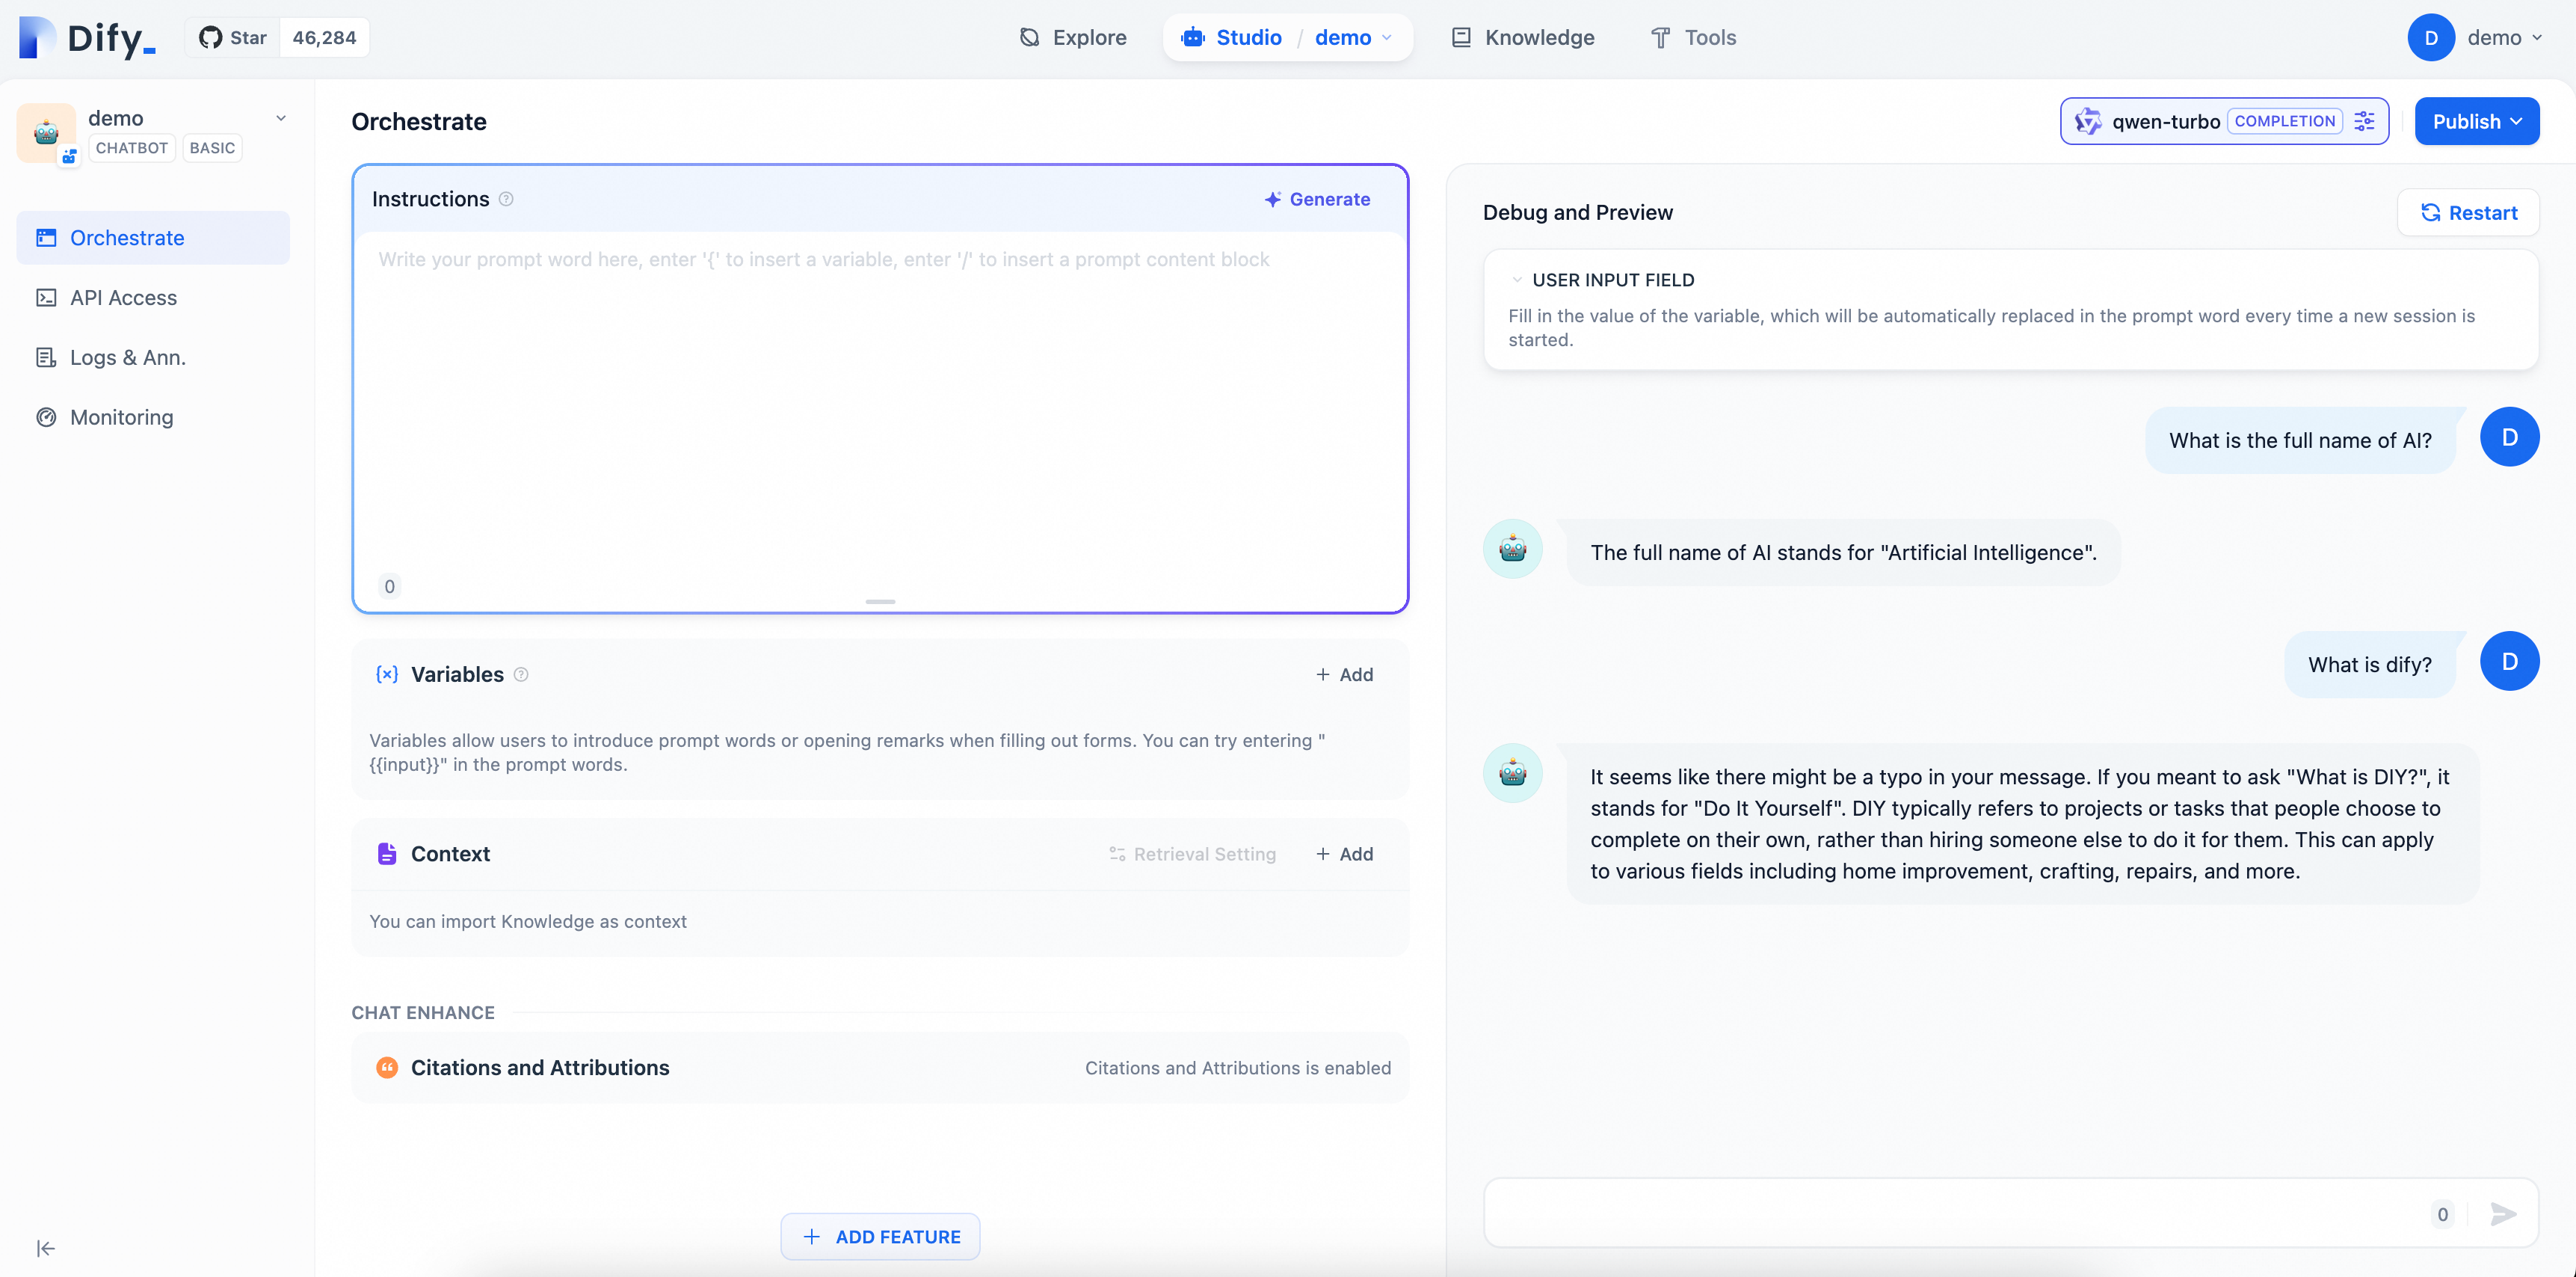
2.3 Verify the AI Q&A assistant

Test the assistant by asking questions. The general-purpose chatbot handles simple conversations but cannot yet answer Dify-specific questions.
image

3. Customize the AI assistant

3.1 Create a knowledge base

To answer Dify-related technical questions accurately, configure a dedicated knowledge base for the assistant.

This example provides a corpus file dify_doc.md. Create and upload the knowledge base as follows.

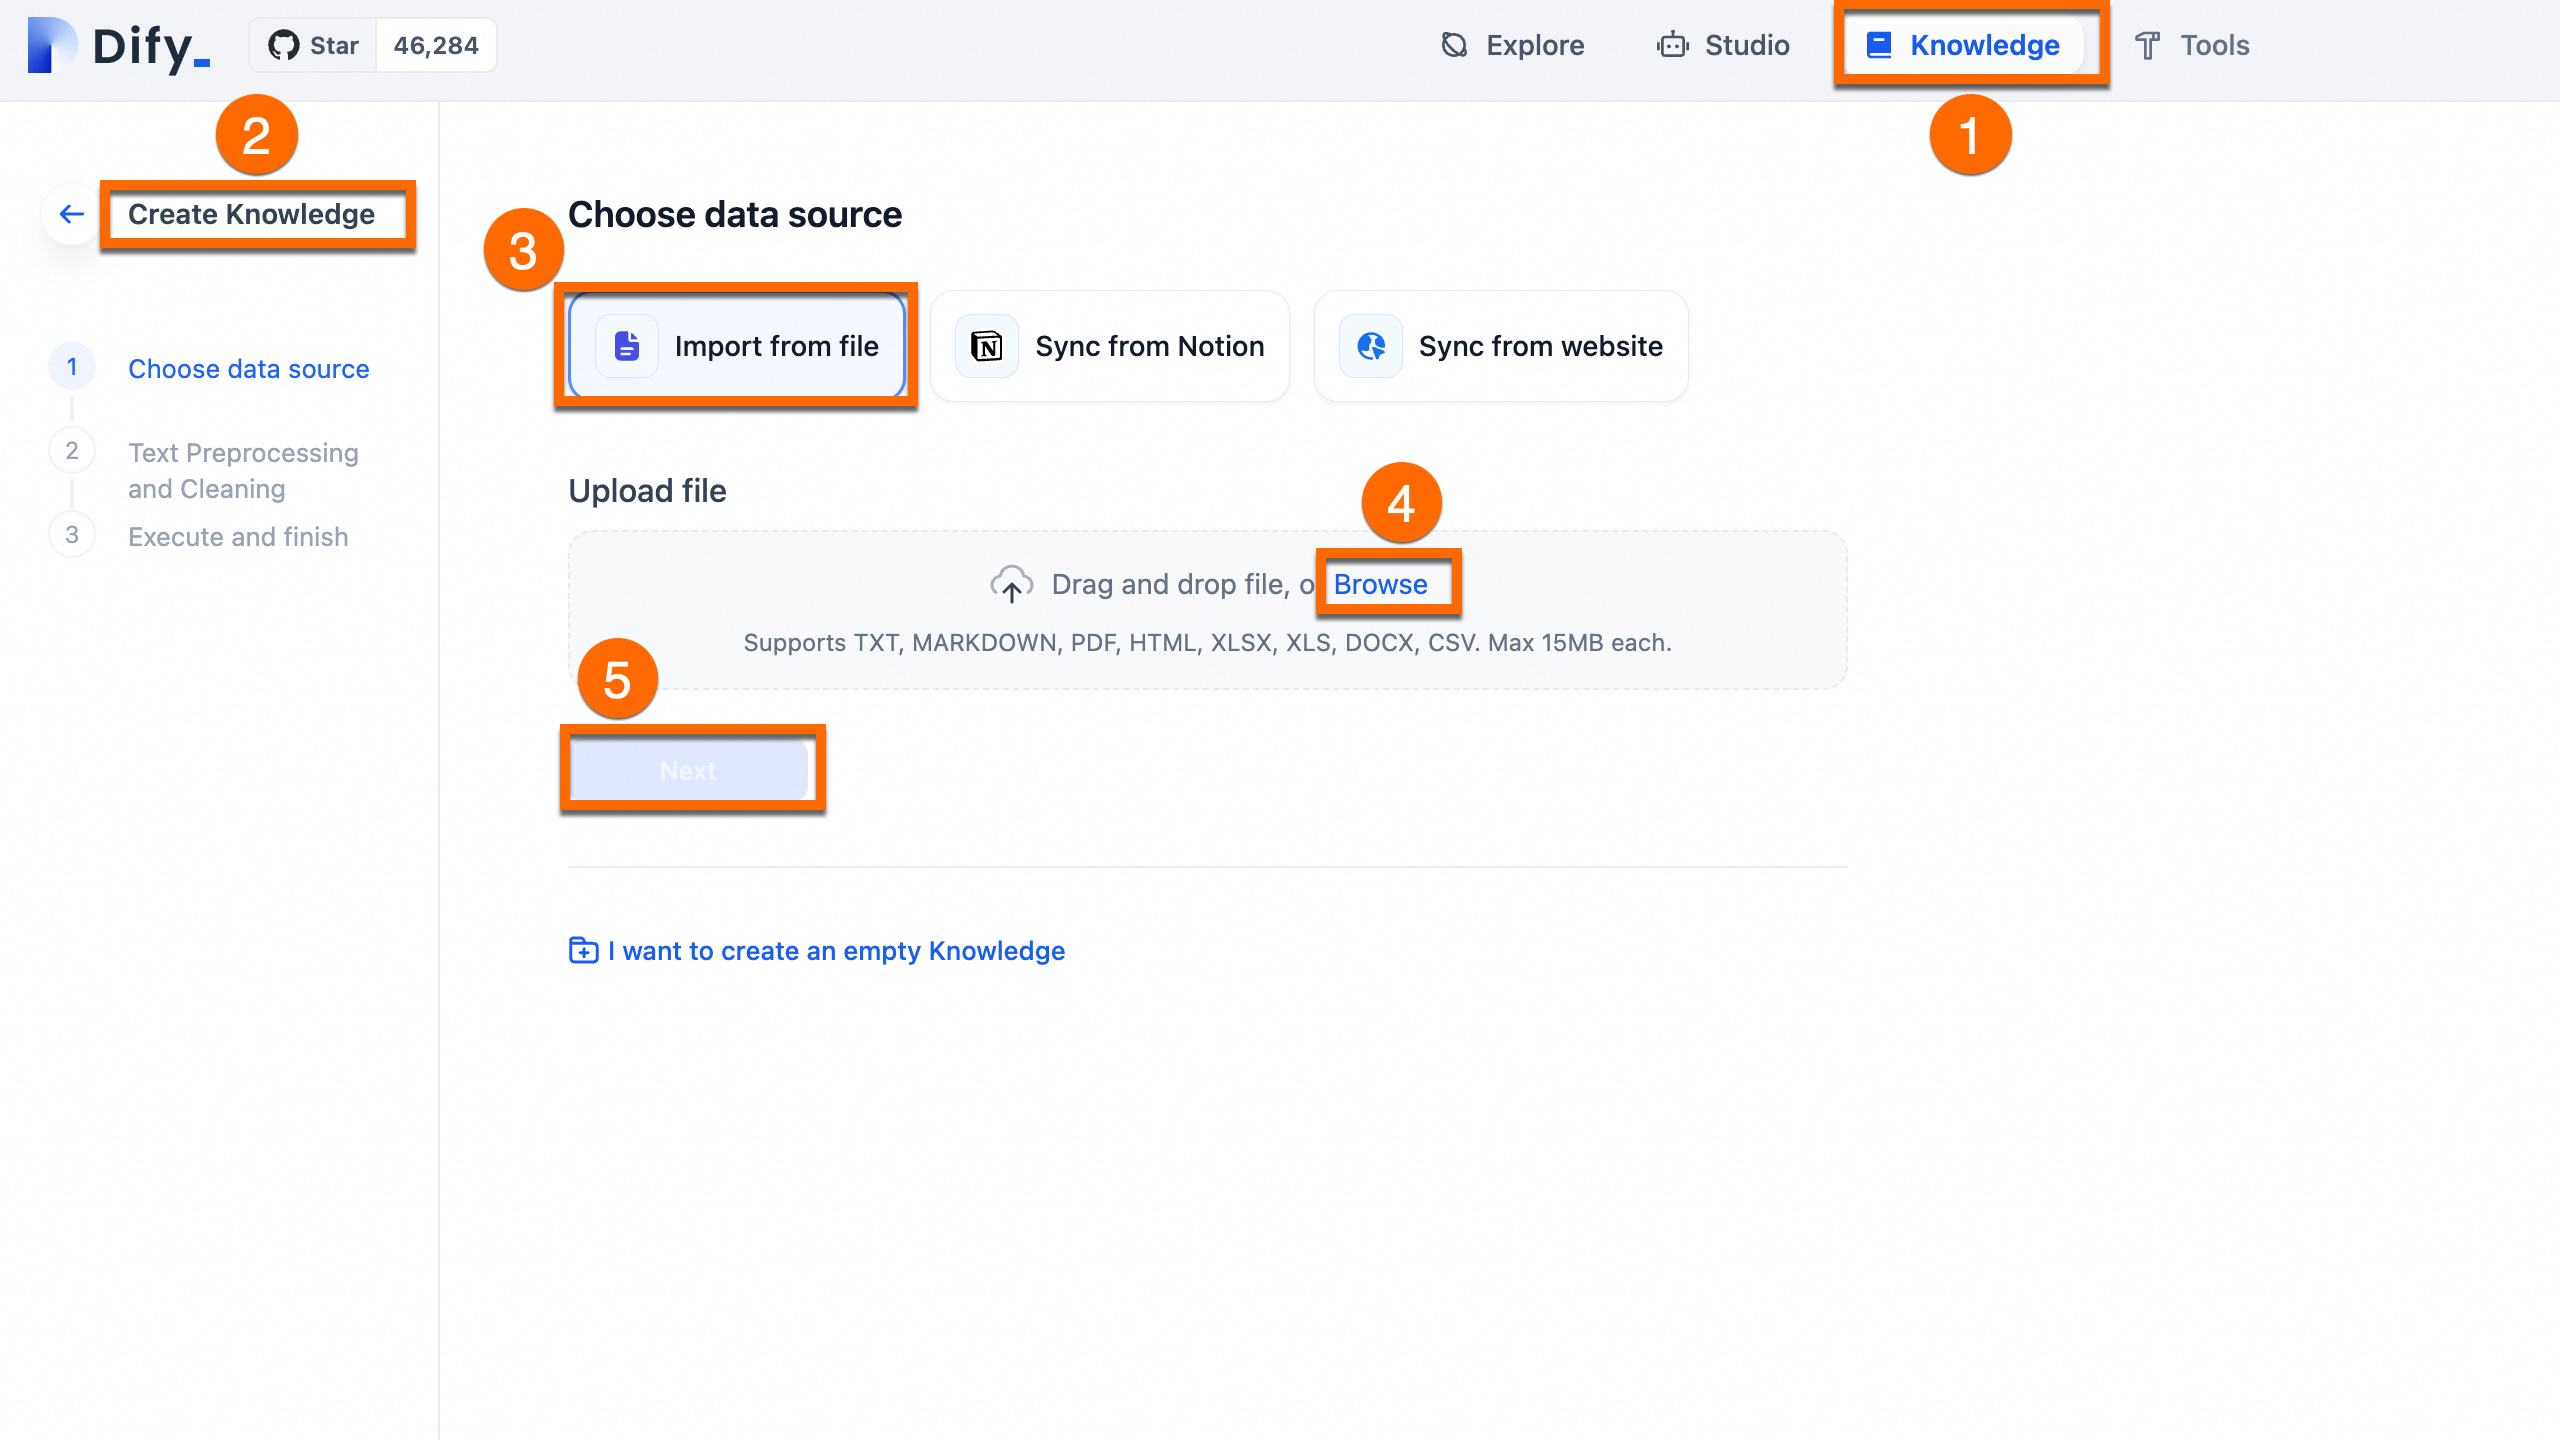
  1. Upload the prepared corpus file dify_doc.md to the knowledge base.

    Choose Knowledge > Create Knowledge > Import from file > Select File > Next.
    image

  2. Click Next. Perform text segmentation and cleaning, then save.

    Keep defaults. The knowledge base automatically cleans, segments, and indexes the document for retrieval.

To learn how the above corpus files are organized into a single .md file, expand the collapsible section below for details.

Prepare a custom knowledge base

Prepare a dedicated Dify knowledge base. Dify currently supports uploading a single file in TXT, HTML, Markdown, or PDF format.

Before you start training, you need to prepare the knowledge base. Because all previous CODING documents were managed in a Git repository with Markdown, you just need to pull the documents locally and merge the series of .md files into a single file. The following is a general example for your reference:

  1. Clone the code repository. Use the Git command to clone the corresponding Dify code repository.

    git clone https://github.com/langgenius/dify-docs.git
  2. Corpus organization. To facilitate the subsequent vectorization of the corpus, you can use the following Python code to merge and organize the .md files in the Dify code repository.

    from langchain_text_splitters import MarkdownHeaderTextSplitter, RecursiveCharacterTextSplitter
    import os
    
    
    def merge_markdown_files_from_directory(root_dir, output_file):
        """
        merge_markdown_files_from_directory function
          1. Function: Merges the content of all .md files in a specified directory into an output file.
          2. Parameters:
            root_dir: The path of the specified root directory.
            output_file: The path of the output file.
          3. Implementation:
            Uses os.walk to traverse the root_dir directory and its subdirectories.
            Checks if each file ends with .md. If so, adds its path to the markdown_files list.
            Opens output_file and writes the content of each file from markdown_files into it.
        """
        markdown_files = []
        for root, dirs, files in os.walk(root_dir):
            for file in files:
                if file.endswith('.md'):
                    markdown_files.append(os.path.join(root, file))
    
        with open(output_file, 'w', encoding='utf-8') as outfile:
            for file_path in markdown_files:
                with open(file_path, 'r', encoding='utf-8') as infile:
                    outfile.write(infile.read())
                    # outfile.write('\n\n')
    
                   
    def process_and_write_markdown(file_path: str, headers_to_split_on: list, chunk_size: int, chunk_overlap: int, output_file: str):
        """
        process_and_write_markdown function
          1. Function:
            Processes the content of a single Markdown file, splits the text based on specified headers and chunking rules, and writes the result to a new file.
          2. Parameters:
            file_path: The path of the input Markdown file.
            headers_to_split_on: A list of tuples defining header levels, e.g., [("#", "Header 1"), ("##", "Header 2")].
            chunk_size: The maximum length of each text chunk.
            chunk_overlap: The overlap length between text chunks.
            output_file: The path of the output file.
          3. Implementation:
            Reads the content of the Markdown file from file_path.
            Creates a MarkdownHeaderTextSplitter object to split the content based on headers_to_split_on.
            Creates a RecursiveCharacterTextSplitter object to further split the text based on chunk_size and chunk_overlap.
            Opens output_file and writes the metadata and content of each split chunk to the file.
        """
        try:
            # Read the content of the Markdown file from file_path.
            with open(file_path, "r", encoding="utf-8") as doc:
                markdown_content = doc.read()
    
            # Create a MarkdownHeaderTextSplitter object to split the content based on headers_to_split_on.
            splitter = MarkdownHeaderTextSplitter(headers_to_split_on=headers_to_split_on, strip_headers=True)
            md_splits = splitter.split_text(markdown_content)
    
            # Create a RecursiveCharacterTextSplitter object to further split the text based on chunk_size and chunk_overlap.
            text_splitter = RecursiveCharacterTextSplitter(chunk_size=chunk_size, chunk_overlap=chunk_overlap)
            splits = text_splitter.split_documents(md_splits)
    
            # Open output_file and write the metadata and content of each split text chunk to the file.
            with open(output_file, "w") as f:
                for line in splits:
                    f.write(str(line.metadata))
                    f.write("\n")
                    f.write(line.page_content)
                    f.write("\n\n\n\n")
    
        except FileNotFoundError:
            raise FileNotFoundError(f"The file {file_path} does not exist.")
    
    
    # Example usage
    if __name__ == "__main__":
        """
         1. Set parameters:
          root_directory: The path of the specified root directory.
          merged_file_path: The path of the merged Markdown file.
          output_file: The path of the final processed output file.
          headers_to_split_on: The list of header levels.
          chunk_size and chunk_overlap: The size and overlap length for text chunks.
        2. Execution steps:
          Call merge_markdown_files_from_directory to merge all .md files into merged_file_path.
          Call process_and_write_markdown to process the merged file and write the result to output_file.
          These steps complete the script's process from merging multiple Markdown files to final processing and output.
        """
        
        # Path of the folder to be processed
        root_directory = 'path/to/dify-docs/en'
        # Path of the merged file
        merged_file_path = './merged_markdown.md'
        # Path of the cleaned file
        output_file = './dify_doc.md'
        
        merge_markdown_files_from_directory(root_directory, merged_file_path)
        headers_to_split_on = [
            ("#", "Header 1"),
            ("##", "Header 2"),
            ("###", "Header 3"),
        ]
        chunk_size = 500
        chunk_overlap = 50
        process_and_write_markdown(merged_file_path, headers_to_split_on, chunk_size, chunk_overlap, output_file)
    
  3. Upload the prepared document dify_doc.md to the knowledge base.

3.2 Orchestrate and publish the assistant

Configure a prompt and add the knowledge base to the assistant's context.

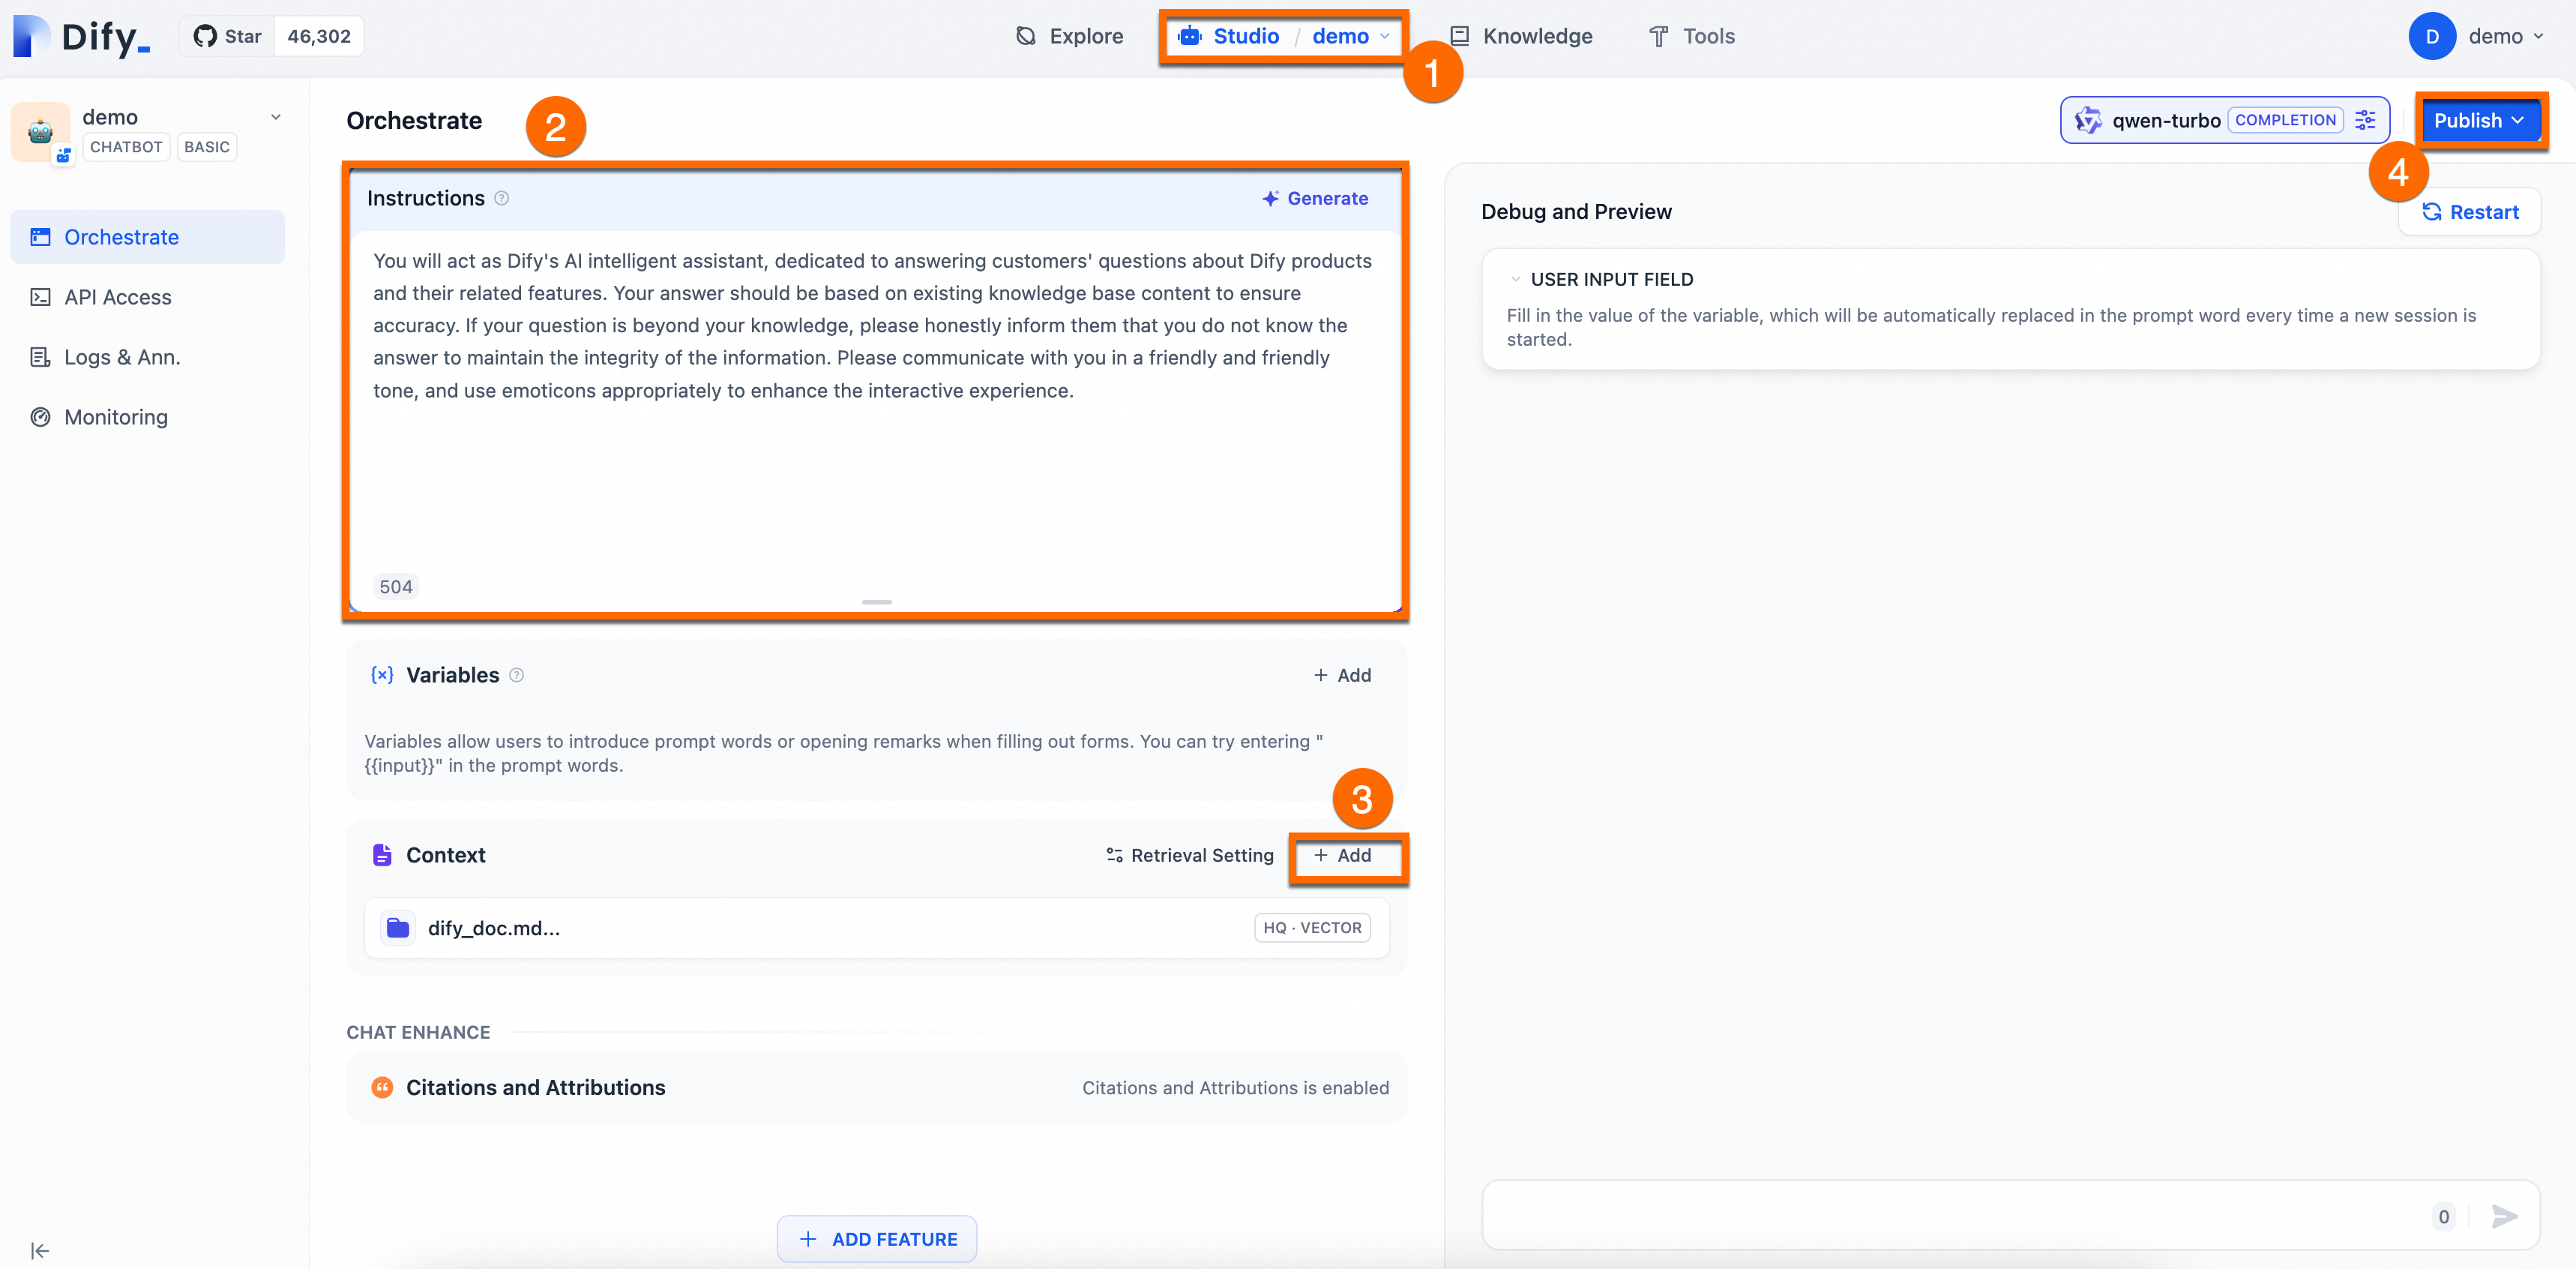
  1. Configure the prompt: Copy the following content into the Instructions field. Prompts improve response accuracy with instructions and constraints.

    You will act as Dify's AI assistant, dedicated to answering customers' questions about Dify products and their features. Your responses should be based on the existing knowledge base to ensure accuracy. If a question is beyond your knowledge, please honestly inform them that you do not know the answer, in order to maintain the integrity of the information. Please communicate in a friendly and warm tone, and feel free to use emoticons appropriately to enhance the interactive experience.
  2. Add the knowledge base to the context: Click Add in the Context area to add the knowledge base, enabling accurate and professional answers.

  3. Click Releases > Update to save and apply the configuration.

The configuration is shown in the following figure:
image

3.3 Verify the results

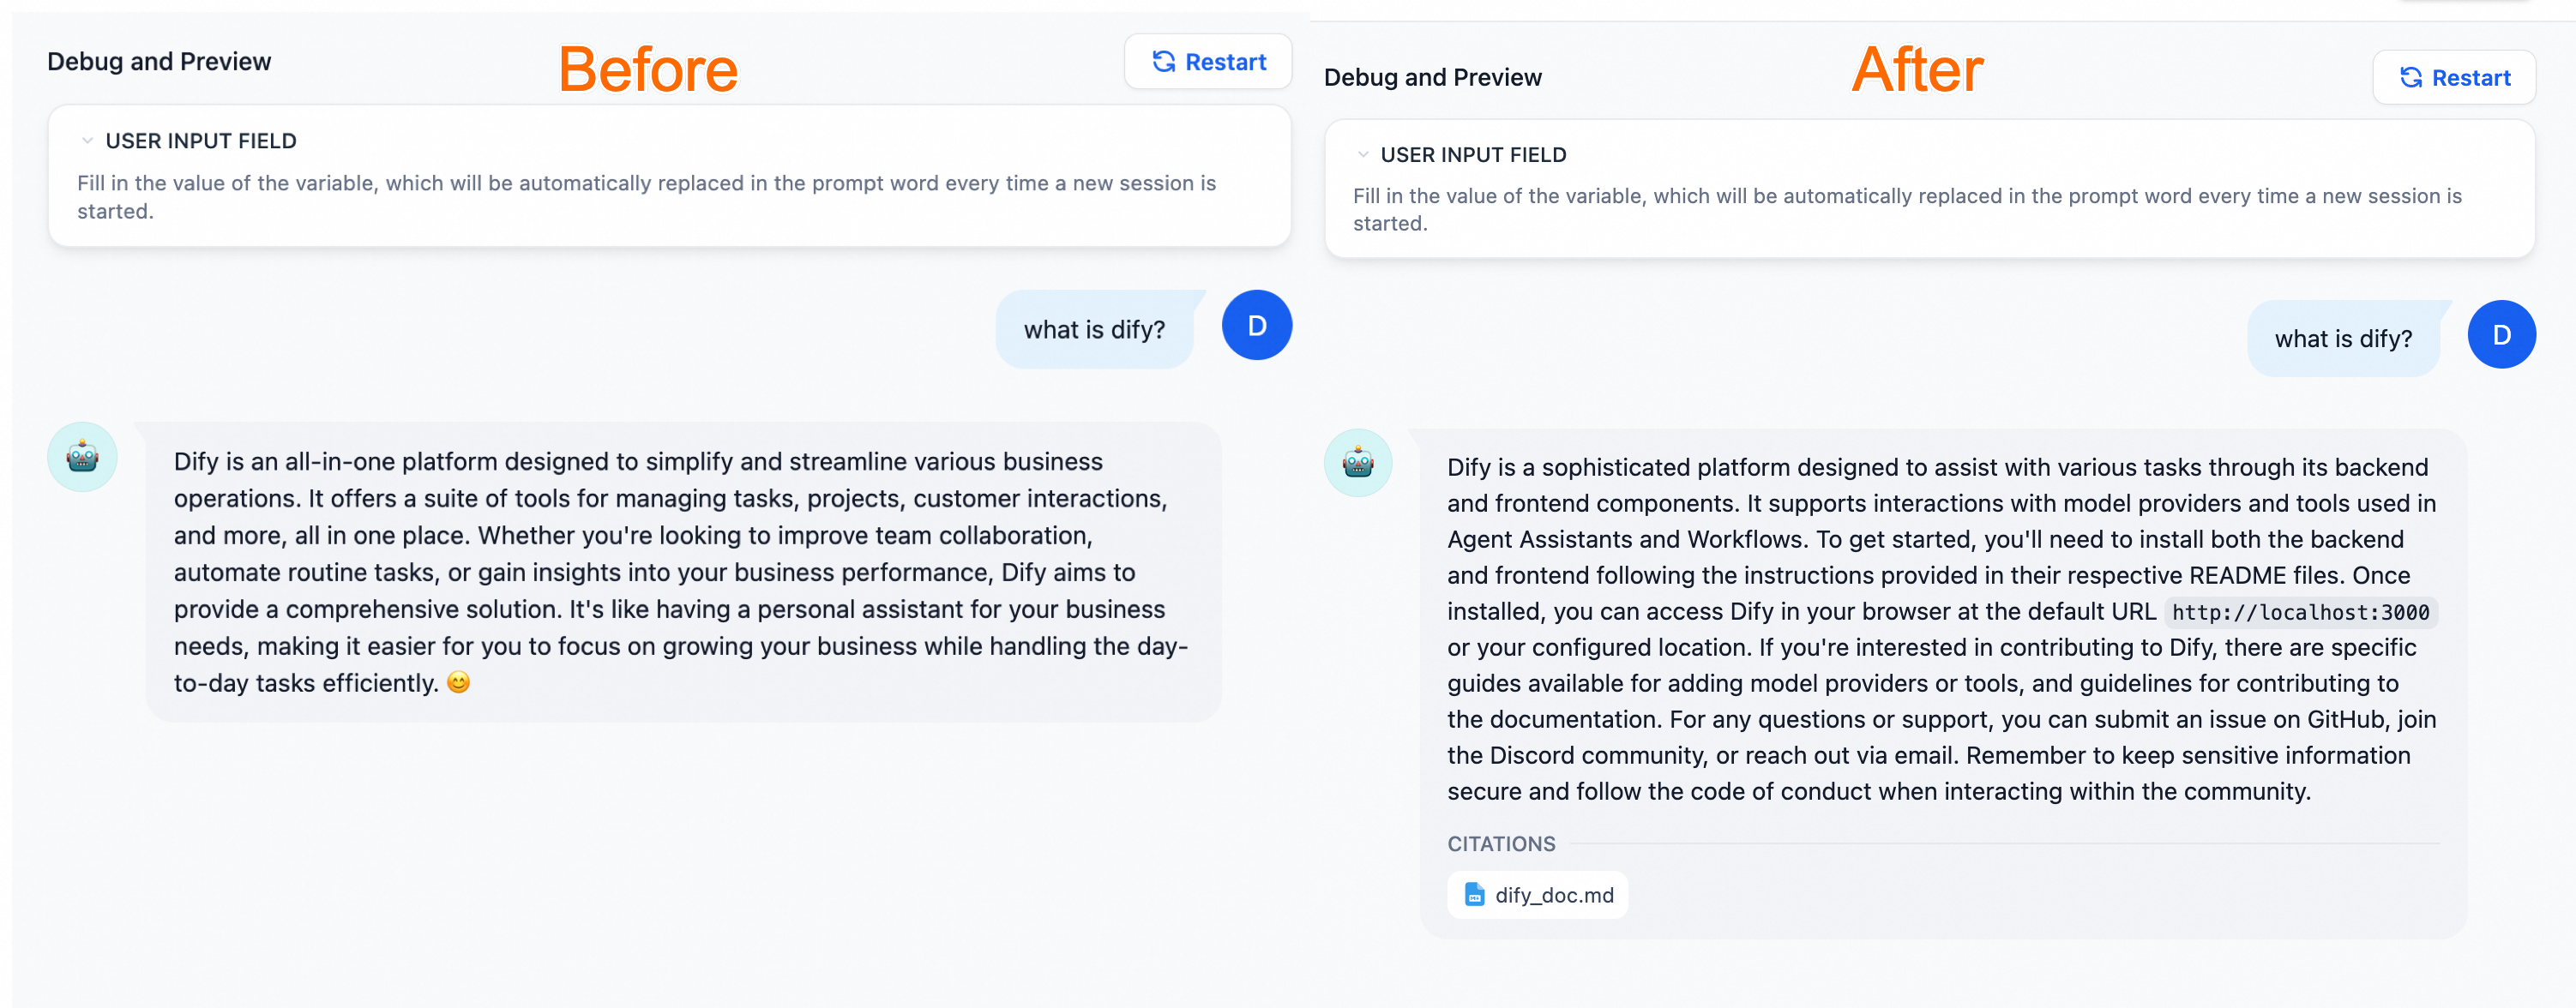
With a dedicated knowledge base, the AI assistant provides more accurate, domain-specific answers than the general-purpose chatbot.image
Summary

Core Dify features:

Feature

Description

Comprehensive LLMOps

Real-time monitoring of application logs and metrics, with continuous optimization of prompts, datasets, and models based on production data.

RAG engine

End-to-end RAG pipeline from document ingestion to retrieval. Processes common formats such as PDF and PPT directly.

Agent

Define agents using LLM function calling or the ReAct paradigm, with 50+ built-in tools and support for custom tools.

workflow orchestration

Visual canvas for building AI workflows by dragging and connecting components, with minimal coding.

observability

Track and evaluate the quality and cost of LLM applications through a monitoring dashboard.

Enterprise features (SSO/access control)

Organizations can reduce the risk of information leakage and data damage, ensuring information security and business continuity.

Going to production

Four options for deploying the AI Q&A assistant to production:

  1. Publicly shared website.

    The AI application you create with Dify can be published as a web application accessible on the internet, which will operate based on your prompt and orchestration settings. For more information, see Publish as a public web app.

  2. API-based calls.

    Dify provides APIs for all applications based on the "Backend-as-a-Service" concept, allowing developers to leverage the power of large language models in their front-end applications without worrying about complex back-end architecture and deployment. For more information, see Develop with APIs.

  3. Redevelopment based on front-end components.

    If you are developing a new product from scratch or are in the prototype design phase, use Dify to quickly publish an AI site. For more information, see Redevelop based on front-end components.

  4. Embedding in your enterprise or personal website.

    Dify supports embedding your AI application into your business website. Use this capability to create an official AI customer service, business Q&A, and other applications with your business data in minutes. For more information, see Embed in a website.