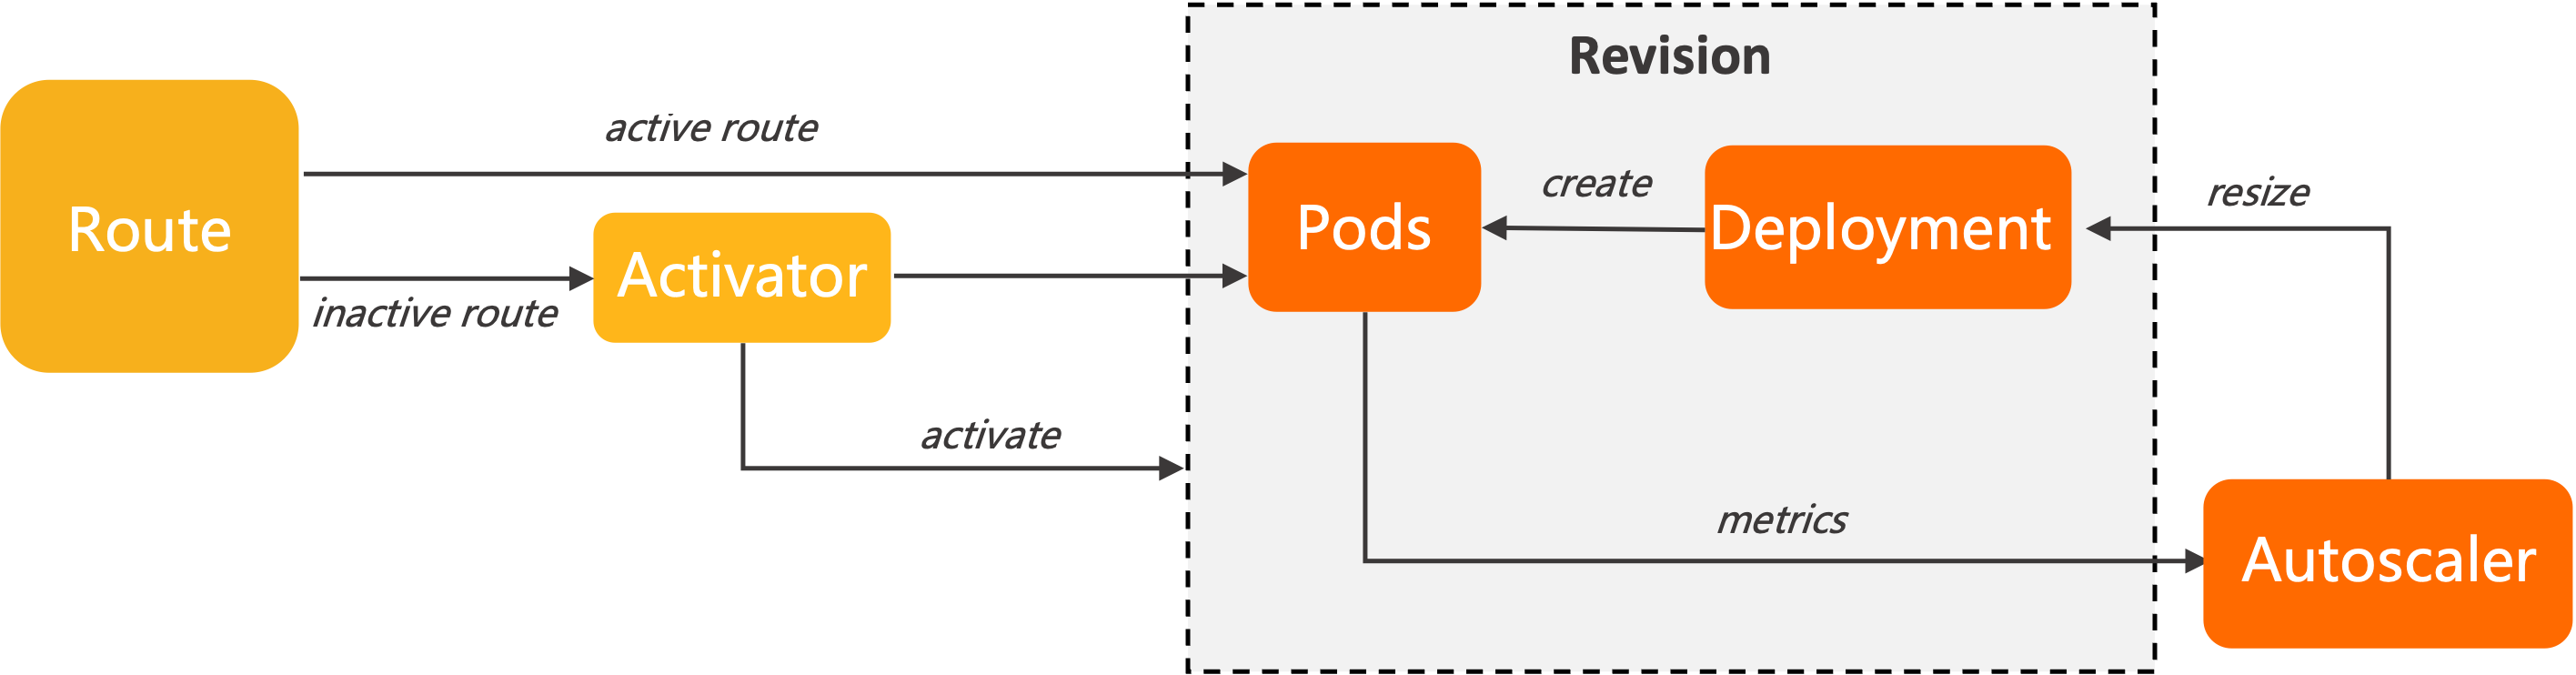
When traffic to your Knative Services fluctuates, fixed pod counts either waste resources during low traffic or degrade performance during spikes. Knative Pod Autoscaler (KPA) on ASM solves this by monitoring real-time request concurrency through a Queue Proxy sidecar in each pod and automatically adjusting pod count -- scaling up during traffic spikes and scaling down (including to zero) during idle periods.
Prerequisites
A Knative Service deployed through Knative on ASM. For details, see Use Knative on ASM to deploy a serverless application.
This topic uses the default domain name example.com for demonstration. To use a custom domain name, see Set a custom domain name in Knative on ASM.
How KPA works
Knative Serving injects a Queue Proxy container into each pod. Queue Proxy tracks in-flight requests and reports concurrency metrics to KPA. Based on these metrics, KPA calculates the desired pod count and scales the underlying Deployment.
Concurrency vs. QPS
| Metric | Definition |
|---|---|
| Concurrency | Number of requests a pod handles simultaneously |
| QPS | Number of requests a pod completes per second (maximum throughput) |
Higher concurrency does not always increase QPS. Under heavy load, raising concurrency can decrease QPS because CPU and memory contention increases response latency.
Autoscaling algorithms
KPA scales pods based on the average number of concurrent requests per pod. By default, each pod targets a concurrency of 100 requests. KPA operates in two modes:
Stable mode
KPA averages concurrency across all pods over the stable window (default: 60 seconds) and adjusts the pod count to maintain the target concurrency.
Panic mode
KPA averages concurrency over a shorter panic window (default: 6 seconds). The panic window is calculated as:
Panic window = Stable window x panic-window-percentageThe default panic-window-percentage is 10 (10% of the stable window). Valid values: 1 to 100. When observed concurrency exceeds the panic threshold percentage (default: 200%), KPA rapidly scales up to absorb the burst.
                                                    |
                                Panic Target--->  +--| 20
                                                  |  |
                                                  | <------Panic Window (6s)
                                                  |  |
     Stable Target--->  +-------------------------|--| 10
CONCURRENCY             |                         |  |
                        |                      <-----------Stable Window (60s)
                        |                         |  |
--------------------------+-------------------------+--+ 0
120                       60                           0
                       TIME (seconds)
Configure KPA globally
Configure KPA through the config-autoscaler ConfigMap in the knative-serving namespace. Run the following command to view the current configuration:
kubectl -n knative-serving get cm config-autoscaler -o yamlThe ConfigMap structure:
apiVersion: v1
kind: ConfigMap
metadata:
  name: config-autoscaler
  namespace: knative-serving
data:
  _example:
    container-concurrency-target-default: "100"   # Soft concurrency target per pod
    container-concurrency-target-percentage: "0.7" # Utilization factor for scaling trigger
    enable-scale-to-zero: "true"                   # Allow scaling to zero pods
    max-scale-up-rate: "1000"                      # Max scale-up multiplier per evaluation cycle
    max-scale-down-rate: "2"                       # Max scale-down multiplier per evaluation cycle
    panic-window-percentage: "10"                  # Panic window as % of stable window
    panic-threshold-percentage: "200"              # Concurrency % that triggers panic mode
    scale-to-zero-grace-period: "30s"              # Max time last pod runs before scaling to zero
    scale-to-zero-pod-retention-period: "0s"       # Min time last pod stays active after scale-to-zero decision
    stable-window: "60s"                           # Time window for stable mode averaging
    target-burst-capacity: "200"                   # Extra capacity reserved for traffic bursts
    requests-per-second-target-default: "200"      # Default RPS target (when using RPS metric)
The values under _example are defaults. To modify a parameter, copy it from _example to the data field.
Changes to the config-autoscaler ConfigMap apply to all Knative Services in the mesh. To configure autoscaling for a single service, use per-Revision annotations instead. See Set a concurrency target and Set scale bounds.
Scale-to-zero parameters
| Parameter | Per-Revision annotation | Default | Description |
|---|---|---|---|
enable-scale-to-zero | N/A (global only) | true | Allow scaling to zero pods when no traffic arrives |
scale-to-zero-grace-period | N/A (global only) | 30s | Maximum time an inactive Revision keeps running before KPA scales pods to zero. Minimum: 30 seconds |
scale-to-zero-pod-retention-period | N/A (global only) | 0s | Minimum time the last pod stays active after KPA decides to scale to zero |
stable-window | autoscaling.knative.dev/window | 60s | Time window for averaging concurrency in stable mode |
Set a concurrency target
KPA supports two types of concurrency limits:
Soft limit (recommended): A target that KPA uses to calculate desired pod count. During sudden bursts, actual concurrency may temporarily exceed this value.
Hard limit: An enforced upper bound. Requests exceeding this limit are buffered until capacity is available.
Use hard limits only when your application requires strict concurrency control. Low hard-limit values can increase latency and cause cold starts.
| Parameter | Per-Revision annotation | Default | Description |
|---|---|---|---|
container-concurrency-target-default | autoscaling.knative.dev/target | 100 | Soft concurrency target per pod |
containerConcurrency | N/A (set in Revision spec) | 0 (unlimited) | Hard concurrency limit per pod. 0 = unlimited, 1 = single request at a time, 2-N = specific limit |
container-concurrency-target-percentage | N/A (global only) | 0.7 | Utilization factor. Scaling triggers at: concurrency target x this percentage. Example: 100 x 0.7 = 70 -- KPA adds pods when average concurrency reaches 70 |
Set scale bounds
Use minScale and maxScale annotations to control the minimum and maximum number of pods for a Revision. This helps reduce cold starts and control costs.
| Annotation | Default behavior | Description |
|---|---|---|
autoscaling.knative.dev/minScale | All pods removed when idle | Minimum number of pods to keep running |
autoscaling.knative.dev/maxScale | No upper limit | Maximum number of pods allowed |
Add these annotations in the Revision template:
spec:
  template:
    metadata:
      annotations:
        autoscaling.knative.dev/minScale: "2"
autoscaling.knative.dev/maxScale: "10"If
minScaleis not set, all pods are removed when no traffic arrives (assuming scale-to-zero is enabled).If
maxScaleis not set, the number of pods is unlimited.If
enable-scale-to-zerois set tofalsein the ConfigMap, KPA keeps at least one pod running regardless ofminScale.
Scale rate parameters
| Parameter | Per-Revision annotation | Default | Description |
|---|---|---|---|
max-scale-up-rate | N/A (global only) | 1000 | Maximum ratio by which the pod count can scale up in a single evaluation cycle. For example, if 1 pod is running, KPA can scale up to at most 1000 pods in one cycle |
max-scale-down-rate | N/A (global only) | 2 | Maximum ratio by which the pod count can scale down in a single evaluation cycle. For example, if 100 pods are running, KPA can scale down to at most 50 pods in one cycle |
Scale based on a concurrency target
This example deploys the autoscale-go application with a concurrency target of 10, then uses a load test to verify that KPA scales pods to match demand.
For details on deploying a Knative Service, see Use Knative on ASM to deploy a serverless application.
Create a file named
autoscale-go.yamlwith a concurrency target of10:apiVersion: serving.knative.dev/v1 kind: Service metadata: name: autoscale-go namespace: default spec: template: metadata: labels: app: autoscale-go annotations: autoscaling.knative.dev/target: "10" # Scale when avg concurrency exceeds 10 x 0.7 = 7 spec: containers: - image: registry.cn-hangzhou.aliyuncs.com/knative-sample/autoscale-go:0.1Deploy the application:
kubectl apply -f autoscale-go.yamlGet the gateway IP address. Log on to the ASM console. Click the name of the target ASM instance and choose ASM Gateways > Ingress Gateway. On the Ingress Gateway page, find the IP address in the Service address section.
Run a load test with 50 concurrent requests for 30 seconds. Replace
<gateway-ip>with the IP address from the previous step. For information about how to obtain the gateway address, see Step 3: Query the gateway address in Use Knative on ASM to deploy a serverless application. For information about the load testing tool, see hey.hey -z 30s -c 50 \ -host "autoscale-go.default.example.com" \ "http://<gateway-ip>?sleep=100&prime=10000&bloat=5"Verify the results. KPA scales the application to approximately 7 pods. With a concurrency target of 10 and a default utilization factor of 70%, KPA begins adding pods when average concurrency per pod exceeds 7 (10 x 0.7). This proactive scaling prevents the concurrency target from being exceeded as request volume grows.

Scale within defined bounds
This example deploys the same autoscale-go application with scale bounds to limit the pod count between 1 and 3.
For details on deploying a Knative Service, see Use Knative on ASM to deploy a serverless application.
Create a file named
autoscale-go.yamlwith a concurrency target of10,minScaleof1, andmaxScaleof3:apiVersion: serving.knative.dev/v1 kind: Service metadata: name: autoscale-go namespace: default spec: template: metadata: labels: app: autoscale-go annotations: autoscaling.knative.dev/target: "10" # Concurrency target per pod autoscaling.knative.dev/minScale: "1" # Always keep at least 1 pod running autoscaling.knative.dev/maxScale: "3" # Never exceed 3 pods spec: containers: - image: registry.cn-hangzhou.aliyuncs.com/knative-sample/autoscale-go:0.1Deploy the application:
kubectl apply -f autoscale-go.yamlGet the gateway IP address. Log on to the ASM console. Click the name of the target ASM instance and choose ASM Gateways > Ingress Gateway. On the Ingress Gateway page, find the IP address in the Service address section.
Run a load test with 50 concurrent requests for 30 seconds. Replace
<gateway-ip>with the IP address from the previous step. For information about how to obtain the gateway address, see Step 3: Query the gateway address in Use Knative on ASM to deploy a serverless application. For information about the load testing tool, see hey.hey -z 30s -c 50 \ -host "autoscale-go.default.example.com" \ "http://<gateway-ip>?sleep=100&prime=10000&bloat=5"Verify the results. KPA scales the application to the maximum of 3 pods during the load test. When traffic stops, 1 pod remains running (as specified by
minScale). The scale bounds prevent over-provisioning while eliminating cold starts.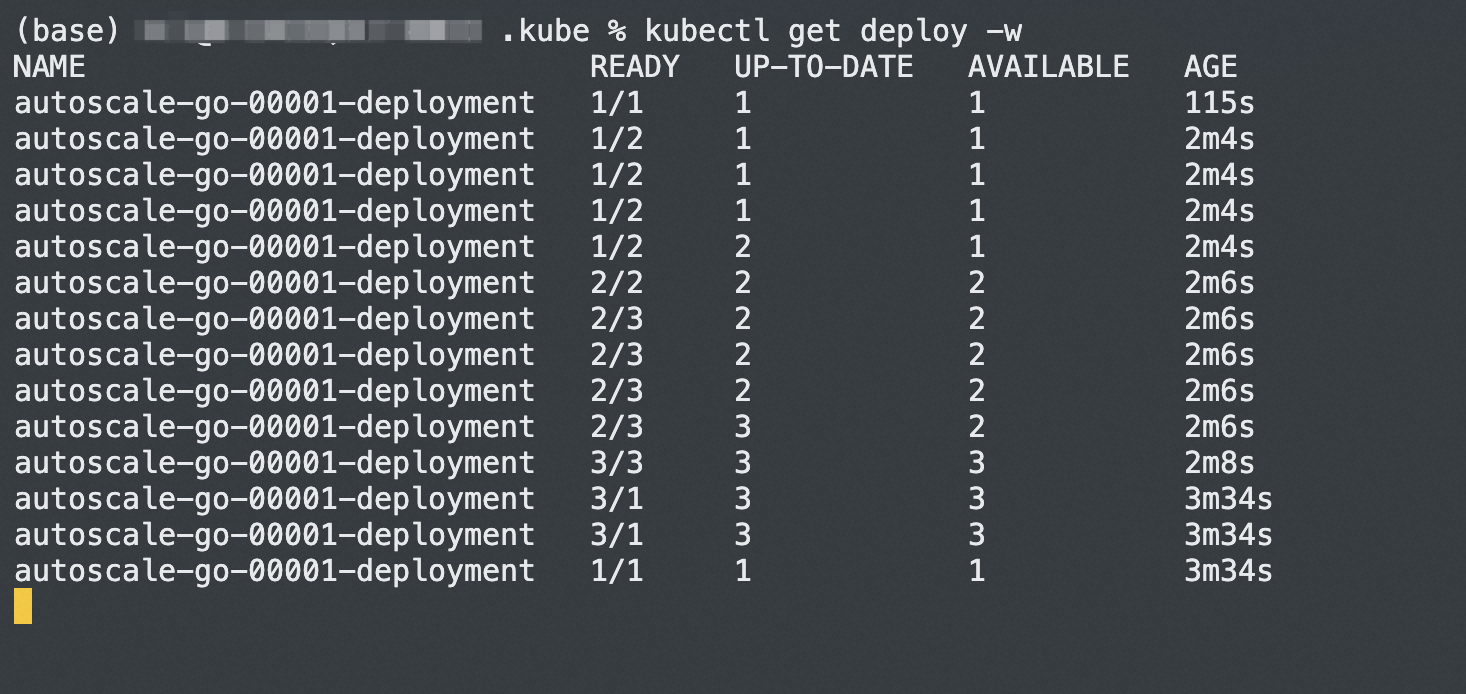
What's next
Use an ASM gateway to access a Knative Service over HTTPS: Secure your Knative Service endpoints with encrypted transmission.
Perform a canary release based on traffic splitting for a Knative Service by using Knative on ASM: Roll out new versions gradually with traffic splitting.
Use HPA in Knative: Scale based on CPU utilization instead of request concurrency.