Shared Memory Communication (SMC) is a kernel-level protocol in Alibaba Cloud Linux 3 that bypasses the standard TCP/IP stack and routes pod traffic through Remote Direct Memory Access (RDMA) hardware. Applications keep using regular socket interfaces -- SMC accelerates the underlying transport transparently.
Running SMC in a native Elastic Compute Service (ECS) environment requires manual whitelist management and per-pod network namespace configuration. Any misconfiguration causes a silent fallback to TCP. Service Mesh (ASM) removes this burden: enable SMC at the mesh level, annotate your workloads, and ASM handles the rest automatically.
Limits
| Category | Requirement |
|---|---|
| Instance type | ECS instances that support elastic RDMA (eRDMA). See Configure eRDMA on an enterprise-level instance. |
| Operating system | Alibaba Cloud Linux 3 |
| ASM version | V1.23 or later. See Update an ASM instance. |
| CNI plug-in | Terway network plug-in for Container Service for Kubernetes (ACK) |
| API server access | Internet access to the ACK cluster API server. See Control public access to the API server of a cluster. |
Enable SMC and benchmark the results
This procedure walks through five steps: initialize nodes, deploy test workloads, run a baseline benchmark, enable SMC, and compare the results. Add the cluster to the ASM instance before you begin.
Step 1: Initialize nodes
SMC accelerates network communications through the elastic RDMA interface (ERI). Prepare the nodes before enabling SMC.
Upgrade the Alibaba Cloud Linux 3 kernel to version 5.10.134-17.3 or later. See Change the kernel version.
Install the erdma-controller and enable Shared Memory Communication over RDMA (SMC-R). See Use eRDMA to accelerate container networking.
Step 2: Deploy test workloads
The following steps use Fortio, a load testing tool, to generate traffic between a client pod and a server pod. Both pods require sidecar proxy injection.
Enable automatic sidecar proxy injection for the
defaultnamespace.Create a file named
fortioserver.yamlwith the following content:Key details in this manifest:
The fortioclient and fortioserver Deployments each include an
anolissidecar container for diagnostic access.Pod anti-affinity ensures the client and server pods land on different nodes, so traffic crosses the network.
The sidecar proxy CPU limits and concurrency values are tuned for the benchmark (2 workers for the server, 4 for the client).
Connect to the ACK cluster with kubectl using the kubeconfig file, then deploy the workloads:
kubectl apply -f fortioserver.yamlVerify that both pods are running: Expected output: Both pods show
3/3under READY (application container + anolis container + sidecar proxy).kubectl get pods | grep fortioNAME READY STATUS RESTARTS fortioclient-8569b98544-9qqbj 3/3 Running 0 fortioserver-7cd5c46c49-mwbtq 3/3 Running 0
Step 3: Run a baseline benchmark
Measure latency and throughput before enabling SMC. Fortio exposes a web console on port 8080.
Forward the fortioclient port to your local machine:
kubectl port-forward service/fortioclient 8080:8080Open
http://localhost:8080/fortioin a browser. Configure the following test parameters:Parameter Value URL http://fortioserver:8080/echoQPS 100000Duration 30sThreads/Simultaneous connections 64Payload xhsyL4ELNoUUbC3WEyvaz0qoHcNYUh0j2YHJTpltJueyXlSgf7xkGqc5RcSJBtqUENNjVHNnGXmoMyILWsrZL1O2uordH6nLE7fY6h5TfTJCZtff3Wib8YgzASha8T8g(128 bytes)
Click Start. Wait for the progress bar to complete.

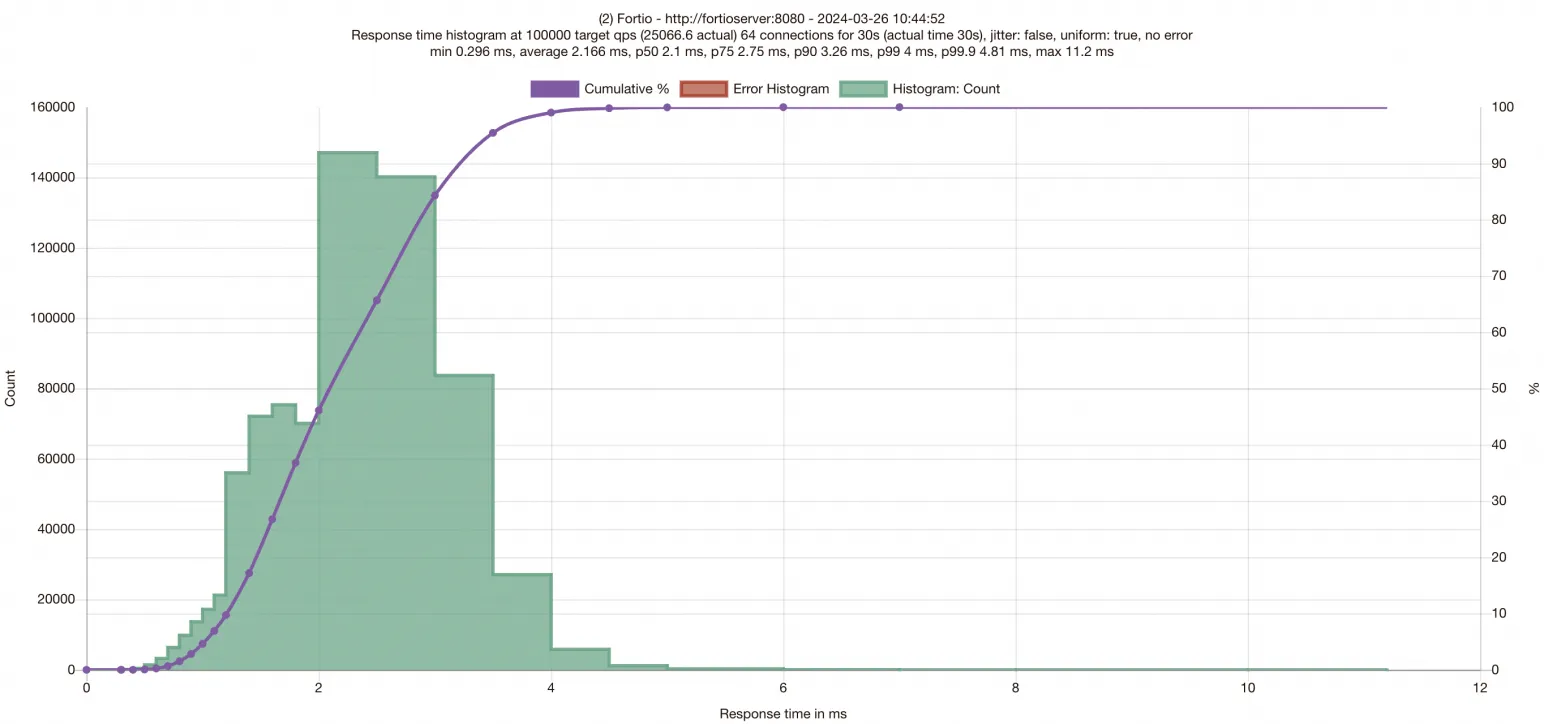
Review the results. The histogram displays request latency distribution. The x-axis represents latency, the y-axis shows the number of processed requests, and the purple curve traces throughput across response times. The top of the chart reports P50, P75, P90, P99, and P99.9 latency percentiles. Record these values to compare against the SMC-enabled results.
Test results vary depending on the test environment. The figures shown here are for reference only.
Step 4: Enable SMC for the ASM instance and workloads
SMC requires two configuration changes: one at the mesh level and one at the workload level. Both client-side and server-side pods must carry the SMC annotation.
| Scope | What to change |
|---|---|
| Mesh | Set smcEnabled: true in the ASMMeshConfig resource |
| Workload | Add the smc.asm.alibabacloud.com/enabled: "true" annotation to every communicating pod |
Enable SMC on the ASM instance
Connect to the ASM instance with kubectl using the kubeconfig file, then add the smcEnabled: true field to the ASMMeshConfig:
kubectl edit asmmeshconfigSet the smcEnabled field under spec:
apiVersion: istio.alibabacloud.com/v1beta1
kind: ASMMeshConfig
metadata:
  name: default
spec:
  ambientConfiguration:
    redirectMode: ""
    waypoint: {}
    ztunnel: {}
  cniConfiguration:
    enabled: true
    repair: {}
  smcEnabled: true
Enable SMC on workloads
Connect to the ACK cluster with kubectl using the kubeconfig file. Add the smc.asm.alibabacloud.com/enabled: "true" annotation to the pod template in each Deployment.
Edit the fortioclient Deployment: Add the annotation under
spec.template.metadata.annotations:kubectl edit deployment fortioclientapiVersion: apps/v1 kind: Deployment metadata: ... name: fortioclient spec: ... template: metadata: ... annotations: smc.asm.alibabacloud.com/enabled: "true"Edit the fortioserver Deployment: Add the same annotation:
kubectl edit deployment fortioserverapiVersion: apps/v1 kind: Deployment metadata: ... name: fortioserver spec: ... template: metadata: ... annotations: smc.asm.alibabacloud.com/enabled: "true"
Kubernetes restarts the pods after you save the Deployment changes.
Step 5: Benchmark with SMC enabled
After the pods restart, re-establish the port-forward (as in Step 3) and run the same test with identical parameters.
kubectl port-forward service/fortioclient 8080:8080Open http://localhost:8080/fortio, enter the same settings, and click Start.
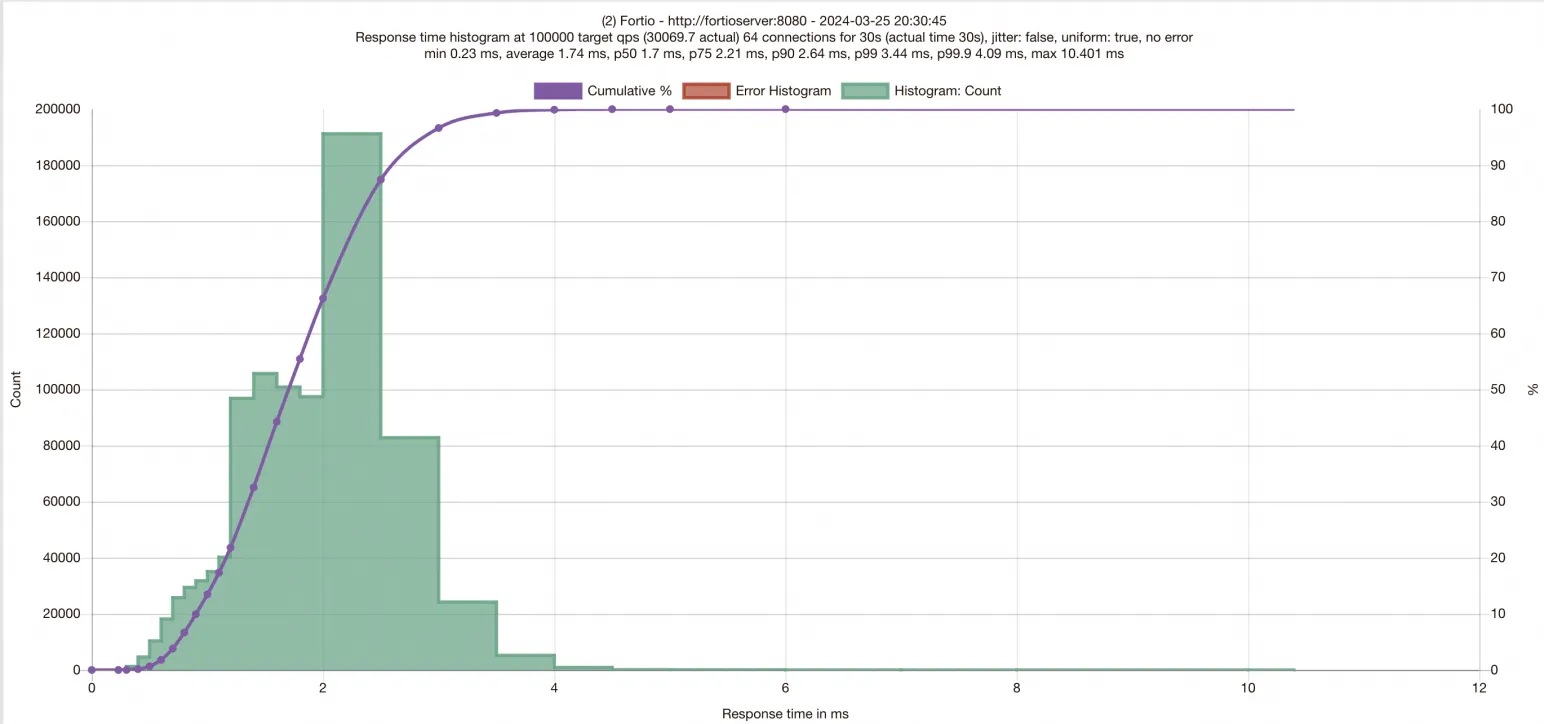
Compare the results against the baseline. With SMC enabled, expect lower request latencies and higher QPS.
FAQ
Why does database access fail after enabling SMC?
A load balancer in the connection path may misidentify the TCP-kind 254 option used by the SMC protocol. This happens when the load balancer does not fully comply with TCP specifications.
To diagnose:
Install the aliyun-smc-extensions toolkit on the node:
sudo yum install -y aliyun-smc-extensionsCheck the communication link to the service URL: Replace
<url>with the database service URL. The tool reports TCP option issues such as replay, conflict, and overlength.aliyunsmc-check syn_check --url <url>
If the tool detects TCP option processing problems on the path to the service, disable SMC for the affected pod by removing the smc.asm.alibabacloud.com/enabled: "true" annotation from its Deployment.