ApsaraVideo Live lets you record live streams in real time for later playback. This topic describes the live stream recording feature.
Function Introduction
ApsaraVideo Live streams data from the ingest client in real time. To watch a stream again after it ends, you must use the live stream recording feature.
The live stream recording feature records stream data from the live center and saves it to a storage location that you specify. Two storage methods are available: Store Recordings in ApsaraVideo VOD and Store Recordings in OSS.
How live stream recording works
The live stream recording process retrieves your ingested live stream, encapsulates the audio and video into individual media segments in the TS container format, and then stores them. Live stream recording follows these principles:
Live stream recording only changes the container format of the audio and video, for example, from RTMP or FLV to TS. It never modifies the audio or video content at the encoding layer. For example, if your ingested stream has video artifacts, the recorded file also has video artifacts.
Live stream recording has permission to write recordings to your storage address. It does not have permission to modify or delete any files at the storage address, including the recordings it has written. You are fully responsible for managing the recordings at your storage address.
Using the live stream recording feature incurs a recording service fee. By default, recordings are saved in the TS/M3U8 file format. If transcoding and container format conversion are required, an additional recording container format conversion fee is incurred. For more information about billing rules, see Live Stream Recording Fees.
Conditions
Audio and video encoding formats
Because live stream recording first segments the live stream into TS files, the audio and video encoding formats of your ingested stream must meet the requirements of the TS container format. Based on the FLV and ISO/IEC 13818-1 standards, live stream recording supports only the following encoding formats:
Video: H.264, HEVC, MPEG-4
Audio: AAC, MP3
If a live stream contains audio or video that uses other encoding formats, live stream recording may fail. For example, a recording may not be generated, the recording may show a black screen, or the recording may have no audio. Other unexpected issues may also occur.
Handling of abnormal live streams
Standard stream (meets encoding requirements, stable frame rate and timestamp) ✅ Recordings are generated 100% of the time.
Stream with minor abnormalities (occasional frame rate fluctuations or timestamp jumps) ✅ The system automatically handles these issues for compatibility.
Stream with severe abnormalities (prolonged absence of video frames, disordered timestamps, or missing keyframes) ❌ Recording success is not guaranteed.
Feature comparison
You can record and store live streams in either ApsaraVideo VOD or OSS. These two methods are suited for different scenarios. You can choose a storage method as needed.
Storage method | Associated product or service | Supported recording methods | Container format | Scenarios |
Record and store in VOD | Activate ApsaraVideo VOD |
|
| Ideal for post-production of recorded content, such as video editing, playback, and setting video thumbnails. |
Record and store in OSS | Activate OSS |
|
| Ideal for managing recorded content, with a focus on storage. |
You cannot configure both storage methods for the same live stream.
For all recordings, the live stream is first segmented into TS files and then packaged into a recording file in the specified container format. A container format conversion fee is charged for formats other than TS/M3U8.
Rules for automatic recording
You can specify a domain name, application name, or stream name to record all applications under a domain name, all live streams in an application, or a specific live stream. You can set AppName and StreamName to an asterisk (*) to represent all application names and all stream names.
When you configure recording templates to store recordings in OSS or VOD, you can configure multiple templates. If a live stream matches multiple recording templates, a priority rule determines which template takes effect. The following table lists the priorities. The lower the number, the higher the priority.
Priority | DomainName | AppName | StreamName |
1 | ✓ | ✓ | ✓ |
2 | ✓ | ✓ | * |
3 | ✓ | * | * |
A check mark (✓) indicates that the parameter is configured with a specific value instead of an asterisk (*). An asterisk (*) indicates that the parameter is set to match all values.
Record and store in VOD
Prerequisites
To store live stream recordings in ApsaraVideo VOD, you must activate the ApsaraVideo VOD service and manage storage buckets.
Recordings are stored in ApsaraVideo VOD and incur storage fees. For more information, see Basic Service Billing.
When you enable a VOD system bucket, the region of the VOD system bucket must be the same as the region of the live center for the domain name that you want to configure.
ApsaraVideo Live does not support recording to VOD for accounts on the finance cloud.
Configure features
ApsaraVideo Live provides two methods to add a configuration for recording and storing in VOD.
After you complete the configuration, you must restart stream ingest for the recording configuration to take effect.
A recording is generated after the stream is interrupted for 180 seconds.
Method 1: Use the console
Log on to the ApsaraVideo Live console.
In the navigation pane on the left, choose Feature Management > Recording. On the Recording page, click the VOD tab.
Select the streaming domain that you want to configure and click Add.
Configure a recording template.
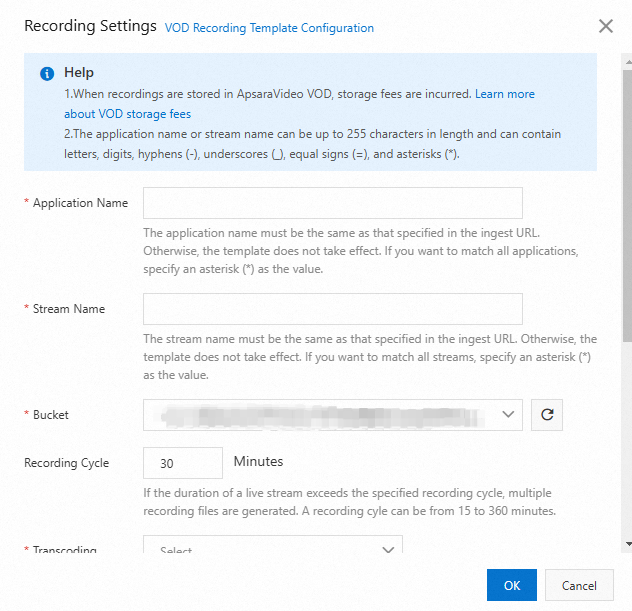
The following table describes the parameters for a recording template.
Parameter
Description
Application Name
The application name for the video. The entered Application Name must be the same as the Application Name for stream ingest for the setting to take effect. If you want to record live streams for all applications under your domain name, enter a wildcard character (*).
Stream Name
Recording to VOD supports stream-level recording. Enter a specific stream name. To record all streams under the specified AppName, enter an asterisk (*).
NoteThe AppName and StreamName parameters can contain letters, digits, hyphens (-), and underscores (_). The length is limited to 255 characters.
Bucket
You can select a storage address that has been created in the VOD service in the current region. If you cannot find the storage address, click Refresh to sync.
Recording Cycle
Recording Cycle is the maximum duration of a video-on-demand (VOD) file that is generated from a live stream. The valid range is 15 to 360 minutes. If the specified recording cycle is exceeded, the system generates a new file based on the recording naming rule. The default ts segment length is 30 s.
Transcoding Settings
Select a transcoding rule from the list to transcode the recorded video in the VOD service. You can transcode the video into different specifications or keep the original quality without transcoding.
For more information about recording transcoding template operations, see ApsaraVideo VOD transcoding configuration.
NoteThe region of the ApsaraVideo VOD transcoding template must be the same as the region of your current domain name. For example, if the current domain name is in the China (Shanghai) region, the ApsaraVideo VOD transcoding template must also be in the China (Shanghai) region.
Auto Merge
If you enable this feature, multiple recording epoch files are automatically merged into a single recording and stored in VOD after the live stream recording ends.
NoteAfter you enable auto merge of recordings of multiple cycles, the editing and production feature and the transcoding feature of ApsaraVideo VOD will be used. For billing details, see Editing and production billing and Media asset transcoding billing.
Transcoding Settings of Merged Video
Select a transcoding template from the drop-down list, which is obtained from ApsaraVideo VOD. The system performs transcoding on the merged video based on the settings of the transcoding template. For more information, see Transcoding Template.
NoteThe region of the ApsaraVideo VOD transcoding template must be the same as the region of your current domain name. For example, if the current domain name is in the China (Shanghai) region, the ApsaraVideo VOD transcoding template must also be in the China (Shanghai) region.
Click OK.
Method 2: Use an API
You can call the Add Live Stream Recording to VOD Configuration API to add a configuration. The following is an SDK call example:
// This file is auto-generated, don't edit it. Thanks.
package demo;

import com.aliyun.auth.credentials.Credential;
import com.aliyun.auth.credentials.provider.StaticCredentialProvider;
import com.aliyun.core.http.HttpClient;
import com.aliyun.core.http.HttpMethod;
import com.aliyun.core.http.ProxyOptions;
import com.aliyun.httpcomponent.httpclient.ApacheAsyncHttpClientBuilder;
import com.aliyun.sdk.service.live20161101.models.*;
import com.aliyun.sdk.service.live20161101.*;
import com.google.gson.Gson;
import darabonba.core.RequestConfiguration;
import darabonba.core.client.ClientOverrideConfiguration;
import darabonba.core.utils.CommonUtil;
import darabonba.core.TeaPair;

//import javax.net.ssl.KeyManager;
//import javax.net.ssl.X509TrustManager;
import java.net.InetSocketAddress;
import java.time.Duration;
import java.util.*;
import java.util.concurrent.CompletableFuture;
import java.io.*;

public class AddLiveRecordVodConfig {
    public static void main(String[] args) throws Exception {

        // HttpClient Configuration
        /*HttpClient httpClient = new ApacheAsyncHttpClientBuilder()
                .connectionTimeout(Duration.ofSeconds(10)) // Set the connection timeout time, the default is 10 seconds
                .responseTimeout(Duration.ofSeconds(10)) // Set the response timeout time, the default is 20 seconds
                .maxConnections(128) // Set the connection pool size
                .maxIdleTimeOut(Duration.ofSeconds(50)) // Set the connection pool timeout, the default is 30 seconds
                // Configure the proxy
                .proxy(new ProxyOptions(ProxyOptions.Type.HTTP, new InetSocketAddress("<YOUR-PROXY-HOSTNAME>", 9001))
                        .setCredentials("<YOUR-PROXY-USERNAME>", "<YOUR-PROXY-PASSWORD>"))
                // If it is an https connection, you need to configure the certificate, or ignore the certificate(.ignoreSSL(true))
                .x509TrustManagers(new X509TrustManager[]{})
                .keyManagers(new KeyManager[]{})
                .ignoreSSL(false)
                .build();*/

        // Configure Credentials authentication information, including ak, secret, token
        StaticCredentialProvider provider = StaticCredentialProvider.create(Credential.builder()
                // Please ensure that the environment variables ALIBABA_CLOUD_ACCESS_KEY_ID and ALIBABA_CLOUD_ACCESS_KEY_SECRET are set.
                .accessKeyId(System.getenv("ALIBABA_CLOUD_ACCESS_KEY_ID"))
                .accessKeySecret(System.getenv("ALIBABA_CLOUD_ACCESS_KEY_SECRET"))
                //.securityToken(System.getenv("ALIBABA_CLOUD_SECURITY_TOKEN")) // use STS token
                .build());

        // Configure the Client
        AsyncClient client = AsyncClient.builder()
                .region("<Your RegionId>") // Region ID
                //.httpClient(httpClient) // Use the configured HttpClient, otherwise use the default HttpClient (Apache HttpClient)
                .credentialsProvider(provider)
                //.serviceConfiguration(Configuration.create()) // Service-level configuration
                // Client-level configuration rewrite, can set Endpoint, Http request parameters, etc.
                .overrideConfiguration(
                        ClientOverrideConfiguration.create()
                                  // For the endpoint, see https://api.aliyun.com/product/live
                                .setEndpointOverride("live.aliyuncs.com")
                        //.setConnectTimeout(Duration.ofSeconds(30))
                )
                .build();

        // Parameter settings for API request
        AddLiveRecordVodConfigRequest addLiveRecordVodConfigRequest = AddLiveRecordVodConfigRequest.builder()
                .regionId("<Your RegionId>")
                .domainName("<Your DomainNmae>")
                .appName("<Your AppName>")
                .streamName("<Your StreamName>")
                .vodTranscodeGroupId("<Your VodTranscodeGroupId>")
                // Request-level configuration rewrite, can set Http request parameters, etc.
                // .requestConfiguration(RequestConfiguration.create().setHttpHeaders(new HttpHeaders()))
                .build();

        // Asynchronously get the return value of the API request
        CompletableFuture<AddLiveRecordVodConfigResponse> response = client.addLiveRecordVodConfig(addLiveRecordVodConfigRequest);
        // Synchronously get the return value of the API request
        AddLiveRecordVodConfigResponse resp = response.get();
        System.out.println(new Gson().toJson(resp));
        // Asynchronous processing of return values
        /*response.thenAccept(resp -> {
            System.out.println(new Gson().toJson(resp));
        }).exceptionally(throwable -> { // Handling exceptions
            System.out.println(throwable.getMessage());
            return null;
        });*/

        // Finally, close the client
        client.close();
    }

}The preceding sample code configures recording to VOD for the domain name <DomainName>. The AppName is <AppName>, and the StreamName is <StreamName>. The recorded content is not transcoded (VOD_NO_TRANSCODE) and is stored in the ApsaraVideo VOD system bucket <StorageLocation>.
For details about the AppName and StreamName configurations, see Rules for automatic recording.
Transcode recorded content
VOD stores recordings in the M3U8 format by default. To store recordings in other formats, you can configure a Recording Transcoding Template.
addLiveRecordVodConfigRequest.setVodTranscodeGroupId("<TranscodeGroupId>");You must configure transcoding templates in the VOD system. For more information, see Transcoding templates.
<TranscodeGroupId> is the Transcoding Template Group ID configured in VOD.
After you configure transcoding, the recording is transcoded and a transcoding URL is generated. The original file is retained.
Manage recordings
You can use the ApsaraVideo Live console to View recordings stored in VOD, and the ApsaraVideo VOD service to manage them. For more information, see Media Management.
View recordings stored in VOD in the ApsaraVideo Live console
Log on to the ApsaraVideo Live console.
In the navigation pane on the left, choose Feature Management > Recording. On the Recording page, click the Recording Management tab.
Select the streaming domain that you configured.
Click the VOD tab.
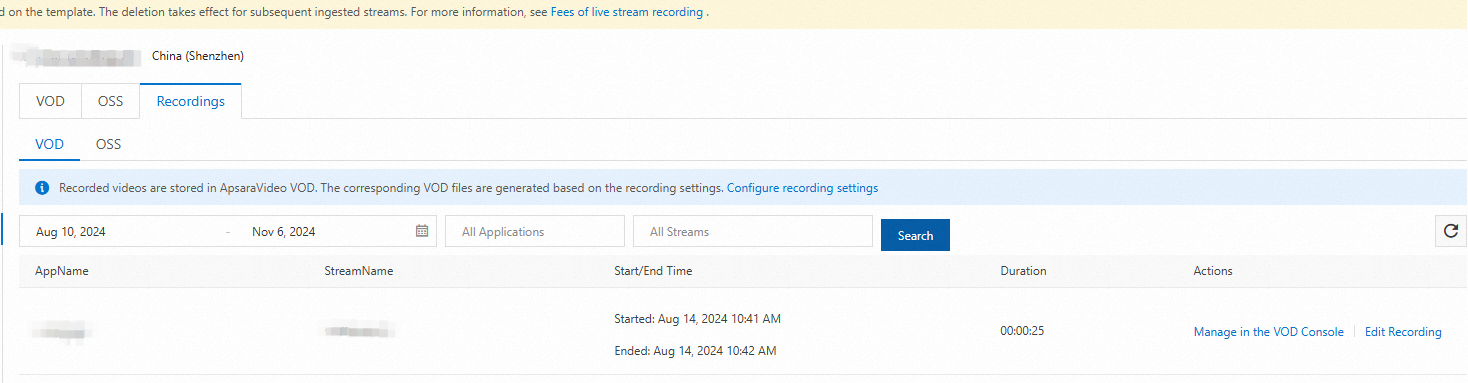
To manage a specific recording, click Go to VOD Console to Manage, or manage the recording in the Audio/Video section of the VOD console.

Record and store in OSS
Prerequisites
To configure live stream recording to store recordings in OSS, you must complete the following operations:
Activate OSS and create a bucket. For more information, see Create a bucket.
ImportantStoring recording files in OSS incurs storage fees. For more information, see Storage Fees.
The Region of the OSS bucket for storing recordings must match the region of the domain name configured for recording. For example, if the live stream domain name is in the China (Shanghai) region, the bucket must also be in the China (Shanghai) region.
Configure permissions for ApsaraVideo Live to write data to OSS. This authorization is typically granted automatically when you activate the ApsaraVideo Live service.
ImportantIf you accidentally delete this permission, you can click Authorize Access to Cloud Resources to grant it again.
We recommend that you use your Alibaba Cloud account to grant the permissions. If you use a RAM user, the user must have the following permissions:
ram:CreateRole,ram:GetRole,ram:ListPoliciesForRole, andram:AttachPolicyToRole. Granting these permissions to a RAM user poses a security risk and is not recommended.
Configure features
ApsaraVideo Live provides two methods to add a configuration for recording and storing in OSS.
After you complete the configuration, you must restart stream ingest for the recording configuration to take effect.
A recording is generated after the stream is interrupted for a period longer than the configured merge duration for stream interruptions (180 seconds by default).
Method 1: Use the console
Log on to the ApsaraVideo Live console.
In the navigation pane on the left, select Feature Management > Recording. On the Recording page, click the OSS tab.
Select the streaming domain and click Add.
Configure a recording template.
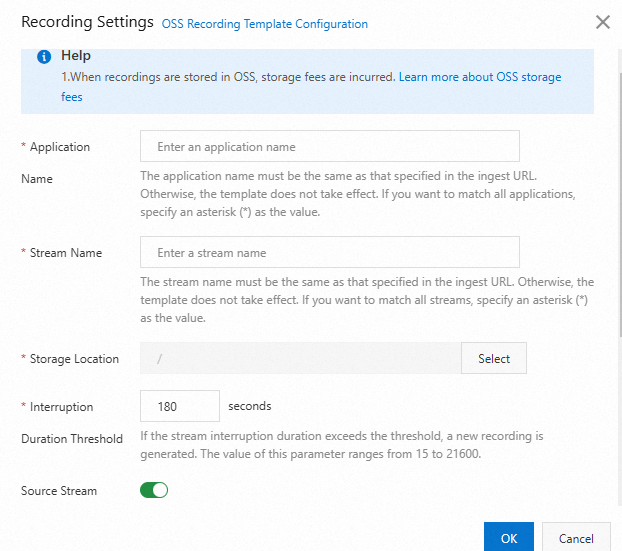
Table 1. Recording template parameters
Parameter
Description
Application Name
The application name. The AppName that you enter must be the same as the AppName in the ingest URL for the configuration to take effect. To record at the domain name level, enter an asterisk (*).
Stream Name
Recording to OSS supports stream-level recording. Enter a specific stream name. To record all streams under the specified AppName, enter an asterisk (*).
NoteThe AppName and StreamName parameters can contain letters, digits, hyphens (-), and underscores (_). The length is limited to 255 characters.
The asterisk (*) can only be entered as a standalone value and cannot be used as a wildcard character in a string.
Storage Location
You can select a bucket that has been created in OSS in the current region.
NoteThere are two types of storage buckets:
Standard bucket: used for general file storage.
Media bucket: dedicated to video transcoding. Files stored in this type of bucket can automatically trigger MPS transcoding jobs.
The system does not distinguish between bucket types. To perform video transcoding, make a note of the media bucket name to ensure that the transcoded media files are stored in the correct location.
Interruption Duration Threshold
If the duration of a stream interruption exceeds the specified splicing duration, a new file is generated. The splicing duration for interrupted streams can be set to a value from 15 to 21,600 seconds.
Storage Format
The supported formats are flv, m3u8, mp4, and cmaf.
NoteYou must configure at least one storage format. The CMAF format cannot be selected at the same time as the M3U8 format.
Naming Conventions
The default storage path is record/{AppName}/{StreamName}/{EscapedStartTime }_{EscapedEndTime }.
Example:
If AppName is liveApp**** and StreamName is liveStream****, the storage path for a recording in m3u8 format is record/liveApp****/liveStream****/{EscapedStartTime}_{EscapedEndTime }.
TS File Duration
The duration of a single segment. The default value is 30 seconds. The value can range from 5 to 30 seconds.
Recording Cycle
The Recording Cycle can be set to a value from 15 to 360 minutes. The maximum supported recording duration is 6 hours. If the specified recording cycle is exceeded, the system generates a new file based on the recording naming rule.
NoteThe recording epoch is the maximum duration of a VOD file converted from a live stream.
Configure recording of transcoded streams. (Optional)
ImportantWhen you use the live stream transcoding feature, you are charged based on the transcoding standard, resolution, and total length of transcoded streams. For more information, see Live stream transcoding fees.

Table 2. Parameters for recording transcoded streams
Parameter
Description
Transcoded Stream Recording
Turn on the Transcoded Stream Recording switch and configure the parameters.
Storage Format
The supported formats are flv, m3u8, mp4, and cmaf.
NoteYou must configure at least one storage format. The CMAF format cannot be selected at the same time as the M3U8 format.
Naming Conventions
The default storage path is transcodeRecord/{AppName}/{StreamName}_{Transcoding Template ID}/{EscapedStartTime }_{EscapedEndTime }.
Example:
If AppName is liveApp****, StreamName is liveStream****, and Transcoding Template ID is lld, the actual storage path for a recording in m3u8 format is transcodeRecord/liveApp****/liveStream****_lld/{EscapedStartTime}_{EscapedEndTime }.
TS File Duration
The duration of a single segment. The default value is 30 seconds. The value can range from 5 to 30 seconds.
Recording Cycle
The Recording Epoch ranges from 15 to 360 minutes. The maximum recording duration is 6 hours. If the duration exceeds 6 hours, the system generates a new file based on the recording naming convention.
NoteThe recording epoch is the maximum duration of a VOD file converted from a live stream.
Transcoding Template ID
You can select specific transcoding templates (up to 10) or all transcoding templates.
For the transcoding template to take effect, its AppName must be the same as the AppName of the recording template. If you do not have a transcoding template, add one first. For more information, see default transcoding.
Click OK.
Method 2: Use an API
You can call the Add Recording Configuration API to add a configuration. The following is an SDK call example:
// This file is auto-generated, don't edit it. Thanks.
package demo;

import com.aliyun.auth.credentials.Credential;
import com.aliyun.auth.credentials.provider.StaticCredentialProvider;
import com.aliyun.core.http.HttpClient;
import com.aliyun.core.http.HttpMethod;
import com.aliyun.core.http.ProxyOptions;
import com.aliyun.httpcomponent.httpclient.ApacheAsyncHttpClientBuilder;
import com.aliyun.sdk.service.live20161101.models.*;
import com.aliyun.sdk.service.live20161101.*;
import com.google.gson.Gson;
import darabonba.core.RequestConfiguration;
import darabonba.core.client.ClientOverrideConfiguration;
import darabonba.core.utils.CommonUtil;
import darabonba.core.TeaPair;

//import javax.net.ssl.KeyManager;
//import javax.net.ssl.X509TrustManager;
import java.net.InetSocketAddress;
import java.time.Duration;
import java.util.*;
import java.util.concurrent.CompletableFuture;
import java.io.*;

public class AddLiveAppRecordConfig {
    public static void main(String[] args) throws Exception {

        // HttpClient Configuration
        /*HttpClient httpClient = new ApacheAsyncHttpClientBuilder()
                .connectionTimeout(Duration.ofSeconds(10)) // Set the connection timeout time, the default is 10 seconds
                .responseTimeout(Duration.ofSeconds(10)) // Set the response timeout time, the default is 20 seconds
                .maxConnections(128) // Set the connection pool size
                .maxIdleTimeOut(Duration.ofSeconds(50)) // Set the connection pool timeout, the default is 30 seconds
                // Configure the proxy
                .proxy(new ProxyOptions(ProxyOptions.Type.HTTP, new InetSocketAddress("<YOUR-PROXY-HOSTNAME>", 9001))
                        .setCredentials("<YOUR-PROXY-USERNAME>", "<YOUR-PROXY-PASSWORD>"))
                // If it is an https connection, you need to configure the certificate, or ignore the certificate(.ignoreSSL(true))
                .x509TrustManagers(new X509TrustManager[]{})
                .keyManagers(new KeyManager[]{})
                .ignoreSSL(false)
                .build();*/

        // Configure Credentials authentication information, including ak, secret, token
        StaticCredentialProvider provider = StaticCredentialProvider.create(Credential.builder()
                // Please ensure that the environment variables ALIBABA_CLOUD_ACCESS_KEY_ID and ALIBABA_CLOUD_ACCESS_KEY_SECRET are set.
                .accessKeyId(System.getenv("ALIBABA_CLOUD_ACCESS_KEY_ID"))
                .accessKeySecret(System.getenv("ALIBABA_CLOUD_ACCESS_KEY_SECRET"))
                //.securityToken(System.getenv("ALIBABA_CLOUD_SECURITY_TOKEN")) // use STS token
                .build());

        // Configure the Client
        AsyncClient client = AsyncClient.builder()
                .region("<Your RegionId>") // Region ID
                //.httpClient(httpClient) // Use the configured HttpClient, otherwise use the default HttpClient (Apache HttpClient)
                .credentialsProvider(provider)
                //.serviceConfiguration(Configuration.create()) // Service-level configuration
                // Client-level configuration rewrite, can set Endpoint, Http request parameters, etc.
                .overrideConfiguration(
                        ClientOverrideConfiguration.create()
                                  // For the endpoint, see https://api.aliyun.com/product/live
                                .setEndpointOverride("live.aliyuncs.com")
                        //.setConnectTimeout(Duration.ofSeconds(30))
                )
                .build();

        // Parameter settings for API request
        AddLiveAppRecordConfigRequest addLiveAppRecordConfigRequest = AddLiveAppRecordConfigRequest.builder()
                .domainName("<Your DomainName>")
                .appName("<Your AppName>")
                .ossEndpoint("<Your OSSEndpoint>")
                .ossBucket("<Your OSSBucket>")
                .streamName("<Your StreamName>")
                // Request-level configuration rewrite, can set Http request parameters, etc.
                // .requestConfiguration(RequestConfiguration.create().setHttpHeaders(new HttpHeaders()))
                .build();

        // Asynchronously get the return value of the API request
        CompletableFuture<AddLiveAppRecordConfigResponse> response = client.addLiveAppRecordConfig(addLiveAppRecordConfigRequest);
        // Synchronously get the return value of the API request
        AddLiveAppRecordConfigResponse resp = response.get();
        System.out.println(new Gson().toJson(resp));
        // Asynchronous processing of return values
        /*response.thenAccept(resp -> {
            System.out.println(new Gson().toJson(resp));
        }).exceptionally(throwable -> { // Handling exceptions
            System.out.println(throwable.getMessage());
            return null;
        });*/

        // Finally, close the client
        client.close();
    }

}The preceding sample code configures recording to OSS for the <DomainName> domain name, where the AppName is <AppName>, the StreamName is <StreamName>, the storage format is m3u8, and the recordings are stored in <OssBucket>.
You can find the <OssEndpoint> for the region of your <OssBucket> in the OSS documentation about Regions and Endpoints.
For details about AppName and StreamName configuration, see Automatic Recording Rules.
Record transcoded streams
If you want to reduce the size of recordings, you can record transcoded streams. This process involves adjusting the video bitrate and increasing the video compression ratio while maintaining video quality. The feature of recording to OSS supports storing both transcoded streams and original streams simultaneously. It also supports storing only transcoded streams or only original streams.
When you use the live stream transcoding feature, you are charged based on the transcoding standard, resolution, and total length of transcoded streams. For more information, see Live stream transcoding fees.
Custom recording policies
When the live stream recording feature is configured in Feature configuration, the live content is automatically recorded during stream ingest. This process is called Automatic Recording.
However, sometimes you may want to decide whether to record a specific live stream based on your business logic. The live stream recording feature provides two solutions for this scenario:
The live center sends a callback to your business system to ask if the live stream needs to be recorded. Recording starts after the live center receives a response that indicates recording is required. This is called on-demand recording.
A call from your business system to the live streaming service to record live content is known as Manual Recording.
On-demand recording
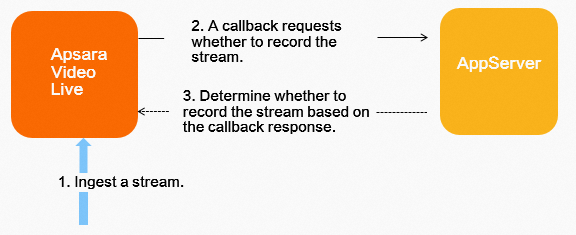
To implement on-demand recording, your business system must provide a URL for live streaming service invocation, as described in On-demand recording callback.
The following sample code shows how to configure on-demand recording:
        // Set the OnDemand field to 1 to enable on-demand recording through HTTP callbacks.
        addLiveAppRecordConfigRequest.setOnDemand(1);
You can also call the Add domain-level recording callback configuration API to configure recording callbacks.
Manual recording
To implement manual recording, you must disable the automatic recording feature. The following sample code shows how to do this:
        // Set the OnDemand field to 7 to disable automatic recording.
        addLiveAppRecordConfigRequest.setOnDemand(7);
Then, during the live stream, you can call the real-time recording instruction API to start recording as needed.
Stop recording
You can stop a recording that was started using Automatic Recording, On-demand Recording, or Manual Recording by calling the real-time recording instructions API.
// This file is auto-generated, don't edit it. Thanks.
package demo;

import com.aliyun.auth.credentials.Credential;
import com.aliyun.auth.credentials.provider.StaticCredentialProvider;
import com.aliyun.core.http.HttpClient;
import com.aliyun.core.http.HttpMethod;
import com.aliyun.core.http.ProxyOptions;
import com.aliyun.httpcomponent.httpclient.ApacheAsyncHttpClientBuilder;
import com.aliyun.sdk.service.live20161101.models.*;
import com.aliyun.sdk.service.live20161101.*;
import com.google.gson.Gson;
import darabonba.core.RequestConfiguration;
import darabonba.core.client.ClientOverrideConfiguration;
import darabonba.core.utils.CommonUtil;
import darabonba.core.TeaPair;

//import javax.net.ssl.KeyManager;
//import javax.net.ssl.X509TrustManager;
import java.net.InetSocketAddress;
import java.time.Duration;
import java.util.*;
import java.util.concurrent.CompletableFuture;
import java.io.*;

public class RealTimeRecordCommand {
    public static void main(String[] args) throws Exception {

        // HttpClient Configuration
        /*HttpClient httpClient = new ApacheAsyncHttpClientBuilder()
                .connectionTimeout(Duration.ofSeconds(10)) // Set the connection timeout time, the default is 10 seconds
                .responseTimeout(Duration.ofSeconds(10)) // Set the response timeout time, the default is 20 seconds
                .maxConnections(128) // Set the connection pool size
                .maxIdleTimeOut(Duration.ofSeconds(50)) // Set the connection pool timeout, the default is 30 seconds
                // Configure the proxy
                .proxy(new ProxyOptions(ProxyOptions.Type.HTTP, new InetSocketAddress("<YOUR-PROXY-HOSTNAME>", 9001))
                        .setCredentials("<YOUR-PROXY-USERNAME>", "<YOUR-PROXY-PASSWORD>"))
                // If it is an https connection, you need to configure the certificate, or ignore the certificate(.ignoreSSL(true))
                .x509TrustManagers(new X509TrustManager[]{})
                .keyManagers(new KeyManager[]{})
                .ignoreSSL(false)
                .build();*/

        // Configure Credentials authentication information, including ak, secret, token
        StaticCredentialProvider provider = StaticCredentialProvider.create(Credential.builder()
                // Please ensure that the environment variables ALIBABA_CLOUD_ACCESS_KEY_ID and ALIBABA_CLOUD_ACCESS_KEY_SECRET are set.
                .accessKeyId(System.getenv("ALIBABA_CLOUD_ACCESS_KEY_ID"))
                .accessKeySecret(System.getenv("ALIBABA_CLOUD_ACCESS_KEY_SECRET"))
                //.securityToken(System.getenv("ALIBABA_CLOUD_SECURITY_TOKEN")) // use STS token
                .build());

        // Configure the Client
        AsyncClient client = AsyncClient.builder()
                .region("<Your RegionId>") // Region ID
                //.httpClient(httpClient) // Use the configured HttpClient, otherwise use the default HttpClient (Apache HttpClient)
                .credentialsProvider(provider)
                //.serviceConfiguration(Configuration.create()) // Service-level configuration
                // Client-level configuration rewrite, can set Endpoint, Http request parameters, etc.
                .overrideConfiguration(
                        ClientOverrideConfiguration.create()
                                  // For the endpoint, see https://api.aliyun.com/product/live
                                .setEndpointOverride("live.aliyuncs.com")
                        //.setConnectTimeout(Duration.ofSeconds(30))
                )
                .build();

        // Parameter settings for API request
        RealTimeRecordCommandRequest realTimeRecordCommandRequest = RealTimeRecordCommandRequest.builder()
                .regionId("<Your RegionId>")
                .command("<Your Command>")
                .domainName("<Your DomainName>")
                .appName("<Your AppName>")
                .streamName("<Your StreamName>")
                // Request-level configuration rewrite, can set Http request parameters, etc.
                // .requestConfiguration(RequestConfiguration.create().setHttpHeaders(new HttpHeaders()))
                .build();

        // Asynchronously get the return value of the API request
        CompletableFuture<RealTimeRecordCommandResponse> response = client.realTimeRecordCommand(realTimeRecordCommandRequest);
        // Synchronously get the return value of the API request
        RealTimeRecordCommandResponse resp = response.get();
        System.out.println(new Gson().toJson(resp));
        // Asynchronous processing of return values
        /*response.thenAccept(resp -> {
            System.out.println(new Gson().toJson(resp));
        }).exceptionally(throwable -> { // Handling exceptions
            System.out.println(throwable.getMessage());
            return null;
        });*/

        // Finally, close the client
        client.close();
    }

}setCommand("stop") stops the recording.
When you stop a recording, a recording file is generated after the merge duration for stream interruptions has passed.
If you are recording a transcoded stream, you must set <StreamName> to the format of
StreamName_Transcoding Template ID.
Manage recordings
View recordings
ApsaraVideo Live provides three ways to view recordings.
Method 1: Use the console
Log on to the ApsaraVideo Live console.
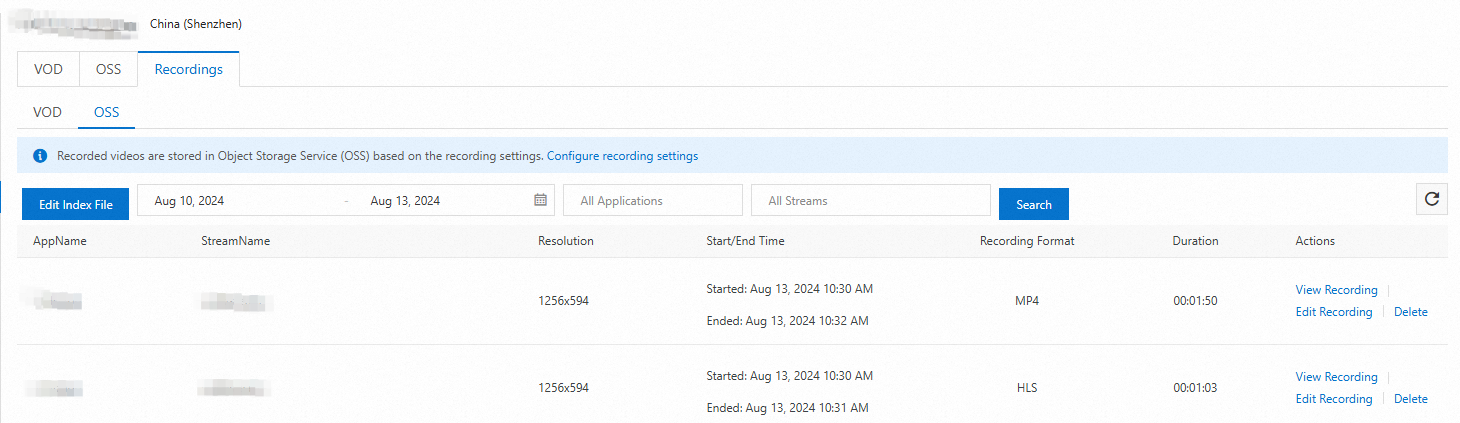
In the navigation pane on the left, go to Feature Management > Recording. On the Recording page, click the Recordings tab.
Select the streaming domain to configure.
Click the OSS tab.
Method 2: Use an API
You can call the DescribeLiveStreamRecordIndexFiles - Query all index files within a specific time period API. The following sample code provides an example:
// This file is auto-generated, don't edit it. Thanks.
package demo;

import com.aliyun.auth.credentials.Credential;
import com.aliyun.auth.credentials.provider.StaticCredentialProvider;
import com.aliyun.core.http.HttpClient;
import com.aliyun.core.http.HttpMethod;
import com.aliyun.core.http.ProxyOptions;
import com.aliyun.httpcomponent.httpclient.ApacheAsyncHttpClientBuilder;
import com.aliyun.sdk.service.live20161101.models.*;
import com.aliyun.sdk.service.live20161101.*;
import com.google.gson.Gson;
import darabonba.core.RequestConfiguration;
import darabonba.core.client.ClientOverrideConfiguration;
import darabonba.core.utils.CommonUtil;
import darabonba.core.TeaPair;

//import javax.net.ssl.KeyManager;
//import javax.net.ssl.X509TrustManager;
import java.net.InetSocketAddress;
import java.time.Duration;
import java.util.*;
import java.util.concurrent.CompletableFuture;
import java.io.*;

public class DescribeLiveStreamRecordIndexFiles {
    public static void main(String[] args) throws Exception {

        // HttpClient Configuration
        /*HttpClient httpClient = new ApacheAsyncHttpClientBuilder()
                .connectionTimeout(Duration.ofSeconds(10)) // Set the connection timeout time, the default is 10 seconds
                .responseTimeout(Duration.ofSeconds(10)) // Set the response timeout time, the default is 20 seconds
                .maxConnections(128) // Set the connection pool size
                .maxIdleTimeOut(Duration.ofSeconds(50)) // Set the connection pool timeout, the default is 30 seconds
                // Configure the proxy
                .proxy(new ProxyOptions(ProxyOptions.Type.HTTP, new InetSocketAddress("<YOUR-PROXY-HOSTNAME>", 9001))
                        .setCredentials("<YOUR-PROXY-USERNAME>", "<YOUR-PROXY-PASSWORD>"))
                // If it is an https connection, you need to configure the certificate, or ignore the certificate(.ignoreSSL(true))
                .x509TrustManagers(new X509TrustManager[]{})
                .keyManagers(new KeyManager[]{})
                .ignoreSSL(false)
                .build();*/

        // Configure Credentials authentication information, including ak, secret, token
        StaticCredentialProvider provider = StaticCredentialProvider.create(Credential.builder()
                // Please ensure that the environment variables ALIBABA_CLOUD_ACCESS_KEY_ID and ALIBABA_CLOUD_ACCESS_KEY_SECRET are set.
                .accessKeyId(System.getenv("ALIBABA_CLOUD_ACCESS_KEY_ID"))
                .accessKeySecret(System.getenv("ALIBABA_CLOUD_ACCESS_KEY_SECRET"))
                //.securityToken(System.getenv("ALIBABA_CLOUD_SECURITY_TOKEN")) // use STS token
                .build());

        // Configure the Client
        AsyncClient client = AsyncClient.builder()
                .region("<Your RegionId>") // Region ID
                //.httpClient(httpClient) // Use the configured HttpClient, otherwise use the default HttpClient (Apache HttpClient)
                .credentialsProvider(provider)
                //.serviceConfiguration(Configuration.create()) // Service-level configuration
                // Client-level configuration rewrite, can set Endpoint, Http request parameters, etc.
                .overrideConfiguration(
                        ClientOverrideConfiguration.create()
                                  // For the endpoint, see https://api.aliyun.com/product/live
                                .setEndpointOverride("live.aliyuncs.com")
                        //.setConnectTimeout(Duration.ofSeconds(30))
                )
                .build();

        // Parameter settings for API request
        DescribeLiveStreamRecordIndexFilesRequest describeLiveStreamRecordIndexFilesRequest = DescribeLiveStreamRecordIndexFilesRequest.builder()
                .domainName("<Your DomainName>")
                .appName("<Your AppName>")
                .streamName("<Your StreamName>")
                .startTime("<Your StartTime>")
                .endTime("<Your EndTime>")
                .order("<Your Order>")
                // Request-level configuration rewrite, can set Http request parameters, etc.
                // .requestConfiguration(RequestConfiguration.create().setHttpHeaders(new HttpHeaders()))
                .build();

        // Asynchronously get the return value of the API request
        CompletableFuture<DescribeLiveStreamRecordIndexFilesResponse> response = client.describeLiveStreamRecordIndexFiles(describeLiveStreamRecordIndexFilesRequest);
        // Synchronously get the return value of the API request
        DescribeLiveStreamRecordIndexFilesResponse resp = response.get();
        System.out.println(new Gson().toJson(resp));
        // Asynchronous processing of return values
        /*response.thenAccept(resp -> {
            System.out.println(new Gson().toJson(resp));
        }).exceptionally(throwable -> { // Handling exceptions
            System.out.println(throwable.getMessage());
            return null;
        });*/

        // Finally, close the client
        client.close();
    }

}You can query data within the past 6 months.
The format for EndTime and StartTime is yyyy-MM-ddTHH:mm:ssZ (UTC). The interval cannot exceed four days.
Method 3: Use OSS
When you configure the live stream recording feature, you need to specify the storage location of recordings in OSS. To view the recordings in OSS, see List files in OSS.
Delete recordings
ApsaraVideo Live stores recording information, such as AppName, StreamName, and the OSS file storage path. The actual Files are stored in OSS. If you want to delete the files in OSS when you delete a recording, you must create the AliyunMTSVideoLifecycleRole service role and Input and Attach the AliyunMTSVideoLifecycleRolePolicy system policy to this role.
Before you can delete recordings in the ApsaraVideo Live console, you must grant permissions. You need to create and authorize a RAM role in the RAM console, and then log on to the ApsaraVideo Live console to delete the recordings.
Create a service role
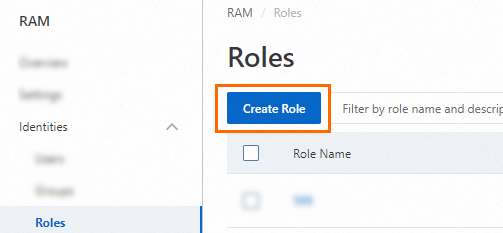
Log on to the RAM console as a RAM administrator.
In the navigation pane on the left, choose .
On the Roles page, click Create Role.
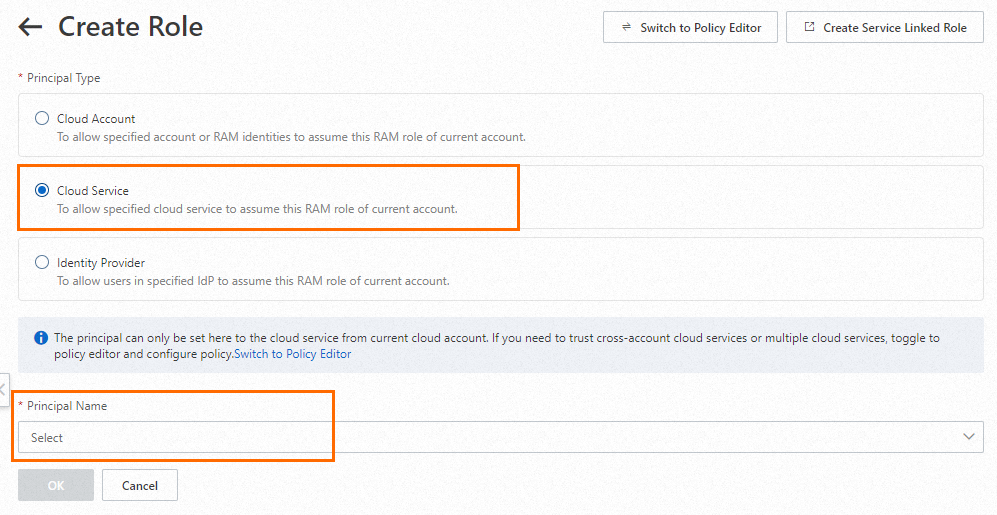
On the Create Role page, set Principal Type to Cloud Service. Then, select a trusted service and click OK.
 Note
NoteFrom the Principal Name drop-down list, select ApsaraVideo Media Processing.
In the Create Role dialog box, enter "AliyunMTSVideoLifecycleRole" in the Role Name field and click OK.

After the role is created, on its Basic Information page, click the Permissions tab.
Click Precise Permissions. Configure the parameters as follows:
Policy Type: System Policy
Policy Name: AliyunMTSVideoLifecycleRolePolicy
After the configuration is complete, click OK.

There are three ways to delete recordings.
Method 1: Use the console
Log on to the ApsaraVideo Live console.
In the navigation pane on the left, select Recordings.
Select the domain name of the recording to delete.
Click the OSS tab and select Delete.
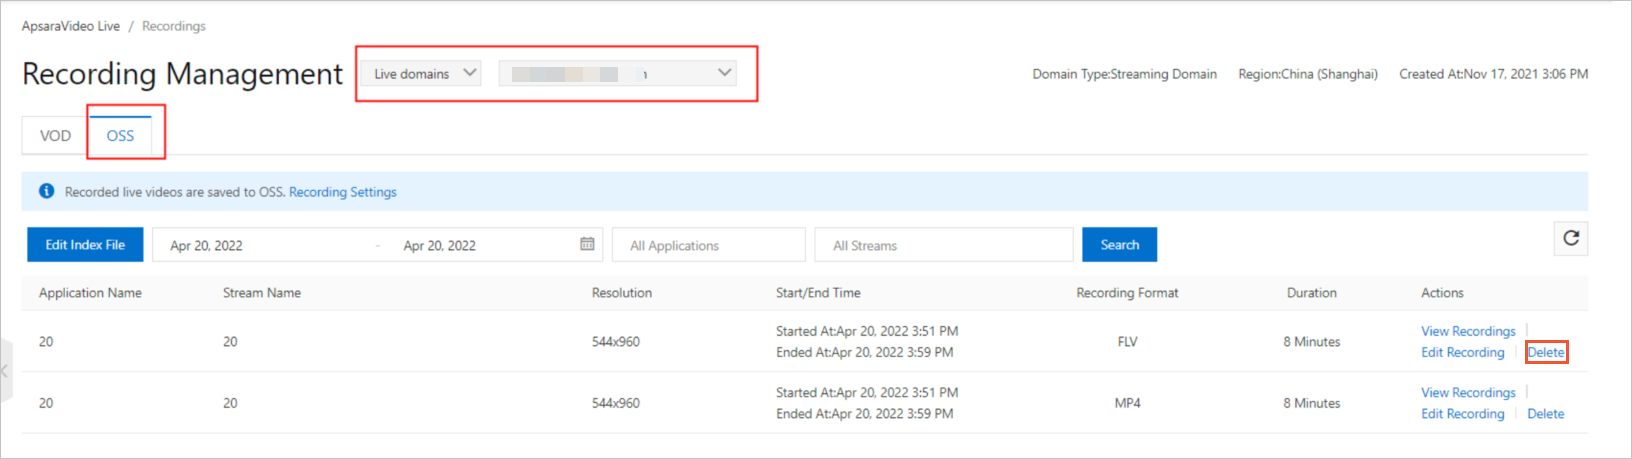
Click OK.
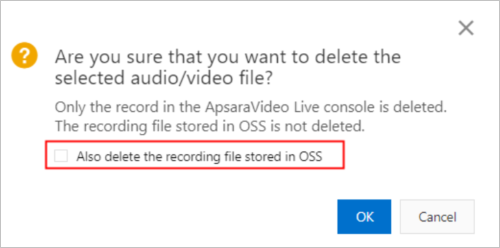
The synchronous deletion option is not selected by default. If you select this option, the recording file in OSS is deleted at the same time as the recording metadata in the ApsaraVideo Live console.
Method 2: Use an API
You can call the Delete live stream recording file API. The following is an SDK code example:
// This file is auto-generated, don't edit it. Thanks.
package demo;

import com.aliyun.auth.credentials.Credential;
import com.aliyun.auth.credentials.provider.StaticCredentialProvider;
import com.aliyun.core.http.HttpClient;
import com.aliyun.core.http.HttpMethod;
import com.aliyun.core.http.ProxyOptions;
import com.aliyun.httpcomponent.httpclient.ApacheAsyncHttpClientBuilder;
import com.aliyun.sdk.service.live20161101.models.*;
import com.aliyun.sdk.service.live20161101.*;
import com.google.gson.Gson;
import darabonba.core.RequestConfiguration;
import darabonba.core.client.ClientOverrideConfiguration;
import darabonba.core.utils.CommonUtil;
import darabonba.core.TeaPair;

//import javax.net.ssl.KeyManager;
//import javax.net.ssl.X509TrustManager;
import java.net.InetSocketAddress;
import java.time.Duration;
import java.util.*;
import java.util.concurrent.CompletableFuture;
import java.io.*;

public class DeleteLiveStreamRecordIndexFiles {
    public static void main(String[] args) throws Exception {

        // HttpClient Configuration
        /*HttpClient httpClient = new ApacheAsyncHttpClientBuilder()
                .connectionTimeout(Duration.ofSeconds(10)) // Set the connection timeout time, the default is 10 seconds
                .responseTimeout(Duration.ofSeconds(10)) // Set the response timeout time, the default is 20 seconds
                .maxConnections(128) // Set the connection pool size
                .maxIdleTimeOut(Duration.ofSeconds(50)) // Set the connection pool timeout, the default is 30 seconds
                // Configure the proxy
                .proxy(new ProxyOptions(ProxyOptions.Type.HTTP, new InetSocketAddress("<YOUR-PROXY-HOSTNAME>", 9001))
                        .setCredentials("<YOUR-PROXY-USERNAME>", "<YOUR-PROXY-PASSWORD>"))
                // If it is an https connection, you need to configure the certificate, or ignore the certificate(.ignoreSSL(true))
                .x509TrustManagers(new X509TrustManager[]{})
                .keyManagers(new KeyManager[]{})
                .ignoreSSL(false)
                .build();*/

        // Configure Credentials authentication information, including ak, secret, token
        StaticCredentialProvider provider = StaticCredentialProvider.create(Credential.builder()
                // Please ensure that the environment variables ALIBABA_CLOUD_ACCESS_KEY_ID and ALIBABA_CLOUD_ACCESS_KEY_SECRET are set.
                .accessKeyId(System.getenv("ALIBABA_CLOUD_ACCESS_KEY_ID"))
                .accessKeySecret(System.getenv("ALIBABA_CLOUD_ACCESS_KEY_SECRET"))
                //.securityToken(System.getenv("ALIBABA_CLOUD_SECURITY_TOKEN")) // use STS token
                .build());

        // Configure the Client
        AsyncClient client = AsyncClient.builder()
                .region("<Your RegionId>") // Region ID
                //.httpClient(httpClient) // Use the configured HttpClient, otherwise use the default HttpClient (Apache HttpClient)
                .credentialsProvider(provider)
                //.serviceConfiguration(Configuration.create()) // Service-level configuration
                // Client-level configuration rewrite, can set Endpoint, Http request parameters, etc.
                .overrideConfiguration(
                        ClientOverrideConfiguration.create()
                                  // For the endpoint, see https://api.aliyun.com/product/live
                                .setEndpointOverride("live.aliyuncs.com")
                        //.setConnectTimeout(Duration.ofSeconds(30))
                )
                .build();

        // Parameter settings for API request
        DeleteLiveStreamRecordIndexFilesRequest deleteLiveStreamRecordIndexFilesRequest = DeleteLiveStreamRecordIndexFilesRequest.builder()
                .regionId("<Your RegionId>")
                .recordId(java.util.Arrays.asList(
                    "<Your RecordId_1>"
                ))
                .domainName("<Your DomainName>")
                .appName("<Your AppName>")
                .streamName("<Your StreamName>")
                .removeFile("<Your RemoveFile>")
                // Request-level configuration rewrite, can set Http request parameters, etc.
                // .requestConfiguration(RequestConfiguration.create().setHttpHeaders(new HttpHeaders()))
                .build();

        // Asynchronously get the return value of the API request
        CompletableFuture<DeleteLiveStreamRecordIndexFilesResponse> response = client.deleteLiveStreamRecordIndexFiles(deleteLiveStreamRecordIndexFilesRequest);
        // Synchronously get the return value of the API request
        DeleteLiveStreamRecordIndexFilesResponse resp = response.get();
        System.out.println(new Gson().toJson(resp));
        // Asynchronous processing of return values
        /*response.thenAccept(resp -> {
            System.out.println(new Gson().toJson(resp));
        }).exceptionally(throwable -> { // Handling exceptions
            System.out.println(throwable.getMessage());
            return null;
        });*/

        // Finally, close the client
        client.close();
    }

}<recordId> is the manifest ID. To obtain the manifest ID, see View recordings.
Method 3: OSS deletion
In most cases, we do not recommend that you directly delete recording files stored in OSS. If you want to delete a recording file stored in OSS, you can select the "Also delete the recording file stored in OSS" option when you delete the recording in the ApsaraVideo Live console. If you must directly delete recording files stored in OSS for business reasons, see Delete Files from OSS.
Other methods for deleting files
Because media resources are stored in OSS buckets, you must grant access permissions to delete recordings. You can click to authorize for one-click authorization.
Delete files older than six months: You can query information only for recordings that are within the last six months. To delete older files, you must use OSS. For more information, see Delete files in OSS.
Delete expired recordings: After you grant the authorization, submit a ticket. We will then configure the expiration time that you require. For information about how to submit a ticket, see Contact us. After the validity period is configured, ApsaraVideo Live can automatically delete expired recording files that are stored in OSS.
Authorizing access to cloud resources grants a system-created role, used by ApsaraVideo Live, permission to access cloud resources. If you accidentally delete the role after authorization, you can grant the permissions again.
Configure a CDN-accelerated domain name
If you want to distribute your recorded live stream videos faster across the network, you can configure a CDN-accelerated domain name. CDN distributes the videos to nodes in various locations. This allows users to access content from the nearest node instead of connecting to the OSS origin. This method not only improves the access speed and experience for edge users but also reduces outbound traffic costs by up to 50% compared to direct OSS access, which effectively saves network costs. For more information, see Accelerate access to OSS using CDN.
References
If you encounter problems when you use live stream recording, see Live Stream Recording FAQ.
To use the Java SDK, see Java SDK Usage Instructions.
For more information about recording callbacks, see Live stream recording callbacks and Callbacks for on-demand recording.