This topic explains how to create an AnalyticDB sink connector that uses AnalyticDB for MySQL to export data from a Message Queue for Apache Kafka source topic to AnalyticDB for MySQL or AnalyticDB for PostgreSQL.
Prerequisites
Before you begin, ensure the following prerequisites are met:
Message Queue for Apache Kafka
Enable the connector feature for the Message Queue for Apache Kafka instance. For more information, see Enable connectors.
Create a source topic for the Message Queue for Apache Kafka instance. For more information, see Step 1: Create a topic.
Function Compute
AnalyticDB for MySQL and AnalyticDB for PostgreSQL
AnalyticDB for MySQL: In the AnalyticDB for MySQL, create a cluster, create a database account, connect to the cluster, and then create a database. For more information, see Create a cluster, Create a database account, Connect to a cluster, and Create a database.
AnalyticDB for PostgreSQL: In the AnalyticDB for PostgreSQL console, create an instance, create a database account, and then log on to the database. For more information, see Create an instance, Create and manage accounts, and Connect to an instance.
Usage notes
You can export data from a source topic of a Message Queue for Apache Kafka instance to AnalyticDB for MySQL or AnalyticDB for PostgreSQL through AnalyticDB for MySQL only if all services are in the same region. For more information about connector limits, see Limits.
This feature is powered by Function Compute. Function Compute provides a free quota. Charges apply for resource usage that exceeds the free quota. For more information, see the Billing overview of Function Compute.
You can query function call logs in Function Compute to troubleshoot issues. For more information, see Configure logging.
During data export, Message Queue for Apache Kafka serializes messages as UTF-8 strings. Binary data formats are not supported.
If the AnalyticDB sink connector uses a private endpoint, the Function Compute runtime environment cannot access it by default. To enable network connectivity, configure the function service in the Function Compute console with the same VPC and vSwitch as your destination AnalyticDB instance. For more information, see Update a service.
Message Queue for Apache Kafka automatically creates a service-linked role when you create a connector.
If a service-linked role does not exist, Message Queue for Apache Kafka automatically creates one. This role grants Message Queue for Apache Kafka the permissions required to export data.
If a service-linked role already exists, Message Queue for Apache Kafka does not create another one.
For more information about service-linked roles, see Service-linked roles.
Procedure
To export data from a source topic of a Message Queue for Apache Kafka instance to an AnalyticDB database with an AnalyticDB sink connector, follow these steps:
Optional: For the AnalyticDB Sink Connector, create the required topic and group
If you do not need to customize the Topic and Group, you can skip this step and choose to automatically create them in the next step.
ImportantSome topics required by the AnalyticDB sink connector must use
local storage. For Message Queue for Apache Kafka instances running major version 0.10.2, you cannot manually create topics that uselocal storage. These topics can only be created automatically.Configure services
Verify the result
Create required topics
You can manually create the five topics required by the AnalyticDB sink connector in the Message Queue for Apache Kafka console: a task offset topic, a task configuration topic, a task status topic, a dead-letter queue topic, and an error data topic. These topics have different requirements for the number of partitions and the storage engine. For more information, see the Parameters for configuring the source service table.
Log on to the ApsaraMQ for Kafka console.
In the Resource Distribution section of the Overview page, select the region where the ApsaraMQ for Kafka instance that you want to manage resides.
ImportantYou must create topics in the region where your Elastic Compute Service (ECS) instance is deployed. A topic cannot be used across regions. For example, if the producers and consumers of messages run on an ECS instance that is deployed in the China (Beijing) region, the topic must also be created in the China (Beijing) region.
On the Instances page, click the name of the instance that you want to manage.
In the left-side navigation pane, click Topics.
On the Topics page, click Create Topic.
In the Create Topic panel, specify the properties of the topic and click OK.
Parameter
Description
Example
Name
The topic name.
demo
Description
The topic description.
demo test
Partitions
The number of partitions in the topic.
12
Storage Engine
NoteYou can specify the storage engine type only if you use a non-serverless Professional Edition instance. For other types of instances, Cloud Storage is selected by default.
The type of the storage engine that is used to store messages in the topic.
ApsaraMQ for Kafka supports the following types of storage engines:
Cloud Storage: If you select this value, the system uses Alibaba Cloud disks for the topic and stores data in three replicas in distributed mode. This storage engine features low latency, high performance, long durability, and high reliability. If you set the Instance Edition parameter to Standard (High Write) when you created the instance, you can set this parameter only to Cloud Storage.
Local Storage: If you select this value, the system uses the in-sync replicas (ISR) algorithm of open source Apache Kafka and stores data in three replicas in distributed mode.
Cloud Storage
Message Type
The message type of the topic. Valid values:
Normal Message: By default, messages that have the same key are stored in the same partition in the order in which the messages are sent. If a broker in the cluster fails, the order of messages that are stored in the partitions may not be preserved. If you set the Storage Engine parameter to Cloud Storage, this parameter is automatically set to Normal Message.
Partitionally Ordered Message: By default, messages that have the same key are stored in the same partition in the order in which the messages are sent. If a broker in the cluster fails, messages are still stored in the partitions in the order in which the messages are sent. Messages in some partitions cannot be sent until the partitions are restored. If you set the Storage Engine parameter to Local Storage, this parameter is automatically set to Partitionally Ordered Message.
Normal Message
Log Cleanup Policy
The log cleanup policy that is used by the topic.
If you set the Storage Engine parameter to Local Storage, you must configure the Log Cleanup Policy parameter. You can set the Storage Engine parameter to Local Storage only if you use an ApsaraMQ for Kafka Professional Edition instance.
ApsaraMQ for Kafka provides the following log cleanup policies:
Delete: the default log cleanup policy. If sufficient storage space is available in the system, messages are retained based on the maximum retention period. After the storage usage exceeds 85%, the system deletes the earliest stored messages to ensure service availability.
Compact: the log compaction policy that is used in Apache Kafka. Log compaction ensures that the latest values are retained for messages that have the same key. This policy is suitable for scenarios such as restoring a failed system or reloading the cache after a system restarts. For example, when you use Kafka Connect or Confluent Schema Registry, you must store the information about the system status and configurations in a log-compacted topic.
ImportantYou can use log-compacted topics only in specific cloud-native components, such as Kafka Connect and Confluent Schema Registry. For more information, see aliware-kafka-demos.
Compact
Tag
The tags that you want to attach to the topic.
demo
After a topic is created, you can view the topic on the Topics page.
Create the group required by the AnalyticDB Sink Connector
You can manually create the group for the AnalyticDB Sink Connector data synchronization task in the Message Queue for Apache Kafka console. The name of the group must be connect-Task Name. For more information, see Source service parameters.
Log on to the ApsaraMQ for Kafka console.
In the Resource Distribution section of the Overview page, select the region where the ApsaraMQ for Kafka instance that you want to manage resides.
On the Instances page, click the name of the instance that you want to manage.
In the left-side navigation pane, click Groups.
On the Groups page, click Create Group.
In the Create Group panel, enter a group name in the Group ID field and a group description in the Description field, attach tags to the group, and then click OK.
After you create a consumer group, you can view the consumer group on the Groups page.
Create and deploy an AnalyticDB sink connector
Log on to the ApsaraMQ for Kafka console.
In the Resource Distribution section of the Overview page, select the region where the ApsaraMQ for Kafka instance that you want to manage resides.
In the left-side navigation pane, click Connectors.
On the Connectors page, select the instance to which the connector belongs from the Select Instance drop-down list and click Create Connector.
In the Create Connector wizard, complete the following steps.
On the Configure Basic Information tab, configure the parameters as needed, and then click Next.
Parameter
Description
Example value
Name
The name of the connector. Naming rules:
The name can be 1 to 48 characters in length. The first character can be an uppercase letter, a lowercase letter, or a digit. The remaining characters can be lowercase letters, digits, or hyphens (-).
The name must be unique within the same Message Queue for Apache Kafka instance.
A data synchronization task for a Connector must use a Group named connect-task name. If you do not manually create the Group, the system will automatically create it for you.
kafka-adb-sink
Instance
The instance name and ID are automatically populated.
demo alikafka_post-cn-st21p8vj****
On the Configure Source Service tab, select Message Queue for Apache Kafka as the Data Source, configure the following parameters, and then click Next.
Table 1. Source service parameters
Parameter
Description
Example
Data Source Topic
The topic from which to synchronize data.
adb-test-input
Consumer Thread Concurrency
The number of concurrent consumer threads for the source topic. Default value: 6. Valid values:
1
2
3
6
12
6
Consumer Offset
The position where consumption starts. Valid values:
Earliest Offset: Starts consumption from the earliest available offset.
Latest Offset: Starts consumption from the latest available offset.
Earliest Offset
VPC ID
The VPC where the data synchronization task is located. This parameter is displayed after you click Configure Runtime Environment. By default, this is the VPC of the Message Queue for Apache Kafka instance and does not require manual entry.
vpc-bp1xpdnd3l***
vSwitch ID
The vSwitch where the data synchronization task is located. This parameter is displayed after you click Configure Runtime Environment. This vSwitch must be in the same VPC as the Message Queue for Apache Kafka instance. By default, this is the vSwitch specified when you deployed the Message Queue for Apache Kafka instance.
vsw-bp1d2jgg81***
Failure Handling Policy
The policy for handling partitions where a message sending failure occurs. This parameter is displayed after you click Configure Runtime Environment. Valid values:
Continue Subscription: Continues subscribing to the partition and prints an error log.
Stop Subscription: Stops subscribing to the partition and prints an error log.
NoteTo learn how to view logs, see Connector-related operations.
To find solutions based on error codes, see Error codes.
Continue Subscription
Resource Creation Method
The method for creating the topics and group required by the connector. This parameter is displayed after you click Configure Runtime Environment.
Auto
Manual
Auto
Connector Consumer Group
The group used by the data synchronization task of the connector. Click Configure Runtime Environment to display this parameter. The name of the group must be connect-task name.
connect-kafka-adb-sink
Task Offset Topic
The topic used to store consumer offsets. This parameter is displayed after you click Configure Runtime Environment.
Topic: It is recommended that the name starts with
connect-offset.Partitions: The number of partitions must be greater than 1.
Storage Engine: The topic must use
local storage.cleanup.policy: The topic's log cleanup policy must becompact.
connect-offset-kafka-adb-sink
Task Configuration Topic
The topic used to store task configurations. This parameter is displayed after you click Configure Runtime Environment.
Topic: It is recommended that the name starts with
connect-config.Partitions: The number of partitions must be 1.
Storage Engine: The topic must use
local storage.cleanup.policy: The topic's log cleanup policy must becompact.
connect-config-kafka-adb-sink
Task Status Topic
The topic used to store task status. This parameter is displayed after you click Configure Runtime Environment.
Topic: It is recommended that the name starts with
connect-status.Partitions: The recommended number of partitions is 6.
Storage Engine: The topic must use
local storage.cleanup.policy: The topic's log cleanup policy must becompact.
connect-status-kafka-adb-sink
Dead-letter Queue Topic
The topic that is used to store error data from the Connect framework. Click Configure Runtime Environment to display this parameter. This topic can be the same as the error data topic to save topic resources.
Topic: It is recommended that the name starts with
connect-error.Partitions: The recommended number of partitions is 6.
Storage Engine: The topic can use
local storageorcloud storage.
connect-error-kafka-adb-sink
Error Data Topic
The topic used to store exception data from the Sink. Click Configure Runtime Environment to display this parameter. This topic can be the same as the dead-letter queue topic to save topic resources.
Topic: It is recommended that the name starts with
connect-error.Partitions: The recommended number of partitions is 6.
Storage Engine: The topic can use
local storageorcloud storage.
connect-error-kafka-adb-sink
On the Configure Destination Service tab, select AnalyticDB as the Destination Service, configure the following parameters, and then click Create.
Parameter
Description
Example
Instance Type
The type of the destination AnalyticDB instance. Valid values: AnalyticDB for MySQL and AnalyticDB for PostgreSQL.
MySQL
AnalyticDB Instance ID
The ID of the destination AnalyticDB for MySQL or AnalyticDB for PostgreSQL instance.
am-bp139yqk8u1ik****
Database Name
The name of the destination database in the AnalyticDB instance.
adb_demo
Table Name
The name of the destination table in the AnalyticDB database for storing messages.
user
Database Username
The username for connecting to the AnalyticDB instance to import data.
adbmysql
Database Password
The password for connecting to the AnalyticDB instance to import data. You set the password when you create the instance. If you forget the password, you can reset it.
AnalyticDB for MySQL: For information about how to reset the password, see Change an account password.
AnalyticDB for PostgreSQL: Log on to the AnalyticDB for PostgreSQL console, click the instance name, and then click Account Management in the navigation pane on the left. Find the account whose password you want to reset, and click Reset Password in the Actions column.
********
NoteMessage Queue for Apache Kafka passes the username and password as environment variables to the Function Compute function when it creates the task. After the task is created, Message Queue for Apache Kafka does not save this information.
After the connector is created, you can view it on the Connectors page.
On the Connectors page, find the connector that you created and click Deploy in the Actions column.
Configure the Function Compute service
After you successfully create and deploy an AnalyticDB Sink Connector in the Message Queue for Apache Kafka console, Function Compute automatically creates a service and a function for the connector. The service is named in the format kafka-service-<connector_name>-<random_string>, and the function is named in the format fc-adb-<random_string>.
On the Connectors page, find the target connector and click Configure Function in the Actions column.
This action redirects you to the Function Compute console.
In the Function Compute console, find the automatically created function service and configure its VPC and vSwitch information. For specific steps, see Update a service.
Configure the destination AnalyticDB database
After you configure the Function Compute service, you must add the CIDR block of its vSwitch to the whitelist of your AnalyticDB instance. You can find this CIDR block on the vSwitch page of the VPC console, in the row corresponding to the VPC and vSwitch of the Function Compute service.
AnalyticDB for MySQL: Log on to the AnalyticDB for MySQL console and configure the whitelist. For more information, see Configure an IP address whitelist.
AnalyticDB for PostgreSQL: Log on to the AnalyticDB for PostgreSQL console and configure the whitelist. For more information, see Configure a whitelist.
Send test messages
You can send messages to the source topic in Message Queue for Apache Kafka to test the data export to AnalyticDB for MySQL or AnalyticDB for PostgreSQL.
The message content (Value) must be in JSON format. The content is parsed into key-value pairs. Each key in the JSON object must correspond to a column name in the destination database table, and the corresponding value is the data to be inserted into that column. Therefore, every key in a message sent from Message Queue for Apache Kafka must have a column with the same name in the database. You can view the column names in a database table by connecting to the database from the AnalyticDB for MySQL console or the AnalyticDB for PostgreSQL console.
On the Connectors page, find the connector that you want to manage and click Test in the Actions column.
In the Send Message panel, configure the parameters to send a message for testing.
If you set the Sending Method parameter to Console, perform the following steps:
In the Message Key field, enter the message key. Example: demo.
In the Message Content field, enter the message content. Example: {"key": "test"}.
Configure the Send to Specified Partition parameter to specify whether to send the test message to a specific partition.
If you want to send the test message to a specific partition, click Yes and enter the partition ID in the Partition ID field. Example: 0. For information about how to query partition IDs, see View partition status.
If you do not want to send the test message to a specific partition, click No.
If you set the Sending Method parameter to Docker, run the Docker command in the Run the Docker container to produce a sample message section to send the test message.
If you set the Sending Method parameter to SDK, select an SDK for the required programming language or framework and an access method to send and subscribe to the test message.
Verify the result
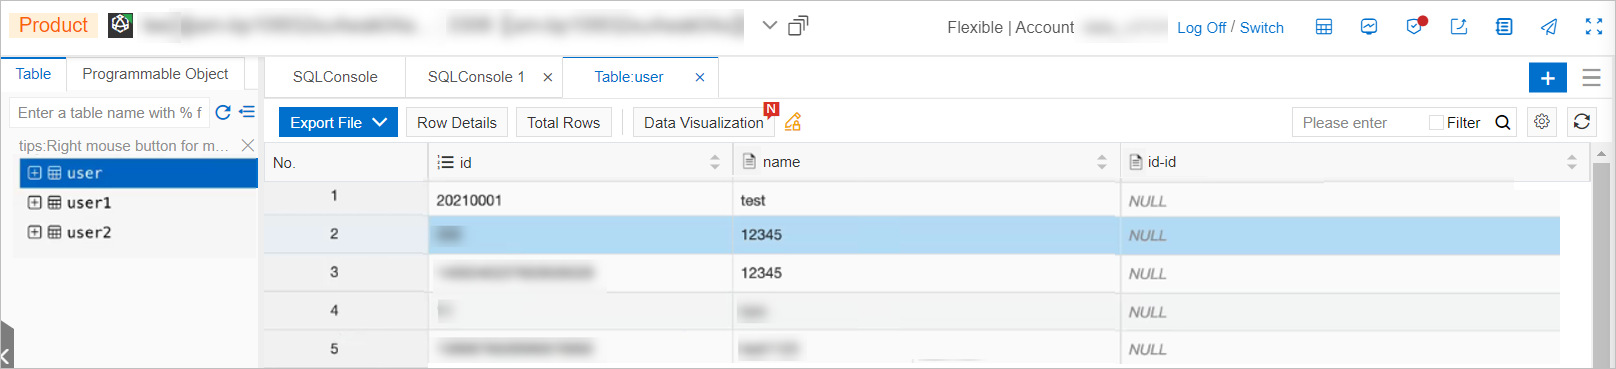
After sending messages to the source topic in Message Queue for Apache Kafka, log on to the AnalyticDB for MySQL console or the AnalyticDB for PostgreSQL console, connect to the database, and go to the SQL Window of Data Management Service (DMS). Query the table in the corresponding instance to check if the data has been exported correctly.
The following figure shows an example of data exported from Message Queue for Apache Kafka to AnalyticDB for MySQL: