Create a MaxCompute sink connector to export data from a source topic in a instance to a table in MaxCompute.
Prerequisites
Before you create a MaxCompute sink connector, complete the following preparations on both services:
ApsaraMQ for Kafka — Prepare the instance that provides the source data:
Enable the connector feature for the ApsaraMQ for Kafka instance. For more information, see Enable Connector.
Create a source topic for the ApsaraMQ for Kafka instance. For more information, see Step 1: Create a topic.
In this topic, a topic named maxcompute-test-input is used as an example.
MaxCompute — Prepare the destination table that receives the data:
Create a table by using the MaxCompute client. For more information, see Create a table.
In this topic, a table named test_kafka in a project named connector_test is used as an example. The following statement creates the table:
CREATE TABLE IF NOT EXISTS test_kafka(topic STRING,partition BIGINT,offset BIGINT,key STRING,value STRING) PARTITIONED by (pt STRING);Optional:EventBridge — Required only for instances that use the EventBridge deployment path:
NoteYou must complete this operation only if the instance to which your connector task belongs resides in the China (Hangzhou) or China (Chengdu) region.
Usage notes
Review the following limits and behaviors before you create a MaxCompute sink connector.
Limits that determine whether the task is supported
Region — You can export data from a source topic in a ApsaraMQ for Kafka instance to MaxCompute only within the same region. For more information about connector limits, see Limits.
Instance major version 0.10.2 — Some of the topics required by the MaxCompute sink connector must use the local storage engine. ApsaraMQ for Kafka instances whose major version is 0.10.2 do not support manually creating topics that use local storage. These topics can be created only automatically. If your instance runs this version, let the connector create the required topics automatically.
Instances in the China (Hangzhou) and China (Chengdu) regions
If the instance to which the connector belongs resides in the China (Hangzhou) or China (Chengdu) region, the feature is deployed to EventBridge. Instances in all other regions use the default deployment path, and the following items do not apply to them.
Billing — EventBridge is currently free of charge. For more information, see Billing.
Service-linked roles — When you create a connector, EventBridge automatically creates the AliyunServiceRoleForEventBridgeSourceKafka and AliyunServiceRoleForEventBridgeConnectVPC service-linked roles. A Service Authorization dialog box appears in the creation wizard for each role that does not exist yet.
If the service-linked roles are not created, EventBridge automatically creates the corresponding service-linked roles so that EventBridge can use the roles to access ApsaraMQ for Kafka and virtual private clouds (VPCs).
If the service-linked roles are already created, EventBridge does not create them again.
For more information about service-linked roles, see Service-linked roles for EventBridge.
Task run logs — Tasks that are deployed to EventBridge do not support viewing task run logs. After the connector task is complete, you can check the task progress based on the consumption details of the Group that subscribes to the source topic. For more information, see View consumer status.
Procedure
To use a MaxCompute sink connector to export data from a source topic in a ApsaraMQ for Kafka instance to a table in MaxCompute, complete the following stages in order. Each stage is described in one of the following sections.
Grant ApsaraMQ for Kafka the permissions to access MaxCompute.
Optional: Create the topics and the Group required by the MaxCompute sink connector.
If you do not need to customize the topics and the Group, you can skip this stage and select automatic creation in the next stage. If the major version of your instance is 0.10.2, use automatic creation, as described in the Usage notes section of this topic.
Verify the result.
Create a RAM role
Resource Access Management (RAM) roles do not support directly selecting ApsaraMQ for Kafka as the trusted service. Therefore, when you create a RAM role, select any supported service as the trusted service. After the RAM role is created, manually modify the trust policy.
Log on to the RAM console.
In the left-side navigation bar, choose Identities > Roles.
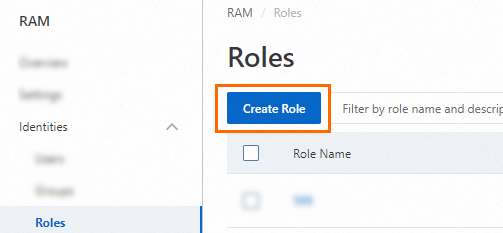
On the Roles page, click Create Role.
The following figure shows the Create Role button on the Roles page.
In the Create Role panel, perform the following operations.
Set the trusted entity type to Alibaba Cloud Service and then click Next.
In the Role Type section, select Normal Service Role. In the Role Name field, enter AliyunKafkaMaxComputeUser1. From the Select Trusted Service list, select MaxCompute, and then click Finish.
On the Roles page, find AliyunKafkaMaxComputeUser1 and click AliyunKafkaMaxComputeUser1.
On the AliyunKafkaMaxComputeUser1 page, click the Trust Policy tab and then click Edit Trust Policy.
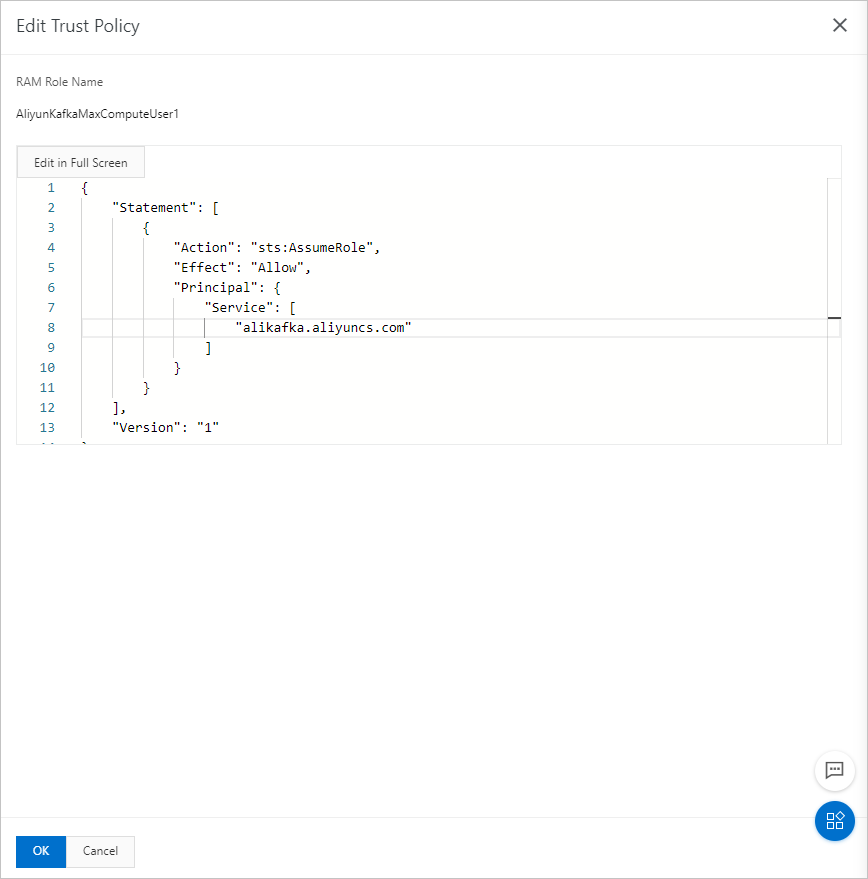
In the Edit Trust Policy panel, replace odps in the script with alikafka and then click OK.
The following policy shows the result after the replacement.
Add permissions
To allow the connector to synchronize messages to a MaxCompute table, you must grant at least the following permissions to the RAM role that you created:
Object | Action | Description |
Project | CreateInstance | Create an instance in the project. |
Table | Describe | Read the metadata of the table. |
Table | Alter | Modify the metadata of the table, or add and delete partitions. |
Table | Update | Overwrite or add data of the table. |
For more information about the preceding permissions and how to grant them, see MaxCompute permissions.
The following steps show how to grant permissions to the AliyunKafkaMaxComputeUser1 role that is created in this topic. MaxCompute manages a RAM role as a user, so every command in this section targets the RAM$<accountid>:role/aliyunkafkamaxcomputeuser1 object.
In each of the following commands, replace with your own Alibaba Cloud account ID.
Log on to the MaxCompute client.
Run the following command to add the RAM role as a user.
add user `RAM$<accountid>:role/aliyunkafkamaxcomputeuser1`;Grant the RAM role the least privilege that is required to access MaxCompute.
Run the following command to grant the RAM role the permissions on the project.
grant CreateInstance on project connector_test to user `RAM$<accountid>:role/aliyunkafkamaxcomputeuser1`;Run the following command to grant the RAM role the permissions on the table.
grant Describe, Alter, Update on table test_kafka to user `RAM$<accountid>:role/aliyunkafkamaxcomputeuser1`;Create the topics required by a MaxCompute sink connector
In the ApsaraMQ for Kafka console, you can manually create the five topics that are required by a MaxCompute sink connector: the task offset topic, task configuration topic, task status topic, dead-letter queue topic, and error data topic. The required number of partitions and the required storage engine vary based on the topic, as described in the following table.
Topic | Recommended name prefix | Partitions | Storage engine | cleanup.policy |
Task offset topic | connect-offset | Greater than 1 | Local storage | compact |
Task configuration topic | connect-config | 1 | Local storage | compact |
Task status topic | connect-status | 6 recommended | Local storage | compact |
Dead-letter queue topic | connect-error | 6 recommended | Local storage or cloud storage | — |
Error data topic | connect-error | 6 recommended | Local storage or cloud storage | — |
To save topic resources, you can use one topic as both the dead-letter queue topic and the error data topic. For the dead-letter queue topic and the error data topic, the storage engine can be local storage or cloud storage, and the remaining properties follow the general rules that are described in the topic property table in this section. For the full description of each topic, see Parameters on the Configure Source Service tab.
Log on to the ApsaraMQ for Kafka console.
Log on to the ApsaraMQ for Kafka console.
Log on to the ApsaraMQ for Kafka console.
Log on to the ApsaraMQ for Kafka console.
Log on to the ApsaraMQ for Kafka console.
In the Resource Distribution section of the Overview page, select the region where the ApsaraMQ for Kafka instance that you want to manage resides.
You must create topics in the region where your Elastic Compute Service (ECS) instance is deployed. A topic cannot be used across regions. For example, if the producers and consumers of messages run on an ECS instance that is deployed in the China (Beijing) region, the topic must also be created in the China (Beijing) region.
On the Overview page, select a region in the Resource Distribution section.
You must create topics in the same region as your application, which is the region where the ECS instance is deployed. Topics cannot be used across regions. For example, if a topic is created in the China (Beijing) region, the message producer and consumer must also run on an ECS instance in the China (Beijing) region.
On the Overview page, select a region in the Resource Distribution section.
You must create topics in the same region as your application, which is the region where the ECS instance is deployed. Topics cannot be used across regions. For example, if a topic is created in the China (Beijing) region, the message producer and consumer must also run on an ECS instance in the China (Beijing) region.
On the Overview page, select a region in the Resource Distribution section.
You must create topics in the same region as your application, which is the region where the ECS instance is deployed. Topics cannot be used across regions. For example, if a topic is created in the China (Beijing) region, the message producer and consumer must also run on an ECS instance in the China (Beijing) region.
On the Instances page, click the name of the instance that you want to manage.
On the Instances page, click the name of the target instance.
On the Instances page, click the name of the target instance.
In the left-side navigation pane, click Topics.
In the navigation pane on the left, click Topics.
On the Topics page, click Create Topic.
Set the properties of each connector topic to the values that are listed in the preceding table. The following table describes all topic properties.
Parameter | Description | Example |
Name | The name of the topic. In Kafka, topic names in the | connect-offset-kafka-maxcompute-sink |
Description | A brief description of the topic. | demo test |
Partitions | The number of partitions of the topic. | 12 |
Storage Engine > Note: Only non-serverless Professional Edition instances support selecting a storage engine type. Other instances do not support this option and use the cloud storage type by default. | The storage engine of topic messages. ApsaraMQ for Kafka supports the following two storage engines. - Cloud Storage: Uses Alibaba Cloud disks at the underlying layer and provides low latency, high performance, durability, and high reliability. This engine uses a distributed three-replica mechanism. If the Instance Edition of the instance is Standard (High Write), the storage engine can only be Cloud Storage. - Local Storage: Uses the In-Sync Replicas (ISR) replication algorithm of open source Kafka and a distributed three-replica mechanism. | Local Storage |
Message Type | The type of topic messages. - Normal Message: By default, messages that have the same key are distributed to the same partition, and messages in a partition are stored in the order in which they are sent. If a machine in the cluster fails, the messages may become out of order. If you set Storage Engine to Cloud Storage, Normal Message is selected by default. - Partitionally Ordered Message: By default, messages that have the same key are distributed to the same partition, and messages in a partition are stored in the order in which they are sent. If a machine in the cluster fails, messages in a partition are still stored in the order in which they are sent. However, messages may fail to be sent to some partitions until these partitions recover. If you set Storage Engine to Local Storage, Partitionally Ordered Message is selected by default. | Normal Message |
Log Cleanup Policy | The cleanup policy for topic logs. If you set Storage Engine to Local Storage, you must configure Log Cleanup Policy. ApsaraMQ for Kafka supports the following two cleanup policies. - Delete: the default message cleanup policy. If the disk capacity is sufficient, messages are retained within the maximum retention period. If the disk capacity is insufficient, which is usually when the disk usage exceeds 85%, earlier messages are deleted ahead of schedule to ensure service availability. - Compact: uses the Kafka log compaction policy. The log compaction policy ensures that the latest value of each message key is retained. This policy is suitable for scenarios such as restoring the state after a system failure or reloading the cache after a system restart. For example, when you use Confluent Schema Registry or Kafka Connect, you must use a Kafka compacted topic to store the system state or configuration information. > Important: Compacted topics are usually used only for specific ecosystem components, such as Confluent Schema Registry or Kafka Connect. Do not set this property for topics that are used to send and receive messages in other scenarios. For more information, see ApsaraMQ for Kafka demo library. | Compact |
Tag | The tag of the topic. | demo |
After the topic is created, the topic appears in the list on the Topics page. Because you created these topics manually, set Resource Creation Method to Manual when you create the connector, and then enter the names of the topics that you created.
Create the Group required by a MaxCompute sink connector
In the ApsaraMQ for Kafka console, you can manually create the Group that is used by the data synchronization task of a MaxCompute sink connector. The name of the Group must be connect-task name, where task name is the name of the connector. For more information, see Parameters on the Configure Source Service tab.
Log on to the ApsaraMQ for Kafka console.
Log on to the ApsaraMQ for Kafka console.
Log on to the ApsaraMQ for Kafka console.
Log on to the ApsaraMQ for Kafka console.
Log on to the ApsaraMQ for Kafka console.
In the Resource Distribution section of the Overview page, select the region where the ApsaraMQ for Kafka instance that you want to manage resides.
On the Overview page, select a region in the Resource Distribution section.
On the Overview page, select a region in the Resource Distribution section.
On the Overview page, select a region in the Resource Distribution section.
On the Instances page, click the name of the instance that you want to manage.
On the Instances page, click the name of the target instance.
On the Instances page, click the name of the target instance.
In the left-side navigation pane, click Groups.
In the navigation pane on the left, click Groups.
On the Groups page, click Create Group.
After the Group is created, it appears in the list on the Groups page. Enter its name in the Connector Consumer Group field when you create the connector.
Create and deploy a MaxCompute sink connector
Create and deploy a MaxCompute sink connector that synchronizes data from ApsaraMQ for Kafka to MaxCompute.
Log on to the ApsaraMQ for Kafka console.
Log on to the ApsaraMQ for Kafka console.
Log on to the ApsaraMQ for Kafka console.
Log on to the ApsaraMQ for Kafka console.
Log on to the ApsaraMQ for Kafka console.
In the Resource Distribution section of the Overview page, select the region where the ApsaraMQ for Kafka instance that you want to manage resides.
On the Overview page, select a region in the Resource Distribution section.
On the Overview page, select a region in the Resource Distribution section.
On the Overview page, select a region in the Resource Distribution section.
In the left-side navigation pane, click Connectors.
In the navigation pane on the left, click Connectors.
In the navigation pane on the left, click Connectors.
On the Connectors page, select the instance to which the connector belongs from the Select Instance drop-down list and click Create Connector.
On the Connectors page, select the instance to which the connector belongs from the Select Instance drop-down list and click Create Connector.
1. On the Create Connector configuration wizard page, perform the following operations.
On the Configure Basic Information tab, configure the following parameters based on your business requirements and then click Next.
Parameter
Description
Example
Name
The name of the connector. Naming conventions: - The name can contain digits, lowercase letters, and hyphens (-), but cannot start with a hyphen (-). The name must be 1 to 48 characters in length. - The name must be unique in the same ApsaraMQ for Kafka instance. The data synchronization task of the connector must use a Group named connect-task name. If you do not manually create the Group, the system automatically creates it.
kafka-maxcompute-sink
Instance
By default, the instance name and instance ID are specified.
demo alikafka_post-cn-st21p8vj****
On the Configure Source Service tab, set Data Source to ApsaraMQ for Kafka, configure the following parameters, and then click Next.
NoteIf you have already created a topic and a consumer group, choose manual resource creation and enter the information for your existing resources. Otherwise, choose automatic resource creation.
If you have already created a topic and a consumer group, choose manual resource creation and enter the information for your existing resources. Otherwise, choose automatic resource creation.
If you have already created a topic and a consumer group, choose manual resource creation and enter the information for your existing resources. Otherwise, choose automatic resource creation.
If you have already created a topic and a consumer group, choose manual resource creation and enter the information for your existing resources. Otherwise, choose automatic resource creation.
If you have already created a topic and a consumer group, choose manual resource creation and enter the information for your existing resources. Otherwise, choose automatic resource creation.
Parameter
Description
Example
Data Source Topic
The source topic whose data you want to synchronize.
maxcompute-test-input
Consumer Thread Concurrency
The number of concurrent consumer threads for the source topic. Default value: 6. Valid values: - 1 - 2 - 3 - 6 - 12
6
Consumer Offset
The offset from which messages are consumed. Valid values: - Earliest Offset: Consumption starts from the earliest offset. - Latest Offset: Consumption starts from the latest offset.
Earliest Offset
VPC ID
The VPC in which the data synchronization task runs. Click Configure Runtime Environment to display this parameter. By default, the VPC in which the ApsaraMQ for Kafka instance is deployed is used. You do not need to specify this parameter.
vpc-bp1xpdnd3l***
vSwitch ID
The vSwitch in which the data synchronization task runs. Click Configure Runtime Environment to display this parameter. The vSwitch must be in the same VPC as the ApsaraMQ for Kafka instance. By default, the vSwitch that you specified when you deployed the ApsaraMQ for Kafka instance is used.
vsw-bp1d2jgg81***
Failure Handling Policy
Specifies whether to continue subscribing to the partition of the topic in which an error occurs after a message fails to be sent. Click Configure Runtime Environment to display this parameter. Valid values: - Continue Subscription: continues to subscribe to the partition of the topic in which the error occurs and prints the error log. - Stop Subscription: stops subscribing to the partition of the topic in which the error occurs and prints the error log > Note: - For more information about how to view logs, see connector operations. - For more information about how to find solutions based on error codes, see Error codes. - To resume the subscription to the partition of the topic in which the error occurs, to contact technical support.
Continue Subscription
Resource Creation Method
The method that is used to create the topics and the Group required by the connector. Click Configure Runtime Environment to display this parameter. Valid values: - Auto: The system creates the required topics and Group for you. Select this value if you did not create them in advance. - Manual: Select this value if you created the topics and the Group in advance, and then enter their names in the following fields.
Auto
Connector Consumer Group
The Group that is used by the data synchronization task of the connector. Click Configure Runtime Environment to display this parameter. The name of the Group must be connect-task name.
connect-kafka-maxcompute-sink
Task Offset Topic
The topic that stores consumer offsets. Click Configure Runtime Environment to display this parameter. - Topic name: We recommend that the name start with connect-offset. - Number of partitions: The number of partitions of the topic must be greater than 1. - Storage engine: The storage engine of the topic must be local storage. - cleanup.policy: The log cleanup policy of the topic must be compact.
connect-offset-kafka-maxcompute-sink
Task Configuration Topic
The topic that stores task configurations. Click Configure Runtime Environment to display this parameter. - Topic name: We recommend that the name start with connect-config. - Number of partitions: The number of partitions of the topic must be 1. - Storage engine: The storage engine of the topic must be local storage. - cleanup.policy: The log cleanup policy of the topic must be compact.
connect-config-kafka-maxcompute-sink
Task Status Topic
The topic that stores the task status. Click Configure Runtime Environment to display this parameter. - Topic name: We recommend that the name start with connect-status. - Number of partitions: We recommend that you set the number of partitions of the topic to 6. - Storage engine: The storage engine of the topic must be local storage. - cleanup.policy: The log cleanup policy of the topic must be compact.
connect-status-kafka-maxcompute-sink
Dead-letter Queue Topic
The topic that stores the abnormal data of the Connect framework. Click Configure Runtime Environment to display this parameter. To save topic resources, you can use this topic as the error data topic. - Topic name: We recommend that the name start with connect-error. - Number of partitions: We recommend that you set the number of partitions of the topic to 6. - Storage engine: The storage engine of the topic can be local storage or cloud storage.
connect-error-kafka-maxcompute-sink
Error Data Topic
The topic that stores the abnormal data of the sink. Click Configure Runtime Environment to display this parameter. To save topic resources, you can use this topic as the dead-letter queue topic. - Topic name: We recommend that the name start with connect-error. - Number of partitions: We recommend that you set the number of partitions of the topic to 6. - Storage engine: The storage engine of the topic can be local storage or cloud storage.
connect-error-kafka-maxcompute-sink
On the Configure Destination Service tab, set Destination Service to MaxCompute, configure the following parameters, and then click Create.
If the instance to which the connector belongs resides in the China (Hangzhou) or China (Chengdu) region, a Service Authorization dialog box appears for each of the AliyunServiceRoleForEventBridgeSourceKafka and AliyunServiceRoleForEventBridgeConnectVPC service-linked roles when you set Destination Service to MaxCompute. In the Service Authorization dialog box that appears, click OK. Then, configure the following parameters and click Create. If the service-linked roles are already created, they are not created again and the Service Authorization dialog box does not appear.
Parameter | Description | Example |
Endpoint | The service endpoint of MaxCompute. Replace the region ID in the endpoint with the region ID of your MaxCompute project. For more information, see endpoints. - VPC endpoint: low latency and recommended. Use this endpoint if the ApsaraMQ for Kafka instance and MaxCompute reside in the same region. - Public endpoint: high latency and not recommended. Use this endpoint if the ApsaraMQ for Kafka instance and MaxCompute reside in different regions. To use a public endpoint, you must enable public network access for the connector. For more information, see Enable public network access for a connector. | http://service.cn-hangzhou.maxcompute.aliyun-inc.com/api |
Workspace | The workspace of MaxCompute, which corresponds to the MaxCompute project that contains the destination table. | connector_test |
Table | The table of MaxCompute. | test_kafka |
Region for Table | The region in which the MaxCompute table resides. | China (Hangzhou) |
Alibaba Cloud Account ID | The Alibaba Cloud account ID of MaxCompute. | 188*** |
RAM Role | The name of the RAM role of ApsaraMQ for Kafka. For more information, see Create a RAM role. | AliyunKafkaMaxComputeUser1 |
Mode | The mode in which messages are synchronized to the connector. Default value: DEFAULT. Valid values: - KEY: Only the key of the message is retained and written to the key column of the MaxCompute table. - VALUE: Only the value of the message is retained and written to the value column of the MaxCompute table. - DEFAULT: Both the key and the value of the message are retained and written to the key column and the value column of the MaxCompute table. > Important: In DEFAULT mode, the CSV format is not supported. Only the TEXT format and the BINARY format are supported. | DEFAULT |
Format | The format in which messages are synchronized to the connector. Default value: TEXT. Valid values: - TEXT: The messages are strings. - BINARY: The messages are byte arrays. - CSV: The messages are strings that are separated by commas (,). > Important: In CSV format, the DEFAULT mode is not supported. Only the KEY mode and the VALUE mode are supported: - KEY mode: Only the key of the message is retained. The key string is separated by commas (,), and the separated strings are written to the table in the order of their indexes. - VALUE mode: Only the value of the message is retained. The value string is separated by commas (,), and the separated strings are written to the table in the order of their indexes. | TEXT |
Partition | The granularity of the partition. Default value: HOUR. Valid values: - DAY: Data is written to a new partition every day. - HOUR: Data is written to a new partition every hour. - MINUTE: Data is written to a new partition every minute. | HOUR |
Time Zone | The time zone of the ApsaraMQ for Kafka producer client that sends messages to the source topic of the connector. Default value: GMT+08:00. | GMT+08:00 |
After the connector is created, you can view it on the Connectors page.
After the connector is created, go to the Connectors page, find the connector that you created, and then click Deploy in the Actions column.
Send a test message
After you deploy the MaxCompute sink connector, you can send a message to the source topic of ApsaraMQ for Kafka to test whether the data can be synchronized to MaxCompute.
On the Connectors page, find the connector that you want to manage and click Test in the Actions column.
On the Connectors page, find the target connector and click Test in the Actions column.
On the Connectors page, find the target connector and click Test in the Actions column.
On the Connectors page, find the target connector and click Test in the Actions column.
On the Connectors page, find the target connector and click Test in the Actions column.
1. In the Send Message panel, send a test message.
Set Sending Method to Console.
In the Message Key text box, enter the key of the message, for example, demo.
In the Message Content field, enter the content of the test message, for example, {"key": "test"}.
Set Send to Specified Partition to specify whether to send the message to a specific partition.
Click Yes and enter the partition ID in the Partition ID field, for example, 0. For more information about how to query the partition ID, see View partition status.
Click No to send the message without specifying a partition.
Set Sending Method to Docker and run the Docker command in the Run the Docker container to produce a sample message section to send the message.
Set Sending Method to SDK. Based on your business requirements, select the software development kit (SDK) of the programming language or framework that you want to use and the connection method, and then send messages by using the SDK.
View table data
After you send messages to the source topic of ApsaraMQ for Kafka, view the table data on the MaxCompute client to check whether the messages are received.
The following steps show how to view the data that is written to test_kafka in this topic. The connector writes each message to the partition that corresponds to the time when the message is written, at the granularity that you set for the Partition parameter.
Log on to the MaxCompute client.
Run the following command to view the data partitions of the table.
show partitions test_kafka;The following result is returned:
pt=11-17-2020 15

OK
Run the following command to view the data in the partition that the previous step returned.
select * from test_kafka where pt ="11-17-2020 15";The following result is returned:
+----------------------+------------+------------+-----+-------+---------------+
| topic                | partition  | offset     | key | value | pt            |
+----------------------+------------+------------+-----+-------+---------------+
| maxcompute-test-input| 0          | 0          | 1   | 1     | 11-17-2020 15 |
+----------------------+------------+------------+-----+-------+---------------+
If the query returns no rows, verify that you queried the partition that show partitions returned, check the consumption details of the Group that subscribes to the source topic, and check the error data topic and the dead-letter queue topic of the connector for messages that failed to be written.