Internet-based log pipelines often need to consume messages from a managed Kafka service without VPC connectivity. ApsaraMQ for Kafka exposes a public SSL endpoint on port 9093 that Filebeat can connect to using its built-in Kafka input plugin with SASL authentication.
This topic walks through the end-to-end setup: obtaining your SSL endpoint and credentials, creating a topic and consumer group, and configuring Filebeat to consume messages.
# Minimal Filebeat configuration for ApsaraMQ for Kafka (internet/SSL)
filebeat.inputs:
- type: kafka
  hosts:
    - <your-kafka-endpoint-1>:9093
    - <your-kafka-endpoint-2>:9093
    - <your-kafka-endpoint-3>:9093
  username: "<your-instance-username>"
  password: "<your-instance-password>"
  topics: ["<your-topic>"]
  group_id: "<your-group-id>"
  ssl.certificate_authorities: ["<path-to-ca-cert>"]
  ssl.verification_mode: none

output.console:
  pretty: true
The following sections explain how to get each value.
Prerequisites
Before you begin, make sure that you have:
An ApsaraMQ for Kafka instance with internet access enabled (this topic uses a non-serverless instance as an example). For setup instructions, see Purchase and deploy an internet- and VPC-connected instance
Filebeat installed on your server. Download it from the Filebeat downloads page
JDK 8 installed. Download it from the JDK 8 downloads page
Step 1: Get the endpoint and credentials
Filebeat connects through the public SSL endpoint and authenticates with the SASL username and password of your ApsaraMQ for Kafka instance.
Log on to the ApsaraMQ for Kafka console.
In the Resource Distribution section of the Overview page, select the region where your instance is deployed.
On the Instances page, click the name of your instance.
On the Instance Details page, collect the following values:
Value Location on page Description SSL endpoint Endpoint Information section The public endpoint uses port 9093. Username Configuration Information section The SASL username for authentication. Password Configuration Information section The SASL password for authentication.
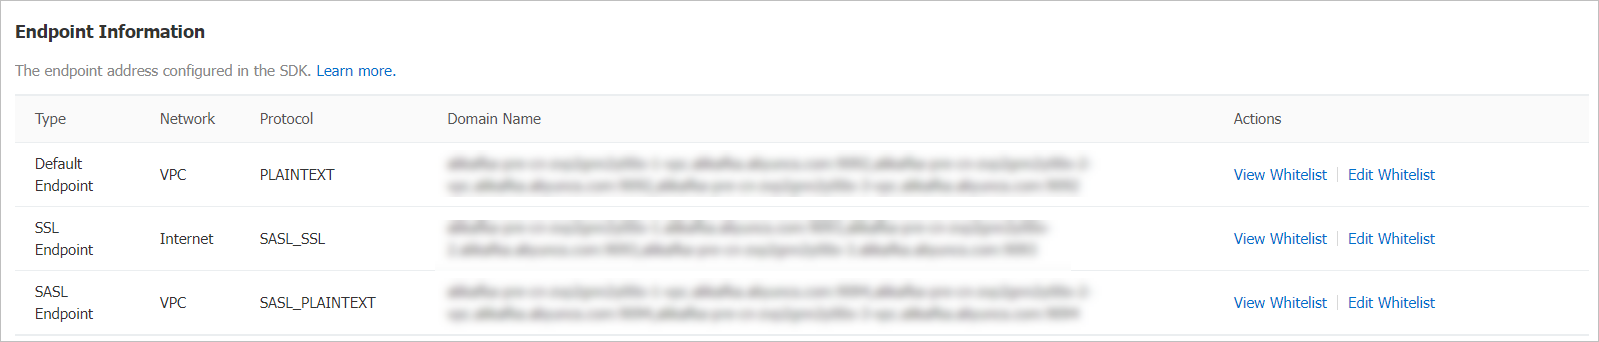
ApsaraMQ for Kafka provides multiple endpoint types. For internet access, use the SSL endpoint. For details, see Comparison among endpoints.
Step 2: Create a topic
Create a topic that Filebeat consumes messages from.
Create the topic in the same region as your Elastic Compute Service (ECS) instance. Topics cannot be used across regions. For example, if producers and consumers run on an ECS instance in the China (Beijing) region, the topic must also be in the China (Beijing) region.
In the ApsaraMQ for Kafka console, navigate to your instance and click Topics in the left-side navigation pane.
Click Create Topic.
In the Create Topic panel, configure the following parameters and click OK.
| Parameter | Description | Example |
|---|---|---|
| Name | The topic name. | demo |
| Description | A brief description. | demo test |
| Partitions | The number of partitions. | 12 |
| Storage Engine | Cloud Storage (default) or Local Storage. Cloud Storage stores data in three distributed replicas on Alibaba Cloud disks with low latency and high reliability. Local Storage uses the Apache Kafka in-sync replicas (ISR) algorithm. Only non-serverless Professional Edition instances allow you to select the storage engine. If the Instance Edition is set to Standard (High Write), only Cloud Storage is available. | Cloud Storage |
| Message Type | Normal Message or Partitionally Ordered Message. Auto-selected based on storage engine: Cloud Storage sets Normal Message; Local Storage sets Partitionally Ordered Message. Partitionally Ordered Message preserves message order during broker failures, but affected partitions may be temporarily unavailable. | Normal Message |
| Log Cleanup Policy | Only available with Local Storage. Delete: retains messages up to the max retention period and removes the oldest when storage exceeds 85%. Compact: retains only the latest value per message key, used with Kafka Connect and Confluent Schema Registry. See log compaction in Apache Kafka. Important Log-compacted topics can only be used in specific cloud-native components, such as Kafka Connect and Confluent Schema Registry. For more information, see aliware-kafka-demos. | Compact |
| Tag | Optional tags for the topic. | demo |
After the topic is created, it appears on the Topics page.
Step 3: Send test messages
Publish messages to the topic so Filebeat has data to consume.
In the ApsaraMQ for Kafka console, go to Topics and click the topic name.
In the upper-right corner of the Topic Details page, click Send Message.
In the Start to Send and Consume Message panel, choose a sending method:
Console: Enter a Message Key (for example,
demo) and Message Content (for example,{"key": "test"}). Optionally, set Send to Specified Partition to Yes and enter a Partition ID to target a specific partition. For information about how to query partition IDs, see View partition status. After sending the message, use ApsaraMQ for Kafka SDKs or run the Docker commands displayed in the panel to subscribe to the test message.Docker: Run the Docker commands displayed in the panel.
SDK: Select an SDK for your programming language and follow the instructions.
Step 4: Create a consumer group
Create a consumer group for Filebeat to use.
In the ApsaraMQ for Kafka console, navigate to your instance and click Groups in the left-side navigation pane.
Click Create Group.
In the Create Group panel, enter a Group ID and an optional Description, attach tags if needed, and click OK.
The consumer group appears on the Groups page.
Step 5: Download the certificate, configure Filebeat, and start consuming
With the endpoint, topic, and consumer group ready, configure Filebeat to consume messages over SSL.
Download the CA certificate
Internet connections to ApsaraMQ for Kafka use SSL encryption. Filebeat needs the CA certificate to verify the server identity. In the Filebeat installation directory, run:
wget https://help-static-aliyun-doc.aliyuncs.com/file-manage-files/zh-CN/20220826/ytsw/only-4096-ca-certThis downloads the only-4096-ca-cert file to the current directory.
Create the configuration file
Create a file named input.yml in the Filebeat installation directory:
filebeat.inputs:
- type: kafka
  hosts:
    - <your-kafka-endpoint-1>:9093
    - <your-kafka-endpoint-2>:9093
    - <your-kafka-endpoint-3>:9093
  username: "<your-instance-username>"
  password: "<your-instance-password>"
  topics: ["<your-topic>"]
  group_id: "<your-group-id>"
  ssl.certificate_authorities: ["<path-to-ca-cert>"]
  ssl.verification_mode: none

output.console:
  pretty: true
Replace the placeholders with your actual values:
| Placeholder | Where to find it | Example |
|---|---|---|
<your-kafka-endpoint-{1,2,3}> | SSL endpoint hostnames from Step 1 | alikafka-pre-cn-zv**********-1.alikafka.aliyuncs.com |
<your-instance-username> | Username from Step 1 | alikafka_pre-cn-v641e1dt*** |
<your-instance-password> | Password from Step 1 | aeN3WLRoMPRXmAP2jvJuGk84Kuuo*** |
<your-topic> | Topic name from Step 2 | filebeat_test |
<your-group-id> | Group ID from Step 4 | filebeat_group |
<path-to-ca-cert> | Absolute path to the downloaded CA certificate | /home/admin/filebeat/filebeat-7.7.0-linux-x86_64/only-4096-ca-cert |
ssl.verification_mode: none skips hostname verification. This is acceptable for testing but not recommended for production. For production, set it to full and make sure the CA certificate chain is valid.
For all available Kafka input parameters, see Kafka input plugin in the Filebeat documentation.
Start Filebeat
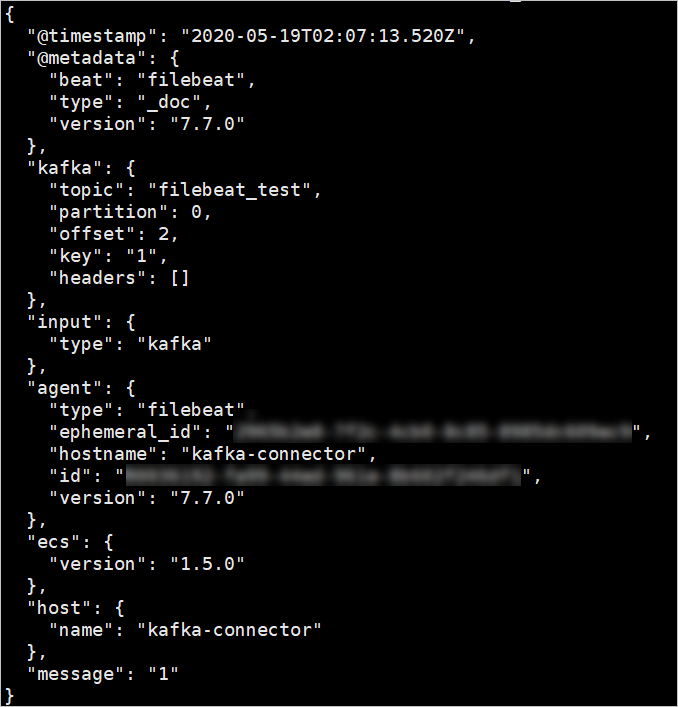
Run the following command in the Filebeat installation directory:
./filebeat -c ./input.ymlOn a successful connection, consumed messages appear in JSON format:
What to do next
Route to Elasticsearch: Replace the
output.consolesection with anoutput.elasticsearchconfiguration to index consumed messages. See Elasticsearch output in the Filebeat documentation.Parse message content: Add
parsersorprocessorsto your Filebeat configuration to parse JSON or multiline messages before output.