This topic describes how to use the DMS job scheduling feature to periodically transfer data from an ApsaraDB RDS for PostgreSQL instance to an AnalyticDB for PostgreSQL instance.
How it works
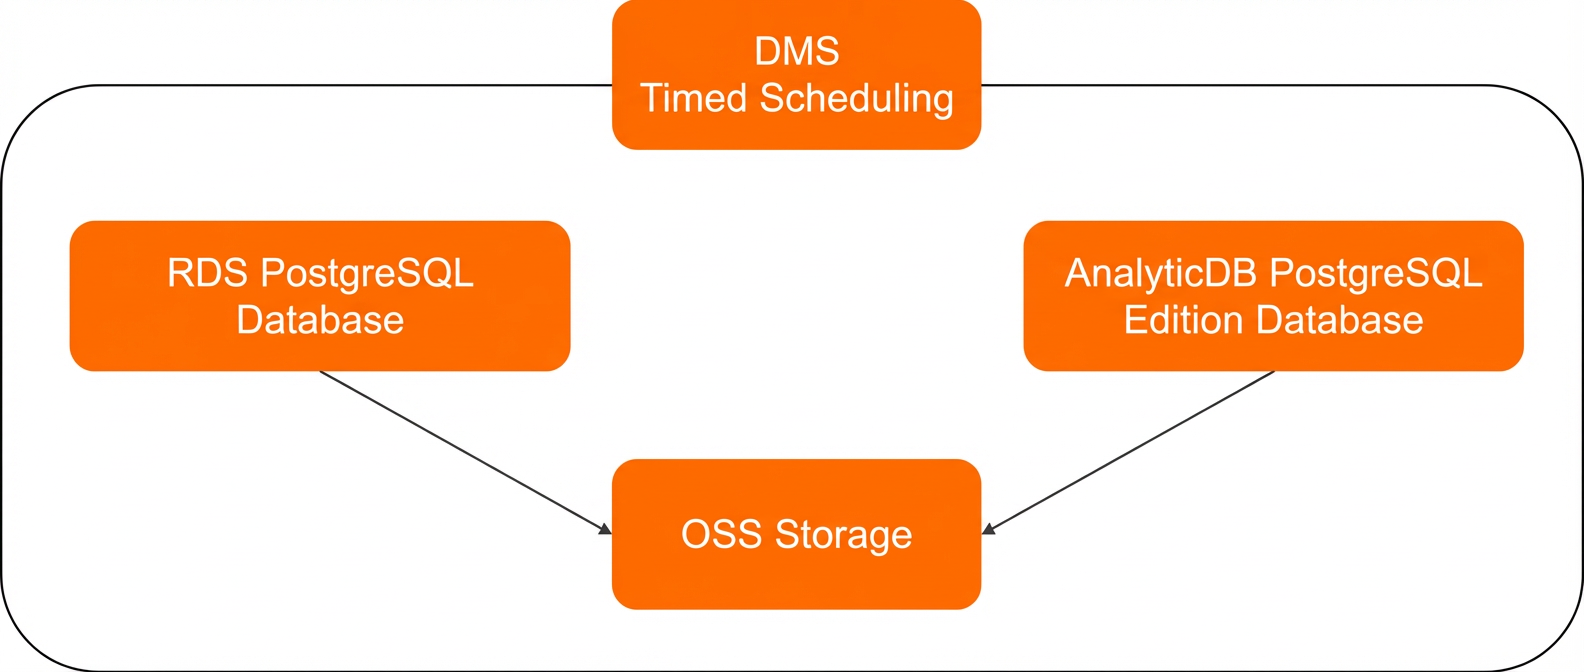
This process uses DMS to orchestrate an Extract, Transform, and Load (ETL) pipeline. The job extracts data from an ApsaraDB RDS for PostgreSQL database, loads it into an OSS bucket for intermediate storage, and then an AnalyticDB for PostgreSQL in Serverless mode instance reads the data from OSS for analysis. The following figure shows the workflow.
Benefits
-
Storing data in OSS provides a low-cost archival solution without data loss.
-
Data is loaded from the ApsaraDB RDS for PostgreSQL database into AnalyticDB for PostgreSQL in Serverless mode for high-performance data analysis, typically on a T+1 or daily basis.
-
The low-code, graphical user interface (GUI) in DMS job scheduling simplifies the configuration of automated scheduling frameworks.
Usage notes
-
Data in the ApsaraDB RDS for PostgreSQL database must be suitable for incremental archiving, for example, by using a time column to archive data daily.
-
The ApsaraDB RDS for PostgreSQL instance, AnalyticDB for PostgreSQL instance, and OSS bucket must be in the same region.
Prerequisites
AnalyticDB for PostgreSQL
-
An AnalyticDB for PostgreSQL in Serverless mode instance is created. For more information, see Create an instance.
-
An initial account is created. For more information, see Create and manage a database account.
ApsaraDB RDS for PostgreSQL
-
An ApsaraDB RDS for PostgreSQL instance is created. For more information, see Create an ApsaraDB RDS for PostgreSQL instance.
NoteThe ApsaraDB RDS for PostgreSQL instance must run PostgreSQL 9.4 to 13.0.
-
A privileged account is created. For more information, see Create an account.
OSS
-
An OSS bucket is created. For more information, see Create buckets.
-
Obtain the Bucket Name and Endpoint of the OSS bucket as follows:
-
Log on to the OSS console.
-
In the left-side navigation pane, click Buckets.
-
On the Buckets page, click the name of the target bucket.
On the Buckets page, you can obtain the Bucket Name.
-
In the left-side navigation pane, click Overview.
-
On the Overview page, find the Endpoint in the Port section.
We recommend that you use the endpoint for Access from ECS over the VPC (internal network).
-
Obtain an AccessKey ID and AccessKey secret
For more information about how to obtain an AccessKey ID and an AccessKey secret, see Create an AccessKey pair.
Prepare the services and data
ApsaraDB RDS for PostgreSQL
-
Connect to your ApsaraDB RDS for PostgreSQL database. For more information, see Connect to an ApsaraDB RDS for PostgreSQL instance.
All operations in this tutorial are performed using the DMS console.
-
Create a test table named t_src and insert sample data:
CREATE TABLE t_src (a int, b int, c date); INSERT INTO t_src SELECT generate_series(1, 1000), 1, now(); -
Install the oss_fdw extension:
CREATE EXTENSION IF NOT EXISTS oss_fdw; -
Create an OSS foreign table:
CREATE SERVER ossserver FOREIGN DATA WRAPPER oss_fdw OPTIONS
     (host '<oss_endpoint>' , id '<access_key_id>', key '<access_key_secret>',bucket '<bucket_name>');
The following table describes the parameters.
Parameter
Description
host
The OSS Endpoint that you obtained in the "Prerequisites" section.
id
The AccessKey ID that you obtained in the "Prerequisites" section.
key
The AccessKey secret that you obtained in the "Prerequisites" section.
bucket
The OSS Bucket Name that you obtained in the "Prerequisites" section.
AnalyticDB for PostgreSQL
-
Connect to your AnalyticDB for PostgreSQL database. For more information, see Client connection.
All operations in this tutorial are performed using the DMS console.
-
Create a target table named t_target that has the same structure as the t_src table in ApsaraDB RDS for PostgreSQL:
CREATE TABLE t_target (a int, b int, c date);NoteAnalyticDB for PostgreSQL in Serverless mode does not support primary keys.
-
Install the oss_fdw extension:
CREATE EXTENSION IF NOT EXISTS oss_fdw; -
Create an OSS server and a user mapping:
CREATE SERVER oss_serv
    FOREIGN DATA WRAPPER oss_fdw
    OPTIONS (
        endpoint '<oss_endpoint>',
        bucket '<bucket_name>'
  );
CREATE USER MAPPING FOR PUBLIC
    SERVER oss_serv
    OPTIONS (
        id '<access_key_id>',
        key '<access_key_secret>'
    );
The following table describes the parameters.
Parameter
Description
endpoint
The OSS Endpoint that you obtained in the "Prerequisites" section.
id
The AccessKey ID that you obtained in the "Prerequisites" section.
key
The AccessKey secret that you obtained in the "Prerequisites" section.
bucket
The OSS Bucket Name that you obtained in the "Prerequisites" section.
Configure the ETL task
-
Log on to the DMS console.
-
In the top navigation bar, click Data Development. In the left-side navigation pane, choose .
-
In the Task Flow section, click Create Task Flow.
-
In the Create Task Flow dialog box, enter a name for Task Flow Name and click OK.
In this example, Task Flow Name is set to Import RDS PG data to OSS.
-
Configure the task flow to archive data from ApsaraDB RDS for PostgreSQL.
-
On the Import RDS PG data to OSS tab, drag a SQL for Single Instance node from the Data Processing category on the left to the canvas.
-
Optional: Click the
 icon on the task node to rename the task.
Renaming tasks helps you maintain the ETL pipeline. You can set the task name based on your business requirements. In this example, the task is renamed to Extract data from RDS.
-
Click the
 icon on the newly created task node on the canvas.
 -
Select the ApsaraDB RDS for PostgreSQL database.
At the top of the SQL editor tab for the Extract data from RDS job, select your target database connection from the drop-down list, such as
[Free-control]public@pgm-bp11c***.pg.rds.aliyuncs.com:5432:postgre.You can switch to the SQL editor tab for the ApsaraDB RDS for PostgreSQL database to view the database.
Ensure your database is prepared as described in the "Prepare the services and data" section.
-
In the editor, paste the following SQL statement:
DROP FOREIGN TABLE IF EXISTS oss_${mydate}; CREATE FOREIGN TABLE IF NOT EXISTS oss_${mydate} (a int, b int, c date) SERVER ossserver OPTIONS ( dir 'rds/t3/${mydate}/', DELIMITER '|' , format 'csv', encoding 'utf8'); INSERT INTO oss_${mydate} SELECT * FROM t_src WHERE c >= '${mydate}'; -
On the right side, click the Variable Settings tab, and then select Node Variable. Set Variable Name to
mydateand Time Format toyyyyMMdd.
-
-
Return to the Import RDS PG data to OSS task flow to configure the data loading task for AnalyticDB for PostgreSQL.
-
On the Import RDS PG data to OSS tab, drag a SQL for Single Instance node from the Data Processing category on the left to the canvas.
-
Optional: Click the
icon on the task node to rename the task.Renaming tasks helps you maintain the ETL pipeline. You can set the task name based on your business requirements. In this example, the task is renamed to Load data to ADBPG.
-
Click the
icon on the newly created task node. -
Select the AnalyticDB for PostgreSQL database.
Select the target AnalyticDB for PostgreSQL database connection from the drop-down list.
-
In the editor, paste the following SQL statement:
CREATE FOREIGN TABLE IF NOT EXISTS oss_${mydate}( a int , b int , c date ) SERVER oss_serv OPTIONS ( dir 'rds/t3/${mydate}/', format 'csv', delimiter '|', encoding 'utf8'); INSERT INTO t_target SELECT * FROM oss_${mydate}; -
On the right side, click the Variable Settings tab, and then select Node Variable. Set Variable Name to
mydateand Time Format toyyyyMMdd.
-
-
Configure the scheduling dependency so the ApsaraDB RDS for PostgreSQL data extraction task runs before the AnalyticDB for PostgreSQL data loading task.
-
Drag from the circle on the right side of the Extract data from RDS task to the Load data to ADBPG task. The resulting dependency is displayed as follows:

-
At the bottom of the page, click the Task Flow Information tab. Under Scheduling Settings, turn on the Enable Scheduling switch.
-
Select a scheduling cycle. The task to extract data from ApsaraDB RDS for PostgreSQL and the task to load data into AnalyticDB for PostgreSQL run in each cycle.
In the Basic Properties section, set Error Handling Policy to Complete running tasks and Concurrency Control Policy to Skip. In the Scheduling Settings section, turn on the Enable Scheduling switch, set Scheduling Type to Periodic Scheduling, and set Scheduling Cycle to Hour. For Scheduled Time, set the start time to
00:00, the interval to1, and the end time to23:59. The corresponding cron expression is00 00 00-23/1 * * ?.
-
-
Click Trial Run in the upper-left corner.
-
After a successful test run, click Publish.