DataWorks is a platform for the offline processing and analysis of massive data. It uses MaxCompute as its computing and storage engine to provide visual workflow development and hosted scheduling and O&M. DataWorks supports fully hosted task scheduling based on time and dependencies. AnalyticDB for MySQL users can use powerful DataWorks features, such as hosted task scheduling, task dependency management, and task O&M, to schedule and manage AnalyticDB for MySQL tasks.
Objective
Defining dependencies between tasks is a key feature of task scheduling. This tutorial shows you how to create two dependent AnalyticDB for MySQL tasks in DataWorks. The following figure illustrates the relationship between the tables and tasks.
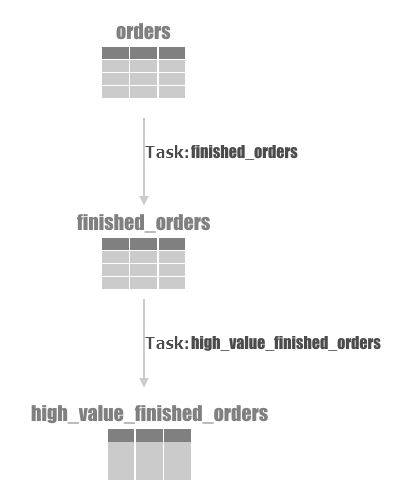
Task 1
Cleanse the
orderstable by filtering for completed orders, whereo_orderstatus = 'F', and write the results to thefinished_orderstable.Task 2
Query the
finished_orderstable for orders with a total price greater than 10,000, whereo_totalprice > 10000, and write the results to thehigh_value_finished_orderstable.
Prerequisites
Complete the initial setup, including creating a cluster and configuring a whitelist, by following the instructions in Quick start for the Data Warehouse Edition.
NoteEnsure that your AnalyticDB for MySQL cluster and DataWorks workspace are in the same region.
If you connect to AnalyticDB for MySQL from DataWorks by using a public endpoint of AnalyticDB for MySQL, you must first apply for a public endpoint, and then add the DataWorks whitelist to the AnalyticDB for MySQL whitelist.
If you connect to AnalyticDB for MySQL from DataWorks by using a VPC address to connect to AnalyticDB for MySQL, you must first add an exclusive resource group mode in DataWorks, and the VPC of the exclusive resource group must be the same as the VPC of AnalyticDB for MySQL.
This tutorial uses the
orderstable from the . After you connect to your AnalyticDB for MySQL database, run the following SQL statements to create the required tables.CREATE TABLE orders( o_orderkey bigint NOT NULL COMMENT'', o_custkey int NOT NULL COMMENT'', o_orderstatus varchar NOT NULL COMMENT'', o_totalprice decimal(15,2) NOT NULL COMMENT'', o_orderdate date NOT NULL COMMENT'', o_orderpriority varchar NOT NULL COMMENT'', o_clerkvar char NOT NULL COMMENT'', o_shippriority int NOT NULL COMMENT'', o_comment varchar NOT NULL COMMENT'', dummy varchar )DISTRIBUTED BY HASH(o_orderkey); CREATE TABLE finished_orders ( o_orderkey bigint NOT NULL, o_totalprice decimal(15,2) NOT NULL, primary key (o_orderkey) )DISTRIBUTED BY HASH(o_orderkey); CREATE TABLE high_value_finished_orders ( o_orderkey bigint NOT NULL, o_totalprice decimal(15,2) NOT NULL, PRIMARY KEY (`o_orderkey`) ) DISTRIBUTED BY HASH(o_orderkey);
Create a workspace in DataWorks.
NoteSelect standard mode for the workspace.
Step 1: Add an AnalyticDB for MySQL data source in DataWorks
For detailed instructions, see AnalyticDB for MySQL 3.0 data source.
For security reasons, DataWorks controls the services that can establish connections. You must add the endpoint and port of your AnalyticDB for MySQL database to a whitelist.
On the Security Settings page, in the Sandbox Whitelist section, click Add Sandbox Whitelist to add the connection endpoint and port (such as 3306) of AnalyticDB for MySQL to the whitelist.
Step 2: Create an AnalyticDB for MySQL node
For detailed instructions, see AnalyticDB for MySQL.
Step 3: Configure task dependencies
DataWorks triggers tasks based on time properties or a same-cycle scheduling dependency, allowing you to run multiple tasks at a specified time and in a specific order.
For example, you can schedule the finished_orders task to run daily at 2:00 AM. You can then configure the high_value_finished_orders task to run only after the finished_orders task completes successfully.
Step 4: Deploy nodes
After you configure the tasks and their dependencies, deploy them. For details, see Deploy a node.
Once you submit the nodes for deployment, you can view their status.
Once the deployment is successful, go to the task O&M page to monitor and manage your tasks.