This topic describes how to use AnalyticDB for MySQL Spark and OSS to build an open lakehouse. It demonstrates the complete process, from resource deployment and data preparation to data import, interactive analysis, and task scheduling.
Preparations
Deploy resources
This tutorial provides instructions on how to import data from four sample data sources: OSS, MongoDB, RDS for SQL Server, and Azure Blob Storage. To follow the steps for a specific data source, you need to deploy only that resource. However, because importing data from MongoDB, RDS for SQL Server, and Azure Blob Storage requires you to upload dependent JAR files to OSS, you must also deploy an OSS resource in those cases.
AnalyticDB for MySQL
An AnalyticDB for MySQL Enterprise Edition, Basic Edition, or Data Lakehouse Edition cluster is created.
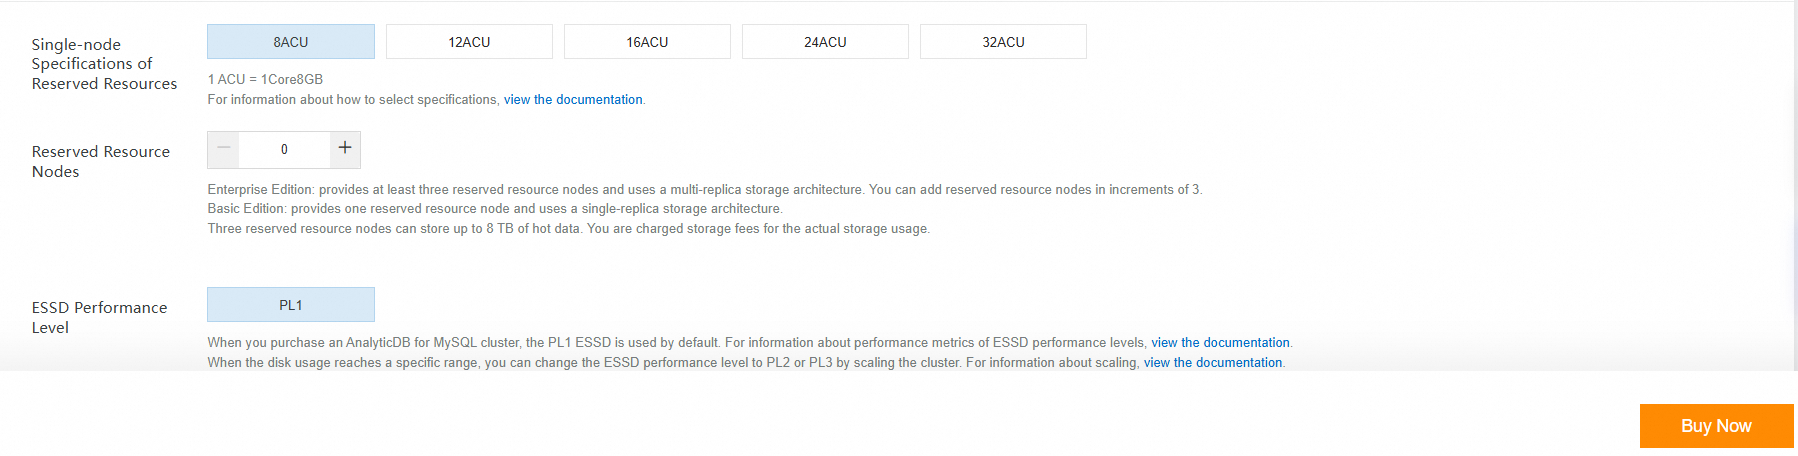
If you do not have a cluster that meets these requirements, log on to the AnalyticDB for MySQL console to create an Enterprise Edition or Basic Edition cluster. This tutorial involves reading data only from external tables. Therefore, you can set the number of reserved resource nodes to 0 when you create the cluster, as shown in the following figure. For more information, see Create a cluster.
Create a database account.
If you use an Alibaba Cloud account to access the cluster, create a privileged account.
If you use a RAM user to access the cluster, create a privileged account and a standard account. Then, grant the required database and table permissions to the standard account and attach the RAM user to the standard account.

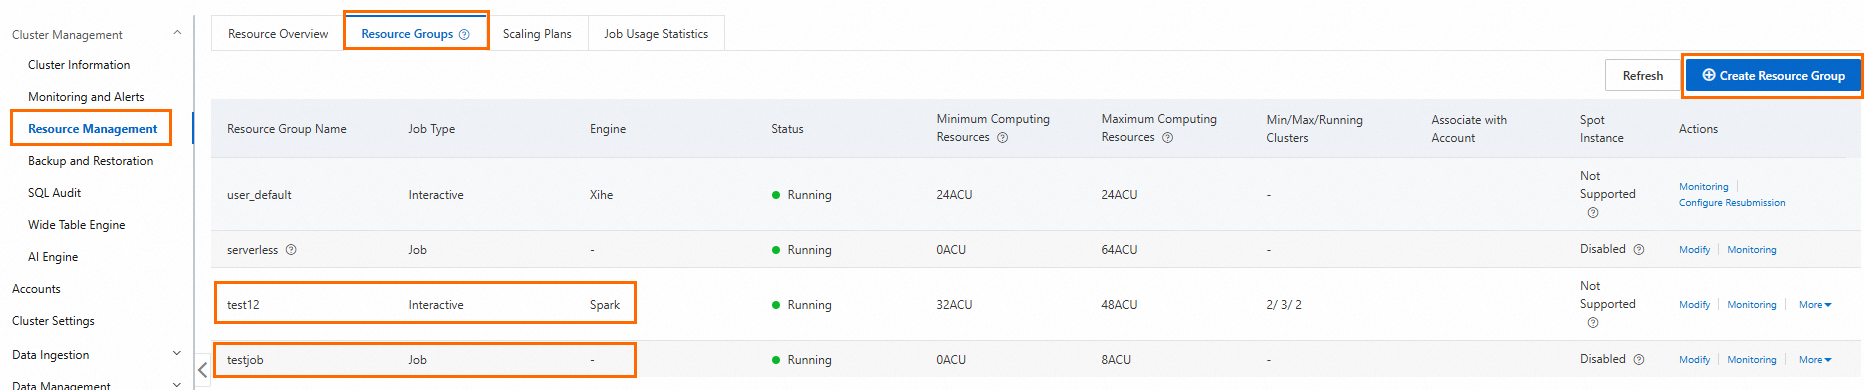
Create a Job resource group and a Spark Interactive resource group.
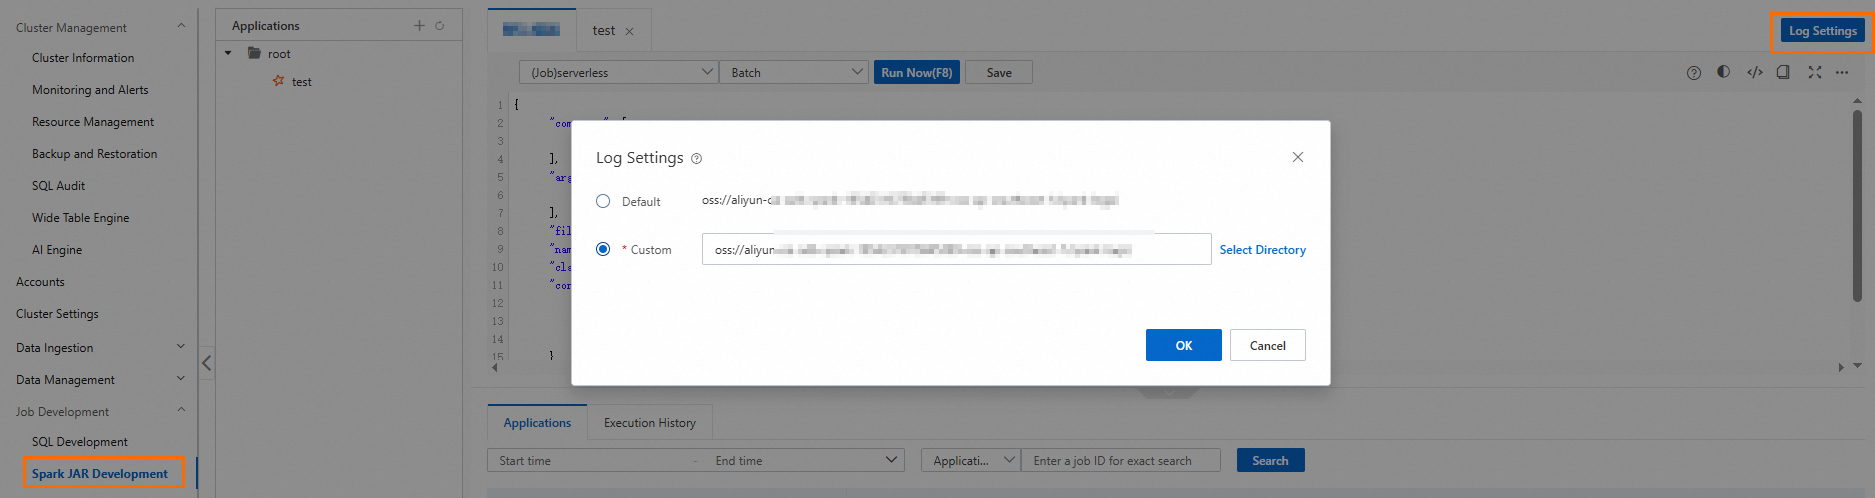
Configure the log storage address for Spark applications.
Log on to the AnalyticDB for MySQL console. On the page, click Log Settings and select a default or custom storage path. If you specify a custom storage path, do not save logs to the root directory of an OSS bucket. Ensure that the path contains at least one folder.
If you want to use a RAM user to log on to the console for Spark job development, grant permissions to the RAM user.
In a Job resource group or a Spark Interactive resource group, create a database named
test_dband specify an OSS path. The data for all tables in this database is stored in this path.CREATE DATABASE IF NOT exists test_db COMMENT 'demo database for lakehouse' LOCATION 'oss://testBucketName/test';
OSS
Create a bucket. The bucket must be in the same region as the AnalyticDB for MySQL cluster.
MongoDB (Optional)
Create a MongoDB instance. The MongoDB instance must be in the same vSwitch as the AnalyticDB for MySQL cluster.
Add the IP address of the vSwitch to the whitelist of the MongoDB instance.
On the Basic Information page of the ApsaraDB for MongoDB console, click Cross-zone Migration, find the vSwitch ID. Then, log on to the VPC console to find the IP address of the vSwitch.
RDS SQL Server (Optional)
Create an ApsaraDB RDS for SQL Server instance. The RDS for SQL Server instance must be in the same vSwitch as the AnalyticDB for MySQL cluster.
Add the IP address of the vSwitch to the whitelist of the RDS for SQL Server instance.
On the Database Connection page of the RDS for SQL Server console, find the vSwitch ID. Then, log on to the VPC console to find the IP address of the vSwitch.
Azure Blob Storage (Optional)
Generate sample data
Sample data for OSS and Azure Blob Storage
You can use the following code to generate 10,000 records in Parquet format. After the data is generated, store it in an OSS bucket or an Azure Blob Storage container.
import numpy as np
import pandas as pd
import pyarrow as pa
import pyarrow.parquet as pq
from faker import Faker

# Initialize Faker to generate random data
fake = Faker()

# Generate 100,000 rows of data
def generate_data(num_rows=100000):
    data = {
        'id': np.arange(1, num_rows + 1),
        'name': [fake.name() for _ in range(num_rows)],
        'age': [np.random.randint(18, 80) for _ in range(num_rows)]
    }
    return pd.DataFrame(data)

# Generate DataFrame
df = generate_data()

# Explicitly define the PyArrow Schema to limit integer length
schema = pa.schema([
    ('id', pa.int32()),  # Limit the id column to int32
    ('name', pa.string()),
    ('age', pa.int32())  # Limit the age column to int32
])

# Convert Pandas DataFrame to PyArrow Table and apply the explicit Schema
table = pa.Table.from_pandas(df, schema=schema)

# Write to a Parquet file with Snappy compression
output_file = "test_tbl.parquet"
pq.write_table(table, output_file, compression='snappy')

print(f"Parquet file successfully written: {output_file}")
print(f"Generated {output_file} with {len(df)} rows, using Snappy compression.")
Sample data for MongoDB
This example provides a script that generates sample data for an e-banking transaction scenario by dynamically simulating transactions and writing the data to a MongoDB instance.
Connect to the MongoDB instance, create a database named
test, and create a collection namedTransactionRecordin the database.You can use the following code to randomly generate test data in the
TransactionRecordcollection.from pymongo import MongoClient from datetime import datetime, timedelta import uuid import random import string import urllib.parse from faker import Faker fake = Faker() # Connect to MongoDB instance and create database/collection def connect_mongodb(uri,db_name,collection_name): try: # Connect to local MongoDB instance client = MongoClient(uri) # Create/Select database and collection db = client[db_name] # Check if collection exists and handle accordingly if collection_name not in db.list_collection_names(): # Collection doesn't exist, create it db.create_collection(collection_name) # Get the collection collection = db[collection_name] return client, db, collection except Exception as e: print(f"Connection failed: {e}") return None, None, None # Generate the username def generate_chinese_name(): surnames = ["Li", "Wang", "Zhang", "Liu", "Chen", "Yang", "Huang", "Zhao", "Zhou", "Wu", "Xu", "Sun", "Ma", "Zhu"] names = ["Wei", "Fang", "Na", "Xiuying", "Min", "Jing", "Li", "Qiang", "Lei", "Jun", "Yang", "Yong", "Yan", "Jie", "Juan", "Tao", "Ming", "Chao", "Xiulan", "Xia"] return random.choice(surnames) + random.choice(names) # Generate the bank account name def generate_bank_account(): return ''.join(random.choice(string.digits) for _ in range(16)) # Generate random transaction data def insert_transaction(collection, count=1): transaction_ids = [] # Define a list of possible values financial_institutions = ["Bank of China", "ICBC", "China Construction Bank", "Agricultural Bank of China", "China Merchants Bank", "Bank of Communications"] main_channels = ["APP", "Web", "ATM", "Branch", "Phone"] sub_channels = ["Bank Transfer", "Third-party Payment", "Cash", "Check", "Direct Debit"] operation_types = ["Deposit", "Withdrawal", "Transfer", "Payment", "Loan"] digital_wallet_types = ["Alipay", "WeChat Pay", "UnionPay", "Apple Pay", "Samsung Pay", "None"] source_operations = ["User ID", "System Auto", "Admin", "API"] offer_categories = ["Cash Back", "Bonus", "Discount", "Loan", "Investment"] item_types = ["Deposit", "Investment", "Loan", "Insurance", "Fund"] prefixes = ["TX", "PAY", "DEP", "WD", "TR"] for _ in range(count): # Generate name local_name = generate_chinese_name() english_first_name = fake.first_name() english_last_name = fake.last_name() # Generate transaction value and balance change transaction_value = round(random.uniform(100, 10000), 2) pre_balance = round(random.uniform(1000, 100000), 2) post_balance = round(pre_balance + transaction_value, 2) # Generate credit limit change pre_credit = round(random.uniform(10000, 50000), 2) post_credit = round(pre_credit, 2) # Transactions usually do not change the credit limit # Generate transaction breakdown amounts item1_value = round(transaction_value * 0.5, 2) item2_value = round(transaction_value * 0.3, 2) item3_value = round(transaction_value * 0.2, 2) # Generate wallet balance wallet_item1 = round(random.uniform(1000, 5000), 2) wallet_item2 = round(random.uniform(1000, 5000), 2) wallet_item3 = round(random.uniform(1000, 5000), 2) # Generate unresolved balance unresolved_item1 = round(random.uniform(0, 1000), 2) unresolved_item2 = round(random.uniform(0, 1000), 2) unresolved_item3 = round(random.uniform(0, 1000), 2) # Generate unique identifier record_id = str(uuid.uuid4()) timestamp_creation = datetime.now() # Construct the complete transaction record transaction_doc = { "record_id": record_id, "identifier_prefix": random.choice(prefixes), "user_id": f"user_{random.randint(10000, 99999)}", "transaction_value": transaction_value, "incentive_value": round(transaction_value * random.uniform(0.01, 0.2), 2), "financial_institution_name": random.choice(financial_institutions), "user_bank_account_number": generate_bank_account(), "account_reference": f"REF-{random.randint(100000, 999999)}", "account_group": random.randint(1, 5), "main_channel": random.choice(main_channels), "sub_channel": random.choice(sub_channels), "operation_type": random.choice(operation_types), "digital_wallet_type": random.choice(digital_wallet_types), "source_of_operation": random.choice(source_operations), "reference_id": f"ORD-{random.randint(100000, 999999)}", "pre_transaction_balance": pre_balance, "post_transaction_balance": post_balance, "pre_credit_limit": pre_credit, "post_credit_limit": post_credit, "product_reference": f"PROD-{random.randint(1000, 9999)}", "local_first_name": local_name[1:], "local_last_name": local_name[0], "english_first_name": english_first_name, "english_last_name": english_last_name, "campaign_id": f"CAM-{random.randint(1000, 9999)}", "offer_id": f"OFFER-{random.randint(10000, 99999)}", "offer_title": f"{random.choice(['Special', 'Premium', 'Standard', 'VIP'])} Offer", "offer_category": random.choice(offer_categories), "withdrawal_limit": round(random.uniform(5000, 20000), 2), "is_initial_transaction": random.random() < 0.1, # 10% chance of being an initial transaction "has_withdrawal_restrictions": random.random() < 0.2, # 20% chance of having withdrawal restrictions "bonus_flag": random.random() < 0.3, # 30% chance of being a bonus transaction "transaction_note": fake.sentence(), "timestamp_creation": timestamp_creation, "timestamp_expiration": timestamp_creation + timedelta(days=random.randint(30, 365)), "recovery_data": str(uuid.uuid4()), "transaction_breakdown": { "item_1": item1_value, "item_2": item2_value, "item_3": item3_value, "max_operation_count": random.randint(5, 20), "max_operation_value": round(transaction_value * 2, 2), "item_1_type": random.choice(item_types), "item_2_type": random.choice(item_types) }, "virtual_wallet_balance": { "item_1": wallet_item1, "item_2": wallet_item2, "item_3": wallet_item3 }, "unresolved_balance": { "item_1": unresolved_item1, "item_2": unresolved_item2, "item_3": unresolved_item3 } } # Insert the document into the collection result = collection.insert_one(transaction_doc) print(f"Document inserted, ID: {record_id}") transaction_ids.append(record_id) return transaction_ids[0] if count == 1 else transaction_ids # Update document with partial field modifications def update_transaction(collection, doc_id): # First, query the original document to get the transaction value for calculating new values original_doc = collection.find_one({"record_id": doc_id}) if not original_doc: print("Document to be updated not found") return # Generate random update data # Update transaction breakdown original_value = original_doc.get("transaction_value", 1000.0) new_item1_value = round(original_value * random.uniform(0.4, 0.6), 2) new_item2_value = round(original_value * random.uniform(0.2, 0.4), 2) new_item3_value = round(original_value - new_item1_value - new_item2_value, 2) # Update wallet balance new_wallet_item1 = round(random.uniform(2000, 8000), 2) new_wallet_item2 = round(random.uniform(1500, 6000), 2) new_wallet_item3 = round(random.uniform(1000, 5000), 2) # Update unresolved balance new_unresolved_item1 = round(random.uniform(0, 500), 2) new_unresolved_item2 = round(random.uniform(0, 400), 2) new_unresolved_item3 = round(random.uniform(0, 300), 2) # Randomly select some other fields to update random_fields_update = {} possible_updates = [ ("incentive_value", round(original_value * random.uniform(0.05, 0.25), 2)), ("withdrawal_limit", round(random.uniform(6000, 25000), 2)), ("transaction_note", fake.sentence()), ("has_withdrawal_restrictions", not original_doc.get("has_withdrawal_restrictions", False)), ("source_of_operation", random.choice(["User ID", "System Auto", "Admin", "API"])), ("bonus_flag", not original_doc.get("bonus_flag", False)), ] # Randomly select 2 to 4 fields to update for field, value in random.sample(possible_updates, random.randint(2, 4)): random_fields_update[field] = value # Construct the update data update_data = { "$set": { "transaction_breakdown": { "item_1": new_item1_value, "item_2": new_item2_value, "item_3": new_item3_value, "max_operation_count": random.randint(5, 20), "max_operation_value": round(original_value * 2, 2), "item_1_type": original_doc.get("transaction_breakdown", {}).get("item_1_type", "Deposit"), "item_2_type": original_doc.get("transaction_breakdown", {}).get("item_2_type", "Investment") }, "is_initial_transaction": False, "virtual_wallet_balance": { "item_1": new_wallet_item1, "item_2": new_wallet_item2, "item_3": new_wallet_item3 }, "unresolved_balance": { "item_1": new_unresolved_item1, "item_2": new_unresolved_item2, "item_3": new_unresolved_item3 }, "timestamp_update": datetime.now() } } for field, value in random_fields_update.items(): update_data["$set"][field] = value result = collection.update_one( {"record_id": doc_id}, update_data ) print(f"{result.modified_count} documents modified") def delete_transaction(collection, doc_id): result = collection.delete_one({"record_id": doc_id}) print(f"Deleted {result.deleted_count} document") def find_transaction(collection, doc_id): doc = collection.find_one({"record_id": doc_id}) if doc: print("Found document:") print(doc) else: print("Document not found") if __name__ == "__main__": # Database account for the MongoDB instance username = "root" # Password for the database account of the MongoDB instance password = "****" encoded_username = urllib.parse.quote_plus(username) encoded_password = urllib.parse.quote_plus(password) # Endpoint of the MongoDB instance uri = f'mongodb://root:****@dds-bp1dd******-pub.mongodb.rds.aliyuncs.com:3717' # Database name of the MongoDB instance db_name = 'test' # Collection name of the MongoDB instance collection_name = 'transaction_record' client, db, collection = connect_mongodb(uri,db_name,collection_name) if collection is None: exit(1) try: # Insert multiple documents transaction_count = 10 # You can change this to the desired number print(f"Preparing to insert {transaction_count} transaction records...") transaction_ids = insert_transaction(collection, transaction_count) # Randomly select a transaction ID for update and query random_transaction_id = random.choice(transaction_ids) if isinstance(transaction_ids, list) else transaction_ids if random.uniform(0, 1) < 0.3: # Increase the probability of an update # Update document print("Updating a transaction record...") update_transaction(collection, random_transaction_id) # Verify update print("Querying the updated transaction record...") find_transaction(collection, random_transaction_id) if random.uniform(0, 1) < 0.1: # Keep the deletion probability low print("Deleting a transaction record...") delete_transaction(collection, random_transaction_id) # Verify deletion find_transaction(collection, random_transaction_id) finally: # Close connection if 'client' in locals(): client.close()
Sample data for RDS SQL Server
Connect to the RDS for SQL Server instance and create a database named
demo.CREATE DATABASE demo;In the
demodatabase, create a table namedrdstest.CREATE TABLE rdstest ( id INT PRIMARY KEY, name VARCHAR(100), age INT );Insert test data.
INSERT INTO rdstest (id, name, age) VALUES
(1, 'Alice', 25),
(2, 'Bob', 30),
(3, 'Charlie', 28),
(4, 'Diana', 22),
(5, 'Edward', 35),
(6, 'Fiona', 40),
(7, 'George', 27),
(8, 'Hannah', 33),
(9, 'Ian', 29),
(10, 'Judy', 31),
(11, 'Kevin', 26),
(12, 'Linda', 34),
(13, 'Mark', 23),
(14, 'Nina', 21),
(15, 'Oliver', 32),
(16, 'Paula', 36),
(17, 'Quentin', 38),
(18, 'Rachel', 24),
(19, 'Steve', 39),
(20, 'Tina', 28);
Data import and ETL
This section describes how to import data from the following sources: OSS, MongoDB, Azure Blob Storage, RDS for SQL Server, and internal tables in AnalyticDB for MySQL.
You can batch import OSS data using Spark SQL.
You can stream import MongoDB data using PySpark.
You can batch import Azure Blob Storage data, RDS for SQL Server data, and AnalyticDB for MySQL internal table data using PySpark.
Batch import data using Spark SQL
In this tutorial, Delta Lake is the default table format. If you want to create an OSS table in the Iceberg format, you must specify the type as ICEBERG when you create the table. For example, use USING iceberg.
Go to the SQL development page.
Log on to the AnalyticDB for MySQL console. In the upper-left corner, select the region where your cluster resides. In the navigation pane on the left, click Clusters and then click the ID of the target cluster.
In the navigation pane on the left, click .
In the SQLConsole window, select the Spark engine and the Job resource group.
In the
test_dbdatabase, create an external table namedtest_src_tbl.CREATE TABLE IF NOT exists test_db.test_src_tbl( id int, name string, age int ) USING parquet -- The OSS path where the sample data from the data preparation section is stored LOCATION 'oss://testBucketName/test/test_tbl/' TBLPROPERTIES ('parquet.compress'='SNAPPY');Query the
test_src_tbltable to verify that the data was read successfully.SELECT * FROM test_db.test_src_tbl LIMIT 10;Create a Delta table and import the data from the OSS table into it.
Create a Delta table.
CREATE TABLE IF NOT EXISTS test_db.test_target_tbl (
  id INT,
  name STRING,
  age INT
)
USING DELTA;
Import data from the external table into the Delta table.
INSERT INTO test_db.test_target_tbl SELECT * FROM test_db.test_src_tbl;
Query the data to verify that the import was successful.
SELECT * FROM test_db.test_target_tbl LIMIT 10;View the OSS path where the data for the target table
demo.test_target_tblis stored.DESCRIBE DETAIL test_db.test_target_tbl;Perform Extract, Transform, and Load (ETL) on the data.
To modify the AnalyticDB Compute Units (ACUs) for a job, you can add the parameter before the SQL statement for that job. Alternatively, you can add the parameter as a key-value pair when you create the resource group to apply the change to all jobs in that group.
Use the SET command to modify the ACUs for a single job
This example sets the number of Spark Executor nodes for the job to 32 and the specification to medium (2 cores, 8 GB, and 2 ACUs). The job is allocated 64 ACUs.
SET spark.executor.instances=32;
SET spark.executor.resourceSpec = medium;

-- Create the ETL target table
CREATE TABLE IF NOT EXISTS test_db.etl_result_tbl (
  id INT,
  name STRING,
  age INT,
  is_adult INT
)
USING DELTA;

-- Step 2: ETL (cleanse + transform)
INSERT INTO test_db.etl_result_tbl
SELECT
  id,
  name,
  age,
  CASE WHEN age >= 18 THEN 1 ELSE 0 END AS is_adult
FROM
  test_db.test_target_tbl
WHERE
  name IS NOT NULL;
Use a resource group to modify the ACUs for all jobs
This example sets the number of Spark Executor nodes for the job to 32 and the specification to medium (2 cores, 8 GB, and 2 ACUs). The job is allocated 64 ACUs.
Modify the Job resource group. You can use one of the following methods.
In the Text Editor Configuration section, configure the parameters as key-value pairs:
spark.executor.instances 32
spark.executor.resourceSpec  medium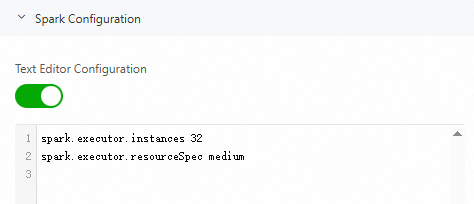
Click the
 icon to configure the parameters in the prop-value format:
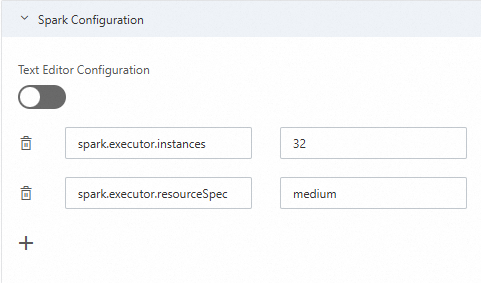
Perform ETL on the data.
-- Create the ETL target table
CREATE TABLE IF NOT EXISTS test_db.etl_result_tbl (
  id INT,
  name STRING,
  age INT,
  is_adult INT
)
USING DELTA;

-- ETL (cleanse + transform)
INSERT INTO test_db.etl_result_tbl
SELECT
  id,
  name,
  age,
  CASE WHEN age >= 18 THEN 1 ELSE 0 END AS is_adult
FROM
  test_db.test_target_tbl
WHERE
  name IS NOT NULL;
Stream import data using PySpark
This section uses a DMS Notebook to demonstrate how to use PySpark to import data from MongoDB into AnalyticDB for MySQL and store it as a Delta table.
Download the JAR files required by AnalyticDB for MySQL Spark to access MongoDB, and then upload the files to OSS.
Download links: mongo-spark-connector_2.12-10.4.0.jar, mongodb-driver-sync-5.1.4.jar, bson-5.1.4.jar, bson-record-codec-5.1.4.jar, and mongodb-driver-core-5.1.4.jar.
Log on to the AnalyticDB for MySQL console. In the upper-left corner, select the region where your cluster resides. In the navigation pane on the left, click Clusters, and then click the ID of the target cluster.
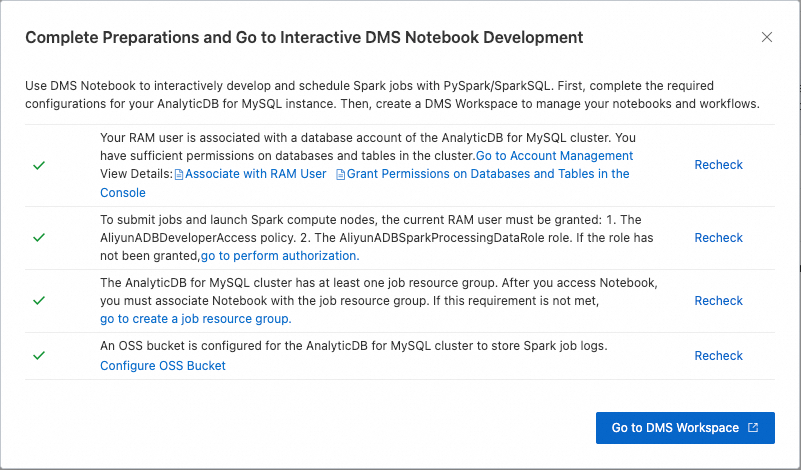
Click . After you complete the required preparations, click Go To DMS Workspace.
Create a Notebook file and import data.
Create a Spark cluster.
Click the
 icon to go to the resource management page, and then click Computing Cluster.
On the Spark cluster tab, click Create Cluster, and configure the following parameters:
Parameter
Description
Example value
Cluster Name
Enter a cluster name that helps you identify the usage scenario.
spark_test
Runtime Environment
You can select one of the following images:
adb-spark:v3.3-python3.9-scala2.12
adb-spark:v3.5-python3.9-scala2.12
adb-spark:v3.5-python3.9-scala2.12
AnalyticDB Instance
From the drop-down list, select the AnalyticDB for MySQL cluster.
amv-uf6i4bi88****
AnalyticDB for MySQL Resource Group
From the drop-down list, select the Job resource group.
testjob
Spark APP Executor Spec
Select the resource specification for the Spark Executor.
Different models correspond to different specifications. For more information, see the Model column in Spark application configuration parameters.
large
vSwitch
Select a vSwitch under the current VPC.
vsw-uf6n9ipl6qgo****
Dependent Jars
The OSS storage path for the JAR files. Enter the OSS path of the JAR files you downloaded in Step 1.
You can leave this blank if you want to specify the OSS address of the JAR files in your business code.
oss://testBucketName/adb/mongo-spark-connector_2.12-10.4.0.jar
oss://testBucketName/adb/mongodb-driver-sync-5.1.4.jar
oss://testBucketName/adb/bson-5.1.4.jar
oss://testBucketName/adb/bson-record-codec-5.1.4.jar
oss://testBucketName/adb/mongodb-driver-core-5.1.4.jar
When you create and start a Notebook session, the initial startup may take approximately 5 minutes.
Parameter
Description
Example value
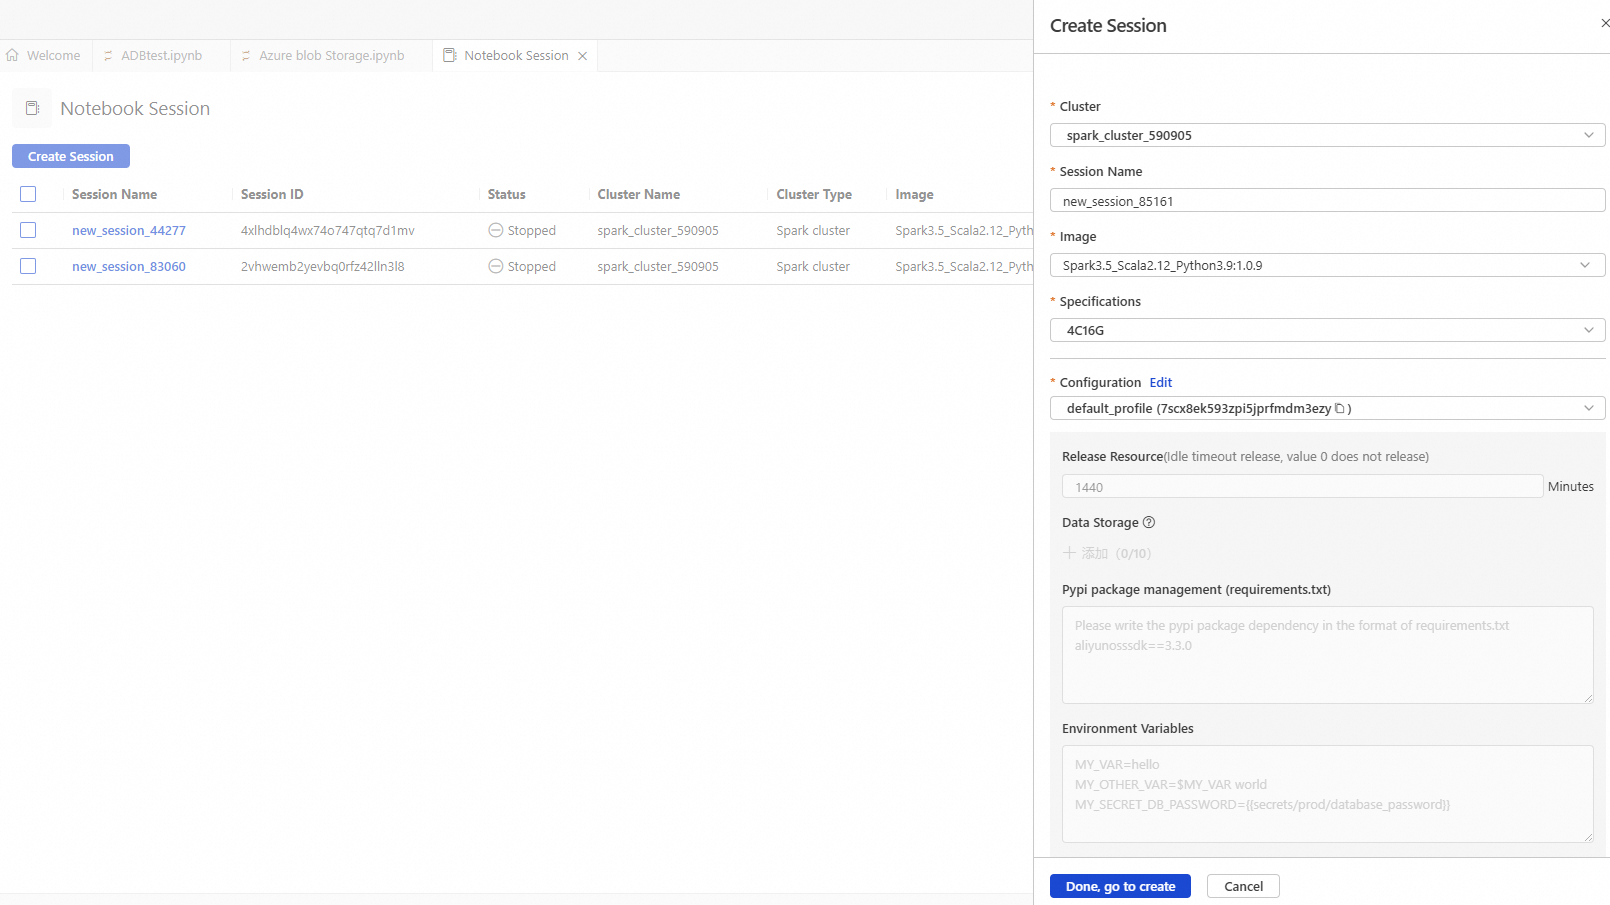
Cluster
Select the Spark cluster created in step b.
spark_test
Session Name
You can customize the session name.
new_session
Image
Select an image specification.
Spark3.5_Scala2.12_Python3.9:1.0.9
Spark3.3_Scala2.12_Python3.9:1.0.9
Spark3.5_Scala2.12_Python3.9:1.0.9
Specifications
The resource specification for the kernel.
1 core 4 GB
2 cores 8 GB
4 cores 16 GB
8 cores 32 GB
16 cores 64 GB
4C16G
Configuration
The profile resource.
You can edit the profile name, resource release duration, data storage location, PyPI package management, and environment variables.
ImportantResource release duration: Resources are automatically released when they are idle for longer than the specified duration. If you set the duration to 0, resources are never automatically released.
deault_profile
Create a Notebook file.
Click the
 icon, and then click .
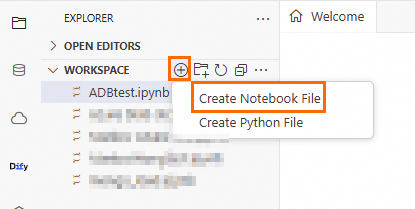
Set the cell language to Python and run the following code to perform a batch import of historical data from the
TransactionRecordcollection in the MongoDB instance to themongo_load_table_testtable in thetestdatabase of AnalyticDB for MySQL.from pyspark.sql import SparkSession spark = SparkSession.builder.appName("AppLoadMongoDB") \ # Enter the OSS path where the dependent JAR files for MongoDB downloaded in Step 1 are stored .config("spark.jars", "oss://testBucketName/mongodb/bson-5.1.4.jar,oss://testBucketName/mongodb/bson-record-codec-5.1.4.jar,oss://testBucketName/mongodb/mongo-spark-connector_2.12-10.4.0.jar,oss://testBucketName/mongodb/mongodb-driver-core-5.1.4.jar,oss://testBucketName/mongodb/mongodb-driver-sync-5.1.4.jar") \ .config("spark.driver.memory", "2g") \ .getOrCreate() # Database name of the MongoDB instance mongo_database_name = "test" # Collection name of the MongoDB instance mongo_collection_name = "TransactionRecord" # Endpoint of the MongoDB instance url = "mongodb://root:******@dds-uf667b******.mongodb.rds.aliyuncs.com:3717" df = spark.read \ .format("mongodb") \ .option("spark.mongodb.connection.uri", url) \ .option("spark.mongodb.database", mongo_database_name) \ .option("spark.mongodb.collection", mongo_collection_name) \ .load() df.printSchema() df.show(truncate=False) df.write.format("delta").mode(saveMode="append").saveAsTable("test_db.mongo_load_table_test")Set the cell language to Python and run the following code to synchronize incremental data from the
TransactionRecordcollection in the MongoDB instance to themongo_load_table_testtable in thetestdatabase of AnalyticDB for MySQL.from pyspark.sql.types import StructType, StructField, StringType, IntegerType, DoubleType, BooleanType, TimestampType, ArrayType schema = StructType([ StructField("record_id", StringType(), True), StructField("identifier_prefix", StringType(), True), StructField("user_id", StringType(), True), StructField("transaction_value", DoubleType(), True), StructField("incentive_value", DoubleType(), True), StructField("financial_institution_name", StringType(), True), StructField("user_bank_account_number", StringType(), True), StructField("account_reference", StringType(), True), StructField("account_group", IntegerType(), True), StructField("main_channel", StringType(), True), StructField("sub_channel", StringType(), True), StructField("operation_type", StringType(), True), StructField("digital_wallet_type", StringType(), True), StructField("source_of_operation", StringType(), True), StructField("reference_id", StringType(), True), StructField("pre_transaction_balance", DoubleType(), True), StructField("post_transaction_balance", DoubleType(), True), StructField("pre_credit_limit", DoubleType(), True), StructField("post_credit_limit", DoubleType(), True), StructField("product_reference", StringType(), True), StructField("local_first_name", StringType(), True), StructField("local_last_name", StringType(), True), StructField("english_first_name", StringType(), True), StructField("english_last_name", StringType(), True), StructField("campaign_id", StringType(), True), StructField("offer_id", StringType(), True), StructField("offer_title", StringType(), True), StructField("offer_category", StringType(), True), StructField("withdrawal_limit", DoubleType(), True), StructField("is_initial_transaction", BooleanType(), True), StructField("has_withdrawal_restrictions", BooleanType(), True), StructField("bonus_flag", BooleanType(), True), StructField("transaction_note", StringType(), True), StructField("timestamp_creation", TimestampType(), True), StructField("timestamp_expiration", TimestampType(), True), StructField("recovery_data", StringType(), True), StructField("transaction_breakdown", StructType([ StructField("item_1", DoubleType(), True), StructField("item_2", DoubleType(), True), StructField("item_3", DoubleType(), True), StructField("max_operation_count", IntegerType(), True), StructField("max_operation_value", DoubleType(), True), StructField("item_1_type", StringType(), True), StructField("item_2_type", StringType(), True) ]), True), StructField("virtual_wallet_balance", StructType([ StructField("item_1", DoubleType(), True), StructField("item_2", DoubleType(), True), StructField("item_3", DoubleType(), True) ]), True), StructField("unresolved_balance", StructType([ StructField("item_1", DoubleType(), True), StructField("item_2", DoubleType(), True), StructField("item_3", DoubleType(), True) ]), True) ]) # Database name of the MongoDB instance mongo_database_name = "test" # Collection of the MongoDB instance mongo_collection_name = "TransactionRecord!" # Endpoint of the MongoDB instance uri = "mongodb://root:******@dds-uf667b******.mongodb.rds.aliyuncs.com:3717" df = (spark.readStream \ .format("mongodb") \ .option("database", mongo_database_name) \ .option("collection", mongo_collection_name) \ .option("spark.mongodb.connection.uri",uri)\ .option("change.stream.publish.full.document.only", "true")\ .schema(schema) .load()) display(df) checkpoint_oss_location = "oss://testBucketNam/mongodb_checkpoint_v1/" query = df.writeStream \ .trigger(availableNow=True) \ .format(source="delta") \ .outputMode("append") \ .option("checkpointLocation", checkpoint_oss_location) \ .option("mergeSchema", "true") \ .toTable("test_db.mongo_load_table_test") query.awaitTermination()Set the cell language to SQL and run the following code to verify that the data from MongoDB was successfully written to the
mongo_load_table_testtable.DESCRIBE test_db.mongo_load_table_test; DESCRIBE HISTORY test_db.mongo_load_table_test;Set the cell language to SQL and run the following code to merge small files in the target table and sort the files by the timestamp_creation column to optimize query performance.
OPTIMIZE test_db.mongo_load_table_test ZORDER BY (timestamp_creation);
Batch import data using PySpark
This section demonstrates how to use PySpark in a DMS Notebook to import data from Azure Blob Storage, RDS for SQL Server, and AnalyticDB for MySQL data warehouse tables into AnalyticDB for MySQL as Delta tables.
Azure Blob Storage data import
Download the JAR files required by AnalyticDB for MySQL Spark to access Azure Blob Storage and upload them to OSS.
Download links: jetty-util-ajax-9.4.51.v20230217.jar, jetty-server-9.4.51.v20230217.jar, jetty-io-9.4.51.v20230217.jar, jetty-util-9.4.51.v20230217.jar, azure-storage-8.6.0.jar, hadoop-azure-3.3.0.jar, and hadoop-azure-datalake-3.3.0.jar.
Configure the Spark environment for Internet access.
Create an Internet NAT gateway.
The Internet NAT gateway must reside in the same region as the AnalyticDB for MySQL cluster.
- Important
To read and import data from Azure Blob Storage, ensure that the vSwitch specified when you create the SNAT entry is the same as the vSwitch used for the Spark cluster.
Log on to the AnalyticDB for MySQL console. In the upper-left corner, select the region where your cluster resides. In the navigation pane on the left, click Clusters, and then click the ID of the target cluster.
Click . After you complete the required preparations, click Go To DMS Workspace.
Create a Notebook file and import data.
Create a Spark cluster.
Click the
icon to open the resource management page, and then click Computing Cluster.Select the Spark cluster tab, click Create Cluster, and configure the following parameters:
Parameter
Description
Example value
Cluster Name
Enter a cluster name that helps you identify the usage scenario.
spark_test
Runtime Environment
You can select one of the following images:
adb-spark:v3.3-python3.9-scala2.12
adb-spark:v3.5-python3.9-scala2.12
adb-spark:v3.5-python3.9-scala2.12
AnalyticDB Instance
From the drop-down list, select the AnalyticDB for MySQL cluster.
amv-uf6i4bi88****
AnalyticDB for MySQL Resource Group
From the drop-down list, select the Job resource group.
testjob
Spark APP Executor Spec
Select the resource specification for the Spark Executor.
Different models correspond to different specifications. For more information, see the Model column in Spark application configuration parameters.
large
vSwitch
Select a vSwitch under the current VPC.
vsw-uf6n9ipl6qgo****
Dependent Jars
The OSS storage path for the JAR files. Enter the OSS path of the JAR files you downloaded in Step 1.
You can leave this blank if you want to specify the OSS address of the JAR files in your business code.
oss://testBucketName/jar_file/jetty-util-ajax-9.4.51.v20230217.jar,
oss://testBucketName/jar_file/jetty-server-9.4.51.v20230217.jar,
oss://testBucketName/jar_file/jetty-io-9.4.51.v20230217.jar,
oss://testBucketName/jar_file/jetty-util-9.4.51.v20230217.jar,
oss://testBucketName/jar_file/azure-storage-8.6.0.jar,
oss://testBucketName/jar_file/hadoop-azure-3.3.0.jar,
oss://testBucketName/jar_file/hadoop-azure-datalake-3.3.0.jar")
When you create and start a Notebook session, the initial startup may take approximately 5 minutes.
Parameter
Description
Example value
Cluster
Select the Spark cluster created in step b.
spark_test
Session Name
You can customize the session name.
new_session
Image
Select an image specification.
Spark3.5_Scala2.12_Python3.9:1.0.9
Spark3.3_Scala2.12_Python3.9:1.0.9
Spark3.5_Scala2.12_Python3.9:1.0.9
Specifications
The resource specification for the kernel.
1 core 4 GB
2 cores 8 GB
4 cores 16 GB
8 cores 32 GB
16 cores 64 GB
4C16G
Configuration
The profile resource.
You can edit the profile name, resource release duration, data storage location, PyPI package management, and environment variables.
ImportantResource release duration: Resources are automatically released when they are idle for longer than the specified duration. If you set the duration to 0, resources are never automatically released.
deault_profile
Create a Notebook file.
Click the
icon, and then click .Set the cell language to Python and run the following code to load Python dependencies.
!pip install azure-storage-blob>=12.14.0
!pip install azure-identity
Set the cell language to Python and run the following code to test whether data can be read from Azure Blob Storage.
from azure.storage.blob import BlobServiceClient
import azure.storage.blob

# Account name for Azure Blob Storage
storage_account_name = 'storage****'
# Account key for Azure Blob Storage
azure_account_key = 'NPNe9B6DmxQpmA****'
# Container name for Azure Blob Storage
container = 'azurename****'


blob_service = BlobServiceClient(
    account_url=f"https://{storage_account_name}.blob.core.windows.net",
    credential=azure_account_key
)

try:
    container_client = blob_service.get_container_client(container)
    if container_client.exists():
        print(f"Azure Container {container} is accessible!")
        print(azure.storage.blob.__version__)
        blobs = container_client.list_blobs()
        #if azure.storage.blob.__version__ >= "12.14.0":
        #    blobs = container_client.list_blobs(max_results=10)
        #else:
        #    blobs = container_client.list_blobs()
        print("\nAzure Objects count: %s"%len(blobs))
    else:
        print(f"Azure Container {container} access failed!")
except Exception as e:
    print(f"Connection failed: {str(e)}")
Set the cell language to Python and run the following code to create a Spark session.
from datetime import datetime
from datetime import date
from pyspark.sql import SparkSession

# Account name for Azure Blob Storage
storage_account_name = 'storage****'
# Container name for Azure Blob Storage
container = 'azurename****'
# Account key for Azure Blob Storage
azure_account_key = 'NPNe9B6DmxQpmA****'


spark = SparkSession.builder \
    .appName("AzureBlobToOSS") \
    .config("spark.jars", \
    # The OSS path where the dependent JAR files for Azure Blob Storage downloaded in Step 1 are stored
    "oss://testBucketName/jar_file/jetty-util-ajax-9.4.51.v20230217.jar,\
    oss://testBucketName/jar_file/jetty-server-9.4.51.v20230217.jar,\
    oss://testBucketName/jar_file/jetty-io-9.4.51.v20230217.jar,\
    oss://testBucketName/jar_file/jetty-util-9.4.51.v20230217.jar,\
    oss://testBucketName/jar_file/azure-storage-8.6.0.jar,\
    oss://testBucketName/jar_file/hadoop-azure-3.3.0.jar,\
    oss://testBucketName/jar_file/hadoop-azure-datalake-3.3.0.jar")\
    .config("spark.hadoop.fs.azure", "org.apache.hadoop.fs.azure.NativeAzureFileSystem") \
    .config("spark.hadoop.fs.azure.account.key.%s.blob.core.windows.net"%storage_account_name, azure_account_key) \
    .getOrCreate()

print("Spark Session has been created successfully!")
Set the cell language to Python and run the following code to import Parquet data from Azure Blob Storage into the
azure_load_tabletable in the AnalyticDB for MySQLtest_dbdatabase.from pyspark.sql import SparkSession from py4j.java_gateway import java_import import time from datetime import datetime # Replace test_tbl_2.parquet with the actual storage path of the sample Parquet data parquet_path = f"wasbs://{container}@{storage_account_name}.blob.core.windows.net/test_tbl_2.parquet" df = spark.read.parquet(parquet_path) # Import data into the azure_load_table table df.write.format("delta").mode("overwrite").saveAsTable('test_db.azure_load_table')In the AnalyticDB for MySQL cluster, query the data to verify that the import was successful.
SELECT * FROM test_db.azure_load_table LIMIT 10;
RDS SQL Server data import
Download the JAR file required by AnalyticDB for MySQL Spark to access RDS for SQL Server.
Decompress the downloaded driver package and upload the JAR file with the `jre8.jar` suffix from the `jars` folder.
Log on to the AnalyticDB for MySQL console. In the upper-left corner, select the region where your cluster resides. In the navigation pane on the left, click Clusters, and then click the ID of the target cluster.
Click . After you complete the required preparations, click Go To DMS Workspace.
Create a Notebook file and import data.
Create a Spark cluster.
Click the
icon to open the resource management page, and then click Computing Cluster.Select the Spark Cluster tab, click Create Cluster, and configure the following parameters:
Parameter
Description
Example value
Cluster Name
Enter a cluster name that helps you identify the usage scenario.
spark_test
Runtime Environment
You can select one of the following images:
adb-spark:v3.3-python3.9-scala2.12
adb-spark:v3.5-python3.9-scala2.12
adb-spark:v3.5-python3.9-scala2.12
AnalyticDB Instance
From the drop-down list, select the AnalyticDB for MySQL cluster.
amv-uf6i4bi88****
AnalyticDB MySQL Resource Group
From the drop-down list, select the Job resource group.
testjob
Spark APP Executor Spec
Select the resource specification for the Spark Executor.
Different models correspond to different specifications. For more information, see the Model column in Spark application configuration parameters.
large
VSwitch
Select a vSwitch under the current VPC.
vsw-uf6n9ipl6qgo****
Dependent Jars
The OSS storage path for the JAR files. Enter the OSS path of the JAR files you downloaded in Step 1.
You can leave this blank if you want to specify the OSS address of the JAR files in your business code.
oss://testBucketName/jar_file/mssql-jdbc-12.8.1.jre8.jar
When you create and start a Notebook session, the initial startup may take approximately 5 minutes.
Parameter
Description
Example value
Cluster
Select the Spark cluster created in step b.
spark_test
Session Name
You can customize the session name.
new_session
Image
Select an image specification.
Spark3.5_Scala2.12_Python3.9:1.0.9
Spark3.3_Scala2.12_Python3.9:1.0.9
Spark3.5_Scala2.12_Python3.9:1.0.9
Specifications
The resource specification for the kernel.
1 core 4 GB
2 cores 8 GB
4 cores 16 GB
8 cores 32 GB
16 cores 64 GB
4C16G
Configuration
The profile resource.
You can edit the profile name, resource release duration, data storage location, PyPI package management, and environment variables.
ImportantResource release duration: Resources are automatically released when they are idle for longer than the specified duration. If you set the duration to 0, resources are never automatically released.
deault_profile
Create a Notebook file.
Click the
icon, and then click .Set the cell language to Python and run the following code to read data from RDS for SQL Server.
from pyspark.sql import SparkSession

# Initialize SparkSession
spark = SparkSession.builder.appName("AppLoadSQLServer") \
    .config("spark.jars", "oss://testBucketName/sqlserver/mssql-jdbc-12.8.1.jre8.jar") \ # The OSS path where the JAR downloaded in Step 1 is stored
    .config("spark.driver.memory", "2g") \
    .getOrCreate()

# RDS SQL Server database name
database = "demo"
# RDS SQL Server table name
table = "rdstest"
# RDS SQL Server endpoint
sqlserver_url = "jdbc:sqlserver://rm-uf68v****.sqlserver.rds.aliyuncs.com:1433"
# RDS SQL Server database account
user = 'user'
# Password for the RDS SQL Server database account
password = 'pass****'

df = spark.read \
            .format("jdbc") \
            .option("url", f"{sqlserver_url};databaseName={database};trustServerCertificate=true;encrypt=true;") \
            .option("dbtable", table) \
            .option("user", user) \
            .option("password", password) \
            .load()

# Print Schema and sample data
df.printSchema()
df.show(truncate=False)

# Save as a Delta table
df.write.format("delta").mode(saveMode="append").saveAsTable("test_db.rds_delta_test")
AnalyticDB for MySQL data warehouse table import
Log on to the AnalyticDB for MySQL console. In the upper-left corner, select the region where your cluster resides. In the navigation pane on the left, click Clusters, and then click the ID of the target cluster.
Click . After you complete the required preparations, click Go To DMS Workspace.
Create a Notebook file and import data.
Create a Spark cluster.
Click the
icon to open the resource management page, and then click Computing Cluster.Select the Spark Cluster tab, click Create Cluster, and configure the following parameters:
Parameter
Description
Example value
Cluster Name
Enter a cluster name that helps you identify the usage scenario.
spark_test
Runtime Environment
You can select one of the following images:
adb-spark:v3.3-python3.9-scala2.12
adb-spark:v3.5-python3.9-scala2.12
adb-spark:v3.5-python3.9-scala2.12
AnalyticDB Instance
From the drop-down list, select the AnalyticDB for MySQL cluster.
amv-uf6i4bi88****
AnalyticDB MySQL Resource Group
From the drop-down list, select the Job resource group.
testjob
Spark APP Executor Spec
Select the resource specification for the Spark Executor.
Different models correspond to different specifications. For more information, see the Model column in Spark application configuration parameters.
large
VSwitch
Select a vSwitch under the current VPC.
vsw-uf6n9ipl6qgo****
Dependent Jars
The OSS storage path for the JAR files. Enter the OSS path of the JAR files you downloaded in Step 1.
You can leave this blank if you want to specify the OSS address of the JAR files in your business code.
oss://testBucketName/jar_file/mssql-jdbc-12.8.1.jre8.jar
When you create and start a Notebook session, the initial startup may take approximately 5 minutes.
Parameter
Description
Example value
Cluster
Select the Spark cluster created in step b.
spark_test
Session Name
You can customize the session name.
new_session
Image
Select an image specification.
Spark3.5_Scala2.12_Python3.9:1.0.9
Spark3.3_Scala2.12_Python3.9:1.0.9
Spark3.5_Scala2.12_Python3.9:1.0.9
Specifications
The resource specification for the kernel.
1 core 4 GB
2 cores 8 GB
4 cores 16 GB
8 cores 32 GB
16 cores 64 GB
4C16G
Configuration
The profile resource.
You can edit the profile name, resource release duration, data storage location, PyPI package management, and environment variables.
ImportantResource release duration: Resources are automatically released when they are idle for longer than the specified duration. If you set the duration to 0, resources are never automatically released.
deault_profile
Create a Notebook file.
Click the
icon, and then click .Set the cell language to Python and run the following code to read data from an AnalyticDB for MySQL data warehouse table.
from pyspark.sql import SparkSession

# Initialize SparkSession
spark = SparkSession.builder.appName("AppLoadADBMSQL") \
    .config("spark.driver.memory", "2g") \
    .getOrCreate()

# AnalyticDB for MySQL database name
database = "demo"
# AnalyticDB for MySQL table name
table = "test"
# AnalyticDB for MySQL endpoint
url = "jdbc:mysql://amv-uf6i4b****.ads.aliyuncs.com:3306"
# AnalyticDB for MySQL database account
user = 'user'
#  Password for the AnalyticDB for MySQL database account
password = 'pass****'

# Batch read data from AnalyticDB for MySQL
df = spark.read \
            .format("jdbc") \
            .option("url", f"{url}/{database}") \
            .option("dbtable", table) \
            .option("user", user) \
            .option("password", password) \
            .load()

# Print Schema and sample data
df.printSchema()
df.show(truncate=False)

# Save as a Delta table
df.write.format("delta").mode(saveMode="append").saveAsTable("test_db.adb_delta_test")
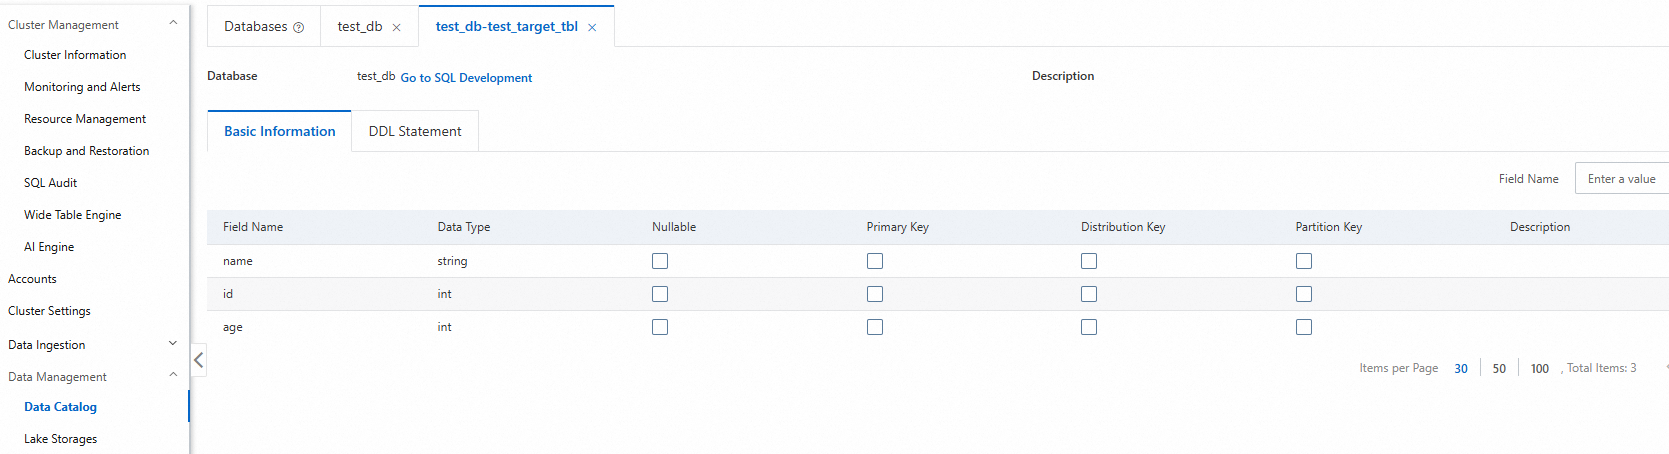
Preview the data catalog
Log on to the AnalyticDB for MySQL console. In the upper-left corner, select the region where your cluster is located. In the navigation pane on the left, click Clusters, and then click the ID of the target cluster.
In the navigation pane on the left, click .
Click the target database and then the table to view detailed information, such as the table type, storage data size, and column names.
Interactive analysis
To run high-performance, interactive Spark SQL queries, you can use a Spark Interactive resource group. By default, these resource groups have a local caching mechanism that improves query performance when you repeatedly read data from OSS.
Perform an interactive search from the console
Log on to the AnalyticDB for MySQL console. In the upper-left corner, select the region where your cluster is located. In the navigation pane on the left, click Clusters, and then click the ID of the target cluster.
In the navigation pane on the left, click .
In the SQLConsole window, select the Spark engine and the Interactive resource group.
Run the following statement to perform an interactive search:
SELECT COUNT(*) FROM test_db.etl_result_tbl;
Perform an interactive search from an application
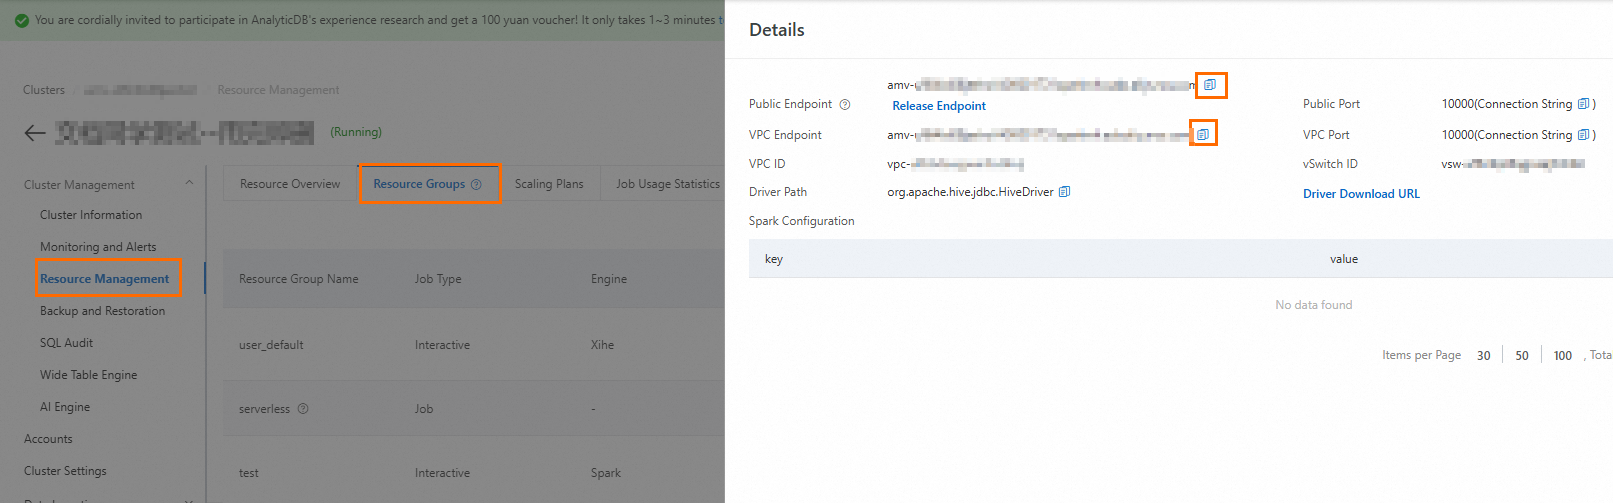
Obtain the endpoint of the Spark Interactive resource group.
Log on to the AnalyticDB for MySQL console. In the upper-left corner, select the region where your cluster is located. In the navigation pane on the left, click Clusters. On the Enterprise Edition, Basic Edition, or Data Lakehouse Edition tab, click the ID of the target cluster.
In the navigation pane on the left, click , and then click the Resource Groups tab.
In the Actions column of the target resource group, click Details to view the internal and public endpoints. You can click the
 icon to copy an endpoint.
You must manually request a public endpoint by clicking Public Endpoint and then Apply for Endpoint in the following cases:
The client tool for submitting Spark SQL jobs is deployed on a local machine or an external server.
The client tool for submitting Spark SQL jobs is deployed on an ECS instance that is not in the same VPC as the AnalyticDB for MySQL cluster.
Install Python dependencies.
For Python 3.11 or later, run the following command:
pip install pyhive[hive_pure_sasl]>=0.7.0For Python versions earlier than 3.11, run the following command:
pip install pyhive[hive]>=0.7.0
Run the following code:
from pyhive import hive
from TCLIService.ttypes import TOperationState

cursor = hive.connect(
    # Endpoint of the Spark Interactive resource group
    host='amv-uf6i4b****sparkwho.ads.aliyuncs.com',
    # Port number of the Spark Interactive resource group, fixed at 10000
    port=10000,
    # Resource group name and database account for AnalyticDB for MySQL
    username='testjob/user',
    # Password for the AnalyticDB for MySQL database account
    password='password****',
    auth='CUSTOM'
).cursor()
# Business code for the Spark SQL job
cursor.execute('select count(*) from test_db.etl_result_tbl;')

status = cursor.poll().operationState
while status in (TOperationState.INITIALIZED_STATE, TOperationState.RUNNING_STATE):
    logs = cursor.fetch_logs()
    for message in logs:
        print(message)
    # If needed, an asynchronous query can be cancelled at any time with:
    # cursor.cancel()
    status = cursor.poll().operationState
print(cursor.fetchall())
Schedule Spark SQL jobs
Airflow is an open-source tool that orchestrates and schedules various types of workloads in a Directed Acyclic Graph (DAG). To schedule Spark SQL jobs using Airflow, you can use the Spark Airflow Operator or the Spark-Submit command-line tool. For more information, see Schedule Spark SQL jobs.
DataWorks provides end-to-end big data development and administration capabilities. Its Data Development (DataStudio) module supports visual workflow development, managed scheduling, and Operations and Maintenance (O&M), which lets you schedule tasks based on time and dependencies. To schedule Spark SQL jobs using DataWorks, you can use an AnalyticDB Spark SQL node. For more information, see Schedule Spark SQL jobs using DataWorks.
You can also use other scheduling tools, such as DMS, DolphinScheduler, or Azkaban, to schedule Spark SQL jobs. For more information, see Spark scheduling.