You can execute Spark SQL queries interactively by specifying a Spark Interactive resource group. The resources for this resource group automatically scale within a specified range, which meets your interactive analysis needs and reduces costs. This topic describes how to perform interactive analysis with Spark SQL using client tools such as the console, Hive Java Database Connectivity (JDBC), PyHive, Beeline, and DBeaver.
Prerequisites
An AnalyticDB for MySQL Enterprise Edition, Basic Edition, or Data Lakehouse Edition cluster is created.
An Object Storage Service (OSS) bucket is created in the same region as the AnalyticDB for MySQL cluster.
A database account is created for the AnalyticDB for MySQL cluster.
If you use an Alibaba Cloud account, you need to only create a privileged account.
If you use a Resource Access Management (RAM) user, you must create a privileged account and a standard account and associate the standard account with the RAM user.
The Java 8 and Python 3.9 development environments are installed. These environments allow you to run clients such as Java applications, Python applications, and Beeline.
You have added the client IP address to the AnalyticDB for MySQL cluster whitelist.
Notes
If a Spark Interactive resource group is stopped, the cluster automatically restarts it when you execute the first Spark SQL query. As a result, the first query may be queued for a long time.
Spark cannot read from or write to the INFORMATION_SCHEMA and MYSQL databases. Do not use these databases for the initial connection.
Ensure that the database account used to submit Spark SQL jobs has the required permissions to access the destination database. Otherwise, the query fails.
Preparations
Obtain the endpoint of the Spark Interactive resource group.
Log on to the AnalyticDB for MySQL console. In the upper-left corner of the console, select a region. In the left-side navigation pane, click Clusters. Find the cluster that you want to manage and click the cluster ID.
In the navigation pane on the left, choose , and click the Resource Groups tab.
Find the target resource group and click Details in the Actions column to view the internal endpoint and public endpoint. You can click the
 icon next to an endpoint to copy it. You can also click the icon in the parentheses next to Port to copy the JDBC connection string.
In the following cases, you must click Apply for Endpoint next to Public Endpoint to manually request a public endpoint.
The client tool used to submit Spark SQL jobs is deployed on a local machine or an external server.
The client tool used to submit Spark SQL jobs is deployed on an ECS instance, and the ECS instance and the AnalyticDB for MySQL cluster are not in the same VPC.

Interactive analysis
Console
If you use a self-managed HiveMetastore, you must create a database named default in AnalyticDB for MySQL. Then, select this database when you develop and execute Spark SQL jobs in the console.
Log on to the AnalyticDB for MySQL console. In the upper-left corner of the console, select a region. In the left-side navigation pane, click Clusters. Find the cluster that you want to manage and click the cluster ID.
In the navigation pane on the left, choose .
Select the Spark engine and the Spark Interactive resource group that you created. Then, execute the following Spark SQL statement:
SHOW DATABASES;
SDK call
When you call an SDK method to execute a Spark SQL query, the query result is written to a file in a specified OSS location. You can then query the data in the OSS console or download the result file to your local computer to view it. The following section provides an example of how to call the SDK using Python.
Run the following command to install the SDK.
pip install alibabacloud-adb20211201Run the following commands to install dependencies.
pip install oss2
pip install loguru
Connect to the cluster and execute Spark SQL queries.
# coding: utf-8
import csv
import json
import time
from io import StringIO

import oss2
from alibabacloud_adb20211201.client import Client
from alibabacloud_adb20211201.models import ExecuteSparkWarehouseBatchSQLRequest, ExecuteSparkWarehouseBatchSQLResponse, \
    GetSparkWarehouseBatchSQLRequest, GetSparkWarehouseBatchSQLResponse, \
    ListSparkWarehouseBatchSQLRequest, CancelSparkWarehouseBatchSQLRequest, ListSparkWarehouseBatchSQLResponse
from alibabacloud_tea_openapi.models import Config
from loguru import logger

def build_sql_config(oss_location,
                     spark_sql_runtime_config: dict = None,
                     file_format = "CSV",
                     output_partitions = 1,
                     sep = "|"):
    """
    Build the configuration for ADB SQL execution.
    :param oss_location: The OSS path where the SQL execution results are stored.
    :param spark_sql_runtime_config: The native configuration of the Spark SQL community.
    :param file_format: The file format of the SQL execution results. Default value: CSV.
    :param output_partitions: The number of partitions for the SQL execution results. If a large amount of results needs to be output, you must increase the number of output partitions to prevent a single file from being too large.
    :param sep: The separator for CSV files. This parameter is ignored for non-CSV files.
    :return: The configuration for SQL execution.
    """

    if oss_location is None:
        raise ValueError("oss_location is required")

    if not oss_location.startswith("oss://"):
        raise ValueError("oss_location must start with oss://")

    if file_format != "CSV" and file_format != "PARQUET" and file_format != "ORC" and file_format != "JSON":
        raise ValueError("file_format must be CSV, PARQUET, ORC or JSON")

    runtime_config =  {
        # sql output config
        "spark.adb.sqlOutputFormat": file_format,
        "spark.adb.sqlOutputPartitions": output_partitions,
        "spark.adb.sqlOutputLocation": oss_location,
        # csv config
        "sep": sep
    }

    if spark_sql_runtime_config:
        runtime_config.update(spark_sql_runtime_config)
    return runtime_config


def execute_sql(client: Client, dbcluster_id: str,
                resource_group_name: str,
                query: str,
                limit = 10000,
                runtime_config: dict = None,
                schema="default"
                ):
    """
    Execute an SQL statement in a Spark Interactive resource group.
    :param client: The Alibaba Cloud Client.
    :param dbcluster_id: The ID of the cluster.
    :param resource_group_name: The resource group of the cluster. It must be a Spark Interactive resource group.
    :param schema: The default database name for SQL execution. If not specified, the default value is `default`.
    :param limit: The maximum number of rows in the SQL execution result.
    :param query: The SQL statements to execute. Use semicolons (;) to separate multiple SQL statements.
    :return:
    """
    # Assemble the request body.
    req = ExecuteSparkWarehouseBatchSQLRequest()
    # The cluster ID.
    req.dbcluster_id = dbcluster_id
    # The resource group name.
    req.resource_group_name = resource_group_name
    # The timeout period for SQL execution.
    req.execute_time_limit_in_seconds = 3600
    # The name of the database where the SQL statement is executed.
    req.schema = schema
    # The SQL business code.
    req.query = query
    # The number of result rows to return.
    req.execute_result_limit = limit

    if runtime_config:
    # The configuration for SQL execution.
        req.runtime_config = json.dumps(runtime_config)
    # Execute the SQL statement and obtain the query_id.
    resp: ExecuteSparkWarehouseBatchSQLResponse = client.execute_spark_warehouse_batch_sql(req)
    logger.info("Query execute submitted: {}", resp.body.data.query_id)
    return resp.body.data.query_id


def get_query_state(client, query_id):
    """
    Query the execution status of an SQL statement.
    :param client: The Alibaba Cloud Client.
    :param query_id: The ID of the SQL execution.
    :return: The execution status and result of the SQL statement.
    """
    req = GetSparkWarehouseBatchSQLRequest(query_id=query_id)
    resp: GetSparkWarehouseBatchSQLResponse = client.get_spark_warehouse_batch_sql(req)
    logger.info("Query state: {}", resp.body.data.query_state)
    return resp.body.data.query_state, resp

def list_history_query(client, db_cluster, resource_group_name, page_num):
    """
    Query the history of SQL statements executed in a Spark Interactive resource group.
    :param client: The Alibaba Cloud Client.
    :param db_cluster: The ID of the cluster.
    :param resource_group_name: The resource group name.
    :param page_num: The page number for the paged query.
    :return: Whether an SQL statement exists. If so, you can proceed to the next page.
    """
    req = ListSparkWarehouseBatchSQLRequest(dbcluster_id=db_cluster,
                                            resource_group_name=resource_group_name,
                                            page_number = page_num)
    resp: ListSparkWarehouseBatchSQLResponse = client.list_spark_warehouse_batch_sql(req)

    # If no SQL statement is found, return true. Otherwise, return false. The default page size is 10.
    if resp.body.data.queries is None:
        return True

    # Print the queried SQL statements.
    for query in resp.body.data.queries:
        logger.info("Query ID: {}, State: {}", query.query_id, query.query_state)
    logger.info("Total queries: {}", len(resp.body.data.queries))
    return len(resp.body.data.queries) < 10


def list_csv_files(oss_client, dir):
    for obj in oss_client.list_objects_v2(dir).object_list:
        if obj.key.endswith(".csv"):
            logger.info(f"reading {obj.key}")
            # read oss file content
            csv_content = oss_client.get_object(obj.key).read().decode('utf-8')
            csv_reader = csv.DictReader(StringIO(csv_content))
            # Print the CSV content
            for row in csv_reader:
                print(row)


if __name__ == '__main__':
    logger.info("ADB Spark Batch SQL Demo")

    # The AccessKey ID. Replace the value with your AccessKey ID.
    _ak = "LTAI****************"
    # The AccessKey secret. Replace the value with your AccessKey secret.
    _sk = "yourAccessKeySecret"
    # The region ID. Replace the value with your region ID.
    _region= "cn-shanghai"


    # The cluster ID. Replace the value with your cluster ID.
    _db = "amv-uf6485635f****"
    # The resource group name. Replace the value with your resource group name.
    _rg_name = "testjob"

    # client config
    client_config = Config(
        # Alibaba Cloud AccessKey ID
        access_key_id=_ak,
        # Alibaba Cloud AccessKey Secret
        access_key_secret=_sk,
        # The endpoint of the ADB service
        # adb.ap-southeast-1.aliyuncs.com is the endpoint of the ADB service in the Singapore region
        # adb-vpc.ap-southeast-1.aliyuncs.com used in the VPC scenario
        endpoint=f"adb.{_region}.aliyuncs.com"
    )

    # Create an Alibaba Cloud Client.
    _client = Client(client_config)

    # The configuration for SQL execution.
    _spark_sql_runtime_config = {
        "spark.sql.shuffle.partitions": 1000,
        "spark.sql.autoBroadcastJoinThreshold": 104857600,
        "spark.sql.sources.partitionOverwriteMode": "dynamic",
        "spark.sql.sources.partitionOverwriteMode.dynamic": "dynamic"
    }
    _config = build_sql_config(oss_location="oss://testBucketName/sql_result",
                               spark_sql_runtime_config = _spark_sql_runtime_config)
    # The SQL statements to be executed.
    _query = """
    SHOW DATABASES;
    SELECT 100;
    """

    _query_id = execute_sql(client = _client,
                            dbcluster_id=_db,
                            resource_group_name=_rg_name,
                            query=_query, runtime_config=_config)
    logger.info(f"Run query_id: {_query_id} for SQL {_query}.\n Waiting for result...")

    # Wait for the SQL execution to complete.
    current_ts = time.time()
    while True:
        query_state, resp = get_query_state(_client, _query_id)
        """
        query_state can be in one of the following states:
        - PENDING: The job is pending in the service queue. The Spark Interactive resource group is starting.
        - SUBMITTED: The job is submitted to the Spark Interactive resource group.
        - RUNNING: The SQL statement is being executed.
        - FINISHED: The SQL statement is executed successfully without errors.
        - FAILED: The SQL execution failed.
        - CANCELED: The SQL execution is canceled.
        """

        if query_state == "FINISHED":
            logger.info("query finished success")
            break
        elif query_state == "FAILED":
            # Print the failure information.
            logger.error("Error Info: {}", resp.body.data)
            exit(1)
        elif query_state == "CANCELED":
            # Print the cancellation information.
            logger.error("query canceled")
            exit(1)
        else:
            time.sleep(2)
            if time.time() - current_ts > 600:
                logger.error("query timeout")
                # If the execution time exceeds 10 minutes, cancel the SQL execution.
                _client.cancel_spark_warehouse_batch_sql(CancelSparkWarehouseBatchSQLRequest(query_id=_query_id))
                exit(1)

    # A query can contain multiple statements. List all statements.
    for stmt in resp.body.data.statements:
        logger.info(
            f"statement_id: {stmt.statement_id}, result location: {stmt.result_uri}")
        # Sample code for viewing the results.
        _bucket = stmt.result_uri.split("oss://")[1].split("/")[0]
        _dir = stmt.result_uri.replace(f"oss://{_bucket}/", "").replace("//", "/")
        oss_client = oss2.Bucket(oss2.Auth(client_config.access_key_id, client_config.access_key_secret),
                                 f"oss-{_region}.aliyuncs.com", _bucket)
        list_csv_files(oss_client, _dir)

    # Query all SQL statements executed in the Spark Interactive resource group. Paged query is supported.
    logger.info("List all history query")
    page_num = 1
    no_more_page = list_history_query(_client, _db, _rg_name, page_num)
    while no_more_page:
        logger.info(f"List page {page_num}")
        page_num += 1
        no_more_page = list_history_query(_client, _db, _rg_name, page_num)
Parameters:
_ak: The AccessKey ID of an Alibaba Cloud account or a RAM user that has AnalyticDB for MySQL access permissions. For more information about how to obtain an AccessKey ID and AccessKey secret, see Accounts and Permissions.
_sk: The AccessKey secret of an Alibaba Cloud account or a RAM user that has AnalyticDB for MySQL access permissions. For more information about how to obtain an AccessKey ID and AccessKey secret, see Accounts and Permissions.
region: The region ID of the AnalyticDB for MySQL cluster.
_db: The ID of the AnalyticDB for MySQL cluster.
_rg_name: The name of the Spark Interactive resource group.
oss_location: (Optional) The OSS path where the query result files are stored.
If you do not specify this parameter, you can view only the first five rows of data in the Logs of the SQL query statement on the page.
Applications
Hive JDBC
Configure Maven dependencies in the pom.xml file.
    <dependency>
      <groupId>org.apache.hive</groupId>
      <artifactId>hive-jdbc</artifactId>
      <version>2.3.9</version>
    </dependency>
Establish a connection and execute a Spark SQL query.
public class java {
    public static void main(String[] args) throws Exception {

        Class.forName("org.apache.hive.jdbc.HiveDriver");
        String url = "<endpoint>";
        Connection con = DriverManager.getConnection(url, "<username>", "<password>");
        Statement stmt = con.createStatement();
        ResultSet tables = stmt.executeQuery("show tables");
        List<String> tbls = new ArrayList<>();
        while (tables.next()) {
            System.out.println(tables.getString("tableName"));
            tbls.add(tables.getString("tableName"));
        }
    }
}
Parameters:
Connection address: The JDBC connection string for the Spark Interactive resource group. For more information, see Preparations. In the connection string, you must replace
defaultwith the name of your database.username: The database account for AnalyticDB for MySQL.
password: The password for the AnalyticDB for MySQL database account.
PyHive
Install the Python Hive client.
pip install pyhiveEstablish a connection and execute a Spark SQL query.
from pyhive import hive
from TCLIService.ttypes import TOperationState

cursor = hive.connect(
    host='<endpoint>',
    port=<port>,
    username='<resource_group_name>/<username>',
    password='<password>',
    auth='CUSTOM'
).cursor()

cursor.execute('show tables')

status = cursor.poll().operationState
while status in (TOperationState.INITIALIZED_STATE, TOperationState.RUNNING_STATE):
    logs = cursor.fetch_logs()
    for message in logs:
        print(message)
    # If needed, an asynchronous query can be cancelled at any time with:
    # cursor.cancel()
    status = cursor.poll().operationState
print(cursor.fetchall())
Parameters:
Connection address: Preparations provides the connection address of the Spark Interactive resource group.
port: The port number of the Spark Interactive resource group. The value is fixed to 10000.
resource_group_name: The name of the Spark Interactive resource group.
username: The database account for AnalyticDB for MySQL.
password: The password for the AnalyticDB for MySQL database account.
Clients
In addition to the Beeline, DBeaver, DBVisualizer, and Datagrip clients that are described in this topic, you can also perform interactive analysis in workflow scheduling tools such as Airflow, Azkaban, and DolphinScheduler.
Beeline
Connect to the Spark Interactive resource group.
The command format is as follows:
!connect <endpoint> <username> <password>Connection address: The JDBC connection string for the Spark Interactive resource group. For more information, see Preparations. In the connection string, you must replace
defaultwith the name of your database.username: The database account for AnalyticDB for MySQL.
password: The password for the AnalyticDB for MySQL database account.
Example:
!connect jdbc:hive2://amv-bp1c3em7b2e****-spark.ads.aliyuncs.com:10000/adb_test spark_resourcegroup/AdbSpark14**** Spark23****The following result is returned:
Connected to: Spark SQL (version 3.2.0)
Driver: Hive JDBC (version 2.3.9)
Transaction isolation: TRANSACTION_REPEATABLE_READ
Execute a Spark SQL query.
SHOW TABLES;
DBeaver
Open the DBeaver client and choose .
On the Connect To A Database page, select Apache Spark and click Next.
Configure the Hadoop/Apache Spark Connection Settings. The parameters are described as follows:
Parameter
Description
Connection method
Set Connection method to URL.
JDBC URL
Enter the JDBC connection string that you obtained in Preparations.
ImportantReplace
defaultin the connection string with the name of your database.Username
The database account of AnalyticDB for MySQL.
Password
The password of the AnalyticDB for MySQL database account.
After you configure the parameters, click Test Connection.
ImportantWhen you test the connection for the first time, DBeaver automatically retrieves information about the required drivers. After the information is retrieved, click Download to download the drivers.
After the connection is successful, click Finish.
On the Database Navigator tab, expand the subdirectory of the data source and click the database.
In the code editor on the right, enter an SQL statement and click the
 icon to run the statement.
SHOW TABLES;The following result is returned:
+-----------+-----------+-------------+
| namespace | tableName | isTemporary |
+-----------+-----------+-------------+
|    db     |   test    |     []      |
+-----------+-----------+-------------+
DBVisualizer
Open the DBVisualizer client and choose .
On the Driver Manager page, select Hive and click the
 icon.
icon.On the Driver Settings tab, configure the following parameters:
Parameter
Description
Name
The name of the Hive data source. You can customize the name.
URL Format
Enter the JDBC connection string that you obtained in Preparations.
ImportantReplace
defaultin the connection string with the name of your database.Driver Class
The Hive driver. Set this to org.apache.hive.jdbc.HiveDriver.
ImportantAfter you configure the parameters, click Start Download to download the driver.
After the driver is downloaded, choose .
In the Create Database Connection from Database URL dialog box, configure the parameters that are described in the following table.
Parameter
Description
Database URL
Enter the JDBC connection string that you obtained in Preparations.
ImportantReplace
defaultin the connection string with the name of your database.Driver Class
Select the Hive data source that you created in Step 3.
On the Connection page, configure the following connection parameters and click Connect.
Parameter
Description
Name
By default, this parameter has the same value as the Hive data source created in Step 3. You can customize the name.
Notes
The remarks.
Driver Type
Select Hive.
Database URL
Enter the JDBC connection string that you obtained in Preparations.
ImportantReplace
defaultin the connection string with the name of your database.Database Userid
The database account of AnalyticDB for MySQL.
Database Password
The password of the AnalyticDB for MySQL database account.
NoteYou do not need to configure other parameters. You can use the default values.
After the connection is successful, on the Database tab, expand the subdirectory of the data source and click the database.
In the code editor on the right, enter an SQL statement and click the
 icon to run the statement.
SHOW TABLES;The following result is returned:
+-----------+-----------+-------------+
| namespace | tableName | isTemporary |
+-----------+-----------+-------------+
|    db     |   test    |    false    |
+-----------+-----------+-------------+
Datagrip
Open the Datagrip client and choose to create a project.
Add a data source.
Click the
 icon and choose .
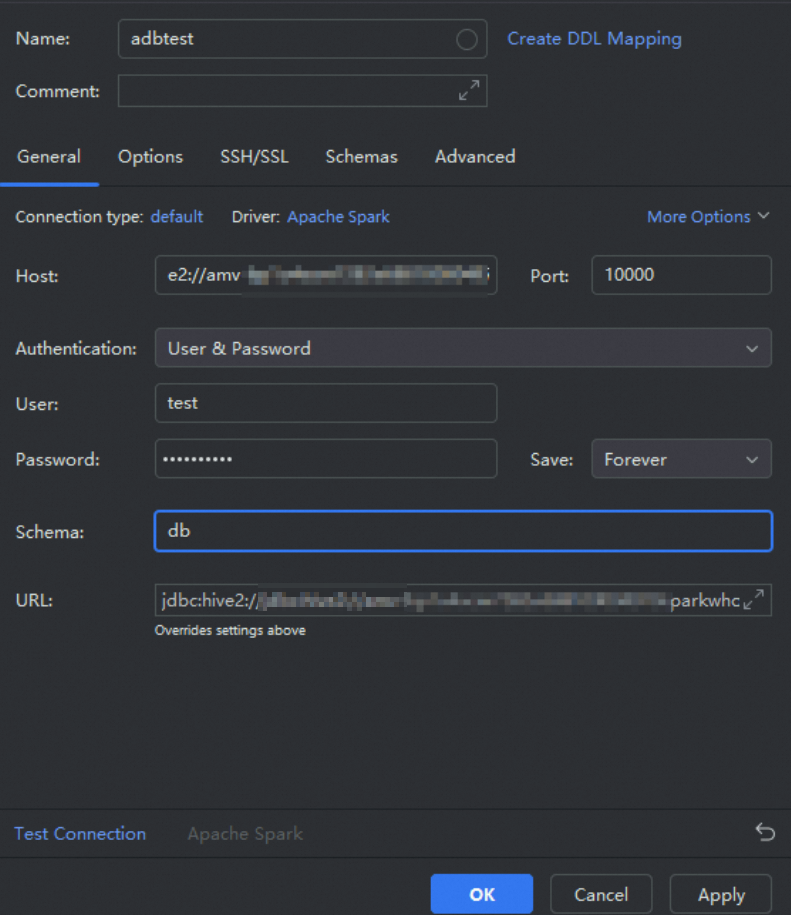
In the Data Sources and Drivers dialog box that appears, configure the following parameters and click OK.
Parameter
Description
Name
The name of the data source. You can customize the name. In this example,
adbtestis used.Host
Enter the JDBC connection string that you obtained in Preparations.
ImportantReplace
defaultin the connection string with the name of your database.Port
The port number of the Spark Interactive resource group. The value is fixed at 10000.
User
The database account of AnalyticDB for MySQL.
Password
The password of the AnalyticDB for MySQL database account.
Schema
The name of the database in the AnalyticDB for MySQL cluster.
Execute a Spark SQL query.
In the data source list, right-click the data source that you created in Step 2 and choose .
In the Console panel on the right, execute a Spark SQL query.
SHOW TABLES;
BI tools
You can perform interactive analysis in Redash, Power BI, and Metabase.