TLS versions range from TLS v1.0 (disabled) to TLS v1.3. A higher minimum version improves HTTPS security but reduces compatibility with older clients. Set the TLS version on the Alibaba Cloud product or web server where your certificate is installed.
Use the table below to jump to your deployment target:
| Deployment target | Go to |
|---|---|
| Anti-DDoS Proxy | Anti-DDoS Proxy |
| Web Application Firewall (WAF) | WAF |
| Server Load Balancer (SLB) | SLB (Classic Load Balancer) |
| CDN | CDN |
| DCDN | DCDN |
| Nginx or other web servers | Web server (Nginx example) |
Anti-DDoS Proxy
Log on to the Anti-DDoS Proxy console.
In the top navigation bar, select the region of your instance:
Anti-DDoS Proxy (Chinese Mainland): select Chinese Mainland.
Anti-DDoS Proxy (Outside Chinese Mainland): select Outside Chinese Mainland.
In the left-side navigation pane, choose Provisioning > Website Config.
On the Website Config page, find the target domain name and click Edit in the Actions column.
On the Modify Website Configurations tab, update the TLS Security Settings.
For the full list of TLS policy options, see Customize the TLS security policy for an HTTPS server certificate.
Web Application Firewall
Log on to the WAF 3.0 console. In the top navigation bar, select the resource group and region of your WAF instance (Chinese Mainland or Outside Chinese Mainland).
In the left-side navigation pane, click Onboarding.
On the CNAME Record tab, click Default SSL/TLS Settings above the list.

In the Default SSL/TLS Settings dialog box, configure the parameters and click OK.
Parameter Description HTTPS Upload Type Upload an SSL certificate. The procedure is the same as uploading a domain name certificate. See Upload a certificate. TLS Version Select the minimum TLS version to accept: (Default) TLS 1.0 and Later (Best Compatibility and Low Security), TLS 1.1 and Later (High Compatibility and High Security), or TLS 1.2 and Later (High Compatibility and Best Security). To also accept TLS 1.3 connections, select Support TLS 1.3. HTTPS Cipher Suite Select the cipher suites to enable: (Default) All Cipher Suites (High Compatibility and Low Security) or Custom Cipher Suite (Select It based on protocol version. Proceed with caution.). For supported custom cipher suites, see Cipher suites supported by WAF.
For more information, see Add a website to WAF using a CNAME.
Server Load Balancer
The Server Load Balancer (SLB) product family includes Application Load Balancer (ALB), Network Load Balancer (NLB), and Classic Load Balancer (CLB). The following steps use CLB as an example.
Only guaranteed-performance CLB instances support TLS security policies. A TLS security policy bundles supported TLS versions with their corresponding cipher suites. See TLS security policies for available options.
Log on to the Classic Load Balancer (CLB) console.
In the top menu bar, select the region where your instance is deployed.
On the Instances page, find the target instance and click Configure Listener in the Actions column.
On the Protocol & Listener wizard page, set Select Listener Protocol to HTTPS. Configure the remaining parameters and click Next. For details, see Add an HTTPS listener.
On the Certificate Management Service wizard page, select an uploaded server certificate, or click Create Server Certificate to upload or purchase a certificate. See Create a Certificate for details.
Click Modify next to Advanced Settings and select a TLS Security Policy.
Complete the remaining wizard pages and click Submit. See Add an HTTPS listener for a CLB instance for the full configuration reference.
CDN
TLS v1.0, TLS v1.1, TLS v1.2, and TLS v1.3 are enabled by default.
Prerequisite: Configure an HTTPS certificate for your CDN domain before setting TLS versions. See Configure an HTTPS certificate.
Log on to the CDN console.
In the left-side navigation pane, click Domain Names.
On the Domain Names page, find the target domain name and click Manage in the Actions column.
In the domain's navigation pane, click HTTPS.
In the Configure TLS Cipher Suite and Version section, select the TLS versions and cipher suite. The Enhanced Cipher Suite supports: TLS_AES_256_GCM_SHA384, TLS_AES_128_GCM_SHA256, TLS_CHACHA20_POLY1305_SHA256, ECDHE-ECDSA-CHACHA20-POLY1305, ECDHE-RSA-CHACHA20-POLY1305, ECDHE-ECDSA-AES128-GCM-SHA256, ECDHE-RSA-AES128-GCM-SHA256, ECDHE-ECDSA-AES128-CCM8, ECDHE-ECDSA-AES128-CCM, ECDHE-ECDSA-AES256-GCM-SHA384, ECDHE-RSA-AES256-GCM-SHA384, ECDHE-ECDSA-AES256-CCM8, ECDHE-ECDSA-AES256-CCM, ECDHE-ECDSA-ARIA256-GCM-SHA384, ECDHE-ARIA256-GCM-SHA384, ECDHE-ECDSA-ARIA128-GCM-SHA256, ECDHE-ARIA128-GCM-SHA256. For background on each TLS version, see Background information.
Cipher suite Security Compatibility All Cipher Suite Groups (Default) Low High Enhanced Cipher Suite High Low Custom Cipher Suite Configurable Configurable 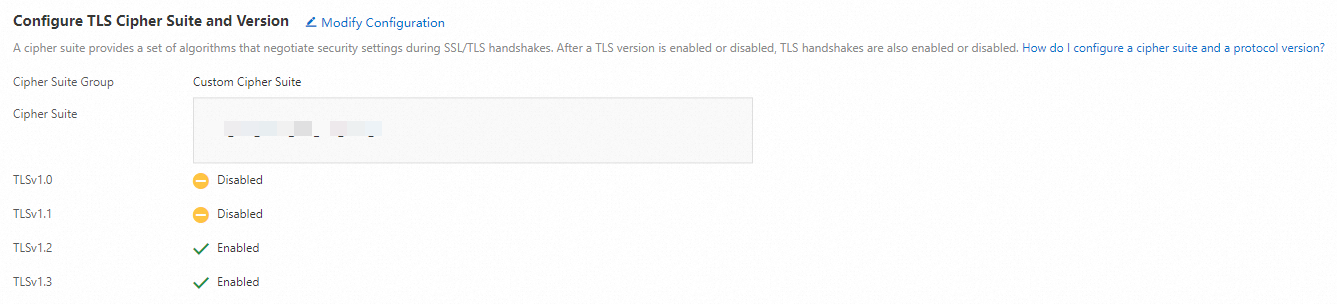
For more information, see Configure TLS versions and cipher suites.
DCDN
TLS 1.0, TLS 1.1, TLS 1.2, and TLS 1.3 are enabled by default.
Prerequisite: Configure an HTTPS certificate for your DCDN domain before setting TLS versions. See Configure an HTTPS certificate.
Log on to the DCDN console.
In the left-side navigation pane, click Domain Names.
On the Domain Names page, find the target domain name and click Configure.
In the left-side navigation tree of the domain name, click HTTPS Settings.
In the Configure TLS Cipher Suite and Version section, select cipher suites and enable the TLS versions you need. The Enhanced Cipher Suite supports the same algorithms as CDN. For the full list, see Default TLS encryption algorithms supported by DCDN.
Cipher suite Security Compatibility All Cipher Suite Groups (Default) Low High Enhanced Cipher Suite High Low Custom Cipher Suite Configurable Configurable 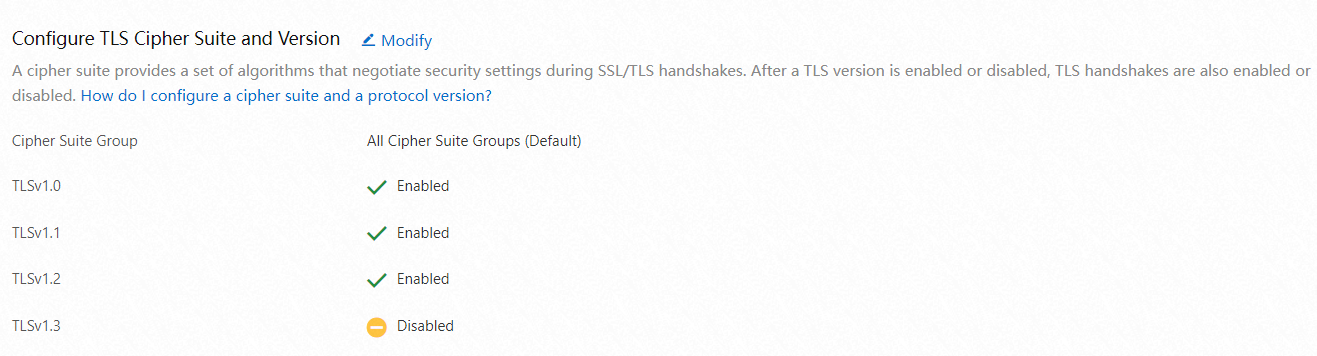
For more information, see Configure TLS versions and cipher suites.
If you have questions during configuration, contact your account manager.
Web server (Nginx example)
On a self-managed web server, set the ssl_protocols directive in your Nginx configuration to control which TLS versions the server accepts. For example:
To accept TLS v1.1 and v1.2 only:
ssl_protocols TLSv1.1 TLSv1.2;To also accept TLS v1.3:
ssl_protocols TLSv1.1 TLSv1.2 TLSv1.3;
Clients using a version below the configured minimum will fail to connect.
Step 1: Open the Nginx configuration file
sudo nano /etc/nginx/nginx.confIf you use a separate site configuration file:
sudo nano /etc/nginx/sites-available/defaultThe configuration file is usually located at /etc/nginx/nginx.conf or in a .conf file under /etc/nginx/conf.d/.
Step 2: Update the ssl_protocols directive
In the server block for your HTTPS site, add or update the ssl_protocols line. The following example enables TLS 1.2 and TLS 1.3:
server {
    listen 443 ssl;
    server_name yourdomain.com;

    # Paths to the SSL certificate and key
    ssl_certificate /path/to/your_certificate.crt;
    ssl_certificate_key /path/to/your_private.key;

    # Accepted TLS versions
    ssl_protocols TLSv1.2 TLSv1.3;

    # Optional: restrict to stronger cipher suites
    ssl_ciphers 'ECDHE-ECDSA-AES256-GCM-SHA384:ECDHE-RSA-AES256-GCM-SHA384:ECDHE-ECDSA-CHACHA20-POLY1305:ECDHE-RSA-CHACHA20-POLY1305:ECDHE-ECDSA-AES128-GCM-SHA256:ECDHE-RSA-AES128-GCM-SHA256';

    location / {
        root /var/www/html;
        index index.html index.htm;
    }
}
Step 3: Reload Nginx
sudo systemctl reload nginxAlternatively:
sudo service nginx restartStep 4: Verify the TLS configuration
Run the following command to test which TLS versions the server accepts:
# Replace <your_ip> with the server's actual IP address.
sudo openssl s_client -connect <your_ip>:443
Check the output for the negotiated protocol version and certificate details. A successful result includes a line such as:
Protocol : TLSv1.3If the specified TLS version appears in the output, the configuration has taken effect.
TLS standards evolve over time. Review and update your TLS configuration periodically to keep your server secure.