This topic describes how to use Arena in multi-tenant scenarios. In this topic, five tasks are used.
Prerequisites
The following operations are complete:
A Container Service for Kubernetes (ACK) cluster is created. For more information, see Create an ACK managed cluster.
An Elastic Compute Service (ECS) instance that runs Linux is created in the virtual private cloud (VPC) in which the ACK cluster is deployed. For more information, see Create an instance on the Custom Launch tab.
In this example, the ECS instance serves as a client. The client is used as an Arena workstation to submit jobs to the ACK cluster.
The latest version of the Arena client is installed. For more information, see Configure the Arena client.
Background Information
In some scenarios, multiple developers in a company or team want to use Arena to submit jobs. To improve the efficiency of job management, you can divide the developers into several user groups and grant each user group different permissions. This allows you to allocate and isolate resources, and manage permissions by user group.
You can allocate resources of the ACK cluster to each user group based on business requirements, such as GPU, CPU, and memory resources. You can also grant each group member different permissions, and provide a separate environment for each member to run Arena. You can grant group members the permissions to view jobs, manage jobs, and read and write specific data.
Figure 1. Configure Arena in a multi-tenant scenario

The following table describes the details of the nodes of the ACK cluster and the client.
Hostname | Role | IP address | Number of GPUs | Number of CPU cores | Memory |
client01 | Client | 10.0.0.97 (private) 39.98.xxx.xxx (public) | 0 | 2 | 8 GiB |
master01 | Master | 10.0.0.91 (private) | 0 | 4 | 8 GiB |
master02 | Master | 10.0.0.92 (private) | 0 | 4 | 8 GiB |
master03 | Master | 10.0.0.93 (private) | 0 | 4 | 8 GiB |
worker01 | Worker | 10.0.0.94 (private) | 1 | 4 | 30 GiB |
worker02 | Worker | 10.0.0.95 (private) | 1 | 4 | 30 GiB |
worker03 | Worker | 10.0.0.96 (private) | 1 | 4 | 30 GiB |
The operations described in this topic are all performed by using an administrator account on the client, unless otherwise stated.
Tasks
This example demonstrates how to complete the following tasks:
Task 1: Create two user groups named dev1 and dev2 for the ACK cluster, and add users Bob and Tom to user groups dev1 and dev2 separately.
Task 2: Allow Bob and Tom to log on to the client only with their own accounts. Both of them must have a separate environment in which they can run Arena.
Task 3: Grant Bob and Tom the permissions to view and manage only jobs that they submit.
Task 4: Allocate the GPU, CPU, and memory resources of worker nodes to different user groups. Arena jobs can consume the computing resources of only worker nodes.
Task 5: Create volumes that can be shared only within a user group and create volumes that can be shared across all user groups.
Table 1. Resource allocation
User group | User | GPU | CPU | Memory | Shared volume |
dev1 | Bob | 1 | Unlimited | Unlimited | dev1-public and department1-public-dev1 |
dev2 | Tom | 2 | 8 | 60 GiB | dev2-public and department1-public-dev2 |
The department1-public-dev1 and department1-public-dev2 volumes are mounted to the same directory of the File Storage NAS (NAS) file system. Therefore, users in user groups dev1 and dev2 can share the data stored in the directory. The dev1-public and dev2-public volumes are mounted to different directories of the NAS file system. The data stored on dev1-public is accessible to only Bob in user group dev1, and the data stored on dev2-public is accessible to only Tom in user group dev2.
Step 1: Create and manage users and user groups for the ACK cluster
To ensure security, we recommend that you do not install Arena, run Arena, or manage the ACK cluster on a master node. You can create an ECS instance in the VPC in which the ACK cluster is deployed and install Arena on the ECS instance. In this example, the ECS instance serves as a client. You can create a kubeconfig file to enable the ECS instance to access the ACK cluster.
Create users and user groups on the client.
Use kubectl to connect to the ACK cluster.
Before you can use kubectl, you must install kubectl on the client and modify the kubeconfig file to allow administrators to manage the ACK cluster. For more information, see Obtain the kubeconfig file of a cluster and use kubectl to connect to the cluster.
NoteThe version of kubectl must be 1.10 or later.
Run the following commands to create user IDs (UIDs) and group IDs (GIDs) in Linux for the corresponding users and user groups on the client.
In this example, create UIDs and GIDs for Bob and Tom, and create user groups dev1 and dev2 on the client. Use the Linux account system to complete Task 2: Each user can log on to the client only with their own username and password, and run Arena only in their own environment.
# Create Linux groups: dev1 and dev2.
groupadd -g 10001 dev1
groupadd -g 10002 dev2

# Create Linux users: Bob and Tom.
adduser -u 20001 -s /bin/bash -G dev1 -m bob
adduser -u 20002 -s /bin/bash -G dev2 -m tom

# Set a password for Bob to log on to the client.
passwd bob
# Set a password for Tom to log on to the client.
passwd tom
Create service accounts and namespaces for the ACK cluster.
After you submit jobs, the jobs are running in the ACK cluster. Each user on the client corresponds to a service account in the ACK cluster and each user group corresponds to a namespace. Therefore, you must create service accounts and namespaces, and make sure that they are mapped to the corresponding users and user groups on the client. You must map namespaces to user groups, and map service accounts to users.
Log on to the client as the root user. Make sure that the root user has permissions to manage the ACK cluster. For more information, see the Use kubectl to connect to an ACK cluster section of this topic. Run the following commands:
# Create a namespace for user group dev1.
kubectl create namespace dev1

# Create a namespace for user group dev2.
kubectl create namespace dev2

# Create a service account for Bob.
kubectl create serviceaccount bob -n dev1

# Create a service account for Tom.
kubectl create serviceaccount tom -n dev2
Expected output:
$ kubectl create namespace dev1
namespace/dev1 created

$ kubectl create namespace dev2
namespace/dev2 created

$ kubectl create serviceaccount bob -n dev1
serviceaccount/bob created

$ kubectl create serviceaccount tom -n dev2
serviceaccount/tom created
Step 2: Configure Arena for the users
Install Arena.
Install Arena on the client. Log on to the client as the root user and download the latest installation package of Arena that is released in the community. Then, decompress the package and run the install.sh script. For more information, see Configure the Arena client.
NoteYou need to install Arena only once on each Linux client. To allow each user to use Arena in a separate environment, you must create a kubeconfig file for each user.
Create a kubeconfig file for each user.
To allow each user to use Arena in a separate environment, you must create a kubeconfig file for each user (service account). You can grant users different permissions on the ACK cluster. This ensures data security.
Log on to the client as the root user. Create a script named generate-kubeconfig.sh and paste the following content into the script:
#!/usr/bin/env bash

set -e

NAMESPACE=
SERVICE_ACCOUNT=
DURATION=
OUTPUT=

help() {
    echo "Usage: $0 -n <namespace> -s <service-account> -d <duration> -o <output-file>"
    echo ""
    echo "Options:"
    echo "-n, --namespace <namespace>      Namespace of the service account."
    echo "-s, --service-account <name>     Name of the service account."
    echo "-d, --duration <duration>        Duration of the token e.g. 30d."
    echo "-o, --output <file>              Output file name. If not set, a temporary file will be created."
}

parse() {
    while [ $# -gt 0 ]; do
        case $1 in
        -n | --namespace)
            NAMESPACE="$2"
            shift 2
            ;;
        -s | --service-account)
            SERVICE_ACCOUNT="$2"
            shift 2
            ;;
        -d | --duration)
            DURATION="$2"
            shift 2
            ;;
        -o | --output)
            OUTPUT="$2"
            shift 2
            ;;
        *)
            help
            exit 0
            ;;
        esac
    done

    if [ -z "${NAMESPACE}" ] || [ -z "${SERVICE_ACCOUNT}" ] || [ -z "${DURATION}" ]; then
        help
        exit 0
    fi

    if [ -z "${OUTPUT}" ]; then
        OUTPUT=$(mktemp -d)/config
    elif [ -f "${OUTPUT}" ]; then
        echo "Output file \"${OUTPUT}\" already exists."
        exit 1
    fi
}

# Generate kubeconfig
generate_kubeconfig() {
    CONTEXT=$(kubectl config current-context)
    CLUSTER=$(kubectl config view -o jsonpath="{.contexts[?(@.name==\"${CONTEXT}\")].context.cluster}")
    SERVER=$(kubectl config view -o jsonpath="{.clusters[?(@.name==\"${CLUSTER}\")].cluster.server}")
    TOKEN=$(kubectl create token "${SERVICE_ACCOUNT}" --namespace "${NAMESPACE}" --duration="${DURATION}")
    CERT=$(mktemp)

    mkdir -p "$(dirname "${OUTPUT}")"
    kubectl config view --raw=true -o jsonpath="{.clusters[?(@.name==\"${CLUSTER}\")].cluster.certificate-authority-data}" | base64 -d >"${CERT}"
    kubectl config set-cluster "${CLUSTER}" --kubeconfig="${OUTPUT}" --server="${SERVER}" --embed-certs=true --certificate-authority="${CERT}" >/dev/null
    kubectl config set-credentials "${SERVICE_ACCOUNT}" --kubeconfig="${OUTPUT}" --token="${TOKEN}" >/dev/null
    kubectl config set-context "${CLUSTER}-${NAMESPACE}-${SERVICE_ACCOUNT}-context" --kubeconfig="${OUTPUT}" --cluster="${CLUSTER}" --user="${SERVICE_ACCOUNT}" --namespace="${NAMESPACE}" >/dev/null
    kubectl config use-context "${CLUSTER}-${NAMESPACE}-${SERVICE_ACCOUNT}-context" --kubeconfig="${OUTPUT}" >/dev/null
    rm "${CERT}"
    echo "Saved kubeconfig to \"${OUTPUT}\"."
}

main() {
    parse "$@"
    generate_kubeconfig
}

main "$@"
Run the following command to create a file named KubeConfig and save it to your home directory. The command below sets the expiration time to 720 hours, but you can customize this expiration time as needed.
bash generate-kubeconfig.sh -n dev1 -s bob -d 720h  -o /home/bob/.kube/config
bash generate-kubeconfig.sh -n dev2 -s tom -d 720h  -o /home/tom/.kube/config
Expected output:
$ bash generate-kubeconfig.sh -n dev1 -s bob -d 720h  -o /home/bob/.kube/config
Saved kubeconfig to "/home/bob/.kube/config".

$ bash generate-kubeconfig.sh -n dev2 -s tom -d 720h  -o /home/tom/.kube/config
Saved kubeconfig to "/home/tom/.kube/config".
Step 3: Grant the users different permissions on Arena
Create required roles in the namespaces of the ACK cluster.
You can create roles that have different permissions in the namespaces of the ACK cluster. Each role in a namespace contains a set of permission rules. For more information about how to create a role, see Using RBAC Authorization.
Create role definition files.
Create roles in user groups dev1 and dev2, and assign the roles to Bob and Tom separately. In this example, grant Bob and Tom the minimum permissions. This allows them to view and manage only the jobs that they submit.
Use the following sample code to create a role definition file named dev1_roles.yaml for the user group dev1:
kind: ClusterRole
apiVersion: rbac.authorization.k8s.io/v1
metadata:
  name: arena-topnode
rules:
- apiGroups:
  - ""
  resources:
  - pods
  - services
  - deployments
  - nodes
  - nodes/*
  - services/proxy
  - persistentvolumes
  verbs:
  - get
  - list
---
apiVersion: rbac.authorization.k8s.io/v1
kind: Role
metadata:
  name: arena
  namespace: dev1
rules:
  - apiGroups:
      - ""
    resources:
      - configmaps
    verbs:
      - '*'
  - apiGroups:
      - ""
    resources:
      - services/proxy
      - persistentvolumeclaims
      - events
    verbs:
      - get
      - list
  - apiGroups:
      - ""
    resources:
      - pods
      - pods/log
      - services
    verbs:
      - '*'
  - apiGroups:
      - ""
      - apps
      - extensions
    resources:
      - deployments
      - replicasets
    verbs:
      - '*'
  - apiGroups:
      - kubeflow.org
    resources:
      - '*'
    verbs:
      - '*'
  - apiGroups:
      - batch
    resources:
      - jobs
    verbs:
      - '*'
Use the following sample code to create a role definition file named dev2_roles.yaml for the user group dev2:
kind: ClusterRole
apiVersion: rbac.authorization.k8s.io/v1
metadata:
  name: arena-topnode
rules:
- apiGroups:
  - ""
  resources:
  - pods
  - services
  - deployments
  - nodes
  - nodes/*
  - services/proxy
  - persistentvolumes
  verbs:
  - get
  - list
---
apiVersion: rbac.authorization.k8s.io/v1
kind: Role
metadata:
  name: arena
  namespace: dev2
rules:
- apiGroups:
  - ""
  resources:
  - configmaps
  verbs:
  - '*'
- apiGroups:
  - ""
  resources:
  - services/proxy
  - persistentvolumeclaims
  - events
  verbs:
  - get
  - list
- apiGroups:
  - ""
  resources:
  - pods
  - pods/log
  - services
  verbs:
  - '*'
- apiGroups:
  - ""
  - apps
  - extensions
  resources:
  - deployments
  - replicasets
  verbs:
  - '*'
- apiGroups:
  - kubeflow.org
  resources:
  - '*'
  verbs:
  - '*'
- apiGroups:
  - batch
  resources:
  - jobs
  verbs:
  - '*'
After you create dev1_roles.yaml and dev2_roles.yaml, run the following commands to deploy the files to the ACK cluster:
kubectl apply -f dev1_roles.yaml

kubectl apply -f dev2_roles.yaml
Expected output:
$ kubectl apply -f dev1_roles.yaml
clusterrole.rbac.authorization.k8s.io/arena-topnode created
role.rbac.authorization.k8s.io/arena created

$ kubectl apply -f dev2_roles.yaml
clusterrole.rbac.authorization.k8s.io/arena-topnode unchanged
role.rbac.authorization.k8s.io/arena created
Run the following commands to query roles in the namespaces:
kubectl get role -n dev1

kubectl get role -n dev2
Expected output:
$ kubectl get role -n dev1
NAME    CREATED AT
arena   2024-09-14T08:25:34Z

$ kubectl get role -n dev2
NAME    CREATED AT
arena   2024-09-14T08:25:39Z
Grant the users permissions on the ACK cluster.
After you create roles, you must assign the roles to the users to grant them permissions. To complete this task, bind the roles in the namespaces to the service accounts.
You can assign one or more roles in different namespaces to each user. This allows a user to access resources that belong to different namespaces. Role-based access control (RBAC) allows you to manage permissions that the users have on namespaces. You can create role bindings based on business requirements.
You can use two Kubernetes objects, RoleBinding and ClusterRoleBinding, to create role bindings that grant users permissions on namespaces or the ACK cluster. For more information about how to use RoleBinding and ClusterRoleBinding to describe role bindings, see Using RBAC Authorization.
To complete Task 3, assign the roles that are created in Step 3 to Bob and Tom. To grant permissions to users, perform the following operations:
Log on to the client as the root user, and use the following sample code to create a authorization file named bob_rolebindings.yaml for the user Bob:
kind: ClusterRoleBinding
apiVersion: rbac.authorization.k8s.io/v1
metadata:
  name: bob-arena-topnode
  namespace: dev1
roleRef:
  apiGroup: rbac.authorization.k8s.io
  kind: ClusterRole
  name: arena-topnode
subjects:
- kind: ServiceAccount
  name: bob
  namespace: dev1
---
kind: RoleBinding
apiVersion: rbac.authorization.k8s.io/v1
metadata:
  name: bob-arena
  namespace: dev1
roleRef:
  apiGroup: rbac.authorization.k8s.io
  kind: Role
  name: arena
subjects:
- kind: ServiceAccount
  name: bob
  namespace: dev1
Use the following sample code to create a authorization file named tom_rolebindings.yaml for the user Tom:
kind: ClusterRoleBinding
apiVersion: rbac.authorization.k8s.io/v1
metadata:
  name: tom-arena-topnode
  namespace: dev2
roleRef:
  apiGroup: rbac.authorization.k8s.io
  kind: ClusterRole
  name: arena-topnode
subjects:
- kind: ServiceAccount
  name: tom
  namespace: dev2
---
kind: RoleBinding
apiVersion: rbac.authorization.k8s.io/v1
metadata:
  name: tom-arena
  namespace: dev2
roleRef:
  apiGroup: rbac.authorization.k8s.io
  kind: Role
  name: arena
subjects:
- kind: ServiceAccount
  name: tom
  namespace: dev2
Run the following commands to assign the roles to Bob and Tom:
kubectl apply -f bob_rolebindings.yaml

kubectl apply -f tom_rolebindings.yaml
Expected output:
$ kubectl apply -f bob_rolebindings.yaml
clusterrolebinding.rbac.authorization.k8s.io/bob-arena-topnode created
rolebinding.rbac.authorization.k8s.io/bob-arena created

$ kubectl apply -f tom_rolebindings.yaml
clusterrolebinding.rbac.authorization.k8s.io/tom-arena-topnode created
rolebinding.rbac.authorization.k8s.io/tom-arena created
Run the following commands to query the role bindings in user groups dev1 and dev2:
kubectl get rolebinding -n dev1

kubectl get rolebinding -n dev2
Expected output:
$ kubectl get rolebinding -n dev1
NAME        ROLE         AGE
bob-arena   Role/arena   34s

$ kubectl get rolebinding -n dev2
NAME        ROLE         AGE
tom-arena   Role/arena   33s
After you complete the preceding operations, the first three tasks are complete.
Step 4: Configure resource quotas for the user groups
You can manage all resources of an ACK cluster in the ACK console. To ensure the security and efficiency of resource usage, you can set resource quotas for the user groups. You can submit jobs to a namespace on which you have permissions. When you submit a job, ACK automatically checks the available resources of the namespace. If the amount of resources requested by a job exceeds the quota, ACK rejects the job.
In Kubernetes, a ResourceQuota object describes constraints that limit aggregate resource consumption per namespace. Each namespace corresponds to a user group on the client on which Arena is installed. You can set quotas for various resources, such as CPU, memory, and extended resources. Extended resources include NVIDIA GPUs. A ResourceQuota object also limits the resource usage of containers and other Kubernetes objects in a namespace. For more information, see Resource Quotas.
To complete Task 4, set quotas of GPU, CPU, and memory resources for each user group. For more information, see the Resource allocation table in this topic. In this example, one GPU is allocated to user group dev1. The CPU and memory resources are unlimited. Bob in user group dev1 can use all CPU and memory resources of the cluster. Then, the following resources are allocated to dev2: 2 GPUs, 8 CPU cores, and 60 GiB of memory. To configure resource quotas for the user groups, perform the following operations:
Log on to the client as the root user, and use the following sample code to create a resource quota file named dev1_quota.yaml for the user group dev1:
apiVersion: v1
kind: ResourceQuota
metadata:
  name: dev1-compute-resources
  namespace: dev1
spec:
  hard:
    requests.cpu: "10"
    requests.memory: 10Gi
    limits.cpu: "15"
    limits.memory: 20Gi
    requests.nvidia.com/gpu: 2
Use the following sample code to create a resource quota file named dev2_quota.yaml for the user group dev2:
apiVersion: v1
kind: ResourceQuota
metadata:
  name: dev2-compute-resources
  namespace: dev2
spec:
  hard:
    requests.nvidia.com/gpu: 2
Run the following command to deploy the files in the ACK cluster:
kubectl apply -f dev1_quota.yaml

kubectl apply -f dev2_quota.yaml
After you set resource quotas, run the following commands to check whether the configurations take effect. You can also query the resource quotas and resource usage.
# Query the resource quota in user group dev1.
kubectl get resourcequotas -n dev1

# Query the resource quota in user group dev2.
kubectl get resourcequotas -n dev2

# Query the resource usage in user group dev1.
kubectl describe resourcequotas dev1-compute-resources -n dev1

# Query the resource usage in user group dev2.
kubectl describe resourcequotas dev2-compute-resources -n dev2
Expected output:
$ kubectl get resourcequotas -n dev1
NAME                     AGE   REQUEST                                                                     LIMIT
dev1-compute-resources   9s    requests.cpu: 0/10, requests.memory: 0/10Gi, requests.nvidia.com/gpu: 0/2   limits.cpu: 0/15, limits.memory: 0/20Gi

$ kubectl get resourcequotas -n dev2
NAME                     AGE   REQUEST                        LIMIT
dev2-compute-resources   10s   requests.nvidia.com/gpu: 0/2

$ kubectl describe resourcequotas dev1-compute-resources -n dev1
Name:                    dev1-compute-resources
Namespace:               dev1
Resource                 Used  Hard
--------                 ----  ----
limits.cpu               0     15
limits.memory            0     20Gi
requests.cpu             0     10
requests.memory          0     10Gi
requests.nvidia.com/gpu  0     2

$ kubectl describe resourcequotas dev2-compute-resources -n dev2
Name:                    dev2-compute-resources
Namespace:               dev2
Resource                 Used  Hard
--------                 ----  ----
requests.nvidia.com/gpu  0     2
After you complete the preceding operations, computing resources are allocated to the user groups, and Task 4 is complete.
Step 5: Create NAS volumes to enforce multi-level access control
To meet the requirements of multi-level access control, you must create volumes that are accessible to different users and user groups. This ensures the security of data sharing.
To complete Task 5, you must create two types of shared volumes. The first type of volume is used to store data that can be accessed by users in both user groups. The other type of volume is used to store data that can be accessed by only users in a specific user group. For more information about shared volumes, see the Resource allocation table in this topic. In this example, the following four volumes are created: dev1-public, dev2-public, department1-public-dev1, and department1-public-dev2. department1-public-dev1 and department1-public-dev2 are mounted to the same directory of the NAS file system. The volume data can be accessed by users in both user groups dev1 and dev2. dev1-public and dev2-public are mounted to different directories of the NAS file system. Data stored on dev1-public can be accessed by only Bob in user group dev1, and data stored on dev2-public can be accessed by only Tom in user group dev2. To create NAS volumes for data sharing, perform the following operations:
Create an NAS file system.
Log on to the NAS console, create a NAS file system, and add a mount target. For more information, see Configure a shared NAS volume.
Create persistent volumes (PVs) and persistent volume claims (PVCs) for the ACK cluster.
Create PVs.
Create four PVs. For more information about how to create a PV, see Mount a statically provisioned NAS volume. The department1-public-dev1 volume is used to share data of department1 with users in user group dev1, and the department1-public-dev2 volume is used to share data of department1 with users in user group dev2. The dev1-public volume is used to share data with only users in user group dev1, and the dev2-public volume is used to share data with only users in user group dev2. The following figure shows the configurations of the PVs.
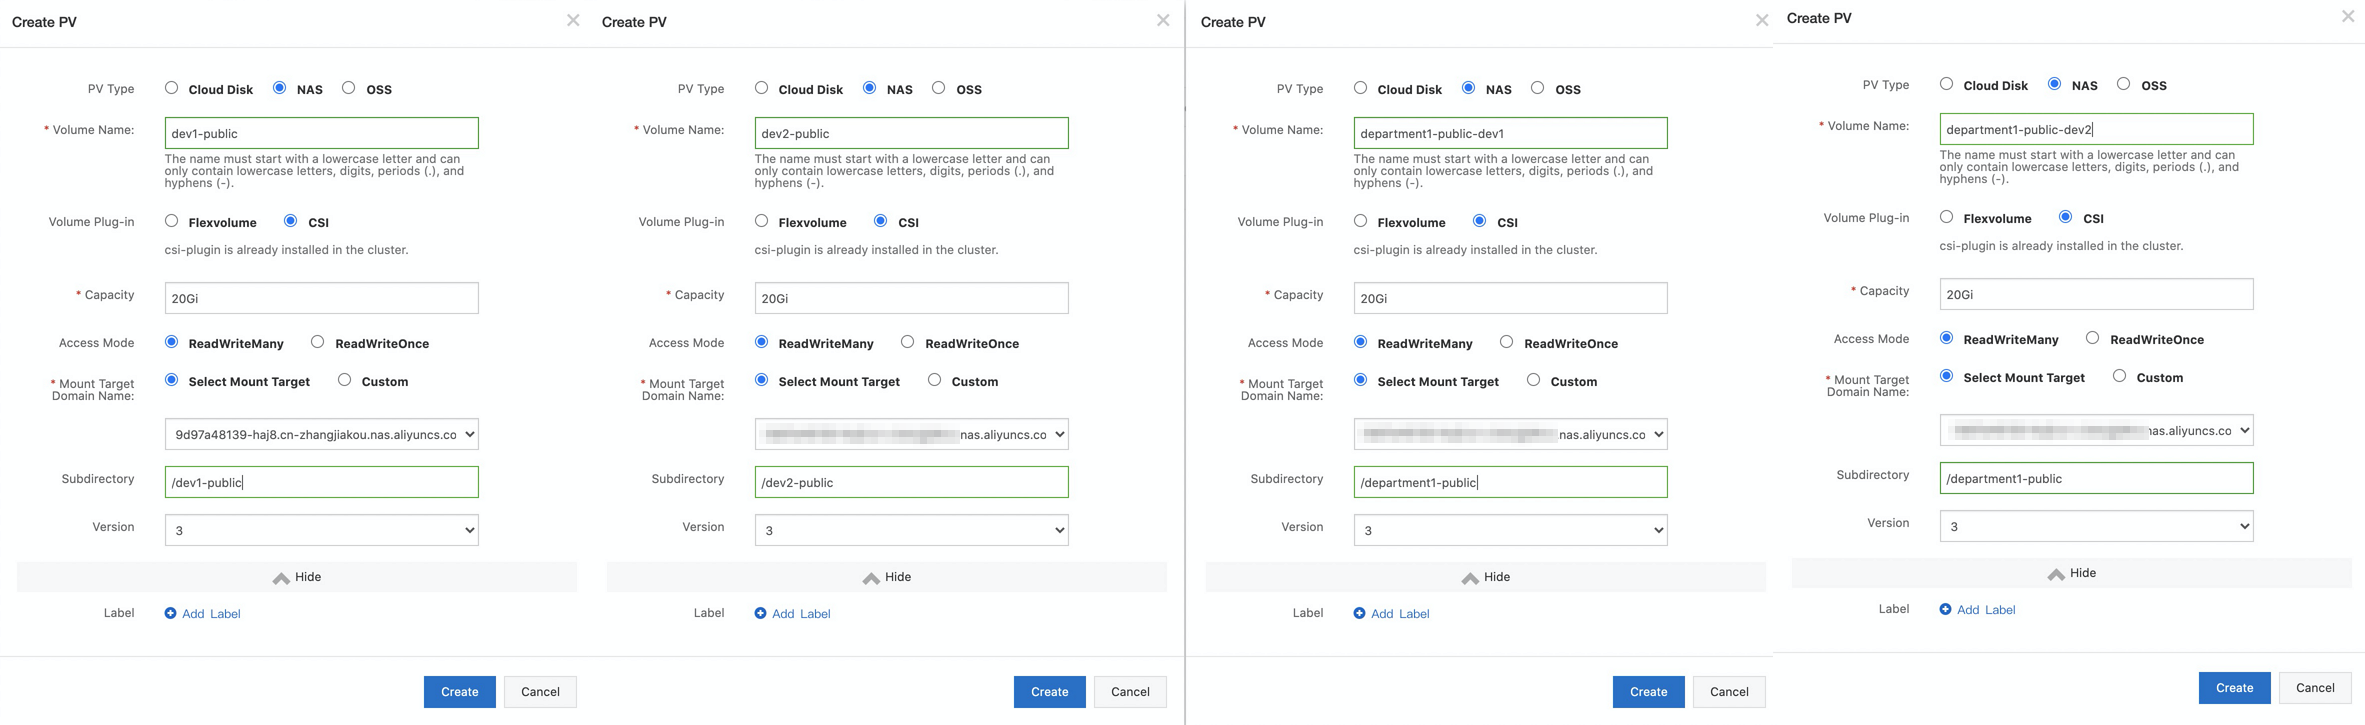 Note
NoteSelect the mount target that you added in the previous step.
Create PVCs.
Create a PVC for each newly created PV. For more information about how to create a PVC, see Mount a statically provisioned NAS volume.
After the PVCs are created, you can find that department1-public-dev1 and dev1-public exist in user group dev1, and department1-public-dev2 and dev2-public exist in user group dev2.
Verify the configurations of the volumes.
Log on to the client as the root user, and run the following commands to query the volumes that are used by user groups dev1 and dev2:
# Query the volumes that are used by user group dev1.
arena data list -n dev1

# Query the volumes that are used by user group dev2.
arena data list -n dev2
Expected output:
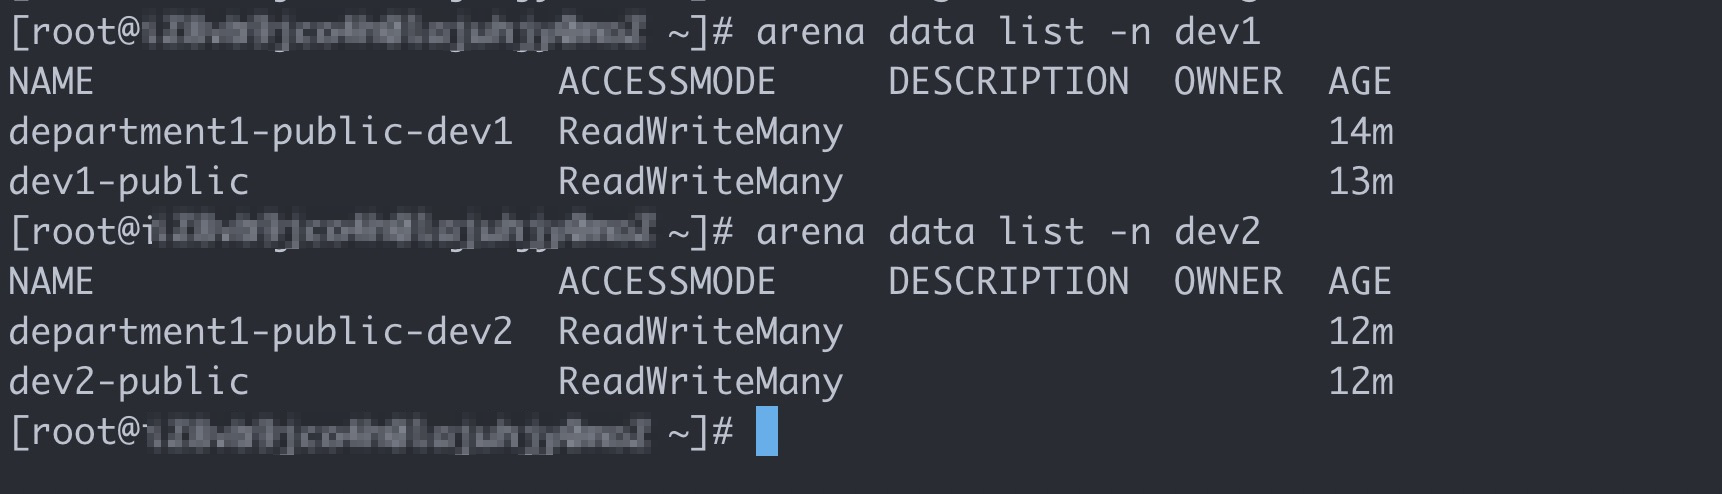
After you complete the preceding operations, all the five tasks are complete. The following example describes how to log on to the client on which Arena is installed with the accounts of Bob and Tom.
Step 6: Run Arena with different user accounts
Use the account of Bob
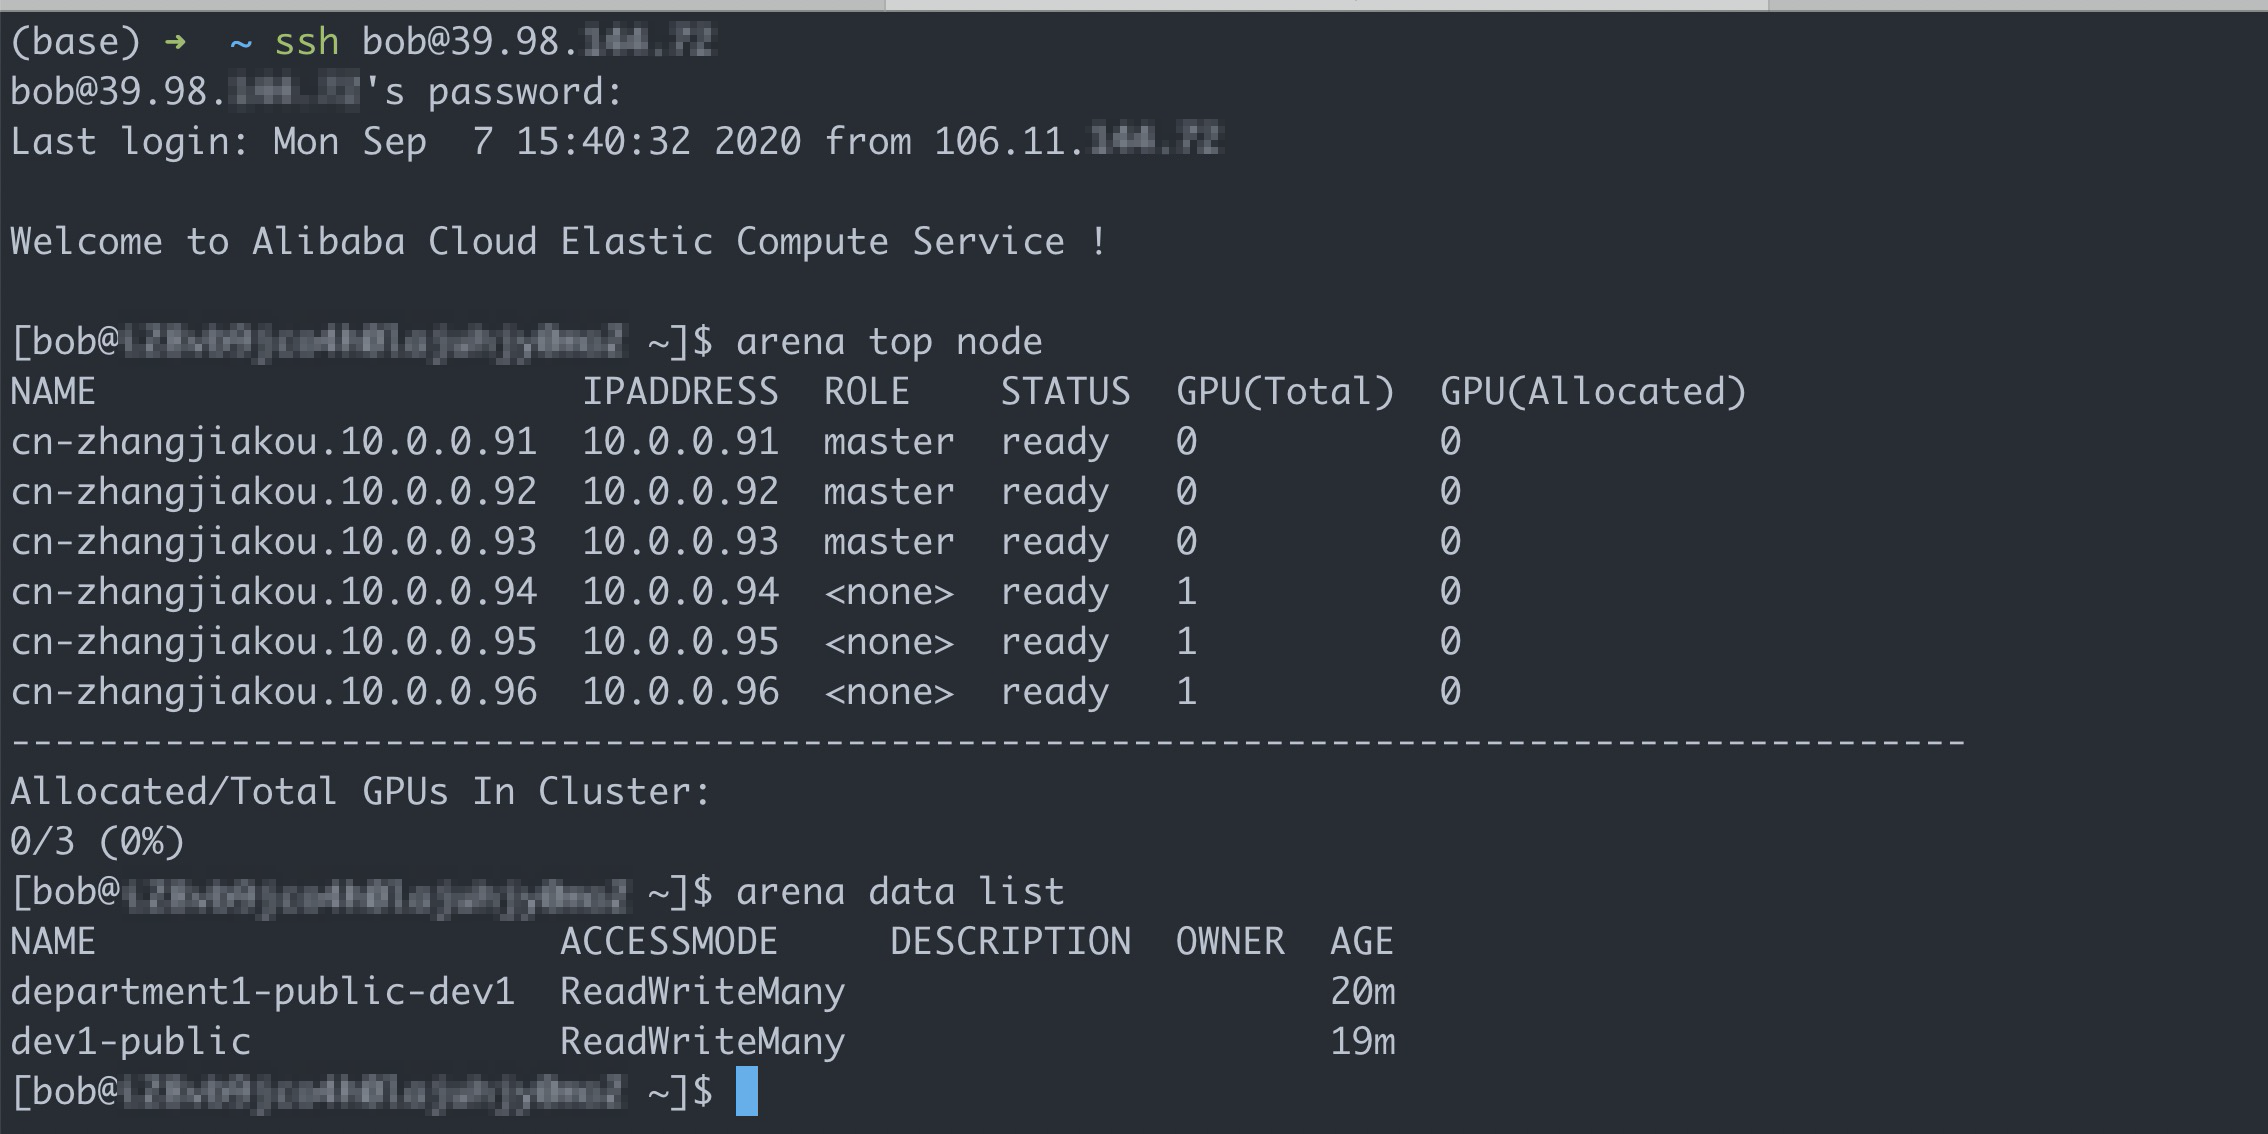
Run the following commands to log on to the client and query available shared volumes:
# Log on to the client with the account of Bob.
ssh bob@39.98.xxx.xx

# Run the arena data list command to query shared volumes that are available to Bob.
arena data list
Expected output:
Run the following command to submit a training job that requires one GPU:
arena submit tf \
        --name=tf-git-bob-01 \
        --gpus=1 \
        --image=tensorflow/tensorflow:1.5.0-devel-gpu \
        --sync-mode=git \
        --sync-source=https://code.aliyun.com/xiaozhou/tensorflow-sample-code.git \
        "python code/tensorflow-sample-code/tfjob/docker/mnist/main.py --max_steps 10000 --data_dir=code/tensorflow-sample-code/data"
Run the following command to list all the jobs that are submitted by Bob:
arena listExpected output:

Run the following command to submit another training job that requires one GPU:
arena submit tf \
        --name=tf-git-bob-02 \
        --gpus=1 \
        --image=tensorflow/tensorflow:1.5.0-devel-gpu \
        --sync-mode=git \
        --sync-source=https://code.aliyun.com/xiaozhou/tensorflow-sample-code.git \
        "python code/tensorflow-sample-code/tfjob/docker/mnist/main.py --max_steps 10000 --data_dir=code/tensorflow-sample-code/data"
In this example, only one GPU is allocated to user group dev1. Therefore, ACK is expected to reject the second job.
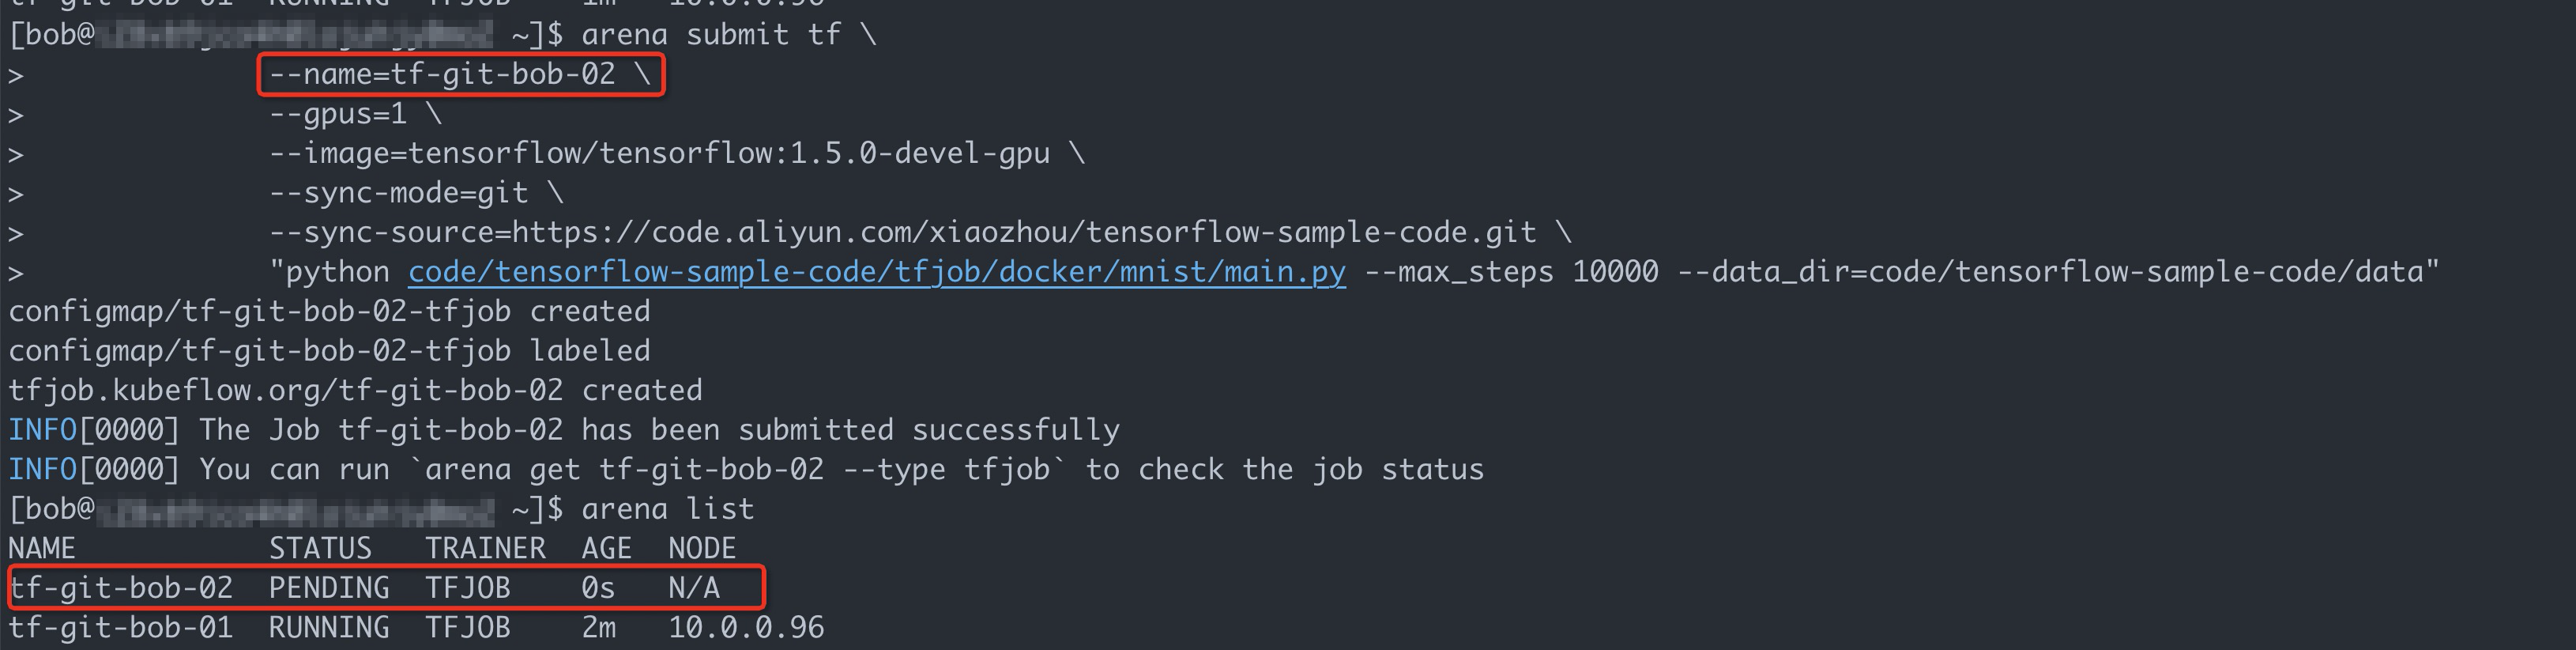
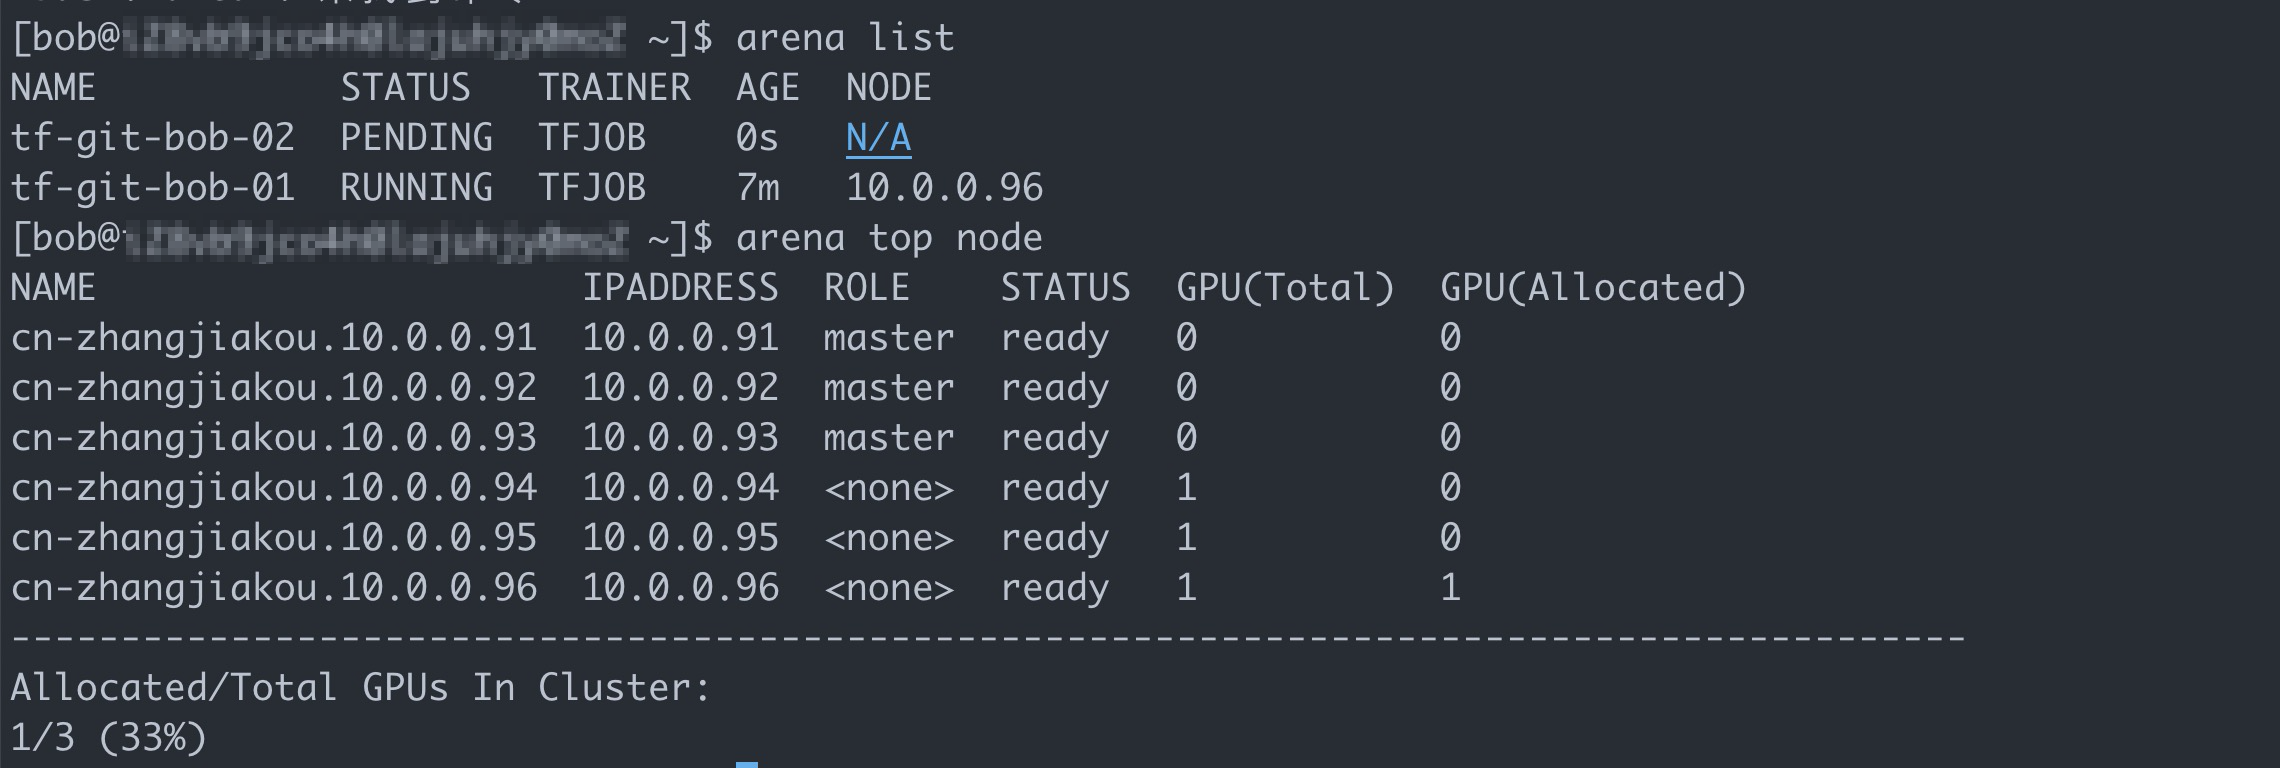
The preceding figure shows that the ACK cluster still has sufficient resources. However, the GPU allocated to the user group to which Bob belongs is already occupied by the first job. As a result, the second job is suspended.
Use the account of Tom
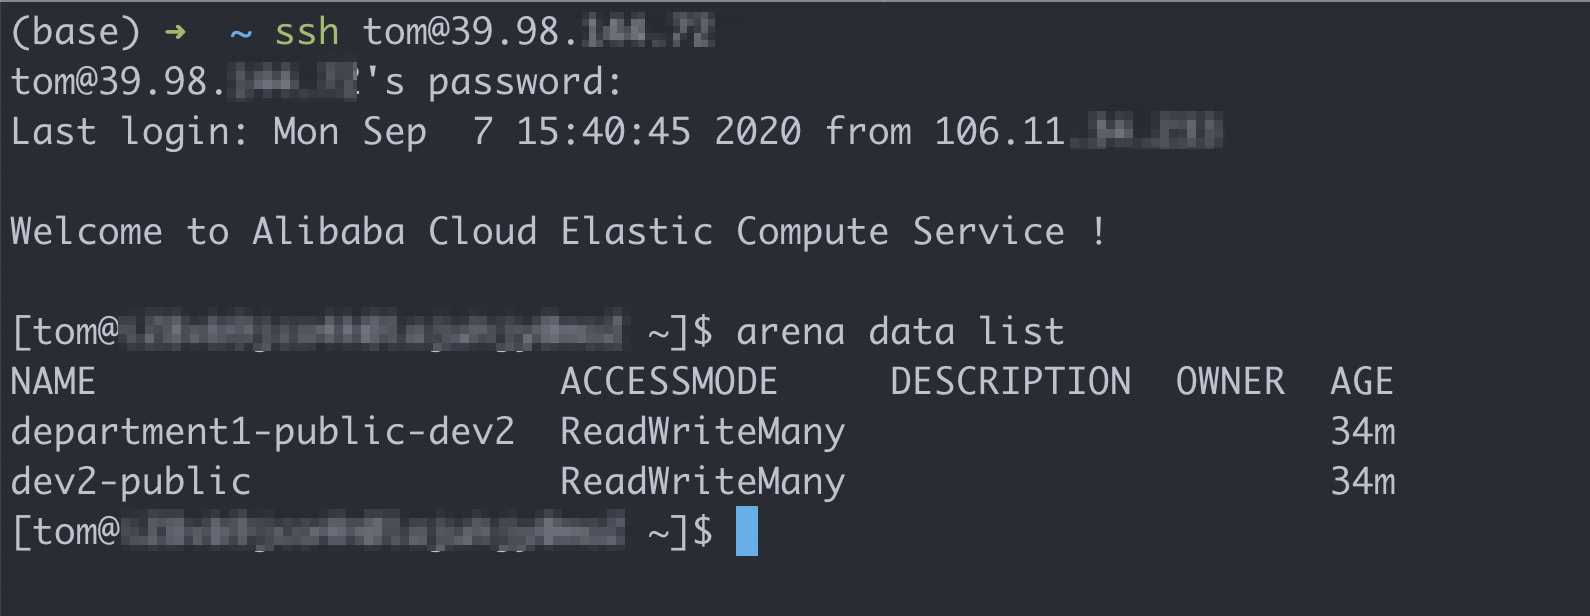
Run the following commands to log on to the client and query available shared volumes:
# Log on to the client with the account of Tom.
ssh tom@39.98.xx.xx

# Run the arena data list command to query shared volumes that are available to Tom.
arena data list
Expected output:
Run the following command to list all the jobs that are submitted by Tom:
arena listTom cannot view the jobs that are submitted by Bob.

Run the following command to submit a training job that requires one GPU:
arena submit tf \ --name=tf-git-tom-01 \ --gpus=1 \ --chief-cpu=2 \ --chief-memory=10Gi \ --image=tensorflow/tensorflow:1.5.0-devel-gpu \ --sync-mode=git \ --sync-source=https://code.aliyun.com/xiaozhou/tensorflow-sample-code.git \ "python code/tensorflow-sample-code/tfjob/docker/mnist/main.py --max_steps 10000 --data_dir=code/tensorflow-sample-code/data"NoteIn this example, GPU, CPU, and memory resources are allocated to user group dev2. Therefore, Tom must specify the resources requested by the job to be submitted.
Run the following command to submit another job that requires one GPU:
 arena submit tf \
         --name=tf-git-tom-02 \
         --gpus=1 \
         --chief-cpu=2 \
         --chief-memory=10Gi \
         --image=tensorflow/tensorflow:1.5.0-devel-gpu \
         --sync-mode=git \
         --sync-source=https://code.aliyun.com/xiaozhou/tensorflow-sample-code.git \
         "python code/tensorflow-sample-code/tfjob/docker/mnist/main.py --max_steps 10000 --data_dir=code/tensorflow-sample-code/data"
Run the following command to list all the jobs that are submitted by Tom:
arena listExpected output:
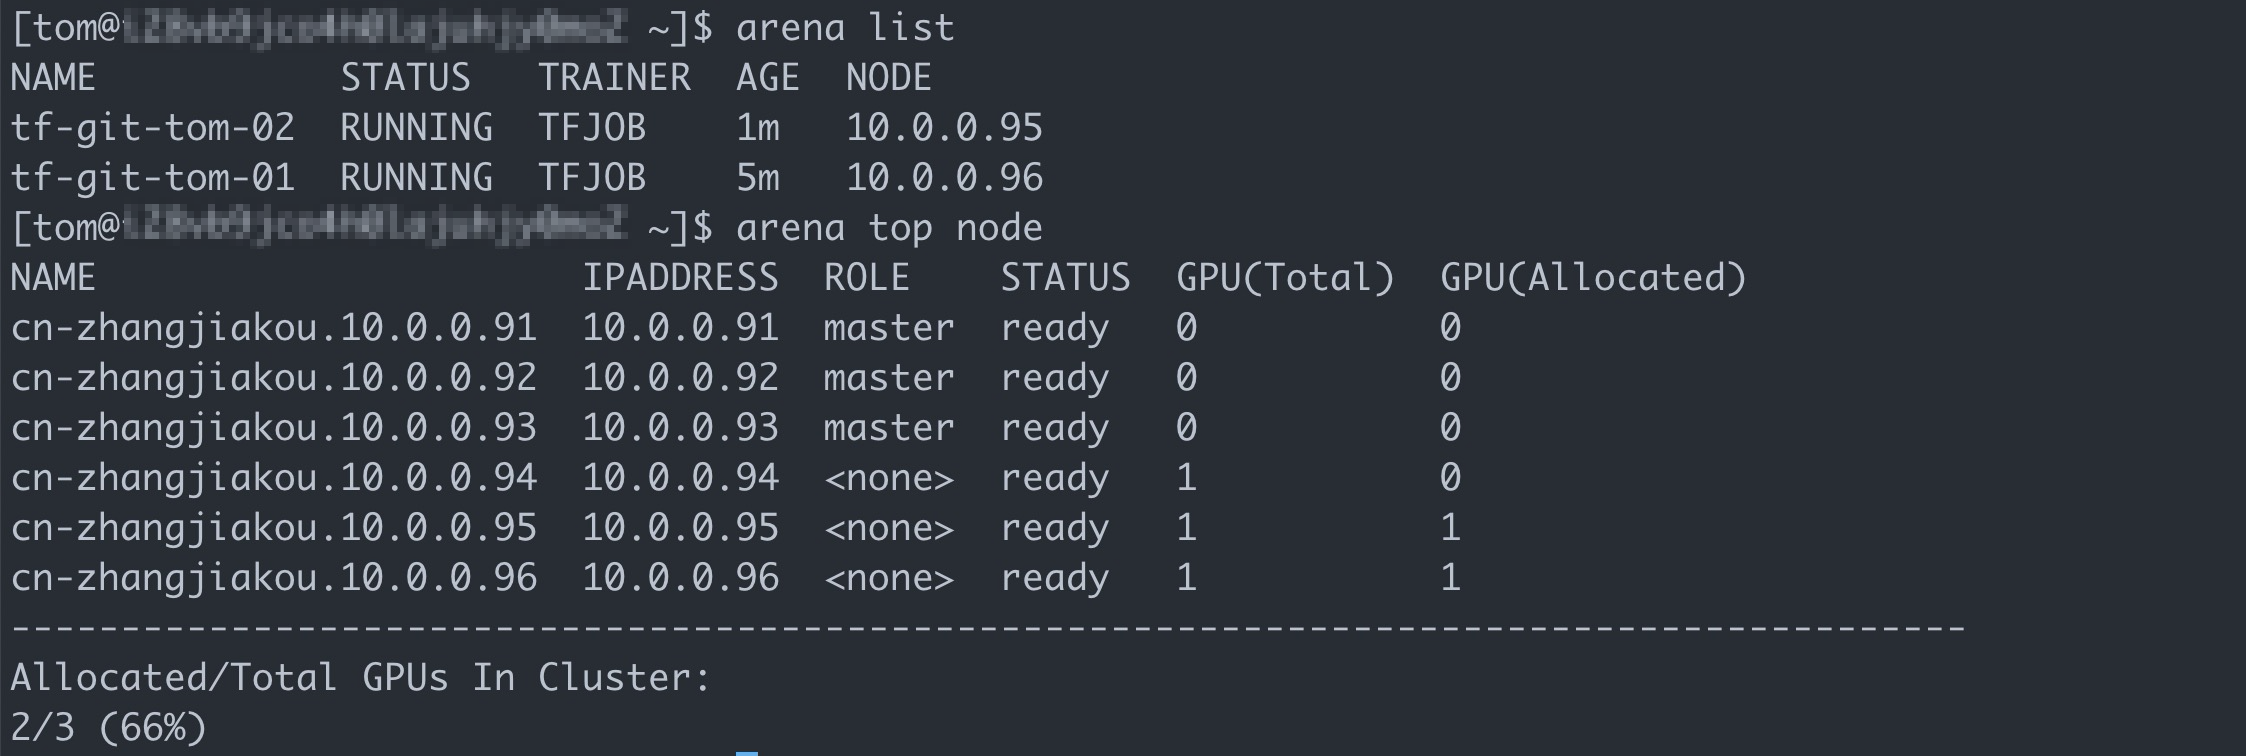
View the result
The preceding results indicate that you can log on to the client and run Arena in a separate environment with the accounts of Bob and Tom. You can also query and use computing and storage resources that are allocated to each user group, and manage jobs that are submitted by Bob and Tom.