ACK Network Policy provides policy-based network control. When you use the Terway container network, you can use network policies for specific applications in a cluster to control network traffic at the IP address or port level. This topic describes how to use network policies in an ACK cluster and common scenarios.
Prerequisites
You have an ACK managed cluster or an ACK dedicated cluster that uses Terway as the network plug-in. For more information, see Create an ACK managed cluster and Create an ACK dedicated cluster (discontinued).
Limitations
To use the network policy feature on the console, you must be a whitelisted user. Apply for access in the Quota Center console.
You do not need to be a whitelisted user if you manage network policies from the command line.
NetworkPolicy rules use label selectors to select namespaces or Pods. However, a large number of NetworkPolicies in a cluster can increase the time required for rules to take effect and may complicate cluster management and troubleshooting. We recommend a maximum of 100 NetworkPolicies per cluster.
This feature applies only to nodes that use the Terway CNI plug-in and are configured in shared ENI (Elastic Network Interface) mode. It is not supported on nodes in a node pool configured in exclusive ENI mode.
This document does not cover specific configurations and limitations for different computing scenarios. To use this feature in specific computing environments, such as a hybrid cloud or elastic instances, consult the documentation for the corresponding computing product.
ACK supports only standard Kubernetes network policies. It does not support custom network policies from third-party solutions such as Calico or Cilium.
Implementation details
When you create a Cluster, the NetworkPolicy implementation depends on the Cluster's initial Terway version.
1.9.0 and later
Component | NetworkPolicy implementation |
terway-eniip | eBPF |
If your rule needs to match Pods within the cluster, use
podSelectorornamespaceSelector.ipBlockcan only match addresses outside the cluster.If you create a Cluster with an initial Terway version earlier than 1.9.0, the NetworkPolicy implementation remains unchanged even after upgrading Terway to version 1.9.0 or later.
The eBPF-based NetworkPolicy implementation requires a Kernel Version of 4.19 or later. The feature does not work on Nodes with a Kernel Version earlier than 4.19.
These notes apply only to Regular ECS Nodes that run the Terway Component. To enable NetworkPolicy on Virtual Nodes, see Use a network policy.
Earlier than 1.9.0
Component | NetworkPolicy implementation |
terway-eniip with IPvlan or DataPath V2 disabled | iptables |
terway-eniip with IPvlan or DataPath V2 enabled | eBPF |
If your rule needs to match Pods within the cluster, use
podSelectorornamespaceSelector. In the eBPF implementation,ipBlockcan only match addresses outside the cluster.If you create a Cluster with an initial Terway version earlier than 1.9.0, the NetworkPolicy implementation remains unchanged even after upgrading Terway to version 1.9.0 or later.
The eBPF-based NetworkPolicy implementation requires a Kernel Version of 4.19 or later. On Nodes with a Kernel Version earlier than 4.19, the feature falls back to iptables Mode. This may cause NetworkPolicy rules to function incorrectly.
These notes apply only to Regular ECS Nodes that run the Terway Component. To enable NetworkPolicy on Virtual Nodes, see Use a network policy.
Enable network policy
You can enable the Network Policy feature for new or existing Clusters.
New clusters
When you create a Cluster, select the Support for NetworkPolicies option to enable the Network Policy feature. For more information, see Create an ACK Pro cluster.
Existing clusters
Log on to the ACK console. In the left navigation pane, click Clusters.
On the Clusters page, click the name of your cluster. In the left navigation pane, click Add-ons.
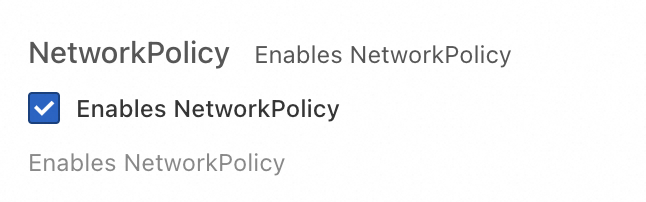
Click the Networking tab, locate the terway-eniip component, and click Configuration in the lower-right corner. Select the Enables NetworkPolicy checkbox, and then click OK.
 Important
For Clusters that do not have DataPath V2 enabled, the Network Policy feature does not take effect on existing Nodes until they are restarted.
Network policy examples
Prepare an example application
Follow these steps to create an Nginx test application that other Pods can access.
Console
Log on to the ACK console. In the left navigation pane, click Clusters.
On the Clusters page, click the name of the target cluster. In the left-side navigation pane, choose .
On the Deployments page, click Create from Image. In the Create wizard, create an application named nginx and expose it as a Service. After you configure the application, click Create.
For this example, configure only the following parameters for the Nginx application and use the default settings for all other parameters. For more information, see Configuration details.
Parameter
Description
Example
Basic Information
Name
The name of the application.
nginx
Replicas
The number of pods.
1
Container
Image Name
The image of the container.
nginx:latest
Advanced
Services
Next to Services, click Create to configure parameters for the Service.
Name: nginx
Type:
ClusterIP
LoadBalancer
NodePort
Port Mapping:
Name: nginx
Service Port: 80
Container Port: 80
Protocol: TCP
On the Deployments page, click Create from Image again. In the Create wizard, create a client application named busybox to test the network connectivity to the nginx Service.
For this example, configure only the following parameters for the busybox client application and use the default settings for all other parameters. For more information, see Configuration details.
Parameter
Description
Example
Basic Information
Name
The name of the application.
busybox
Replicas
The number of pods.
1
Container
Image Name
The image of the container.
busybox:latest
Start Command
Leave this parameter empty.
Select stdin and tty.
Verify that the busybox client application can access the nginx Service.
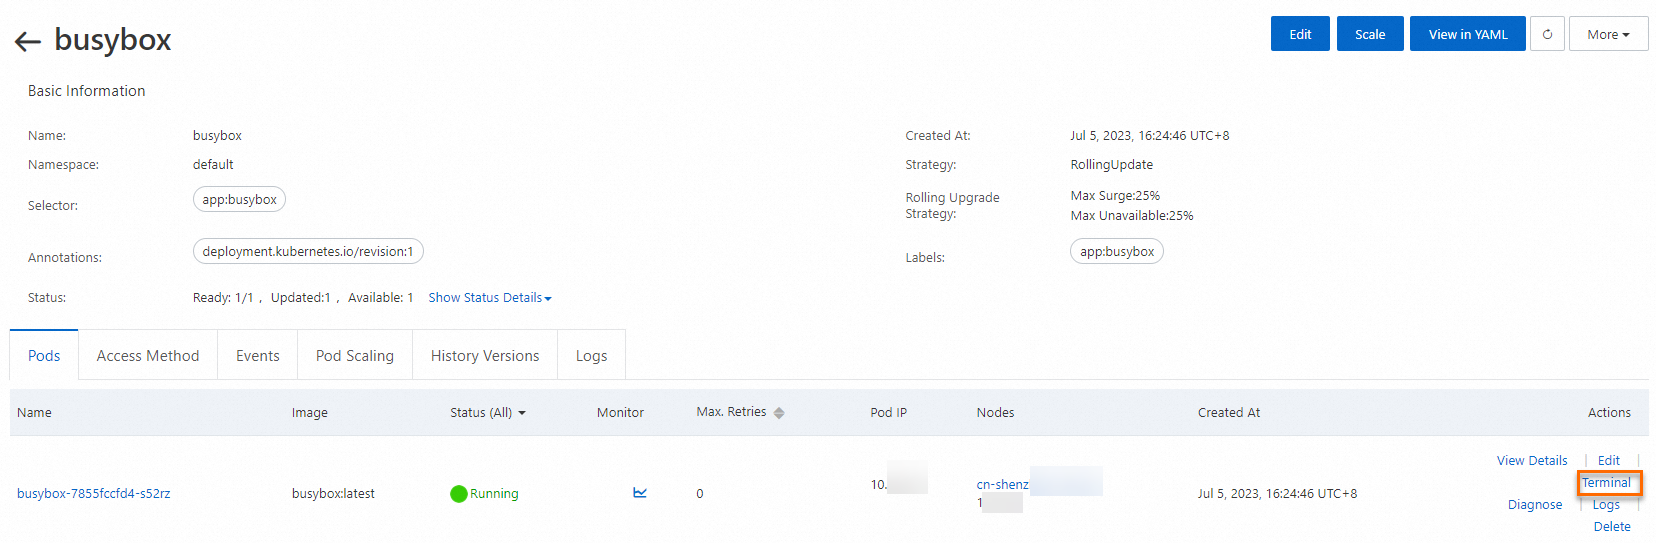
On the Deployments page, find the busybox application and click its name.
Click the Pods tab. Then, find the busybox-{hash} pod and click Terminal in the Actions column.
In the busybox terminal, run the
wget nginxcommand to test the network connectivity to Nginx.
The output shows that the busybox pod can access the nginx Service.
CLI
Run the following commands to create an Nginx application and expose the application by using a Service named nginx.
Create an Nginx application.
kubectl run nginx --image=nginxThe expected output:
pod/nginx createdCheck whether the pod is running.
kubectl get podThe expected output:
NAME                     READY   STATUS    RESTARTS   AGE
nginx                    1/1     Running   0          45s
Create a Service named nginx.
kubectl expose pod nginx --port=80The expected output:
service/nginx exposedView the Service.
kubectl get serviceThe expected output:
NAME         TYPE        CLUSTER-IP      EXTERNAL-IP   PORT(S)   AGE
kubernetes   ClusterIP   172.XX.XX.1     <none>        443/TCP   30m
nginx        ClusterIP   172.XX.XX.48    <none>        80/TCP    12s
Run the following command to create a pod named busybox and access the Service named nginx from the pod.
kubectl run busybox --rm -ti --image=busybox /bin/shThe expected output:
If you don't see a command prompt, try pressing enter.
/ #
/ #
After the prompt appears, run the following command to access nginx:
wget nginxThe expected output:
Connecting to nginx (172.XX.XX.48:80)
saving to 'index.html'
index.html           100% |****************************************************************************************************************************************************|   612  0:00:00 ETA
'index.html' saved
Scenario 1: Allow access by label
Console
To use network policies in the console, you must be added to the whitelist. To be added to the whitelist,
Log on to the ACK console. In the left navigation pane, click Clusters.
On the Clusters page, click the name of your cluster. In the left navigation pane, click .
On the Network Policy page, select a namespace at the top. For this example, select default. In the upper-right corner, click Create and configure the network policy in the Create panel.
Parameter
Description
Example
Name
The name of the network policy.
access-nginx
Pod Selector
Click + Add Label to Select Workload to specify the pods to which the network policy applies.
NoteIf you do not configure a pod selector, the network policy applies to all pods in the selected namespace.
In this example, the following settings are used:
Set Type to Deployment
Set Workload to nginx.
Set Label to app=nginx.
Ingress
Each network policy contains an allowlist of ingress rules. Each rule allows traffic that matches both the
fromandportssections.Rule:
podSelector: selects specific pods in the same namespace as the network policy and allows the pods as sources of inbound traffic.
namespaceSelector: selects specific namespaces and allows all pods in the namespaces as sources of inbound traffic.
ipBlock: selects specific IP address ranges in CIDR notation and allows the IP addresses as sources of inbound traffic.
Port: The TCP and UDP protocols are supported.
NoteIf you do not add rules, inbound traffic to the selected pods is denied.
If DataPath v2 or IPvlan is enabled for the cluster, you cannot use ipBlock to restrict traffic from pod CIDR blocks. You must use podSelector.
In this example, no ingress rules are added.
Egress
Each network policy contains an allowlist of egress rules. Each rule allows traffic that matches both the
toandportssections.Rule:
podSelector: selects specific pods in the same namespace as the network policy and allows the pods as destinations of outbound traffic.
namespaceSelector: selects specific namespaces and allows all pods in the namespaces as destinations of outbound traffic.
ipBlock: selects specific IP address ranges in CIDR notation and allows the IP addresses as destinations of outbound traffic.
Port: The TCP and UDP protocols are supported.
NoteIf DataPath v2 or IPvlan is enabled for the cluster, you cannot use ipBlock to restrict traffic from pod CIDR blocks. You must use podSelector.
In this example, no egress rules are added.
Click Next and then click OK.
In the busybox terminal, run the
wget nginxcommand to test the network connectivity to the nginx Service. For more information, see Step 5.The connection times out because the network policy does not allow access from the busybox pod.

Modify the network policy to allow access from the busybox application.
In the list of network policies, find the access-nginx network policy and click Edit in the Actions column.
Add an ingress rule.
On the right side of the Ingress section, click + Add and perform the following steps:
On the right side of Rule, click + Add. Then, add an access rule for the podSelector with the following settings:
Parameter
Example
Selector
podSelector
Type
Deployment
Workload
busybox
Label
app=busybox
On the right side of Port, click + Add and configure the following settings:
Parameter
Example
Protocol
TCP
Port
80
Click Next and then click OK.
Run the
wget -O /dev/null nginxcommand to test the network connectivity between busybox and nginx after you modify the network policy.After you add the rule for the busybox application to the network policy, the busybox pod can access the nginx pod.

CLI
Use the following YAML template and run the command
vim policy.yamlto create a file named policy.yaml.vim policy.yamlkind: NetworkPolicy apiVersion: networking.k8s.io/v1 metadata: name: access-nginx spec: podSelector: matchLabels: run: nginx ingress: - from: - podSelector: matchLabels: access: "true"Run the following command to deploy the network policy from the policy.yaml file.
kubectl apply -f policy.yamlThe expected output:
networkpolicy.networking.k8s.io/access-nginx createdRun the following command to test the network connectivity to the nginx Service. Because no access label is specified, the request times out.
kubectl run busybox --rm -ti --image=busybox /bin/shTest the network connectivity to the nginx Service:
wget nginxThe expected output:
Connecting to nginx (172.19.XX.XX:80)
wget: can't connect to remote host (172.19.XX.XX): Connection timed out
Run the following command to start a pod with the required access label.
kubectl run busybox --rm -ti --labels="access=true" --image=busybox /bin/shTest the network connectivity to the nginx Service:
wget nginxThe expected output:
Connecting to nginx (172.21.XX.XX:80)
saving to 'index.html'
index.html           100% |****************************************************************************************************************************************************|   612  0:00:00 ETA
'index.html' saved
The output shows that the request is successful and you can access the nginx Service.
Use case 2: Restrict access by source CIDR block
Console
Configure a Network Policy for the nginx Service. For configuration details, see Use case 1: Restrict Service access to applications with specific labels.
In the service list, find the public IP address of the nginx Service in the External Endpoint column (for example, 47.xxx.xx.x) and try to access the address in your browser.

Access fails because the Network Policy denies all ingress traffic by default.
Modify the Network Policy to allow access from specific client CIDR blocks.
Open myip.ipip.net in a browser to find the public IP address of your machine.
In the Network Policy list, find the access-nginx policy, click Edit in the Actions column, and then modify the rules in the Edit panel.
To the right of Source, click + Add and perform the following steps:
To the right of Rule, click + Add to add a rule that allows access from your machine's IP address:
Parameter
Example
Selector
ipBlock
cidr
<Your machine's IP address>/32
For example, 42.xx.xx.xx/32
To the right of Rule, click + Add to add another rule that allows access from the Alibaba Cloud SLB health check CIDR block:
Parameter
Example
Selector
ipBlock
cidr
100.0.0.0/8
To the right of Port, click + Add. Configure the port settings as follows:
Parameter
Example
Protocol
TCP
Port
80
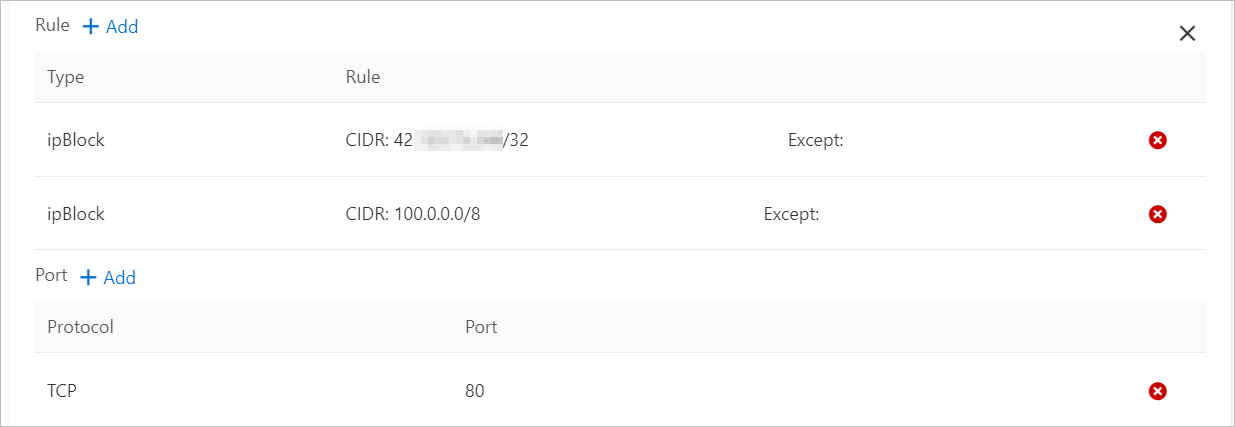
Click Next, and then click OK.
In the service list, click the IP address in the External Endpoint column (for example, 47.xxx.xx.x:80) to access the nginx Service.
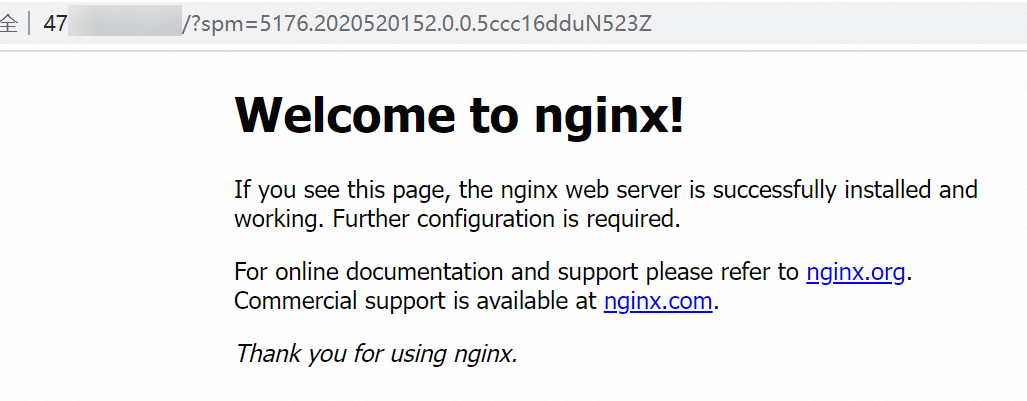
After the Network Policy is updated, you can access the nginx Service from your client through the Internet-facing SLB.
CLI
Run the following command to create an Alibaba Cloud Server Load Balancer (SLB) service for the nginx application, specifying
type=LoadBalancerto expose the nginx service to the internet.vim nginx-service.yamlThe following is the template for the nginx-service.yaml file.
# Paste the following YAML content into nginx-service.yaml.
apiVersion: v1
kind: Service
metadata:
  labels:
    run: nginx
  name: nginx-slb
spec:
  externalTrafficPolicy: Local
  ports:
  - port: 80
    protocol: TCP
    targetPort: 80
  selector:
    run: nginx
  type: LoadBalancer
Run the following command to create the Service from the nginx-service.yaml file.
kubectl apply -f nginx-service.yamlExpected output:
service/nginx-slb createdVerify that the Service is exposed to the internet:
kubectl get service nginx-slbExpected output:
NAME        TYPE           CLUSTER-IP      EXTERNAL-IP      PORT(S)        AGE
nginx-slb   LoadBalancer   172.19.xx.xxx   47.110.xxx.xxx   80:32240/TCP   8m
Run the following command to access the IP address of the SLB that you just created, 47.110.xxx.xxx. Access fails.
wget 47.110.xxx.xxxExpected output:
--2018-11-21 11:46:05-- http://47.110.xx.xxx/ Connecting to 47.110.XX.XX:80... failed: Connection refused.NoteAccess fails for the following reasons:
The configured nginx Service can only be accessed by applications with the specific label
access=true.Accessing the IP address of an SLB provides external access to Kubernetes, which is different from using a network policy to restrict service access to only applications with specific labels.
Solution: Modify the Network Policy to add allowed source CIDR blocks.
Run the following command to check your local public IP address.
curl myip.ipip.netExpected output:
Current IP: 10.0.x.x From: China Beijing Beijing # The output is for reference only. Use your actual IP address.Run the following command to modify the policy.yaml file.
vim policy.yamlUpdate the policy.yaml file with the following content:
# The following is the content of the YAML file.
kind: NetworkPolicy
apiVersion: networking.k8s.io/v1
metadata:
  name: access-nginx
spec:
  podSelector:
    matchLabels:
      run: nginx
  ingress:
  - from:
    - podSelector:
        matchLabels:
          access: "true"
    - ipBlock:
        cidr: 100.64.0.0/10
    - ipBlock:
        cidr: 10.0.0.0/24      # The address range of your local network. This is an example. Use your actual information.
Run the following command to apply the changes from the policy.yaml file.
kubectl apply -f policy.yamlExpected output:
networkpolicy.networking.k8s.io/access-nginx unchangedNoteUse a /24 address range.
The SLB health check address is in the
100.64.0.0/10address block. Therefore, you must configure100.64.0.0/10.
Start a client Pod and use it to access the nginx Service.
kubectl run busybox --rm -ti --labels="access=true" --image=busybox /bin/shAccess the nginx Service:
wget 47.110.XX.XXExpected output:
Connecting to 47.110.XX.XX (47.110.XX.XX:80)
index.html           100% |***********************************************************|   612  0:00:00 ETA
A 100% progress indicates a successful connection to the nginx Service.
Use case 3: Restrict pod egress to specific addresses
Console
This topic uses an example with the domains www.aliyun.com and registry.aliyuncs.com to demonstrate how to configure a network policy that allows a Pod to access only registry.aliyuncs.com.
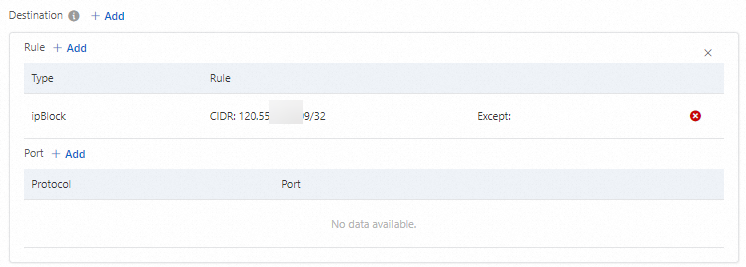
Use the ping command to query registry.aliyuncs.com for its bound IP address (120.55.XXX.XXX).
Create a rule in the network policy to restrict the busybox application's access to only registry.aliyuncs.com.
On the Network Policies page, click Create in the upper-right corner. In the Create panel, configure the Network Policy rules.
Set Type to Stateless.
Set Workloads to busybox.
Set Labels to app=busybox.
Selector: ipBlock
cidr: 120.55.XXX.XXX/32
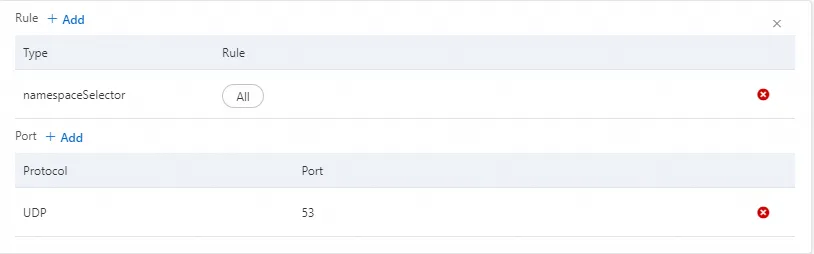
To the right of Rule, click + Add and add a rule that selects all Namespaces.
To the right of Port, click + Add and add a rule for UDP Port 53.
Rule:
Selector: namespaceSelector
Namespace: All
Port:
Protocol: UDP
Port: 53
Click Next, and then click OK.
In the BusyBox terminal, run the following command to access www.aliyun.com.
nc -vz -w 1 www.aliyun.com 443Expected output:
nc: www.aliyun.com (60.191.xx.xx:443): Connection timed outAccess registry.aliyuncs.com.
nc -vz -w 1 registry.aliyuncs.com 443Expected output:
registry.aliyuncs.com (120.55.xx.xx:443) open
For more information about the parameters, see Use case 1: Restrict Service access to applications with specific labels. The following table shows the example configuration.
Parameter
Description
Example
Name
A custom name for the Network Policy.
busybox-policy
Pod Selectors
Click + Specify workload type and labels to select the Pods to which the Network Policy applies.
NoteIf you do not specify a Pod Selector, the Network Policy applies to all Pods in the Namespace.
This example uses the following settings:
Egress
To the right of Egress, click + Add, and then to the right of Rule, click + Add.
Add a rule where the ipBlock is the IP address that you previously obtained for registry.aliyuncs.com in the /32 format, such as 120.55.XXX.XXX/32.
To the right of Egress, click + Add to add another rule. This rule allows egress traffic on UDP Port 53 to all Namespaces, which allows the application to perform DNS Resolution.
CLI
Run the following command to obtain the list of IP addresses that www.aliyun.com resolves to.
dig +short registry.aliyuncs.comExpected output:
120.55.XXX.XXXRun the following command to create the busybox-policy file.
vim busybox-policy.yamlThe busybox-policy file template is as follows:
# The following is the content of the YAML file. kind: NetworkPolicy apiVersion: networking.k8s.io/v1 metadata: name: busybox-policy spec: podSelector: matchLabels: run: busybox egress: - to: - ipBlock: cidr: 120.55.XXX.XXX/32 - to: - ipBlock: cidr: 0.0.0.0/0 - namespaceSelector: {} ports: - protocol: UDP port: 53NoteThe busybox-policy file contains an Egress Rule that restricts the application's outbound access. You must configure this rule to allow UDP requests. Otherwise, DNS resolution will fail.
Run the following command to create a network policy from the busybox-policy file.
kubectl apply -f busybox-policy.yamlExpected output:
networkpolicy.networking.k8s.io/busybox-policy createdRun the following command to start a busybox Pod and test network access.
kubectl run busybox --rm -ti --image=busybox /bin/shAccess websites other than www.aliyun.com, for example, www.taobao.com:
wget www.taobao.comExpected output:
Connecting to www.taobao.com (64.13.XX.XX:80)
wget: can't connect to remote host (64.13.XX.XX): Connection timed out
The can't connect to remote host error indicates that access to the service failed.
Run the following command to access www.aliyun.com.
wget registry.aliyuncs.comExpected output:
Connecting to registry.aliyuncs.com (120.55.XXX.XXX:80)
Connecting to registry.aliyuncs.com (120.55.XXX.XXX:443)
wget: note: TLS certificate validation not implemented
index.html           100% |***********************************************************|  462k  0:00:00 ETA
The 100% progress indicates a successful connection.
Use case 4: Control public network access for pods
This operation may affect services accessing the public network. We recommend performing these steps in an empty namespace.
Console
In the upper-right corner of the Network Policies page, click Create. In the Create panel, configure the Network Policy.
For parameter details and steps, see Restrict Service access to applications with specific labels using a Network Policy. The following table shows the example configuration.
Parameter
Value
Name
deny-public-net
Pod Selector
Set Type to All.
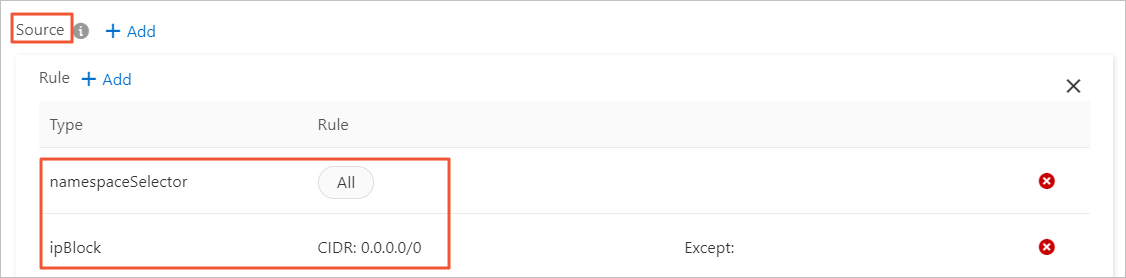
Ingress
Add the following two rules:
An allow-all rule for namespaceSelector.
An allow-all rule for ipBlock.
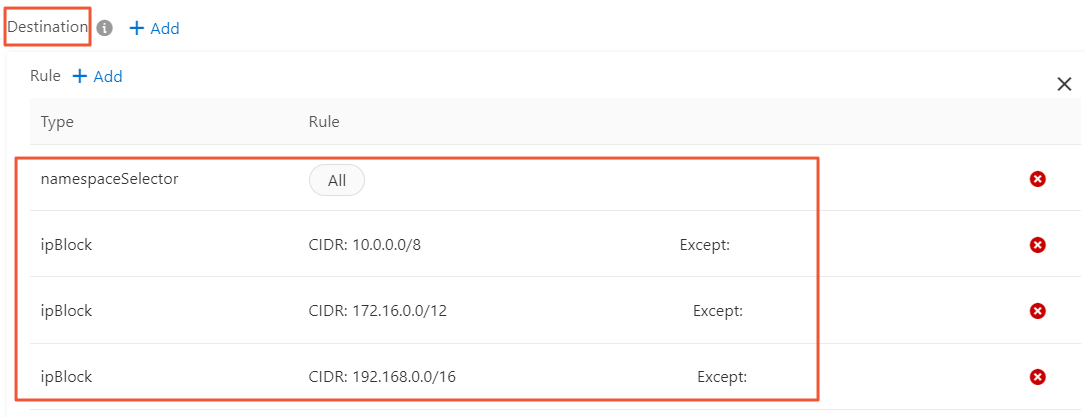
Egress
Add a rule that allows egress traffic only to private networks:
Set namespaceSelector to All to allow Pods to access all Pods in the internal network.
Create three rules for ipBlock to allow egress traffic to the following three private network CIDR blocks:
10.0.0.0/8
172.16.0.0/12
192.168.0.0/16
NoteYou cannot add multiple CIDR blocks in a single ipBlock rule.
Click Next, and then click OK.
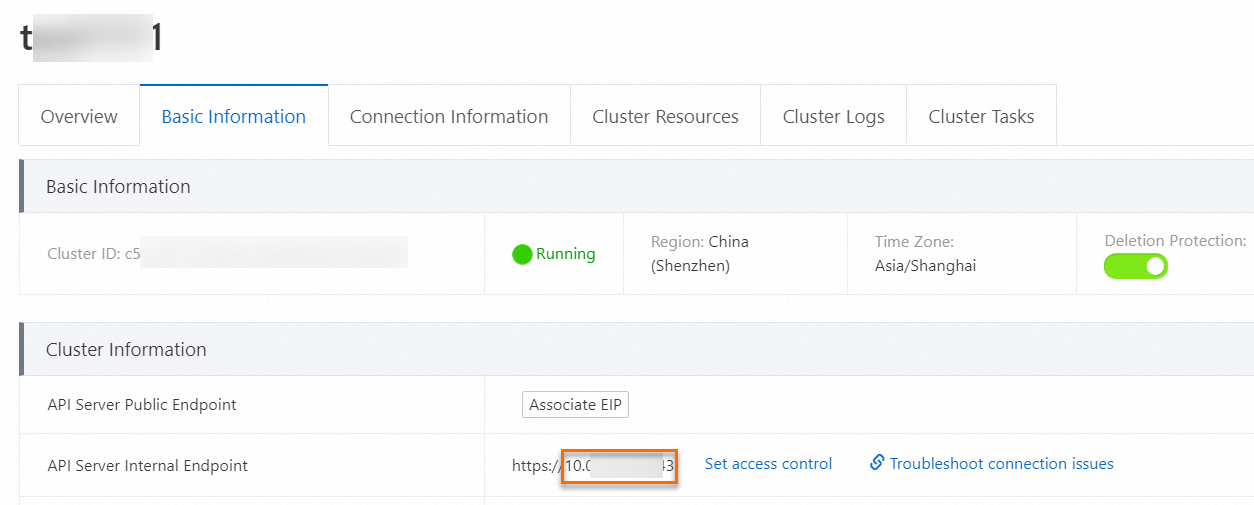
On the Basic Information tab of the cluster details page, obtain the internal IP address and port.
In the busybox terminal, run the following commands to test the Pod's public and private network access.
nc -vz -w 1 www.aliyun.com 443Expected Output: The Pod cannot access the public network, and the connection times out.
nc: www.aliyun.com (60.191.xx.xx:443): Connection timed outTest private network access.
nc -vz -w 1 10.134.xx.xx:<Port> # Replace with your private IP address.Expected Output: The Pod can access the private network address.
10.134.xx.xx:<Port> (10.134.xx.xx:<Port>) open
CLI
Run the following command to create a test namespace to verify the access restrictions.
Create a namespace named test-np.
kubectl create ns test-npExpected output:
namespace/test-np createdCreate a default Network Policy for this namespace that allows egress traffic only to private networks.
vim default-deny.yamlThe following is an example template for the default-deny.yaml file:
# The following is the content of the YAML file.
kind: NetworkPolicy
apiVersion: networking.k8s.io/v1
metadata:
  namespace: test-np
  name: deny-public-net
spec:
  podSelector: {}
  ingress:
  - from:
    - ipBlock:
        cidr: 0.0.0.0/0
  egress:
  - to:
    - ipBlock:
        cidr: 192.168.0.0/16
    - ipBlock:
        cidr: 172.16.0.0/12
    - ipBlock:
        cidr: 10.0.0.0/8
Run the
kubectl applycommand to create the Network Policy from thedefault-deny.yamlfile.kubectl apply -f default-deny.yamlExpected output:
networkpolicy.networking.k8s.io/deny-public-net createdView the Network Policy:
kubectl get networkpolicy -n test-npExpected output:
NAME                              POD-SELECTOR          AGE
deny-public-net                   <none>                1m
Create a Network Policy that allows Pods with a specific label to access the public network.
vim allow-specify-label.yamlThe example label is set to
public-network=true.# The following is the content of the YAML file. kind: NetworkPolicy apiVersion: networking.k8s.io/v1 metadata: name: allow-public-network-for-labels namespace: test-np spec: podSelector: matchLabels: public-network: "true" ingress: - from: - ipBlock: cidr: 0.0.0.0/0 egress: - to: - ipBlock: cidr: 0.0.0.0/0 - namespaceSelector: matchLabels: ns: kube-system # Allows Pods to access key services in kube-system, such as CoreDNS. This is an example. Configure as needed.Run the following command to create the Network Policy:
kubectl apply -f allow-specify-label.yamlExpected output:
networkpolicy.networking.k8s.io/allow-public-network-for-labels createdView the Network Policy:
kubectl get networkpolicy -n test-npExpected output:
NAME                              POD-SELECTOR          AGE
allow-public-network-for-labels   public-network=true    1m
deny-public-net                   <none>                 3m
Run the following commands to verify that a Pod without the special label cannot access the public network.
kubectl run -it --namespace test-np --rm --image registry-cn-hangzhou.ack.aliyuncs.com/ack-demo/busybox:1.28 busybox-intranetping aliyun.comExpected output:
PING aliyun.com (106.11.2xx.xxx): 56 data bytes
^C
--- aliyun.com ping statistics ---
9 packets transmitted, 0 packets received, 100% packet loss
If 0 packets received is displayed, the access failed.
NoteThe access failure is caused by the deny-public-net network policy rule. This rule denies default public network access for Pods in the test-np namespace. As a result, Pods that have default labels and are launched in this namespace cannot access the public network.
Run the following command to verify that a Pod with public-network=true can access the Service.
kubectl run -it --namespace test-np --labels public-network=true --rm --image registry-cn-hangzhou.ack.aliyuncs.com/ack-demo/busybox:1.28 busybox-internetping aliyun.comExpected output:
PING aliyun.com (106.11.1xx.xx): 56 data bytes
64 bytes from 106.11.1xx.xx: seq=0 ttl=47 time=4.235 ms
64 bytes from 106.11.1xx.xx: seq=1 ttl=47 time=4.200 ms
64 bytes from 106.11.1xx.xx: seq=2 ttl=47 time=4.182 ms
^C
--- aliyun.com ping statistics ---
3 packets transmitted, 3 packets received, 0% packet loss
round-trip min/avg/max = 4.182/4.205/4.235 ms
When 0% packet loss is displayed, you have successfully accessed the service.
NoteThe busybox-internet Pod can access the public network because the allow-public-network-for-labels network policy contains a rule that allows public network access for Pods with the public-network=true label.