The ack-ram-authenticator add-on enables ACK managed clusters to use Alibaba Cloud Resource Access Management (RAM) and a Webhook mechanism to securely authenticate API Server requests. For SSO role integrations, it also improves the security of API Server access audits by identifying the specific user who assumed a role. This topic describes how Webhook Authentication works with the ack-ram-authenticator add-on and how to use it.
Prerequisites
You have an ACK managed cluster running version 1.24.6-aliyun.1 or later. For more information, see Create an ACK managed cluster.
Notices
Installing or uninstalling the
ack-ram-authenticatoradd-on restarts the cluster's control plane API Server, disconnecting any long-standing connections. Perform these operations during off-peak hours.Enabling Webhook Authentication does not affect normal access to the cluster API Server using a kubeconfig file from the
DescribeClusterUserKubeconfigAPI operation.ACK Serverlessclusters are also supported.
Authentication method overview
The ack-ram-authenticator add-on is an authentication plugin for ACK managed clusters. It authenticates requests to the cluster API Server through RAM, using the native Kubernetes Webhook Token Authentication method. The add-on also provides a Custom Resource Definition (CRD) to map RAM identities to RBAC permissions, giving you more flexibility in configuring RBAC authorization.
For scenarios where an ACK managed cluster is integrated with Alibaba Cloud SSO roles, the ack-ram-authenticator add-on helps include the requester's session name in API Server requests. This enables more detailed auditing of actions by different users who assume the same role.
After you install the ack-ram-authenticator add-on, the Webhook Authentication process works as follows:
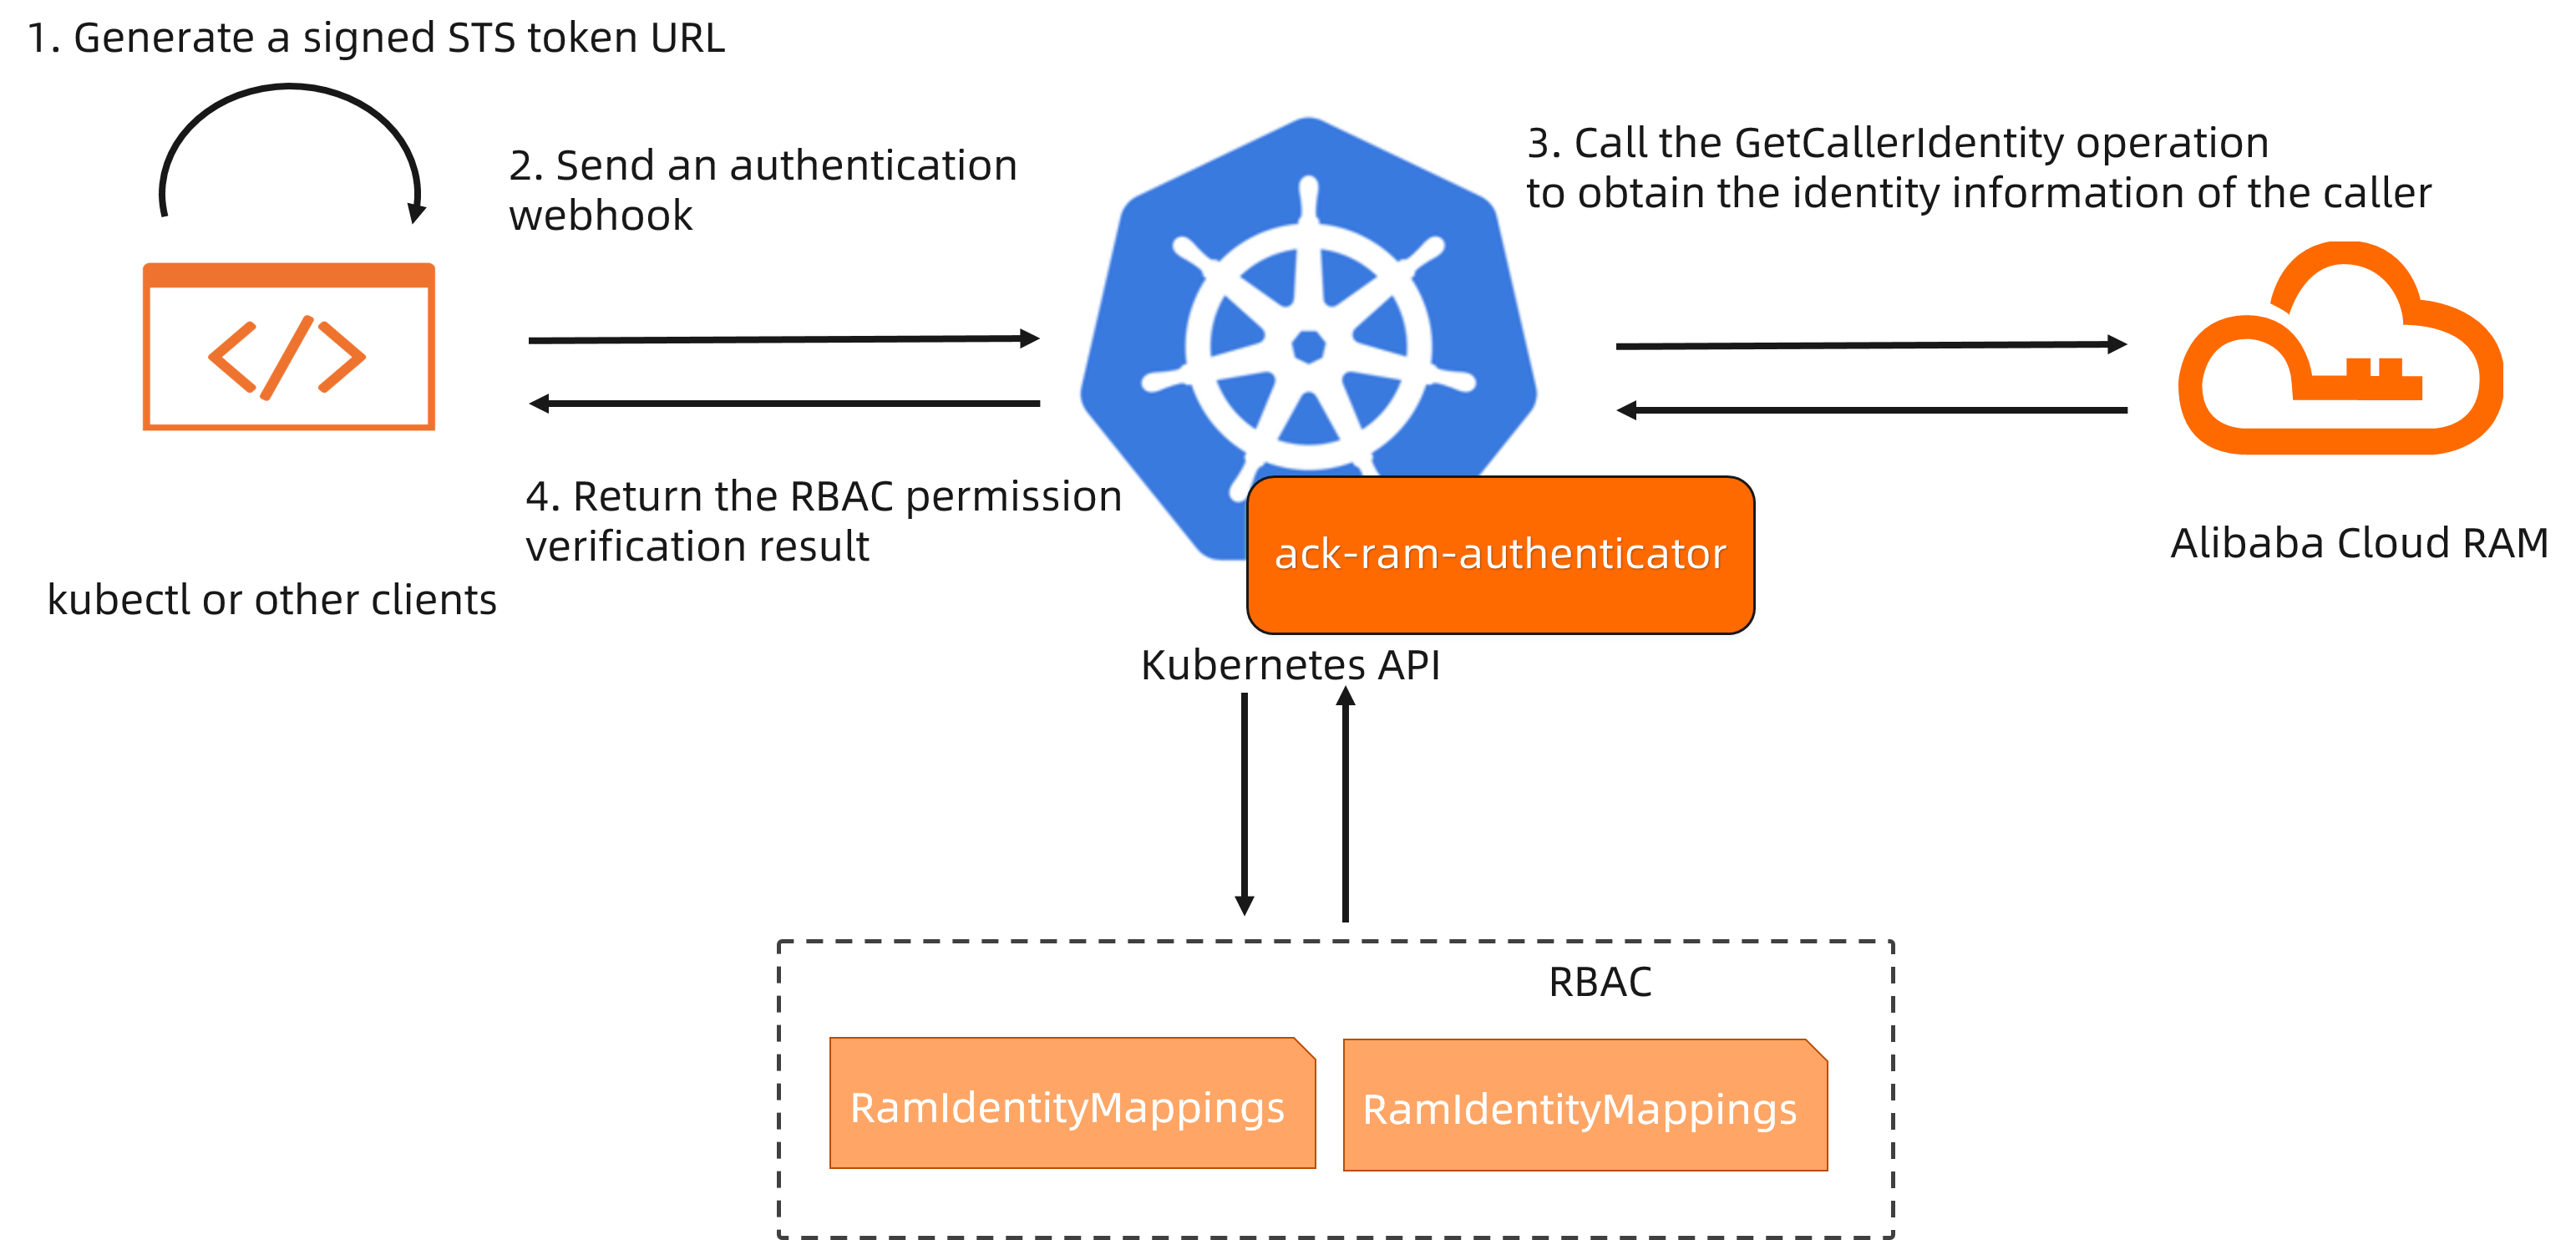
When you use a tool like kubectl to send an authentication request to the API Server, the
execcommand plugin in the kubeconfig file runs theack-ram-toolclient to generate a signed Security Token Service (STS) request URL.The API Server receives the Webhook Authentication request and routes it to the
ack-ram-authenticatoradd-on based on the Webhook Authentication configuration.The add-on uses the token URL to call the
GetCallerIdentityoperation of Alibaba Cloud RAM for authentication. If the authentication is successful,ack-ram-authenticatorsearches theRAMIdentityMappingCR for a mapping that matches the RAM identity returned by the API call.The API Server performs native RBAC authorization on the mapped user and group identities and returns the authorization result.
Advantages of the authentication method
Compared to ACK's default X.509 certificate authentication, this Webhook method offers the following advantages:
Adapts to enterprise CloudSSO scenarios and provides flexible, controlled data plane RBAC authorization.
In SSO role integration scenarios, API Server audit logs include identity information from the enterprise identity provider (IdP). This enables effective auditing of actions performed by different IdP users who assume the same role.
When an employee leaves and their RAM user or role is deleted, their cluster RBAC permissions are automatically revoked.
Step 1: Install the ack-ram-authenticator add-on
To enable RAM Webhook Authentication, you must install the ack-ram-authenticator server-side authentication plugin, which interacts with the cluster API Server for authentication. Install the ack-ram-authenticator add-on as follows:
Log on to the Container Service Management Console . In the navigation pane on the left, click Clusters.
On the Clusters page, click the name of your cluster. In the navigation pane on the left, click Add-ons.
On the Add-ons page, click the Security tab, find the ack-ram-authenticator add-on, and click Install. In the Parameter Settings dialog box that appears, select
EnableNonBootstrapMapping, and then click OK.
Step 2: Install the ack-ram-tool client
The ack-ram-tool client simplifies generating a local kubeconfig access credential for a specific cluster.
Download the ack-ram-tool client for your environment's architecture.
Run the following command to make the client executable:
chmod +x ./ack-ram-toolRun the following command to copy the
ack-ram-toolfile to a directory in your system's PATH:mkdir -p $HOME/bin && cp ./ack-ram-tool $HOME/bin/ack-ram-tool && export PATH=$HOME/bin:$PATH(Optional) Run the following command to make the PATH configuration for
$HOME/binpersistent:echo 'export PATH=$HOME/bin:$PATH' >> ~/.bash_profileRun the following command to verify the installation. The command should return the client's version:
ack-ram-tool version
Step 3: Configure Alibaba Cloud credentials
RAM users and SSO users can configure access credentials for cloud resources as described below.
If environment variables related to access credentials exist, ack-ram-tool uses them by default. You can ignore these variables by adding the --ignore-env-credentials parameter when you run an ack-ram-tool command. For more information about the credential-related environment variables supported by ack-ram-tool, see Credentials.
RAM user
The ack-ram-tool client uses locally configured Alibaba Cloud credentials to authenticate with RAM.
For more information about how to configure access credentials, see Alibaba Cloud CLI.
SSO user
If you are a CloudSSO user, you can use the acs-sso CLI tool provided by the CloudSSO service to log in and obtain access credentials. For more information about acs-sso, see Use the CLI to log on to CloudSSO and access Alibaba Cloud resources.
Alibaba Cloud CLI supports an external mode that dynamically obtains credentials by running an external command-line tool. Run the following command to complete the CloudSSO login and automate credential configuration on your local machine.
aliyun configure --mode External --profile sso

Configuring profile 'sso' in 'External' authenticate mode...
Process Command [acs-sso login --profile sso]:
Default Region Id [cn-shanghai]:
Default Output Format [json]: json (Only support json)
Default Language [zh|en] en:
Saving profile[sso] ...Done.


Configure Done!!!
..............888888888888888888888 ........=8888888888888888888D=..............
...........88888888888888888888888 ..........D8888888888888888888888I...........
.........,8888888888888ZI: ...........................=Z88D8888888888D..........
.........+88888888 ..........................................88888888D..........
.........+88888888 .......Welcome to use Alibaba Cloud.......O8888888D..........
.........+88888888 ............. ************* ..............O8888888D..........
.........+88888888 .... Command Line Interface(Reloaded) ....O8888888D..........
.........+88888888...........................................88888888D..........
..........D888888888888DO+. ..........................?ND888888888888D..........
...........O8888888888888888888888...........D8888888888888888888888=...........
............ .:D8888888888888888888.........78888888888888888888O ..............
Step 4: Generate a kubeconfig file
Run the following command to generate a kubeconfig file. For more information about the command, see get-kubeconfig.
ack-ram-tool credential-plugin get-kubeconfig --cluster-id $cluster_id --mode ram-authenticator-tokenConfigure the kubeconfig file returned by the command in your local or specified environment. For more information, see the official Kubernetes documentation.
Step 5: Map RAM identities to RBAC permissions
Ensure you selected the EnableNonBootstrapMapping option when you install the add-on. Otherwise, the configured mappings will not take effect.
Installing the ack-ram-authenticator add-on creates a Custom Resource Definition (CRD) named RAMIdentityMapping in the cluster by default. This CRD maps RAM identities to Kubernetes user models. A cluster administrator with the required permissions can use the following method to map a specified RAM user or RAM role to a user identity bound with Kubernetes RBAC permissions.
Use the following YAML content to create a configuration template file named
auth.yaml.cat >auth.yaml <<EOF --- apiVersion: ramauthenticator.k8s.alibabacloud/v1alpha1 kind: RAMIdentityMapping metadata: name: tester spec: arn: '<ARN>' username: tester groups: - system:users EOFThe
specfield in aRAMIdentityMappinginstance supports mapping only one RAM ARN to ausernameandgroups. To map different RAM identities, create multipleRAMIdentityMappinginstances.Replace
<ARN>with the ARN of the target RAM user or role. The ARN format for different account types is as follows.Account type
ARN format
Example
Alibaba Cloud account
acs:ram::<root_uid>:rootIn this format,
<root_uid>is the ID of the Alibaba Cloud account.acs:ram::123456789012****:rootRAM user
acs:ram::<root_uid>:user/<user_name>In this format,
<root_uid>is the ID of the Alibaba Cloud account and<user_name>is the username of the RAM user.acs:ram::123456789012****:user/testuserRAM role
acs:ram::<root_uid>:role/<role_name>In this format,
<root_uid>is the ID of the Alibaba Cloud account and<role_name>is the name of the RAM role. For information about how to view the ARN of a RAM role, see View a RAM role.acs:ram::123456789012****:role/testrole
Run the following command to create the
RAMIdentityMappinginstance:kubectl apply -f auth.yamlConfigure RBAC permissions for the target cluster by creating custom RBAC roles and bindings as needed.
The following is an example of how to create an RBAC binding.
cat >binding.yaml <<EOF
---
apiVersion: rbac.authorization.k8s.io/v1
kind: ClusterRoleBinding
metadata:
  name: tester-clusterrolebinding
roleRef:
  apiGroup: rbac.authorization.k8s.io
  kind: ClusterRole
  name: cs:ops
subjects:
- apiGroup: rbac.authorization.k8s.io
  kind: User
  name: tester
EOF

kubectl apply -f binding.yaml
Step 6: Make requests by using the kubeconfig file
Use the kubeconfig file generated in Step 4: Generate a kubeconfig file to send a request to the API Server. This verifies that your access is successful and correctly scoped by your permissions.
kubectl get nsExpected output:
NAME              STATUS   AGE
arms-prom         Active   4h48m
default           Active   4h50m
kube-node-lease   Active   4h50m
kube-public       Active   4h50m
kube-system       Active   4h50m