Hot migration moves an ACK dedicated cluster to an ACK managed Pro cluster without interrupting running services. The control plane switches from self-managed master nodes to a managed control plane while your workloads continue running.
This migration is one-way. After migration completes, you cannot roll back to the ACK dedicated cluster.
Container Service for Kubernetes stopped creating new ACK dedicated clusters on August 21, 2024. ACK managed Pro clusters provide higher reliability, security, and scheduling efficiency through a managed control plane with built-in high availability.
How it works
Migration runs through three sequential stages:
-
The control plane enters sleep mode.
-
etcd data is backed up.
-
The managed control plane components start.
The entire process takes 10–15 minutes. The API server is unavailable for 5–10 minutes during this window. Running workloads are not affected.
Prerequisites
Before you begin, ensure that you have:
-
An ACK dedicated cluster running Kubernetes 1.18 or later. To upgrade, see Manually upgrade ACK clusters.
-
The cluster's time zone configured on the Basic Information page. This ensures the managed control plane inherits the correct time zone, preventing CronJob execution time shifts after migration.
-
An Object Storage Service (OSS) bucket in the same region as the cluster, with hotlink protection disabled. Hotlink protection causes migration failures. See Create buckets and Hotlink protection.
The cluster's Kubernetes version stays unchanged after migration. If you need to upgrade, migrate first, then upgrade the cluster.
Before you start
Review the following considerations before starting the migration.
Billing
After migration, you are no longer charged for the removed master nodes. Instead, you are charged cluster management fees. All other cloud resource billing remains unchanged.
OSS bucket creation is free. You are charged only for object storage and access traffic. See Billing overview.
Internet access
-
If the cluster exposes the API server through elastic IP addresses (EIPs), the access address does not change after migration.
-
If the cluster uses an Internet-facing Server Load Balancer (SLB) instance for API server access, you must manually switch to EIP mode by binding an EIP to the internal-facing Classic Load Balancer (CLB) instance of the API server. See Control public access to the API server of a cluster.
Custom pod configurations
If the ACK dedicated cluster has custom pod configurations enabled, you cannot migrate the cluster until you stop terway-controlplane. Stop terway-controlplane before migration and re-enable it after migration completes. See Stop terway-controlplane before cluster migration and Configure a static IP address, a separate vSwitch, and a separate security group for each pod.
Master nodes
Cloud Assistant Agent is not installed on some older master nodes. Install it manually before migration. See Install the Cloud Assistant Agent.
After migration completes, master nodes show a status of Not Ready (disconnected from the cluster).
ECS instance release
When you remove master nodes, ACK automatically releases all pay-as-you-go ECS instances and their data disks. Release subscription ECS instances manually. See Release or unsubscribe from an ApsaraDB RDS for MySQL instance.
Step 1: Run the hot migration
-
Log on to the ACK console. In the left-side navigation pane, click Clusters.
-
On the Clusters page, find the cluster to migrate and choose More > Migrate to Pro in the Actions column.
-
In the Migrate to Pro dialog box, complete the precheck, complete Resource Access Management (RAM) authorization, select the OSS bucket, and then click OK. Complete the precheck Click precheck to open the Container Intelligence Service console. On the Migration Check page, click Start. Review the check items in the panel, select I know and agree, and click Start. If the cluster fails the precheck, follow the on-page instructions to fix the issues before continuing. Complete the RAM authorization
-
Click RAM console to open the RAM console and complete the authorization. Note the OSS bucket name shown in the dialog — you need it in the next step.
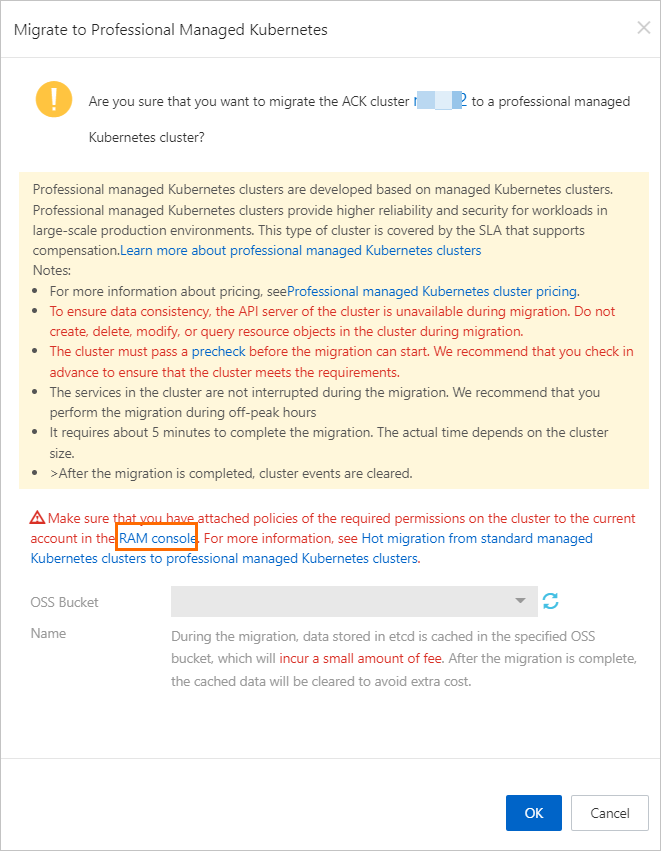
-
Click the policy whose name starts with k8sMasterRolePolicy. On the Policy Document tab, click Modify Policy Document. In the JSON editor, add the following content to the Statement field and click OK. Replace
<YOUR_BUCKET_NAME>with the OSS bucket name from the Migrate to Pro dialog box. Remove the angle brackets (<>)., { "Action": [ "oss:PutObject", "oss:GetObject" ], "Effect": "Allow", "Resource": [ "acs:oss:*:*:<YOUR_BUCKET_NAME>/*" ] }

-
Verify the migration
After migration completes, the Migrate to Pro dialog box shows a confirmation message. Confirm the outcome:
-
Cluster type: On the Clusters page, the Type column changes from ACK Dedicated Cluster to ACK Managed, and the Cluster Specification column shows Professional.
-
Master node status: On the Clusters page, click Details in the Actions column. In the left-side navigation pane, choose Nodes > Nodes. Master nodes showing Unknown in the Role/Status column are disconnected from the cluster and ready to be removed in Step 2.
Step 2: Remove master nodes
After hot migration completes, remove the master nodes from the cluster using the console or kubectl.
Use the ACK console
-
Log on to the ACK console. In the left-side navigation pane, click Clusters.
-
On the Clusters page, click the cluster name. In the left-side navigation pane, choose Nodes > Nodes.
-
On the Nodes page, remove master nodes using one of the following methods: In the dialog box that appears, configure the parameters and click OK.
-
To remove a single node: choose More > Remove in the Actions column.
-
To remove multiple nodes at once: select the nodes and click Batch Remove at the bottom of the page.
-
Use kubectl
Before running these commands, connect to the cluster using kubectl. See Obtain the kubeconfig file of a cluster and use kubectl to connect to the cluster.
-
Get the names of the master nodes.
kubectl get node | grep control-plane -
Remove a master node. Replace
<MASTER_NAME>with the node name.kubectl delete node <MASTER_NAME>To remove multiple master nodes at once, list all names in a single command:
kubectl delete node cn-hangzhou.192.xx.xx.65 cn-hangzhou.192.xx.xx.66
(Optional) Step 3: Handle components
Check whether the ALB Ingress controller or ACK Virtual Node is installed in the cluster. If either is present, reinstall or migrate the component after migration.
On the Clusters page, click the cluster name. In the left-side navigation pane, choose Operations > Add-ons. On the Add-ons page, check the installed components.
Reinstall the ALB Ingress controller
If the ALB Ingress controller is installed, reinstall it after migration. See Manage components for installation steps.
After reinstalling, delete the original deployment:
kubectl delete deployment alb-ingress-controller -n kube-systemReinstall ACK Virtual Node
If the ACK Virtual Node component is installed, manually reinstall it in the ACK managed Pro cluster to maintain continuity.
-
Log on to the ACK console. In the left-side navigation pane, click Clusters.
-
On the Clusters page, click the cluster name. In the left-side navigation pane, choose Operations > Add-ons.
-
On the Add-ons page, find and install the ACK Virtual Node component.
-
After installation completes, delete the original components and configurations in sequence:
# Delete the original vk-webhook Service, ack-virtual-node-controller Deployment, # ClusterRoleBindings, and ServiceAccounts for virtual nodes kubectl -n kube-system delete service vk-webhook kubectl -n kube-system delete deployment ack-virtual-node-controller kubectl -n kube-system delete clusterrolebinding virtual-kubelet kubectl -n kube-system delete serviceaccount virtual-kubelet -
Create test pods to verify the cluster is running normally.
What to do next
-
Limit worker node RAM role permissions: Limit the permissions of the worker RAM role to improve node security. See Manually limit the permissions of the worker RAM role of an ACK managed cluster.
-
Upgrade cGPU: If the cluster had cGPU Basic Edition installed, upgrade it to cGPU Professional Edition. See Upgrade cGPU Basic Edition to cGPU Professional Edition in an ACK Pro cluster.
FAQ
Are running services affected during the migration?
No. The control plane components enter sleep mode during migration, but running services continue uninterrupted.
How long does the migration take?
The migration takes 10–15 minutes in total. The API server is unavailable for 5–10 minutes during this window.
Does the cluster access address change after migration?
No. The IP address of the SLB instance for the API server stays the same. The kubeconfig file you use to access the cluster remains valid.
How do I fix ACK Virtual Node environment variable failures in the precheck?
If the ACK Virtual Node component is installed, configure an internal endpoint for kube-apiserver before starting the migration:
-
On the Cluster Information page, get the internal endpoint of kube-apiserver.
-
On the Deployments page, select the kube-system namespace and find the Deployment named
ack-virtual-node-controller. Add the following environment variables tospec.template.spec.containers[0].env:-
KUBERNETES_APISERVER_HOST: the private IP address of kube-apiserver -
KUBERNETES_APISERVER_PORT: the private port of kube-apiserver (usually6443)
-