Sign container images and OCI artifacts hosted in Container Registry using keys managed by Key Management Service (KMS), then enforce signature verification in your ACK cluster with Ratify. Any workload that uses an unsigned or tampered image is automatically blocked before deployment.
In this article, you'll learn how to:
-
Get or import an asymmetric key in KMS
-
Install the notation-alibabacloud-secret-manager plug-in
-
Build an image and sign it with a KMS key
-
Deploy Ratify and Gatekeeper in your cluster
-
Verify that unsigned images are rejected
Key concepts
notation-alibabacloud-secret-manager — A Notation plug-in developed in compliance with the open source Notation project specification. It retrieves keys and certificates from Key Management Service (KMS) to sign OCI artifacts hosted in Container Registry.
Ratify — A verification engine that runs inside a Kubernetes cluster. It validates OCI artifact signatures and software bill of materials (SBOM) metadata to ensure only artifacts that meet your security policies are deployed.
How it works
The signing and verification pipeline works as follows:
-
You use the Notation CLI with the notation-alibabacloud-secret-manager plug-in to sign an image. The plug-in retrieves the private key from KMS and generates an X.509 certificate attached to the image as an OCI artifact in Container Registry.
-
When a workload deployment request arrives, Gatekeeper intercepts it and asks Ratify to verify the image signature.
-
Ratify fetches the signature from Container Registry and validates it against the trusted certificates configured in its KeyManagementProvider (KMP).
-
Gatekeeper allows or blocks the deployment based on Ratify's verdict.
Prerequisites
Before you begin, ensure that you have:
-
An ACK managed cluster, ACK dedicated cluster, or ACK Serverless cluster running Kubernetes 1.20 or later. See Create an ACK managed cluster, Create an ACK dedicated cluster (discontinued), or Create an ACK Serverless cluster.
-
A Container Registry Enterprise Edition (Advanced Edition) instance. See Create a Container Registry Enterprise Edition instance.
-
Notation CLI installed locally.
-
A KMS instance purchased and enabled. See Purchase and enable a KMS instance.
Step 1: Get a KMS key
Key Management Service (KMS) is an all-in-one platform for credential management and data encryption. notation-alibabacloud-secret-manager supports two key sources: keys created directly in KMS and self-signed keys imported into KMS.
Option 1: Create a key in KMS
-
Log in to the KMS consoleACK console. In the top navigation bar, select a region. In the left-side navigation pane, choose Resource > KeysKMS consoleKMS console.
-
On the Keys page, click the Keys tab, select a KMS instance of the software key management type from the Instance ID drop-down list, and then click Create Key.
-
In the Create Key panel, configure the following parameters and click OK. For more information, see Software-protected key.
Parameter Description Example KMS Instance The KMS instance for which you want to create a key. kst-l\*\*\* Key Type Select Asymmetric Key. Asymmetric key Key Specifications Valid values: RSA_2048, RSA_3072, EC_P256 RSA_2048 Key Usage Select Sign/Verify. SIGN/VERIFY Key Alias The alias of the key. Accepts letters, digits, underscores (_), hyphens (-), and forward slashes (/). test-key Tag Optional. A key-value pair used to classify and manage keys. None -
Create an Application Access Point (AAP) for the plug-in to authenticate with KMS.
-
In the left-side navigation pane, choose Application Access > AAPs.
-
On the Application Access tab, click Create AAP. Configure the following parameters:
Parameter
Description
Mode
Select Quick Creation.
Scope (KMS Instance)
Select the KMS instance you want to access.
Application Access Point Name
Enter a name for the AAP.
Authentication Method
Defaults to ClientKey and cannot be changed.
Default Permission Policy
Defaults to
key/*secret/*and cannot be changed. The application can access all keys and secrets in the specified KMS instance. -
Click OK. The browser automatically downloads two files: Keep these files — you'll need them when configuring the plug-in environment variables.
-
Application Access Secret (ClientKeyContent): saved as
clientKey_****.json -
Password: saved as
clientKey_****_Password.txt
-
-
Option 2: Import a self-signed key into KMS
If you have an existing private key, import it into KMS. This example uses OpenSSL to generate and encrypt the key material.
1. Create an asymmetric key placeholder
Follow the same steps as Option 1 to create an asymmetric key in KMS. This creates a key entry in the Pending Import state.
For Key Type, select Asymmetric Key. For Key Specifications, select RSA_2048, RSA_3072, or EC_P256. For Key Usage, select SIGN/VERIFY.
2. Download the wrapping public key and import token
To import key material, you need a wrapping public key (to encrypt your key material) and an import token (to authorize the import).
-
Find the key you created and click Details in the Actions column. On the Key Material tab, click Obtain Parameters for Import.
-
In the Obtain Parameters to Import Key Material dialog, configure Public Key Type and Encryption Algorithm, then click Next. For encryption process details, see Example: Use OpenSSL to generate key material for RSA_2048.
Key type Key specification Wrapping public key type Encryption algorithm Software-protected key RSA_2048, RSA_3072, EC_P256, EC_P256K RSA_2048 RSAES_OAEP_SHA_256_AES_256_ECB_PKCS7_PAD -
Download the wrapping public key and the import token to a secure location.
-
Public key format: DER format saves as
publickey_****.bin`; PEM format saves as `publickey_****.pem. -
Import token: saved as
token_******.txt.
ImportantThe import token is valid for 24 hours and can be reused within that period. After 24 hours, download a new wrapping public key and import token. Always use the wrapping public key and import token from the same download — mixing files from different downloads is not supported.
-
3. Encrypt your key material
Three keys are involved in the encryption process:
| Key | Purpose | Source |
|---|---|---|
| Target asymmetric key (TAK) | The key to import as key material | Your environment (on-premises KMI, HSM, or OpenSSL) |
| Import wrapping key (IWK) | Encrypts the TAK. IWKpub is the wrapping public key you downloaded. | KMS |
| Ephemeral symmetric key (ESK) | A temporary key that encrypts the TAK private key. Destroy it immediately after export. | Your environment |
The TAK private key must be in PKCS #8 format (RFC 5208). For RSA keys, start from RFC 3447; for ECC keys, start from RFC 5915. Convert to PKCS #8 before proceeding.
4. Import the key material
On the key details page, click Import Key Material. In the Import Wrapped Key Material dialog, configure the following parameters and click OK.
After the import completes, the key status changes from Pending Import to Enabling.
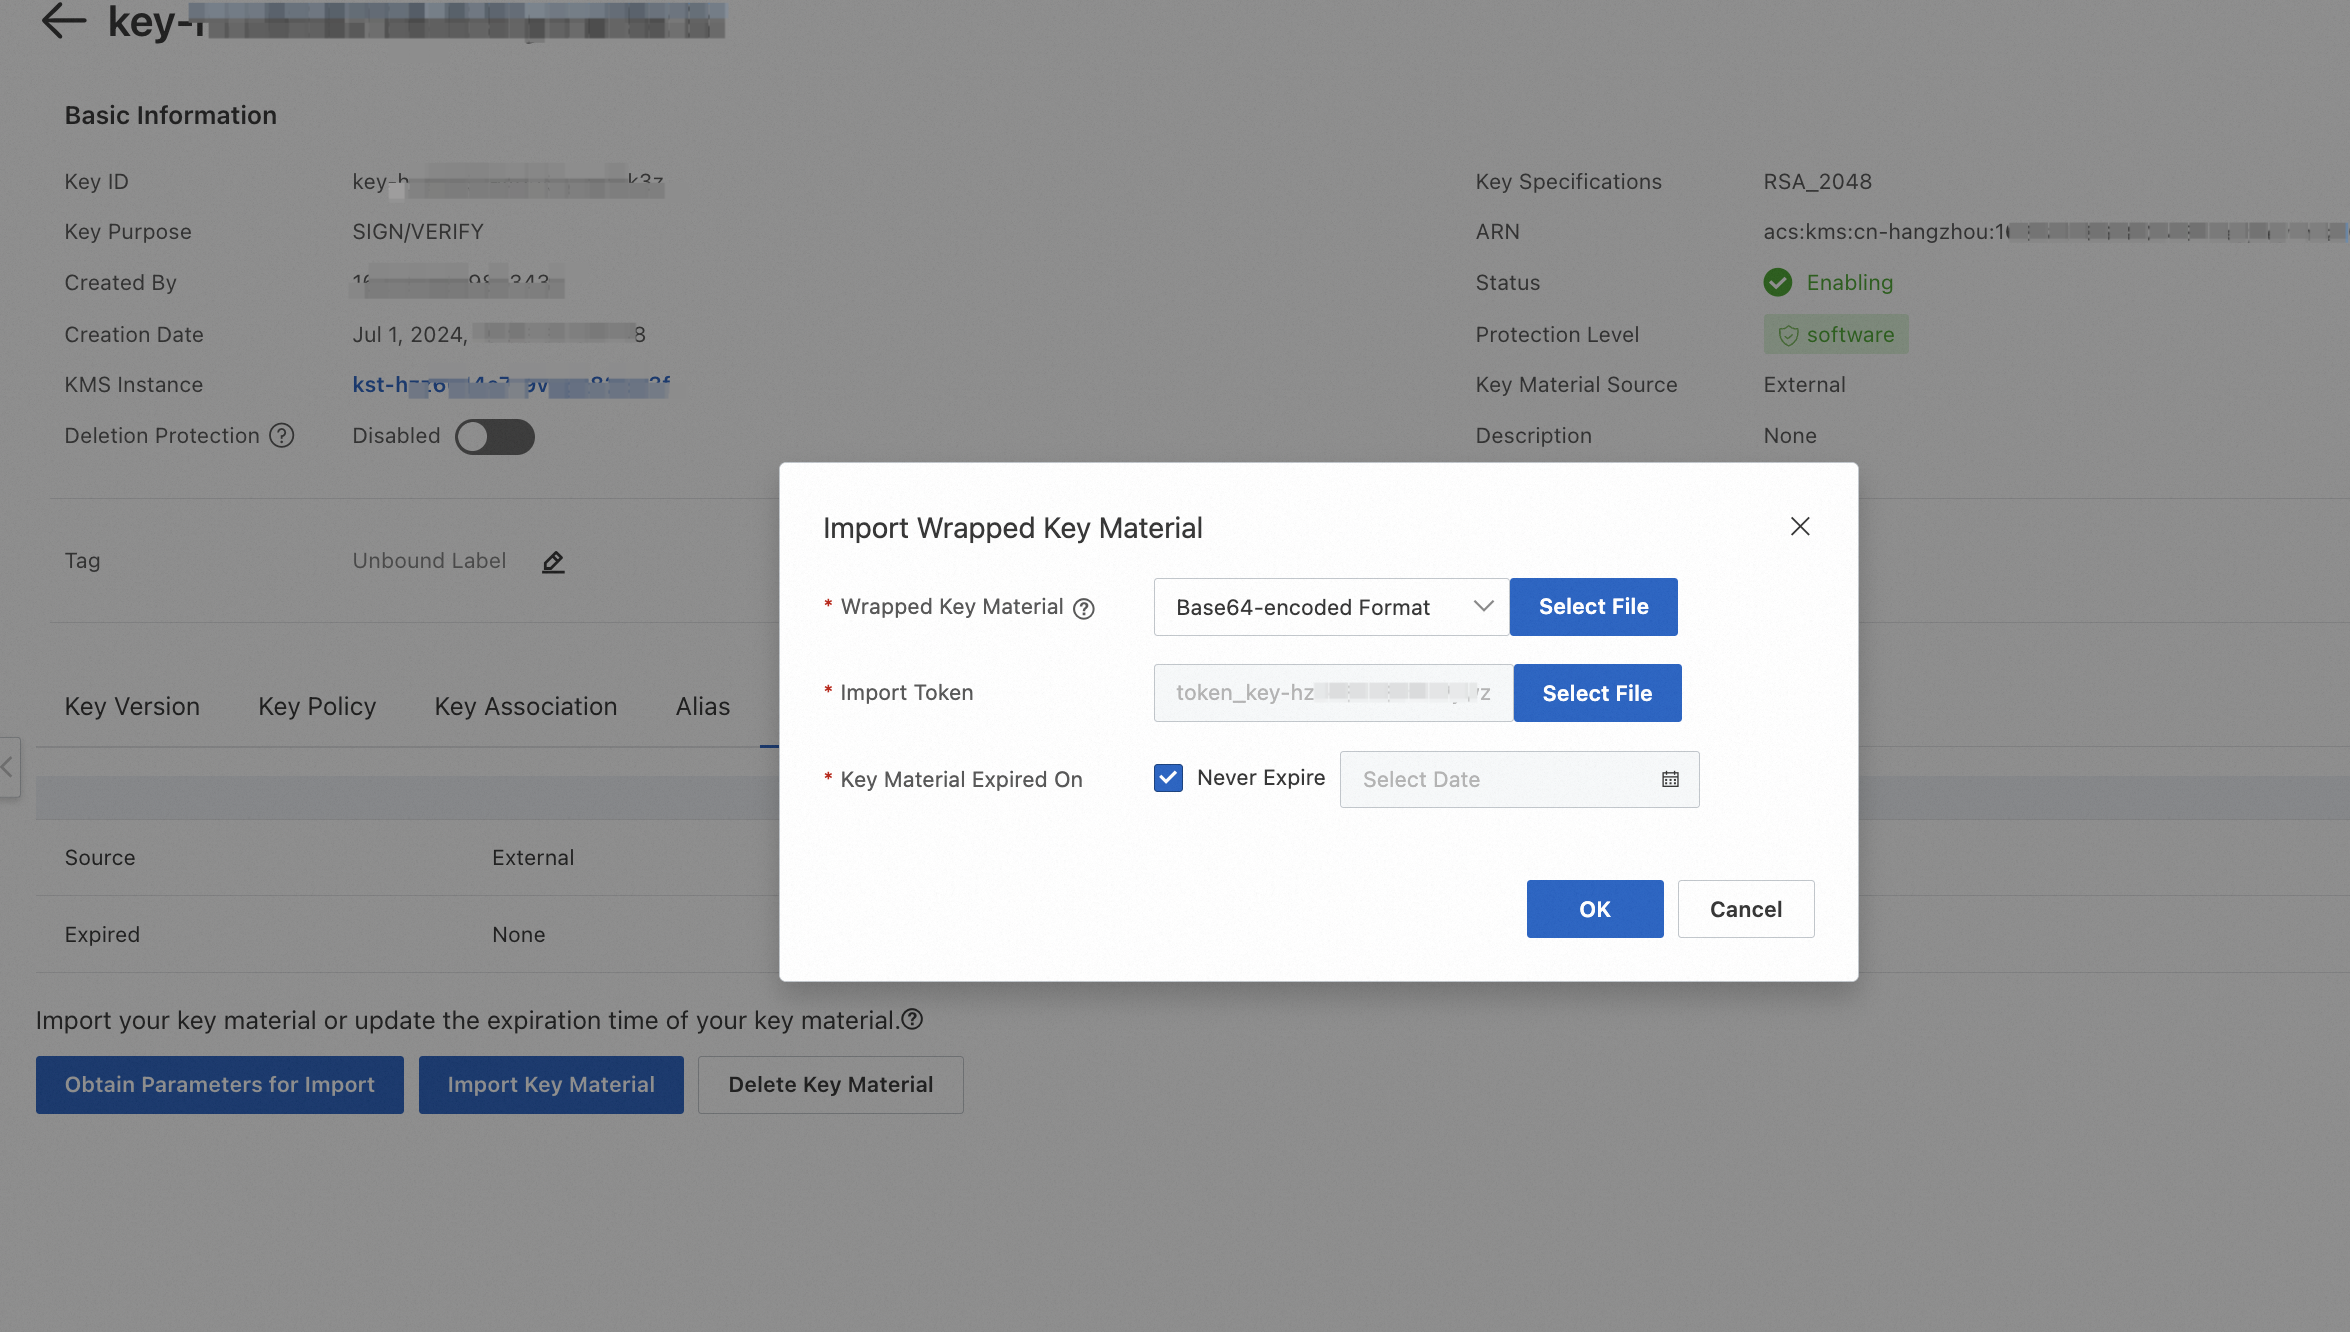
| Parameter | Description |
|---|---|
| Wrapped Key Material | Upload the EncryptedKeyMaterial_base64.txt file generated in step 3. |
| Import Token | Upload the token file you downloaded in step 2. |
| Key Material Expired On | Select Never Expire or set a custom expiration time. |
If you set an expiration time, KMS deletes the key material when it expires. To reuse the same key after expiration, reimport the same key material.
Step 2: Install notation-alibabacloud-secret-manager
Install notation-alibabacloud-secret-manager in the same region and VPC as your KMS instance. To access a KMS instance from multiple VPCs in the same region, see Configure multi-VPC access to KMS instances within the same region.
-
Download the plug-in for your OS. For OS versions not listed below, download from the releases page.
-
Linux (ARM64): ``
bash wget https://notation-alibabacloud-secret-manager.oss-cn-hangzhou.aliyuncs.com/dist/v0.1.2/notation-alibabacloud-secret-manager_Linux_arm64.tar.gz`` -
Linux (x86_64): ``
bash wget https://notation-alibabacloud-secret-manager.oss-cn-hangzhou.aliyuncs.com/dist/v0.1.2/notation-alibabacloud-secret-manager_Linux_x86_64.tar.gz``
-
-
Create the plug-in directory:
mkdir -p /root/.config/notation/plugins/alibabacloud.secretmanager.plugin/ -
Extract the archive into the plug-in directory. Replace
<Version number>with the actual version string from the downloaded filename.tar -xvf notation-alibabacloud-secret-manager_Linux_<Version number>.tar.gz \ -C /root/.config/notation/plugins/alibabacloud.secretmanager.plugin/ -
Verify the plug-in is installed correctly:
notation plugin lsThe plug-in
alibabacloud.secretmanager.pluginshould appear in the output. -
Set the environment variables for KMS authentication. notation-alibabacloud-secret-manager supports multiple credential methods — for CI/CD pipelines and additional options, see Credentials.
Environment variable Description Example ALIBABA_CLOUD_ACCESS_KEY_IDAccessKey ID of your Alibaba Cloud account XXXXXX ALIBABA_CLOUD_ACCESS_KEY_SECRETAccessKey secret of your Alibaba Cloud account XXXXXX ALIBABA_CLOUD_KMS_INSTANCE_ENDPOINTVPC endpoint of the dedicated KMS instance kst-hzxxxxxxxxxx.cryptoservice.kms.aliyuncs.comALIBABA_CLOUD_KMS_CLIENTKEY_FILEPATHPath to the client key file. Create a file (for example, /root/clientkey) and copy the content fromclientKey_KAAP.****.jsondownloaded when you created the AAP./root/clientkeyALIBABA_CLOUD_KMS_PASSWORDPassword for the AAP. Copy the content from clientKey_KAAP.****_Password.txtdownloaded when you created the AAP.XXXXXX ALIBABA_CLOUD_KMS_CA_FILEPATHPath to the CA certificate file. Create a file and copy the content from PrivateKmsCA_xxxxx.pemdownloaded in Step 4: Download the CA certificate of the KMS instance./root/privatekmscaexport ALIBABA_CLOUD_ACCESS_KEY_ID=<your-access-key-id> export ALIBABA_CLOUD_ACCESS_KEY_SECRET=<your-access-key-secret> export ALIBABA_CLOUD_KMS_INSTANCE_ENDPOINT=<your-kms-endpoint> export ALIBABA_CLOUD_KMS_CLIENTKEY_FILEPATH=<your-clientkey-filepath> export ALIBABA_CLOUD_KMS_PASSWORD=<your-password> export ALIBABA_CLOUD_KMS_CA_FILEPATH=<your-ca-filepath>
Step 3: Build and sign an image
Build and push the image
-
Build an image using Container Registry. See Use a Container Registry Enterprise Edition instance to build an image or Build and push a multi-arch image to a Container Registry Enterprise Edition instance.
Container Registry Enterprise Edition supports OCI Image and Distribution Specification 1.1.0, which lets you use tools like OCI Registry As Storage (ORAS) to manage and distribute non-image artifacts. See Using OCI v1.1.0 specification to manage and associate container images and their derivative artifacts.
-
Configure VPC or internet access control for your Container Registry Enterprise Edition instance. See Network access control.
-
Get the password for your Container Registry Enterprise Edition instance. If you've forgotten it, reset it by configuring access credentials. See Configure access credentials for a Container Registry Enterprise Edition instance.
Sign the image
notation-alibabacloud-secret-manager retrieves the private key and certificate from KMS to sign images in Container Registry. All sign commands use --plugin alibabacloud.secretmanager.plugin with the --id parameter set to your KMS key ID.
Sign images by digest, not by tag. Tags are mutable and can be overwritten, which makes tag-based signatures unreliable for security enforcement.
-
Log in to your image repository:
./notation login --username=<username> <registry-domain>Example:
./notation login --username=tsh_ram@11380257155*** test-for-doc-registry.cn-hangzhou.cr.aliyuncs.com -
Sign the image. Replace
<dirPath>with the directory where you want to store the generated certificate (for example,/root)../notation sign --id <keyId> --plugin alibabacloud.secretmanager.plugin \ test-for-doc-registry.cn-hangzhou.cr.aliyuncs.com/test/nginx:2.11 \ --plugin-config output_cert_dir=<dirPath>Expected output:
Successfully signed test-for-doc-registry.cn-hangzhou.cr.aliyuncs.com/test/nginx@sha256:f57e1908e63538ad5159fa99443d0492d23b9d34ba7****** -
To sign an artifact by digest (recommended for production):
Parameter Description idThe ID of the KMS key. plugin-config output_cert_dirDirectory to export the X.509 certificate generated during signing with a KMS key. plugin-config ca_certsPath to the certificate generated when using a self-signed key imported to KMS. notation sign --id <keyId> --plugin alibabacloud.secretmanager.plugin \ <myRegistry>/<myRepo>@<digest> \ --plugin-config output_cert_dir=<dirPath>
Step 4: Deploy Ratify and Gatekeeper
Install Ratify and Gatekeeper
-
Enable Gatekeeper-based policy governance in your cluster. See Enable policy governance.
-
Install Ratify via Helm.
-
Create the
ratifynamespace: ``bash kubectl create ns ratify`` -
In the ACK console, click Clusters in the left-side navigation pane. Find your cluster and click its name. In the left-side navigation pane, choose Applications > Helm.
-
On the Helm page, click Deploy. In the Basic Information step, configure the following parameters, select the ratify Helm chart, and click Next.
Parameter Example Application Name ratify Namespaces Select the ratify namespace. Source Marketplace (default) Chart Set Use Scenarios to All and Supported Architecture to amd64. Search for ratifyand select it. -
In the Parameters step, select a chart version and configure the following parameters. Click OK when done.
ImportantThe
notationCertparameter is deprecated. UsenotationCertsinstead to specify an array of verification certificates for the Notation verifier.Parameter Description Default Recommended value ServiceAccount.createCreates a ServiceAccount named ratify-adminwhen set totrue. Set tofalseif you create the ServiceAccount manually for RRSA.trueKeep default ServiceAccount.nameName of the Ratify ServiceAccount. ratify-adminKeep default ServiceAccount.annotationsCustom annotations. Add pod-identity.alibabacloud.com/role-name: <Your-RRSA-role>to enable RRSA. Replace<Your-RRSA-role>with your RRSA role name.{}Set for RRSA oras.authProviders.k8secretsEnabledEnables Kubernetes Secrets Provider for image repository authentication. falseKeep default oras.authProviders.alibabacloudAcrBasicEnabledEnables Container Registry Provider for image repository authentication. falsetrueoras.cache.enabledEnables ORAS store caching for ListReferrersandGetSubjectDescriptor. Disable if you require strong data consistency.trueKeep default oras.cache.ttlTime-to-live (TTL) of the ORAS store cache (seconds). 10Keep default alibabacloudAcrConfig.defaultInstanceIdID of the default Container Registry instance. Required. Set to the ID of your Container Registry Enterprise Edition instance. `
Required alibabacloudAcrConfig.acrInstancesConfigList of Container Registry instances if you pull images from multiple registries. Specify instanceNameandinstanceIdfor each.[]Set as needed upgradeCRDs.enabledEnables Ratify CustomResourceDefinition (CRD) upgrades via pre-install Helm chart hooks. Set to falseif you don't need to upgrade the Ratify CRD. Note thattruetriggers pre-install hooks, which may slow down installation.trueKeep default featureFlags.RATIFY_CERT_ROTATIONEnables automatic TLS certificate generation and rotation. falseSet to trueto enable automatic certificate rotationnotationCertsArray of public key certificates and certificate chains for the Notation verifier's built-in cert store. Specify the KMS verification certificates generated when you signed your image. Required
-
-
In the left-side navigation pane, choose Security > Policy Governance, then click the My Policies tab. Confirm that the RatifyVerification policy exists.

Configure RRSA to pull private image signatures
Ratify supports RAM Roles for Service Accounts (RRSA) to authenticate with Container Registry when pulling private image signatures. See Use RRSA to authorize different pods to access different cloud services.
-
On the Add-ons page of your ACK cluster, install ack-pod-identity-webhook.
-
Create a RAM role named
ratify-rolewith IdP as the trusted entity type. Use ack-ram-tool to automate role creation with the following trust policy. Replace the placeholders with your actual OIDC values and the namespace and ServiceAccount you specify when installing Ratify.{ "Action": "sts:AssumeRole", "Condition": { "StringEquals": { "oidc:aud": "sts.aliyuncs.com", "oidc:iss": "<oidc_issuer_url>", "oidc:sub": "system:serviceaccount:<namespace>:<service_account>" } }, "Effect": "Allow", "Principal": { "Federated": [ "<oidc_provider_arn>" ] } } -
Attach the AliyunContainerRegistryFullAccess policy to
ratify-role. -
Apply the following YAML to create the namespace and ServiceAccount with RRSA annotation. If you already created a ServiceAccount for Ratify, add the
pod-identity.alibabacloud.com/role-name: ratify-roleannotation to its configuration.--- apiVersion: v1 kind: Namespace metadata: name: ratify labels: pod-identity.alibabacloud.com/injection: 'on' --- apiVersion: v1 kind: ServiceAccount metadata: name: ratify-admin namespace: ratify annotations: pod-identity.alibabacloud.com/role-name: ratify-role ---After Ratify is deployed, the
ALIBABA_CLOUD_ROLE_ARN,ALIBABA_CLOUD_OIDC_PROVIDER_ARN, andALIBABA_CLOUD_OIDC_TOKEN_FILEenvironment variables are automatically injected into Ratify pod templates.
Step 5: Verify the signature
Deploy a test workload to confirm the policy is working:
-
Signed image: the Deployment succeeds. Ratify validates the signature against the trusted certificates and Gatekeeper allows the deployment.
-
Unsigned image: the Deployment is blocked by Ratify. Run the following command to inspect the rejection reason:
kubectl get deploy ${unsigned_deploy_name} -n ${namespace} -o yamlThe following figure shows an example of signature verification logs.

Ratify configuration reference
Ratify provides built-in and external verifiers for different artifact types. The following sections show sample configurations for the resources Ratify uses.