When an enterprise runs workloads across multiple Alibaba Cloud accounts, each with its own Cloud Firewall subscription, managing security policies separately creates blind spots and increases operational overhead. Cloud Firewall's multi-account management feature lets you consolidate all accounts under a single delegated administrator, giving you unified visibility and control over Internet assets and VPC assets across all member accounts.
This topic walks you through the full migration: from setting up a resource directory to restoring firewall protection under the consolidated setup.
How it works
Cloud Firewall's multi-account management integrates with Alibaba Cloud Resource Directory. After you designate one account as the delegated administrator, that account manages all member accounts from a single console — including access control, traffic analysis, intrusion prevention, attack prevention, breach awareness, and log audit.
The following table describes the three account types involved.
| Account type | Description | Resource Directory permissions | Cloud Firewall permissions |
|---|---|---|---|
| Management account | Invites Alibaba Cloud accounts that do not belong to a resource directory to join the resource directory for centralized management. | Manage all enterprise assets | Manage all assets protected by Cloud Firewall |
| Delegated administrator account | Specified by the management account to access resource directory information and manage business within the resource directory for a trusted service. Separates organization management from business management. | Manage all enterprise assets | Manage all assets protected by Cloud Firewall |
| Member | An account invited by the management account to join the resource directory. | Manage only the assets belonging to that member | Cannot purchase Cloud Firewall |
The delegated administrator account separates organization management from business management. The management account handles the resource directory structure; the delegated administrator handles Cloud Firewall operations within it.
Scenario
An enterprise has activated Cloud Firewall separately for account A, account B, and account C. To simplify management, the enterprise designates account A as the delegated administrator account and adds account B and account C as members. Going forward, only account A needs an active Cloud Firewall subscription — accounts B and C share it.

Prerequisites
Complete the following steps in order before proceeding:
Enable a resource directory for your management account. See Enable a resource directory.
Activate Cloud Firewall (Pro, Enterprise, or Ultimate Edition subscription, or pay-as-you-go edition) for account A. See Subscription.
Currently, only the Cloud Firewall subscription edition supports multi-account management. Different subscription editions support different numbers of manageable accounts. If the default limit is not enough, upgrade your edition. For details, see Subscription.
Step 1: Invite accounts to the resource directory
Use the management account to invite account A, account B, and account C to join the resource directory.
Log on to the Resource Management consoleResource Management console with the management account.
In the left-side navigation pane, choose Resource Directory > Invite.
Click Invite Member.

In the Invite Member panel, enter the IDs of account A, account B, and account C in the ID or Email Address of Invited Account field. Select the risk notification.
Use the email address specified at account registration, not an alternate email added later. Separate multiple account IDs or email addresses with commas (,).
Click OK.
Step 2: Designate account A as the delegated administrator
Log on to the Resource Management consoleResource Management console with the management account.
In the left-side navigation pane, choose Resource Directory > Trusted Services.
On the Trusted Services page, find the Cloud Firewall trusted service and click Manage in the Actions column.
In the Delegated Administrator Accounts section, click Add.
In the Delegated Administrator Account panel, select the ID of account A.
Click OK.
Account A can now access the multi-account management module in Cloud Firewall and perform administrative operations across the resource directory.
Step 3: Unsubscribe from or release Cloud Firewall for account B and account C
Member accounts cannot activate Cloud Firewall independently. Before adding account B and account C as members, cancel their existing Cloud Firewall subscriptions.
Additional considerations:
If VPC firewalls are enabled, disable them before unsubscribing.
After unsubscription, all access control and intrusion prevention policies are removed.
For refund rules, see Self-service unsubscription.
Unsubscribe from subscription Cloud Firewall
Perform the following steps with account B and account C:
Go to the Resource Unsubscription page and click the Unsubscribe from Resource tab.
Click Regular Cloud Products and select the Partial Unsubscription type.
Locate the Cloud Firewall subscription instance and click Unsubscribe from Resource in the Operation column.
Confirm the resource information, set the Reason for Unsubscription, and select both of the following checkboxes:
I have carefully read the "Unsubscription Rules" and confirm the unsubscription amount
I confirm that the data of the unsubscribed instance has been backed up and migrated
Click Unsubscribe Now, confirm in the Prompt dialog box, and click OK.
After submission, click Order List to track the unsubscription status.
Release pay-as-you-go Cloud Firewall
Perform the following steps with account B and account C:
Log on to the Cloud Firewall consoleCloud Firewall consoleCloud Firewall console.
On the Overview page, choose More > Self-service Release in the upper-right corner.
In the Prompt dialog box, confirm the release information and click OK.
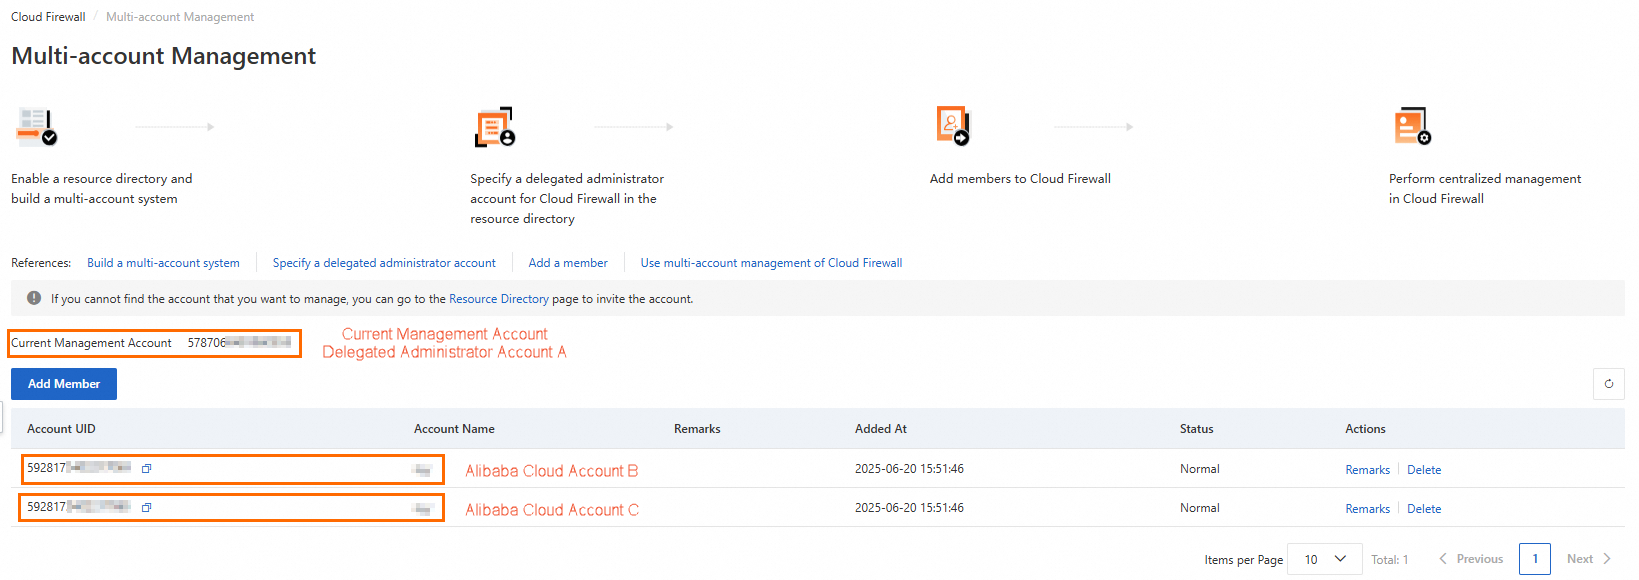
Step 4: Add account B and account C as members in Cloud Firewall
Log on to the Cloud Firewall consoleCloud Firewall consoleCloud Firewall console with account A.
In the left-side navigation pane, choose System Settings > Multi-Account Management.
On the Multi-account Management page, click Add Member.
In the Add Member dialog box, add the account IDs of account B and account C to the Selected Member Accounts list on the right. Click OK.
Account A has now added account B and account C as member accounts.
After adding a member, Cloud Firewall can access the member's resources by default. If a VPC firewall protects VPCs attached to a Cloud Enterprise Network (CEN) instance and those VPCs belong to different Alibaba Cloud accounts, manually authorize Cloud Firewall to access the resources in those accounts. For details, see Authorize Cloud Firewall to access cloud resources.
Step 5: Configure Cloud Firewall for shared resources
After account B and account C unsubscribe from Cloud Firewall, their existing policies are removed. Re-enable firewall protection and reconfigure policies from account A.
Before starting, note the following:
Internet firewalls come online within seconds.
Re-enabling VPC firewalls may interrupt business due to route switching.
Access control and intrusion prevention policies must be reconfigured from scratch.
Log on to the Cloud Firewall consoleCloud Firewall consoleCloud Firewall console with account A.
In the left-side navigation pane, click Firewall Settings.
On the Firewall Settings page, click Synchronize Assets. The system syncs asset information for account A and its member accounts. This takes 1 to 2 minutes.
After the sync completes, enable and configure the following: Enable Internet firewalls See Internet firewall. Enable VPC firewalls Choose the VPC firewall type that matches your network topology: Configure access control policies Configure intrusion prevention policies See Intrusion prevention.
For traffic types that Express Connect cannot protect, switch to Cloud Enterprise Network (CEN). Submit a ticketticket for migration assistance.
VPC firewall type Traffic coverage Setup guide Enterprise Edition transit router Traffic between VPCs (same or cross-region); VPC to virtual border router (VBR) or data center; VPC to Cloud Connect Network (CCN); VBR to VBR; VBR to CCN; VPC to public VPN gateway. Does not cover CCN-to-CCN traffic. Configure a VPC firewall for an Enterprise Edition transit router Basic Edition transit router Traffic between VPCs (same or cross-region); VPC to VBR or data center; VPC to CCN. Does not cover VBR-to-VBR, VBR-to-CCN, or CCN-to-CCN traffic. Configure a VPC firewall for a Basic Edition transit router Express Connect circuit VPCs connected via Express Connect (same region, same account); VPCs connected via VPC peering (same region, same or different accounts). Does not cover cross-region and cross-account Express Connect traffic, or VPC-to-VBR traffic. Configure a VPC firewall for an Express Connect circuit
Step 6: Verify business stability
Check the hit status of access control policies and the traffic log details. If both match your configuration expectations with no anomalies, your migration is complete and business is running normally.