Integrate a Runtime Application Self-Protection (RASP) agent with your Java application to monitor and block malicious attacks in real time, without modifying application code. This topic describes how to connect a Java application to Application Protection.
How it works
Application Protection injects monitoring and defense logic into your running Java application through a RASP agent. Depending on the access method you choose, the agent either attaches dynamically at runtime (automatic access) or loads at startup through a -javaagent JVM parameter (manual access).

Supported environments
The RASP agent supports only Java processes that meet all of the following requirements:
| Requirement | Supported |
|---|---|
| JDK versions | JDK 6 and later. JDK 13, JDK 14, and JDK 8 versions earlier than 1.8.0_40 are not supported. |
| Middleware | Tomcat, Spring Boot, JBoss, WildFly, Jetty, Resin, WebLogic, WebSphere, Liberty, Netty, GlassFish, and domestic middleware. |
| Operating systems | Linux (64-bit) and Windows (64-bit). |
Choose an access method
RASP supports automatic and manual access. Use the following table to determine which method fits your deployment.
| Access method | How it works | When to use |
|---|---|---|
| Automatic access | Connects applications on a per-server basis. Uses the JVM Attach capability to identify and connect to Java processes at runtime, including those in containers. Loads and unloads protection dynamically without restarting application processes. | The server has not been automatically connected to another Application Group. Select up to 50 servers at a time. |
| Manual access | Connects applications on a per-process basis. Requires deploying the agent and restarting the application. | Your application uses the WebSphere framework (automatic access is not supported). You need to assign different processes on the same host to different Application Groups. |
A host can be automatically connected to only one Application Group at a time. To move a server to a different group, first disable Application Protection for that server, then enable automatic access for the new group.
Resource usage thresholds for automatic access
To protect application stability, automatic access pauses RASP agent installation when the resource usage of a host, container, or JVM exceeds any of these thresholds. Installation resumes after usage drops below the threshold. These thresholds do not apply to manual access.
| Resource | Threshold |
|---|---|
| CPU utilization on host or container | Exceeds 98% |
| Available memory on host or container | Less than 200 MB |
| Available JVM heap memory | Less than 150 MB |
| Available Metaspace | Less than 5 MB |
Step 1: Create an application group
Before you begin, make sure that:
The Security Center Agent on your application server is online. Go to Assets > Host. On the Servers tab, check the Agent column. The
 icon indicates the agent is online. If it is offline, see Troubleshoot offline Security Center agents.
If you are operating as a RAM user, the RAM user has the AliyunYundunWAFFullAccess and AliyunYundunSASFullAccess access policies. For details, see Grant permissions to a RAM user.
To create an application group:
Log on to the .
In the left-side navigation pane, choose Protection Configuration > Application Protection. In the upper-left corner, select the region where your assets are located: China or Outside China.
On the Application Configurations tab, click Create Application Group.
In the Create Application Group wizard, enter a name for the Application Group, select Java as the application language, add a description, and then click Next.
Name the Application Group after the application you want to protect. Each name must be unique. The application language cannot be changed after it is set.
Step 2: Connect your application
Option A: Automatic access
Before you begin
When you enable automatic access for the first time, do so during off-peak hours. Avoid gateway-related application processes and perform a phased rollout while monitoring business metrics. During the process, RASP instruments the application by inserting monitoring or protection code. This may cause a brief spike in CPU usage for about 30 seconds, with an average impact of 10 to 20 seconds. In rare cases, large applications may experience impact for several minutes. Performance returns to normal after the process completes.
A host can be automatically connected to only one Application Group at a time. This option is available only for 64-bit hosts that are not already connected to another group.
You can enable automatic access for a host already connected through manual access. If you later uninstall the manually connected RASP agent, Application Protection automatically reconnects the application process.
Procedure
(Optional) In the Automatic/Manual Access wizard, on the Automatic Access tab, click Blacklist or Application Access Whitelist to define which processes are included or excluded. For details, see Add a rule to the whitelist or blacklist.
On the Automatic Access tab, click Select Asset for Application Protection.
In the Select Asset panel, select the assets to connect and click OK. Application Protection automatically identifies and connects to the Java processes on the selected hosts, including those in container environments, without restarting processes. You can select up to 50 servers at a time. The process may take up to 10 minutes depending on your network environment. If multiple Java processes run on a host, Security Center connects all processes that meet the access rules.
Verify the connection status. Check the Protection Status column for each server: In the Actions column, click Details to view the status of individual Java processes.
If the status shows All Added but the access details list is empty, no connectable processes exist on the server. Any connectable process added later will be connected automatically.
Processes that match a blacklist rule or do not match a whitelist rule are skipped.
Status Description Not Connected Application Protection is not enabled for the server. Failed All supported applications on the server failed to connect. Partial Added Some applications connected, others failed. All Added All supported Java applications are connected, or no connectable processes exist on the server. 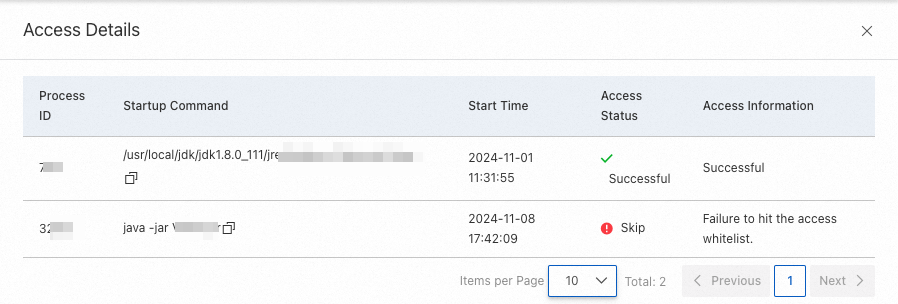
Option B: Manual access
Manual access supports three deployment scenarios: host, container with point-and-click push, and container with custom download. Choose the tab that matches your environment.
Connect a host
On the Manual Access tab, on the Host Access Guide subtab, click Point-and-click Push.
In the Push RASP Agent dialog box, select the servers to push the agent to and click OK.
Add the
-javaagentJVM parameter based on your runtime environment. Replace{appId}with the application ID shown on the Host Access Guide tab. Tomcat (Linux) Add the following to<Tomcat_Installation_Directory>/bin/setenv.sh. Create the file if it does not exist. Tomcat (Windows) Add the following to<Tomcat_Installation_Directory>\bin\setenv.bat. Create the file if it does not exist. Jetty Add the following to{JETTY_HOME}/start.ini: Spring Boot Add the-javaagentparameter to the startup command. For example, if the original command is: Change it to: JBoss or WildFly Liberty Create or modify thejvm.optionsfile at<Liberty_Installation_Directory>/${server.config.dir}(default:/opt/ibm/wlp/usr/servers/defaultServer/jvm.options) and add: ResinResin 3: In
<Resin_Installation_Directory>/conf/resin.conf, find the<jvm-arg>tag under<server-default>and add: ``xml <jvm-arg>-javaagent:/usr/local/aegis/rasp/apps/{appId}/rasp.jar</jvm-arg>``Resin 4: In
<Resin_Installation_Directory>/conf/cluster-default.xml, find the<jvm-arg-line>tag under<server-default>and add: ``xml <jvm-arg>-javaagent:/usr/local/aegis/rasp/apps/{appId}/rasp.jar</jvm-arg>``
ImportantThe
-javaagentparameter must precede the-jarparameter.export CATALINA_OPTS="$CATALINA_OPTS -javaagent:/usr/local/aegis/rasp/apps/{appId}/rasp.jar"set CATALINA_OPTS=%CATALINA_OPTS% "-javaagent:C:\Program Files (x86)\Alibaba\Aegis\rasp\apps\{appId}\rasp.jar"--exec -javaagent:/usr/local/aegis/rasp/apps/{appId}/rasp.jarjava -jar app.jarjava -javaagent:/usr/local/aegis/rasp/apps/{appId}/rasp.jar -jar app.jar-javaagent:/usr/local/aegis/rasp/apps/{appId}/rasp.jar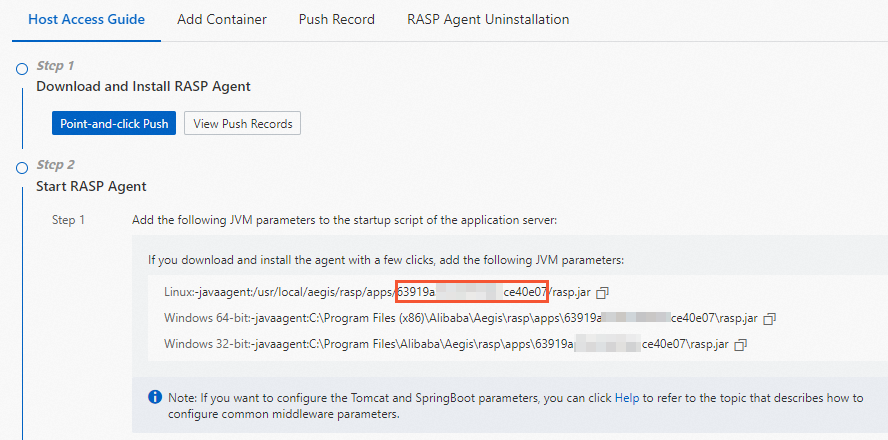
Restart the application. Protection becomes active after the restart. View the connected instances on the Application Configurations page.
Connect a container (point-and-click push)
Use this method when you already know which servers and applications to connect.
On the Manual Access tab, on the Add Container subtab, click Point-and-click Push.
You can also go to the Push Record tab and click Push RASP Agent.
In the Push RASP Agent dialog box, select the servers and click OK.
Start the RASP agent using one of the following methods: Method 1: Write to Dockerfile Method 2: Mount as a data volume
Mount the
raspdirectory from the server into the container: ``bash docker run -itd --privileged=true -v /usr/local/aegis/rasp/apps/<Application_Group_ID>:/rasp/ <Image_ID>``Enter the container: ``
bash docker exec -it <Container_ID> /bin/bash``Add the following JVM parameter to the application startup script. Replace
{manager.key}with theDmanager.keyvalue from the Add Container tab. ``-javaagent:/rasp/rasp.jar -Dmanager.key={manager.key}``
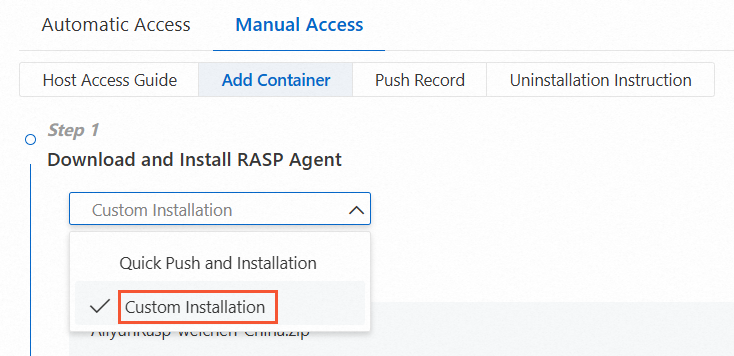
Connect a container (custom download and installation)
Use this method when another team member needs to install the RASP agent. You download the installation package and distribute it.
On the Manual Access tab, on the Add Container subtab, select Custom Installation from the drop-down list under Download and Install RASP Agent.
You can also go to the Push Record tab and click Push RASP Agent.
From the drop-down list, select Do Not Access Proxy or Self-managed Proxy Cluster depending on whether the server connects to Security Center through a proxy. If you select Self-managed Proxy Cluster, choose the proxy cluster that the server uses. For details, see Use a proxy to connect an agent.
Click Download to download the RASP installation package.
Start the RASP agent using one of the following methods: Method 1: Write to Dockerfile Method 2: Mount as a data volume
Upload the package to the server and extract it. Replace
<user_path>with the actual path. ``bash unzip <Installation_Package_Name> -d /<user_path>/``Mount the
raspdirectory into the container: ``bash docker run -itd -v /<user_path>/rasp:/rasp/ <Image_ID>``Enter the container: ``
bash docker exec -it <Container_ID> /bin/bash``Add the following JVM parameter to the application startup script. Replace
{manager.key}with theDmanager.keyvalue from the Add Container tab. ``-javaagent:/rasp/rasp.jar -Dmanager.key={manager.key}``
Step 3: Set a protection policy
In the Configure Protection Mode After No False Alerts Generated wizard, configure the protection policy and click OK.
The default Protection Mode is Monitor. Use Monitor mode for 2 to 5 days. If no false positives occur during this period, switch the Protection Mode to Block. If a false positive occurs, add a whitelist rule to exclude the corresponding Threat Type from detection. For details, see Add an alert to a whitelist.
Protection policy parameters
| Category | Parameter | Description |
|---|---|---|
| Protection Policy | Application Group Name | The name of the Application Group. This cannot be modified here. |
| Protection Status | Enable or disable protection for the Application Group. Enabled by default. If disabled, Application Protection does not detect or block attacks. | |
| Protection Mode | The detection behavior for the Application Group. Monitor monitors attacks but does not block them. When an attack is detected, an alert with the handling method Monitor is generated. Block monitors and blocks attacks, and monitors high-risk operations on application instances. When an attack is blocked, an alert with the handling method Block is generated. | |
| Protection Policy Group | The default is Normal Running Group. Select a different group from the drop-down list as needed. For details, see Manage protection policies. | |
| Threat Type | The threat types supported by the selected Protection Policy Group. | |
| Detection Policy | Weakness Detection | Enable or disable application weakness scanning. Not supported for PHP applications. For details, see Detect application weaknesses. |
| In-memory Webshell | Enable or disable in-memory webshell scanning. Not supported for PHP applications. For details, see Defend against in-memory webshells. | |
| Common Settings | Detection Timeout Period | The maximum time for attack detection, from 1 to 60,000 milliseconds. Default: 300 ms. If detection exceeds this value, the request proceeds without waiting for detection to finish. Use the default unless you have a specific reason to change it. |
| Method to Obtain Source IP Address | Default The system checks headers in this order: X-Real-IP, True-Client-IP, X-Forwarded-For. Enter Custom Header The system prioritizes your custom headers. If no source IP is found in the custom headers, the default order applies. You can set up to 5 custom headers. | |
| Runtime Circuit Breaking Settings | When enabled, RASP protection, In-memory Webshell Detection, and Weakness Detection are temporarily disabled when resource usage exceeds any specified threshold. Protection is restored when usage drops below all thresholds. Disabled by default. Enable it for performance-sensitive, computation-intensive applications. Options: CPU Utilization in Server or Container Exceeds (10%--99%, recommended: 95%). JVM Heap Memory Usage Exceeds (5%--99%, recommended: 98%). Remaining JVM heap memory is less than (10--99,999 MB, recommended: 100 MB). |
Circuit breaking requires RASP agent version 0.8.8 or later. Upgrade earlier versions by restarting the application process. Instances in the Protection After Circuit Breaking state still consume licenses.
Step 4: Verify the connection
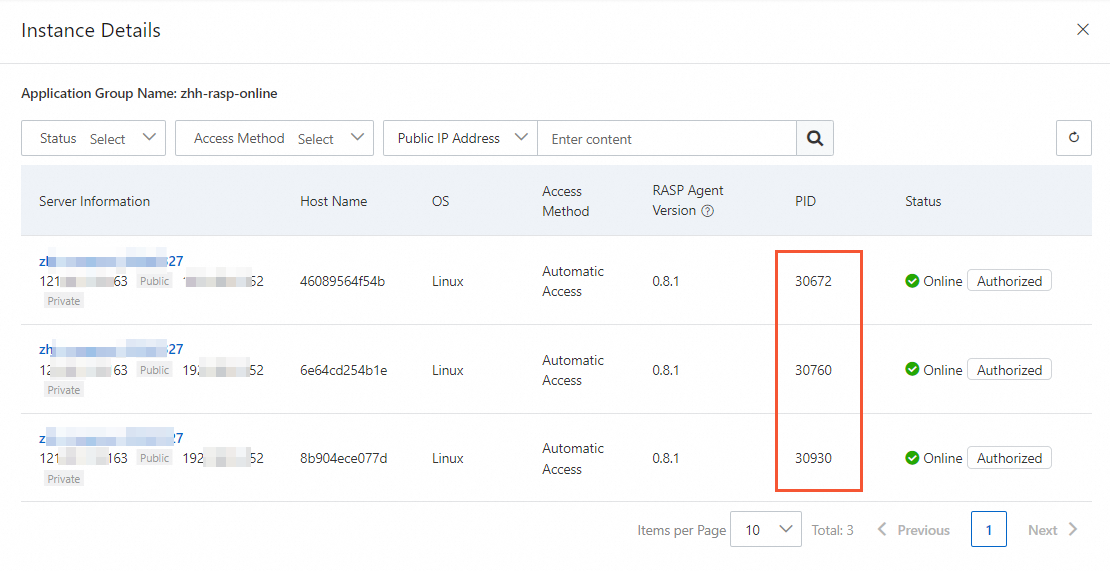
An application is successfully connected if its Process ID (PID) appears in the Application Group's list of authorized processes.
On the Application Configurations tab of the Application Protection page, click the number in the Authorized Process column for the target Application Group.
In the process details panel, verify that the PID of the application process on the target server appears in the list.
Next steps
Adjust automatic access rules for an Application Group to define which applications are connected. See Manage access rules.
Adjust the Protection Mode, Protection Policy Group, and other settings based on your needs. If false positive alerts occur, configure a Protection Whitelist. See Manage protection policies.
FAQ
After I enable automatic access for a server, are new Java applications automatically protected?
Yes. Application Protection uses the JVM Attach capability to discover and connect to Java processes that have listening ports on the server, including those in containers. Protection is loaded and unloaded dynamically at runtime without restarting application processes. Adding or removing applications does not cause process restarts.
Does stopping one application process affect other applications?
No. Application Protection works on a per-process basis. Protection is isolated across processes.
Does Application Protection require a listening port?
No. Application Protection uses hook technology to monitor interactions between the application and other systems in real time. It detects and blocks attacks without occupying any listening ports.
What is the manager.key parameter used for in container deployments? Is it optional?
The -Dmanager.key parameter associates the containerized application with an asset in Security Center. It is required for manual container access. When connecting a Java application on a host (not in a container), this parameter is not needed because the application can be directly associated with the server asset.