The Runtime Application Self Protection (RASP) agent monitors your application at runtime, using semantic analysis and behavioral baseline checks to detect threats with a low false positive rate. Most alerts it generates indicate real attacks. This topic explains how to review alert evidence and decide whether an alert is a true positive, and how to suppress false positives using whitelist rules.
Prerequisites
Before you begin, ensure that you have:
Application Protection enabled in Security Center
Access to the Security Center console
(Optional) RASP agent version 0.5.2 or later, required to configure whitelist rules based on malicious characteristics or input parameters. Restart the protected application to auto-upgrade to the latest version.
Review an alert and respond
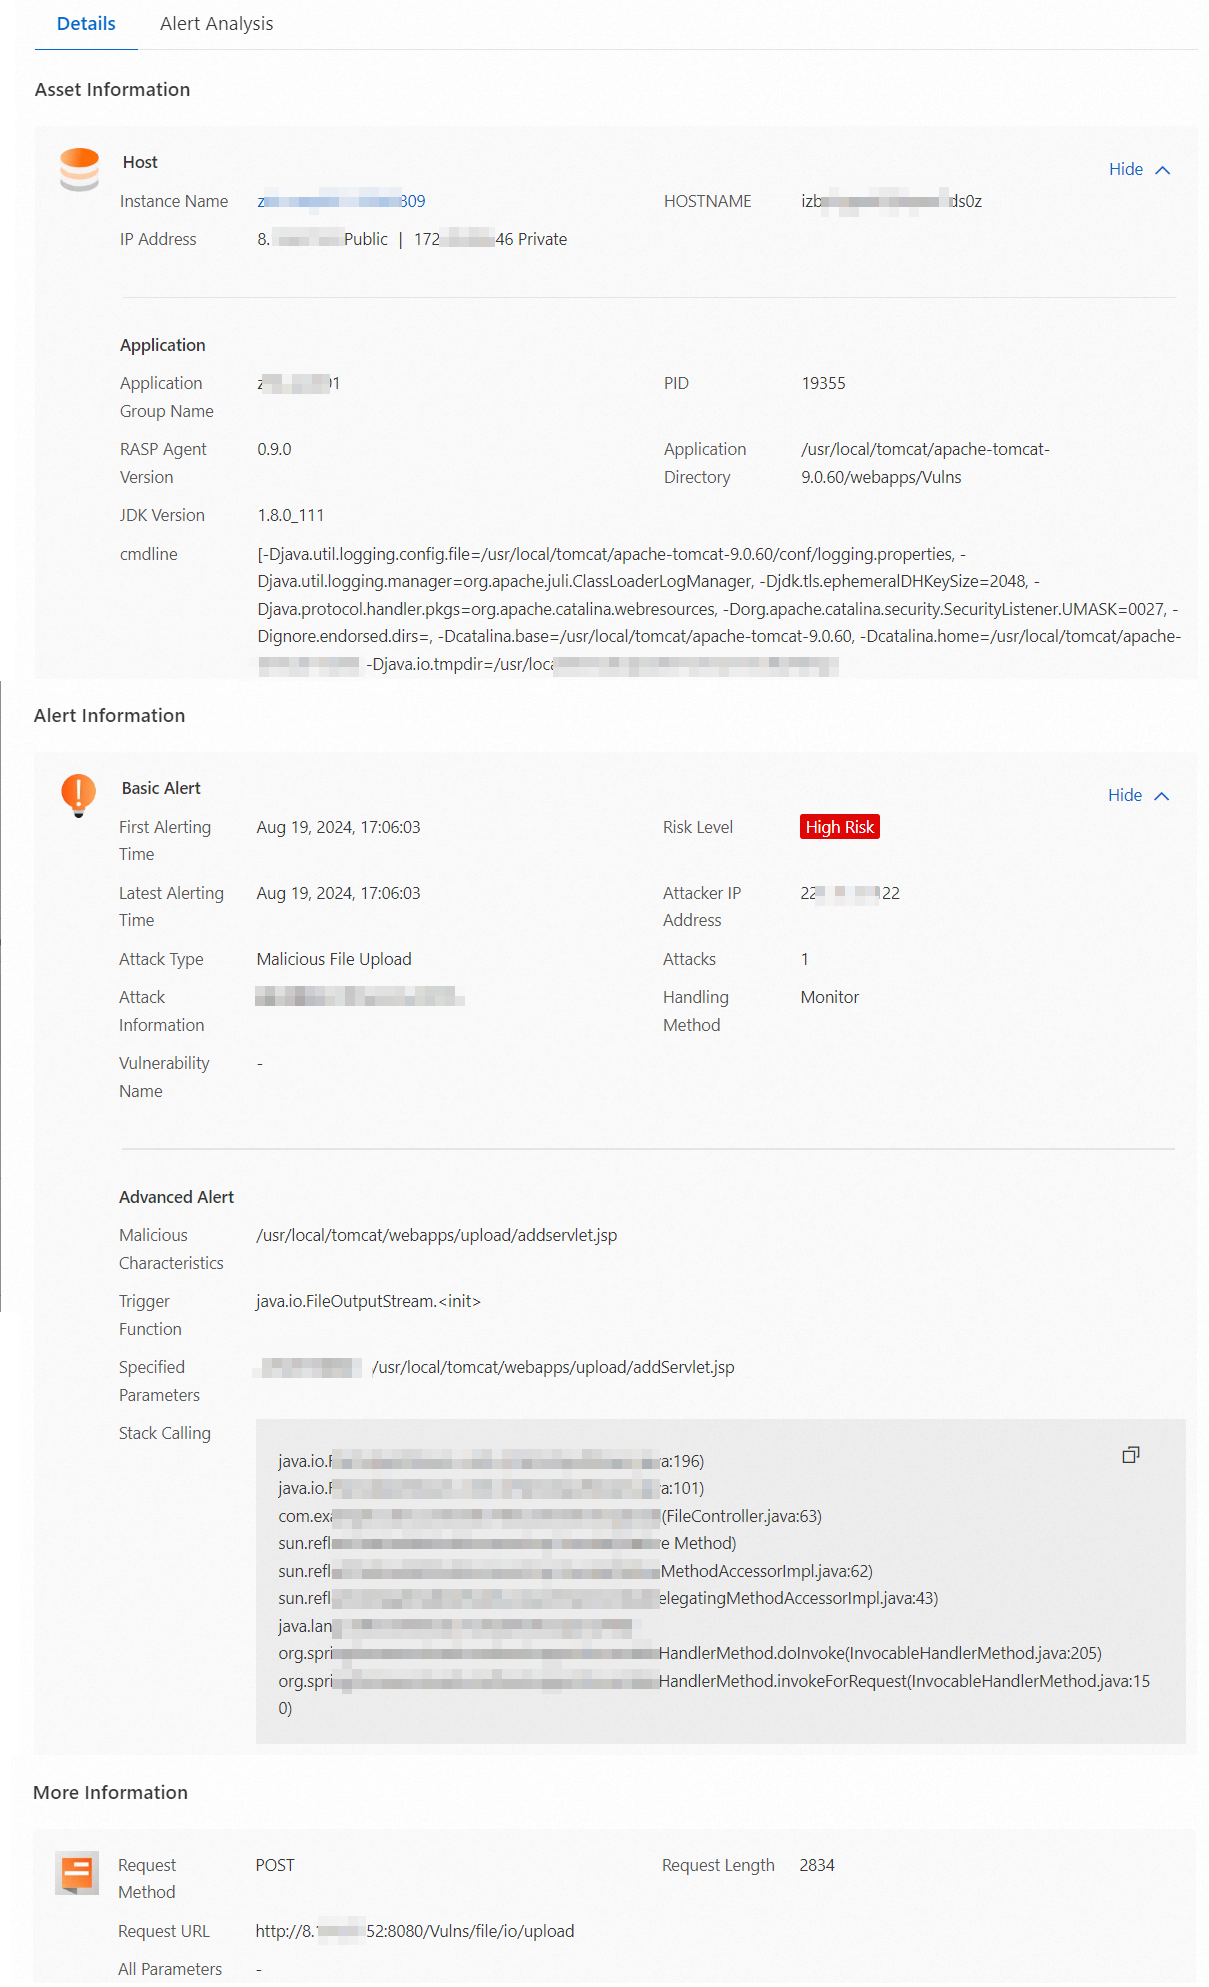
The following example walks through an alert triggered by a malicious file upload.
Log on to the Security Center console. In the top navigation bar, select the region of the assets you want to manage: China or Outside China.
In the left-side navigation pane, choose Protection Configuration > Application Protection.
On the Attack Alerts tab, find the alert and click Details in the Actions column.
On the alert details page, examine the evidence and decide whether the alert is a true positive.
Understand the alert evidence
The details page is organized into four sections. Review each section to determine whether the alert represents a real attack or a false positive.
| Section | Field | What it tells you | How to use it |
|---|---|---|---|
| Basic alert | Attacker IP address | The source IP address that accessed your application. | Check whether this IP belongs to a known internal system, trusted user, or security scanning tool. Unexpected external IPs warrant further investigation. |
| Basic alert | Vulnerability name | The vulnerability exploited by the attacker, if applicable. | Click the vulnerability ID to view details. Patch the vulnerability to reduce your attack surface. |
| Advanced alert | Malicious characteristics | The malicious data sent to your application. In this example: a request to upload /usr/local/tomcat/webapps/upload/addservlet.jsp. | Determine whether this request is expected behavior. If yes, add it to a whitelist. If no, treat it as a real attack. |
| Advanced alert | Trigger function | The security-sensitive function within the application that triggered the alert. | Understand which internal function was involved. |
| Advanced alert | Specified parameters | A JSON object showing the behavior and event logs generated when the application processed the request. | Examine the key-value pairs for suspicious patterns. |
| Advanced alert | Stack calling | The call stack at the time of the event, recording the sequence of function calls. | Trace the execution path to understand how the attacker reached the vulnerable code. |
| More information | Request URL | Information about the HTTP request that accessed the application. | Verify whether the request came from a legitimate source. If not, apply access control or block requests from that source. |
Review the AI-generated summary in the Alert Analysis section for an additional signal on whether the alert is a true positive.
Respond based on your assessment
After reviewing the evidence, take action based on whether the alert is a real attack and which protection mode is active:
| Scenario | Monitor mode | Block mode |
|---|---|---|
| Real attack | The request was not blocked. Locate and delete any malicious files immediately. | The attack was blocked and the file was not written to the server. No immediate cleanup required. |
| False positive | Add the alert to a whitelist to suppress similar alerts. | Add the alert to a whitelist to suppress similar alerts. |
Suppress false positives with whitelist rules
If an alert is triggered by a legitimate request, add it to a whitelist. The alert details page pre-populates the whitelist fields with values from the alert, so you can act directly without manually entering data.
To create whitelist rules based on Malicious characteristics or Specified parameters, upgrade the RASP agent to version 0.5.2 or later. For upgrade instructions, see View the version of the RASP agent.
Add an alert to a whitelist
Log on to the Security Center console. In the top navigation bar, select the region of the assets you want to manage: China or Outside China.
In the left-side navigation pane, choose Protection Configuration > Application Protection.
On the Attack Alerts tab, find the alert and choose Handle > Add to Whitelist in the Actions column.
In the Add to Whitelist panel, configure the whitelist rules and click OK.
The system pre-populates the rule fields based on the alert details. These values create precise rules that target the specific request pattern.
To broaden the scope—for example, to suppress all alerts from an entire directory rather than a single file—adjust the Match Mode and Content to Match fields.
Example: The alert was triggered by
/usr/local/tomcat/webapps/upload/1.jsp. If all requests to the/upload/directory are legitimate, change Match Mode to Prefix Match and set Content to Match to/usr/local/tomcat/webapps/upload/.
Match modes:
| Match mode | When no alert is triggered |
|---|---|
| Exact Match | The transmitted content exactly matches the value in Content to Match. |
| Partial Match | The transmitted content contains the string in Content to Match. |
| Prefix Match | The transmitted content starts with the string in Content to Match. |
| Suffix Match | The transmitted content ends with the string in Content to Match. |
After saving, view and manage the rule on the Whitelists page.
Manage whitelist rules
View whitelist rules
Log on to the Security Center console. In the top navigation bar, select the region of the assets you want to manage: China or Outside China.
In the left-side navigation pane, choose Protection Configuration > Application Protection.
On the Attack Alerts tab, click Whitelists.
On the Whitelists page, view and manage the rules using the following actions:
Enable or disable a rule: Toggle the switch in the Rule Switch column.
Edit a rule: Click Edit in the Actions column.
Delete a rule: Click Delete in the Actions column.
Create a rule: Click Configure Whitelist. See Create whitelist rules for details.
Create whitelist rules
Creating a whitelist rule from the Whitelists page lets you apply one rule to multiple application groups and threat types simultaneously, which is more efficient than adding alerts one at a time.
Log on to the Security Center console. In the top navigation bar, select the region of the assets you want to manage: China or Outside China.
In the left-side navigation pane, choose Protection Configuration > Application Protection.
On the Attack Alerts tab, click Whitelists.
On the Whitelists page, click Configure Whitelist.
In the Configure Whitelist panel, configure the rule parameters and click OK.
Parameter Description Rule Name A descriptive name for the whitelist rule. White Mode The basis for the whitelist: Malicious Characteristics, Specified Parameters, or Request URL. Threat Type The threat type to suppress. Click Select to choose from the Threat Type panel. Match Mode How the transmitted content is matched against Content to Match. See the match mode table above. Content to Match The value to match, based on the Malicious Characteristics, Specified Parameters, or Request URL from the alert details. Destination Application Groups The application groups the rule applies to. Click Select to choose from the Destination Application Groups panel.
What's next
Enable the in-memory webshell prevention feature to enhance your overall detection capabilities. For more information, see Use the in-memory webshell prevention feature.