Dify, AI assistant, ACS, Kubernetes, LLM, knowledge base, RAG, Qwen, ack-dify, chatbot, NAS storage, generative AI, LLMOps, prompt orchestration
Overview
Dify customized AI application example
| Web-integrated AI application example
|
Dify is an open source platform for building large language model (LLM) applications. Combined with Alibaba Cloud Container Service for Kubernetes (ACS), you can:
Deploy Dify in an ACS cluster for automatic scaling
Create an AI Q&A assistant backed by LLMs like Qwen
Attach a dedicated knowledge base to answer specialized questions
Embed the assistant in your website or call it via API
High-level steps:
Install ack-dify: Create an ACS cluster and install the ack-dify component.
Create an AI Q&A assistant: Access Dify and create an assistant.
Customize the assistant: Prepare and attach a knowledge base.
Introduction to Dify
Dify combines backend-as-a-service (BaaS) and LLMOps to help you quickly build production-grade generative AI applications. Key components include:
Core technical components: Multi-model compatibility, visual prompt design, retrieval-augmented generation (RAG) system, and customizable Agent architecture.
Visual orchestration: Intuitive interface for prompt orchestration, O&M, and dataset management.
Application templates: Out-of-the-box templates and orchestration framework for rapid development.

Step 1: Install ack-dify
Prerequisites
Before you begin:
Create an ACS cluster (Kubernetes version 1.26 or later). See Create an ACS cluster.
Configure kubectl to connect to the cluster. See Connect to your cluster.
Configure dynamic NAS volumes. See Use an existing NAS file system as a persistent volume.
Create a StorageClass
Create a file named nas-sc.yaml:
apiVersion: storage.k8s.io/v1
kind: StorageClass
metadata:
  name: alibabacloud-cnfs-nas
mountOptions:
- nolock,tcp,noresvport
- vers=3
parameters:
  volumeAs: filesystem
  fileSystemType: standard
  storageType: Performance
  regionId: cn-hangzhou
  zoneId: cn-hangzhou-g
  vpcId: "vpc-2ze2fxn6popm8c2mzm****"
  vSwitchId: "vsw-2zwdg25a2b4y5juy****"
  accessGroupName: DEFAULT_VPC_GROUP_NAME
  deleteVolume: "false"
provisioner: nasplugin.csi.alibabacloud.com
reclaimPolicy: Retain
Parameter | Description |
| Set to |
|
|
| For general-purpose NAS: |
| Region ID matching the ACS cluster. |
| Zone ID based on the vSwitch of pods in the cluster. |
| VPC and vSwitch IDs used by pods. |
| Use |
| Set to |
Run:
kubectl create -f nas-sc.yaml
kubectl get sc
Create a PVC
Create a file named nas-pvc-fs.yaml:
kind: PersistentVolumeClaim
apiVersion: v1
metadata:
  name: nas-pvc-fs
spec:
  accessModes:
    - ReadWriteMany
  storageClassName: alibabacloud-cnfs-nas
  resources:
    requests:
storage: 20GiFor extreme NAS, set storage to at least 100 GiB.
Run:
kubectl create -f nas-pvc-fs.yaml
kubectl get pvc
Deploy ack-dify
Log on to the ACS console.
In the left navigation pane, click Clusters.
Click the name of the cluster you created to go to the cluster details page.
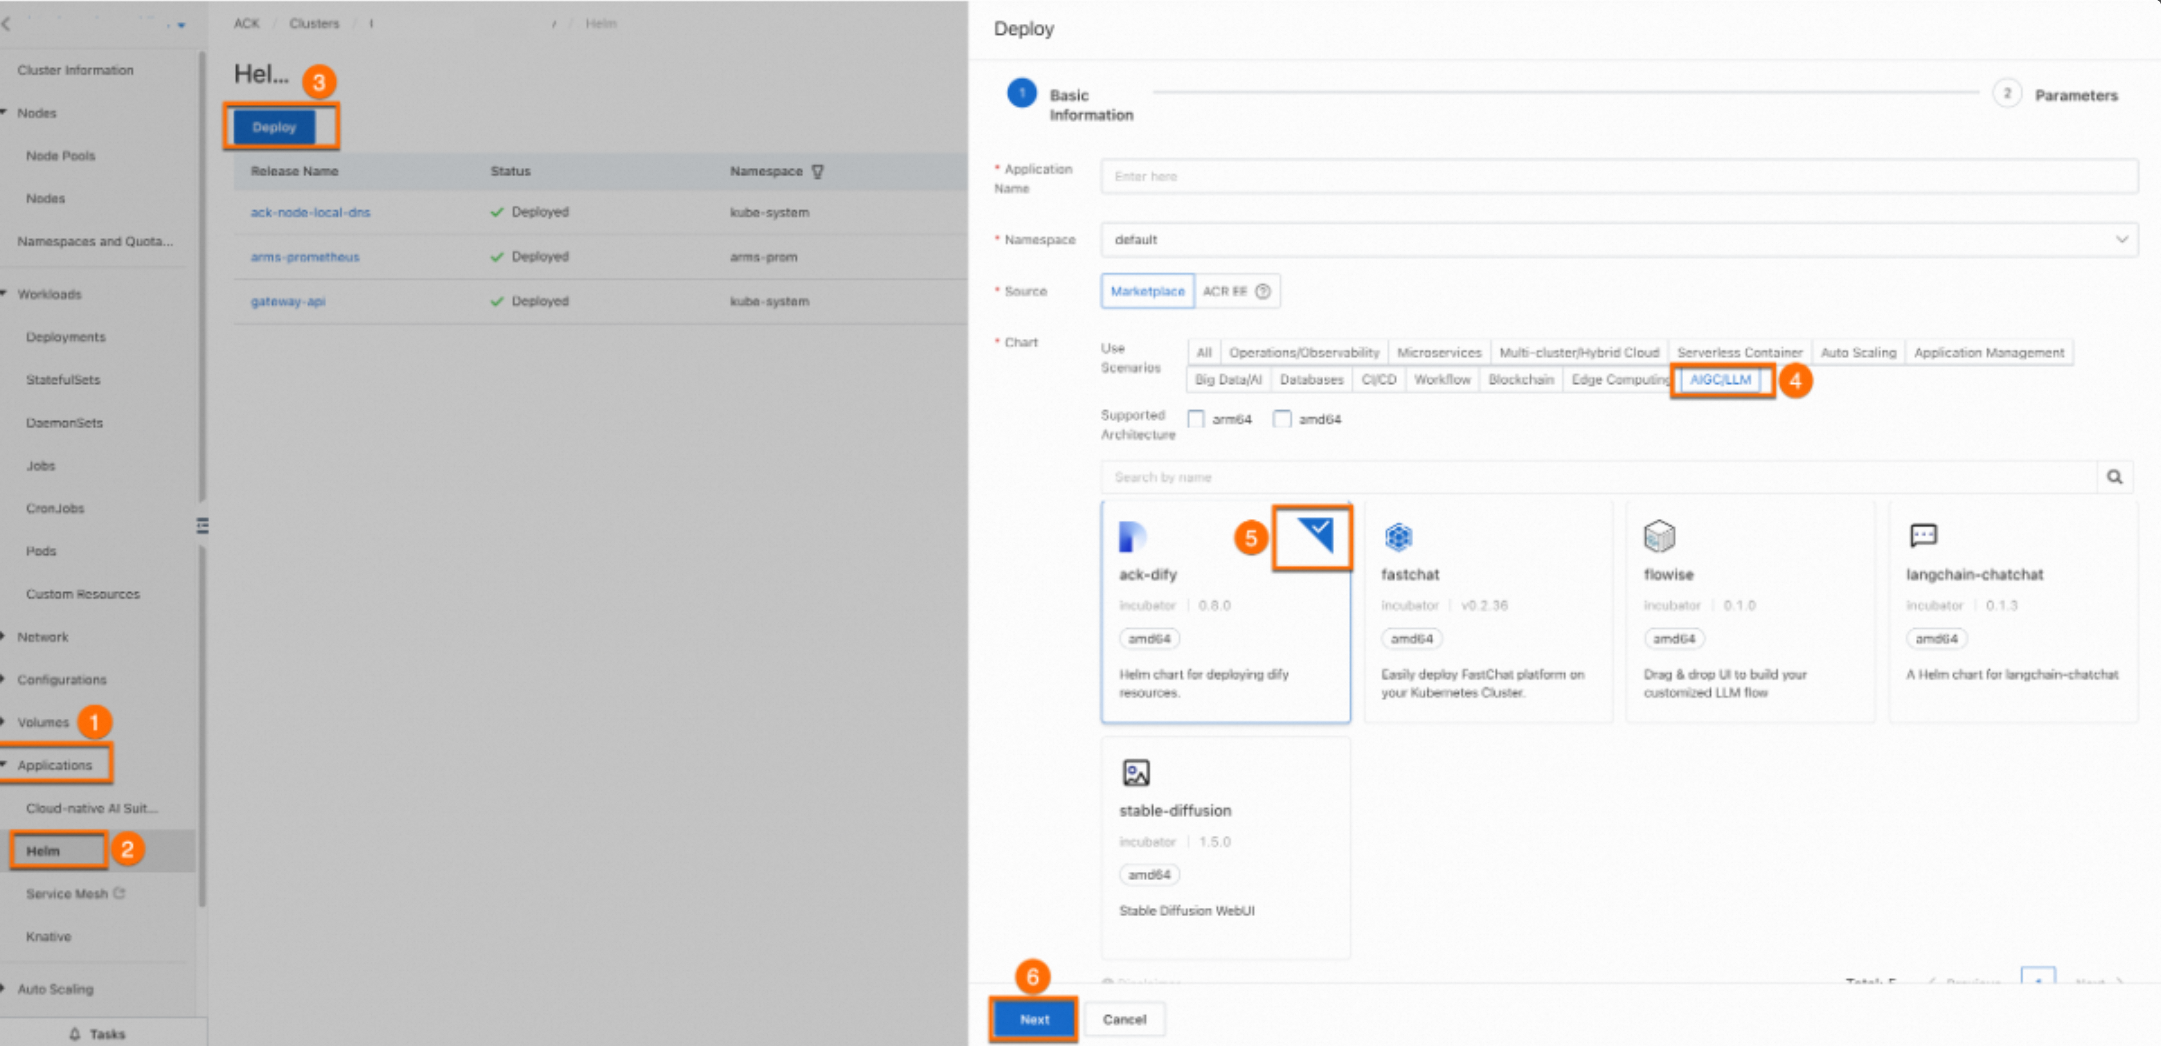
In the left navigation pane, choose Applications > Helm.
Click Deploy.
In the Deploy panel, configure the following settings:
Application Name: Use the default value.
Namespace: Use the default value.
Source: Select App Catalog.
Chart: Click the AIGC/LLM tab, then select ack-dify.
Click Next.
In the Confirm dialog box, click Yes to use the default namespace (
dify-system) and application name (ack-dify) .Select Chart Version
1.1.5, then click OK.
Verify the installation:
kubectl get pod -n dify-systemAll pods should be in Running state. If pods are Pending, verify the NAS StorageClass and PVC. See Pod troubleshooting.
Step 2: Create an AI Q&A assistant
Access the Dify service
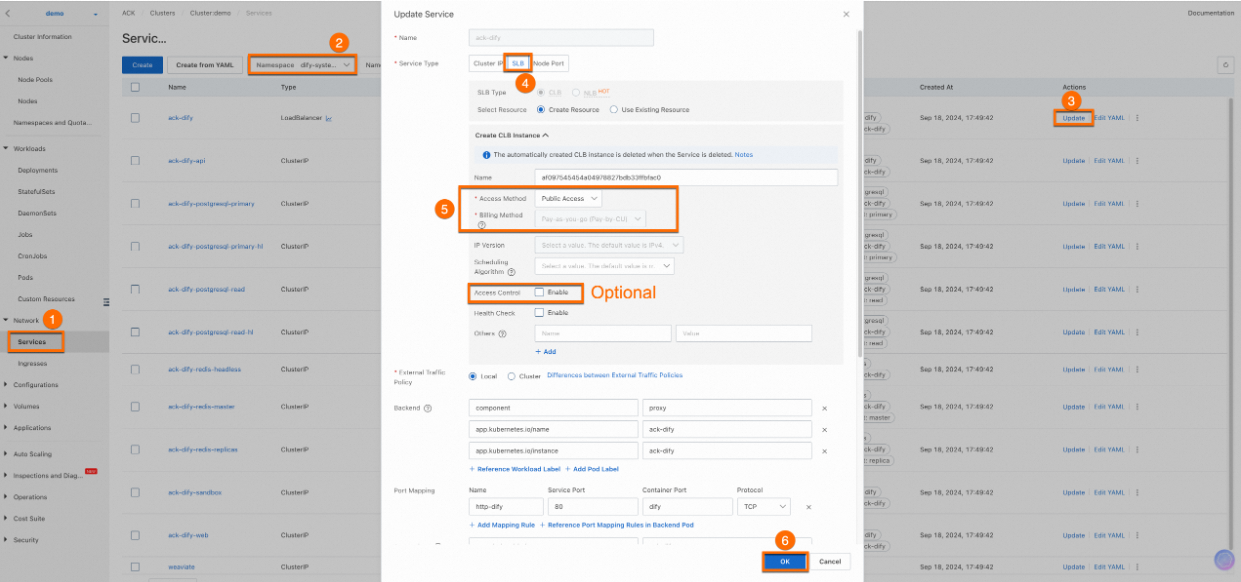
In the ACS console, go to Network > Service. Set namespace to
dify-system.Find the
ack-difyservice and copy its External IP.Open the External IP in a browser.
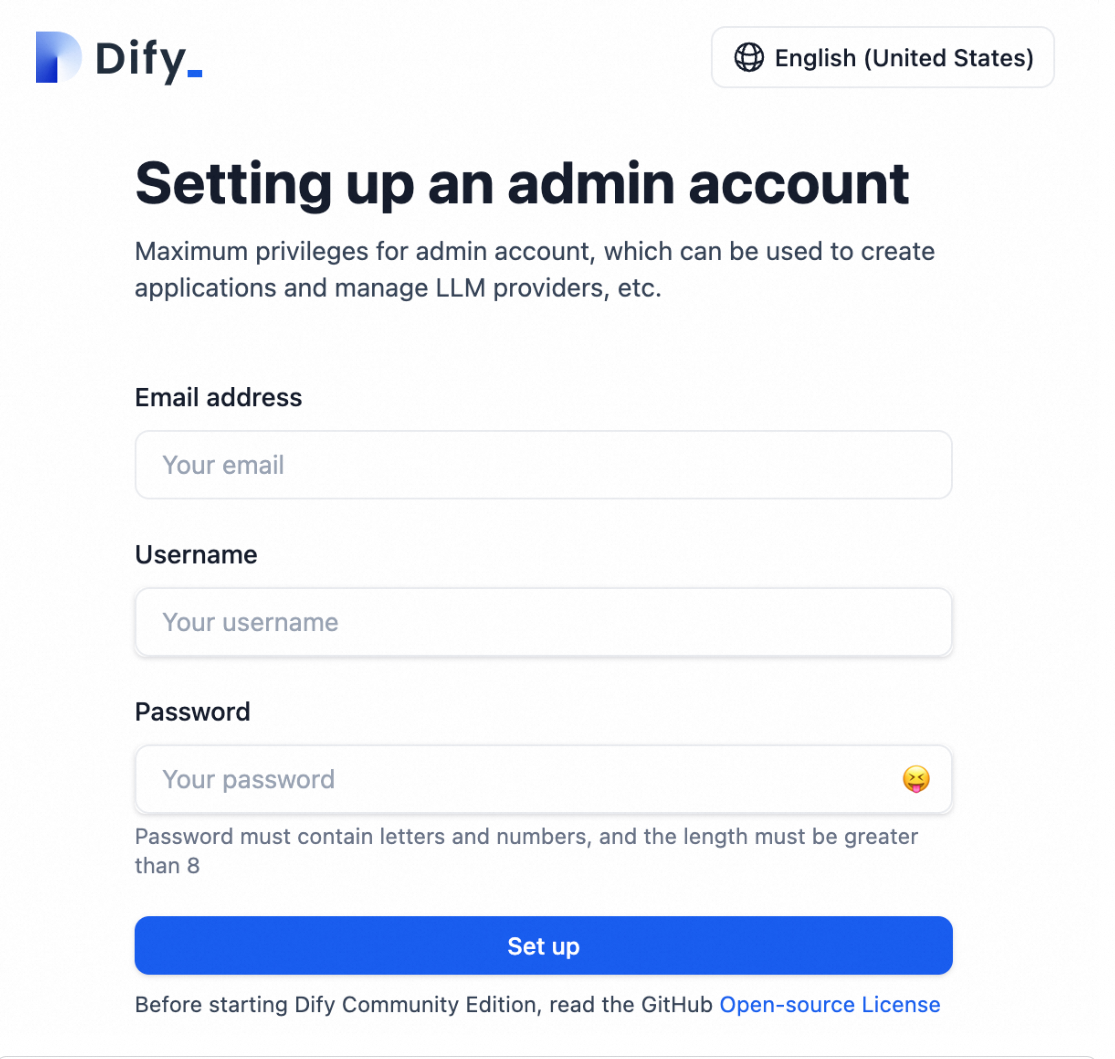
Create an administrator account (email, username, password).
Public access is for demonstration. In production, enable Access Control for security.

Configure the AI model
Log on to Dify using the External IP.
Click your username > Settings > Model Provider.
Install the Qwen plugin and click Get your API key From AliCloud.
Enter the API key and click Save.
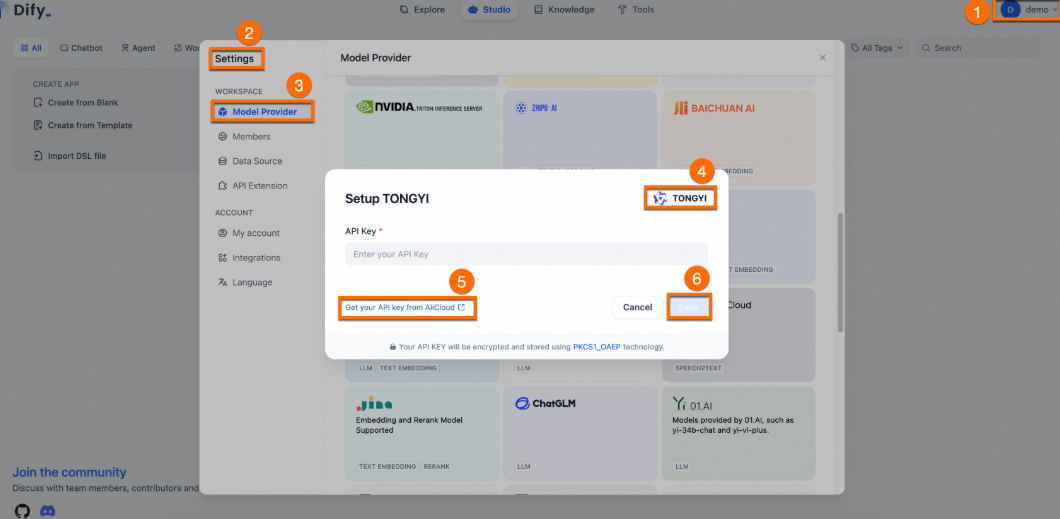
After you use up the free quota, you are charged based on tokens. See Model Studio API key.
Create the assistant
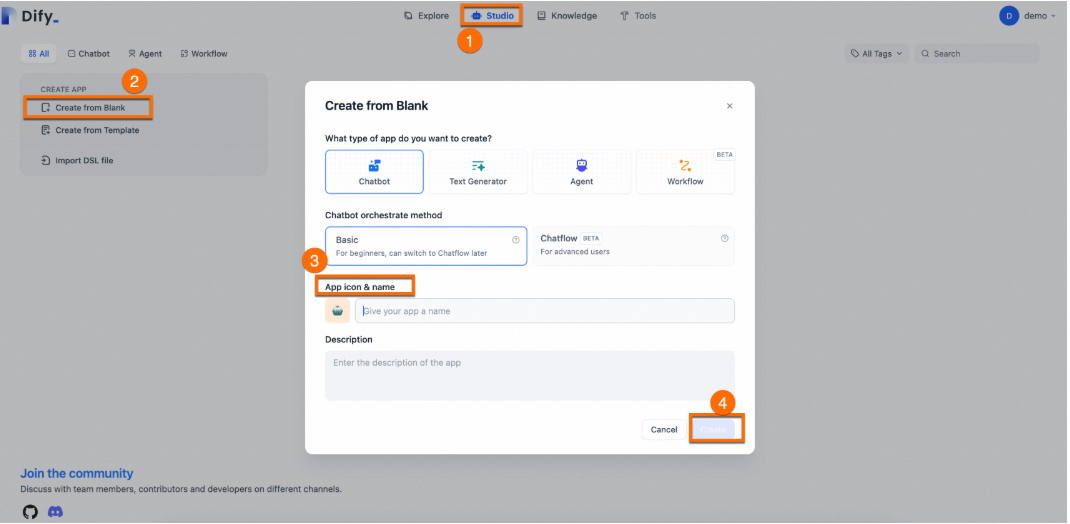
Click Studio > Create from Blank.
Enter a Name and Description.
Keep default values for other parameters.
Verify the assistant
Enter a question to test the assistant. A general-purpose chatbot can conduct simple conversations but cannot answer specialized questions.

Step 3: Customize the AI Q&A assistant
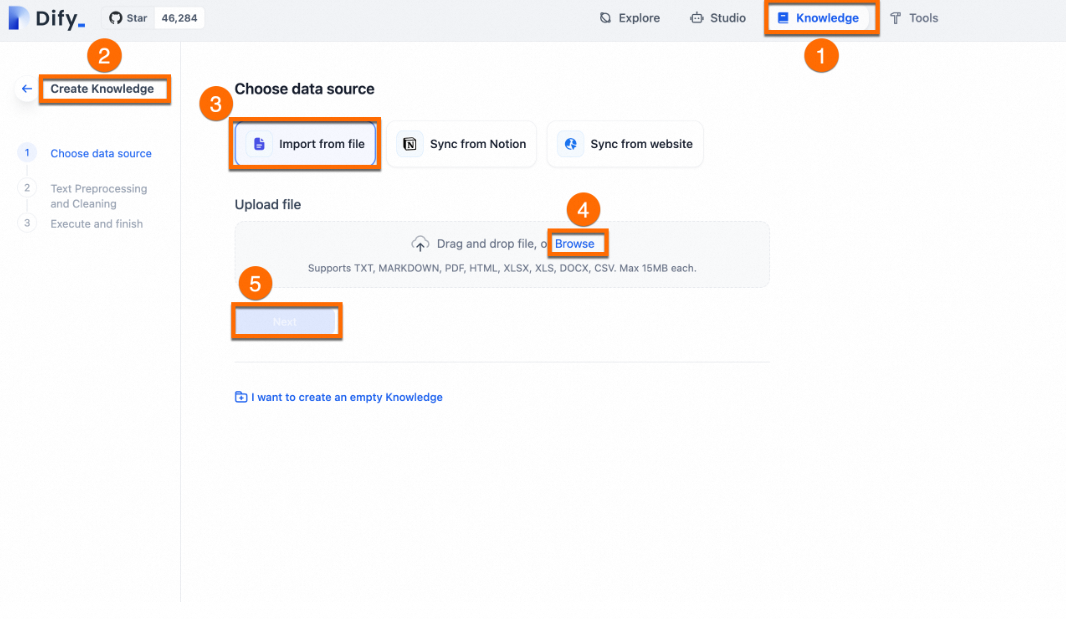
Create a knowledge base
To enable the assistant to answer domain-specific questions, attach a dedicated knowledge base.
Download the sample corpus file: dify_doc.md.
Click Knowledge > Create Knowledge > Import from file.
Select the file and click Next.
Keep default settings for text segmentation and cleaning.
Click Save.
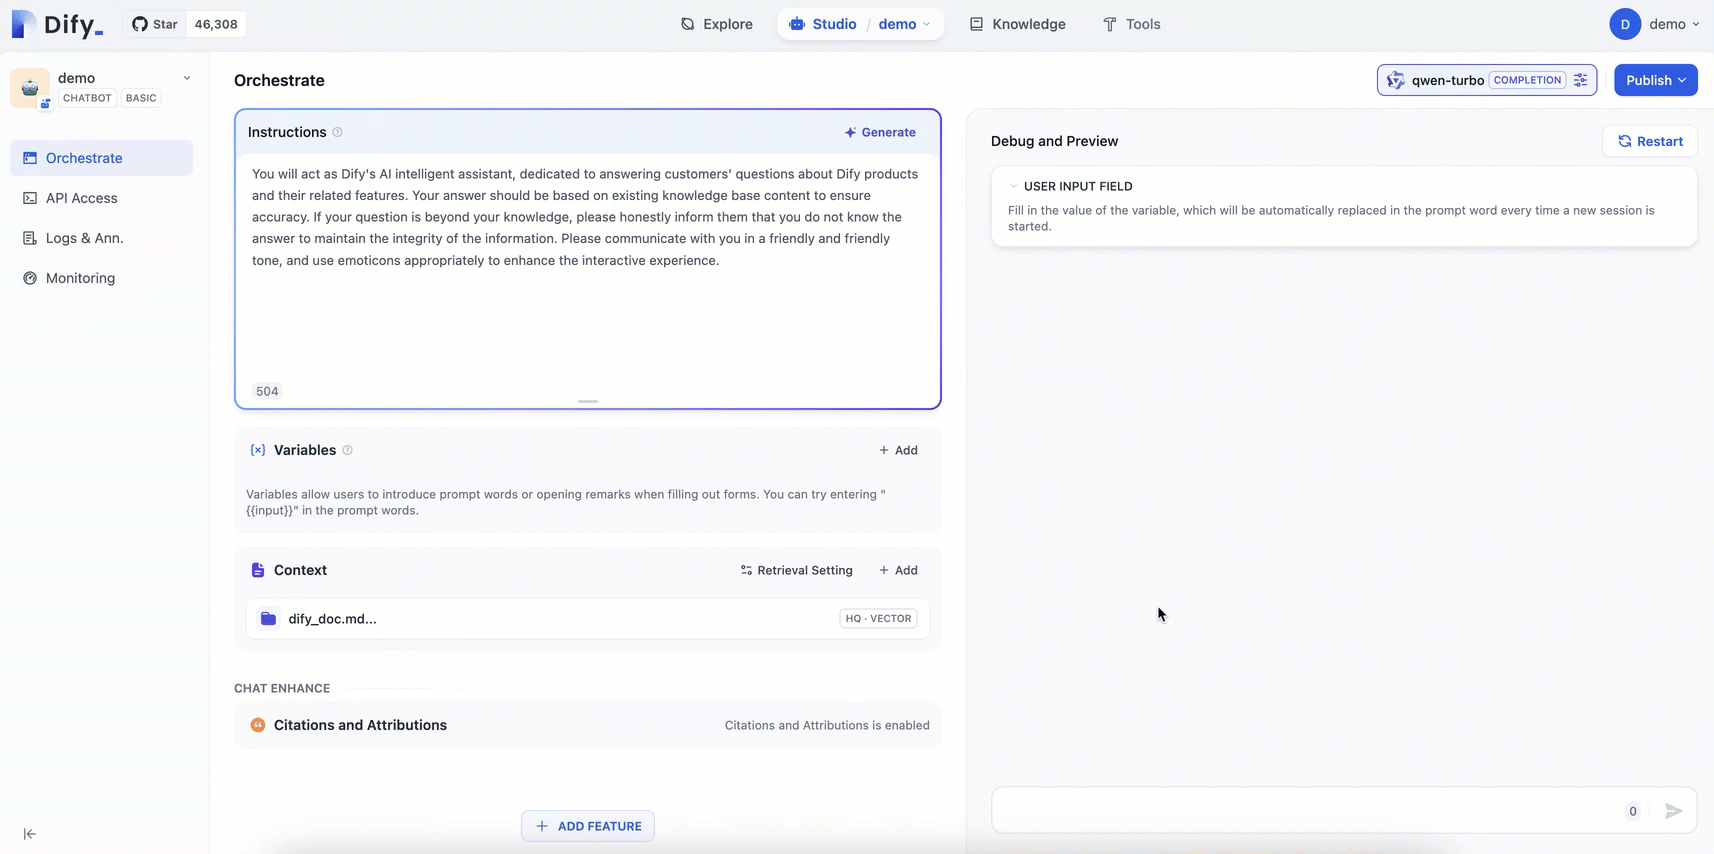
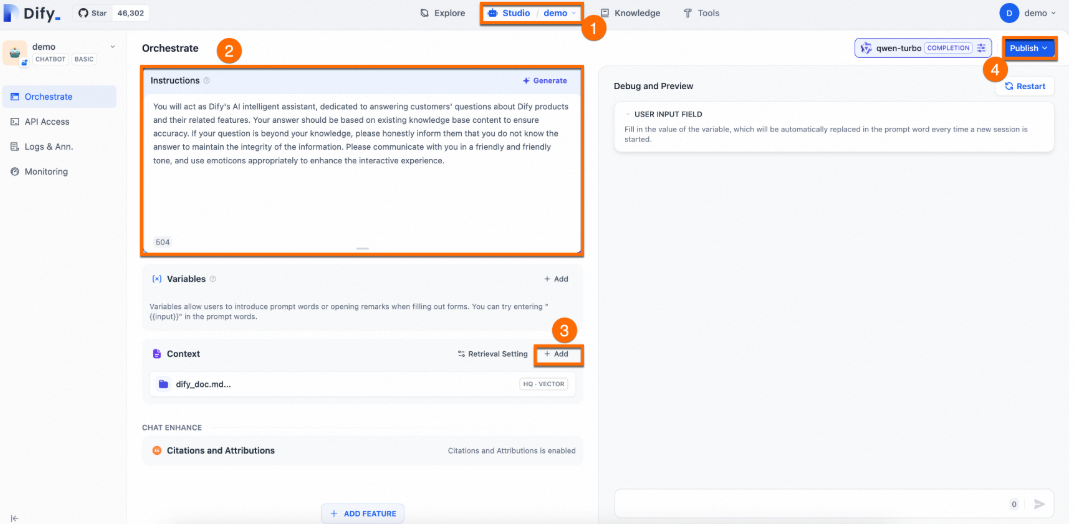
Orchestrate and publish the assistant
Configure the prompt:
You will act as Dify's AI assistant, dedicated to answering customers' questions about Dify products and their features. Your responses should be based on the existing knowledge base to ensure accuracy. If a question is beyond your knowledge, please honestly inform them that you do not know the answer, to maintain the integrity of the information. Please communicate in a friendly and warm tone, and feel free to use emoticons appropriately to enhance the interactive experience.Add a contextual knowledge base: Click Add in the Context section and select the knowledge base you created.
Click Publish > Update.
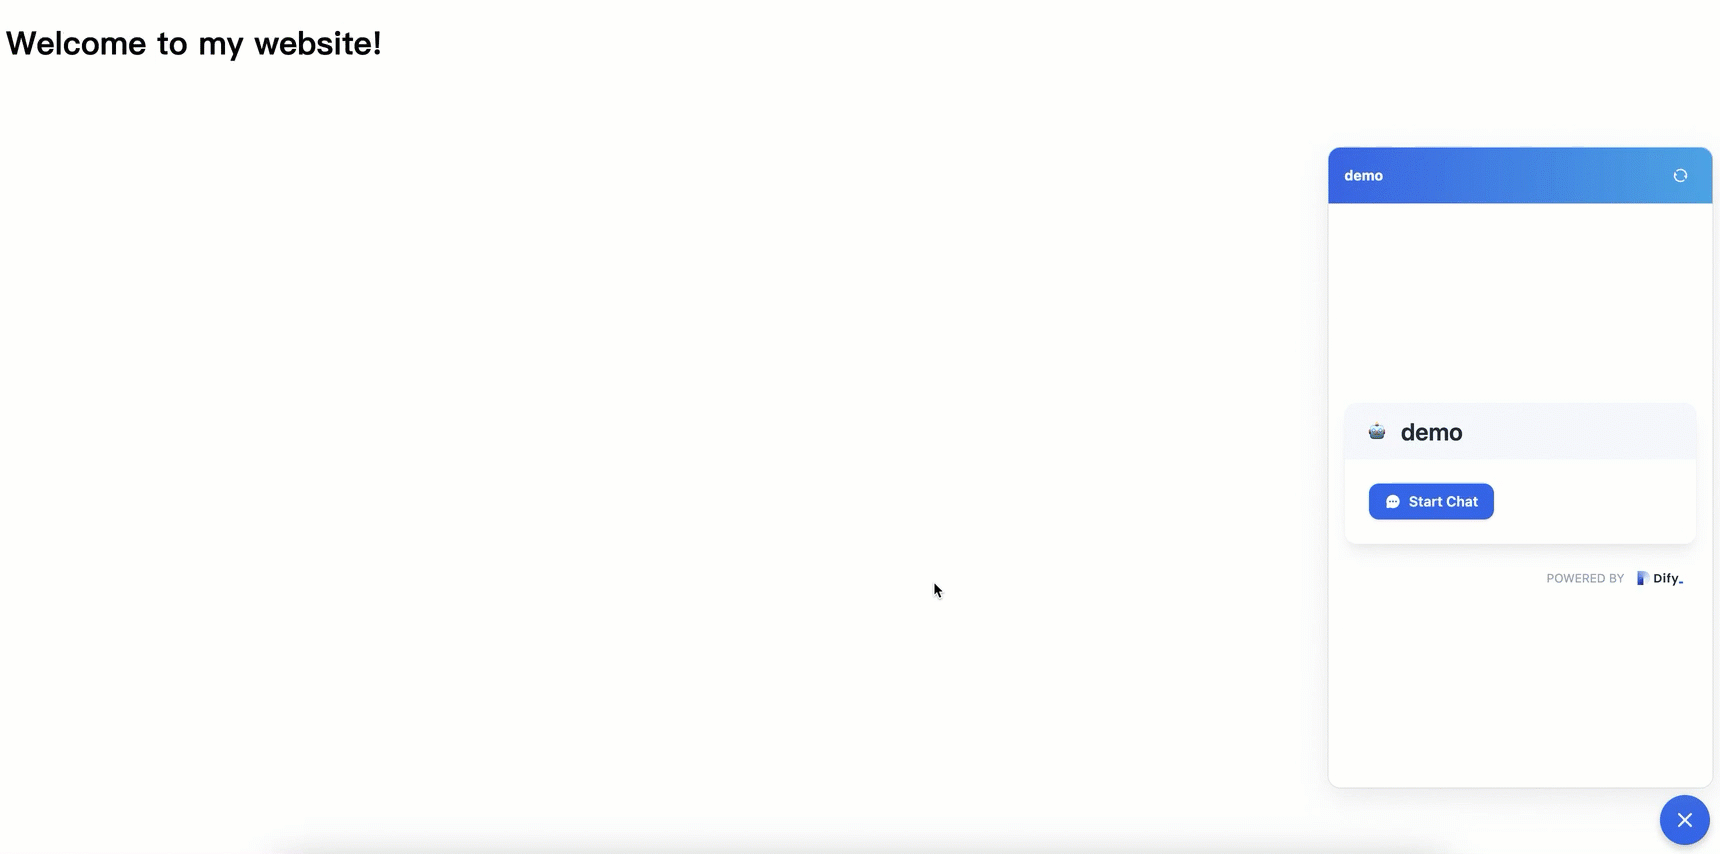
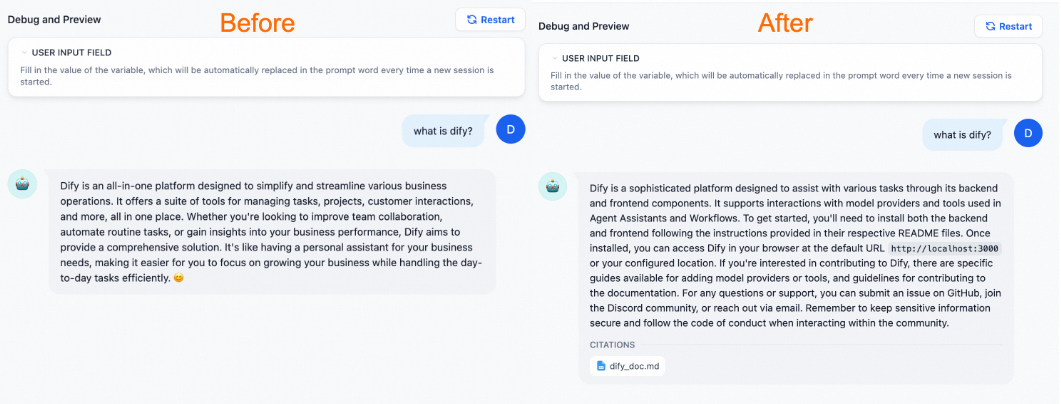
Verify the results
The assistant with a dedicated knowledge base can provide more professional and accurate answers.
Conclusion
Dify Core Feature | Description |
Comprehensive LLMOps | Real-time monitoring, continuous optimization of prompts, datasets, and models. |
RAG Engine | End-to-end pipeline from document ingestion to retrieval. Supports PDF, PPT, and other formats. |
Agent | Define agents based on LLM function calling or ReAct. 50+ built-in tools. |
Workflow Orchestration | Visual canvas for building complex AI workflows without coding. |
Observability | Track and evaluate quality and cost of LLM applications. |
Enterprise Features | SSO and access control for information security. |
Deploy in production
To deploy the AI Q&A assistant in a production environment:
Publicly shared website: Publish as a web application accessible on the Internet. See Publish as a Single-page Web App.
API-based calls: Access LLM capabilities directly from frontend applications. See Develop with APIs.
Redevelopment based on frontend components: Use Dify to quickly publish an AI site. See Re-develop Based on Frontend Templates.
Embed into your website: Embed the AI application into your business website. See Embedding In Websites.