This topic describes how to import data from an external table in MaxCompute to ApsaraDB for ClickHouse.
Usage notes
The kernel version of your ApsaraDB for ClickHouse Community-compatible Edition cluster must be 20.3 or later.
You are charged for using MaxCompute. For more information about the billing of MaxCompute, see Billable items and billing methods.
To ensure a smooth connection between your ApsaraDB for ClickHouse cluster and MaxCompute project, you must access MaxCompute over a virtual private cloud (VPC), and the MaxCompute project must be deployed in the same region as the ApsaraDB for ClickHouse cluster.
Prerequisites
MaxCompute is activated. For more information, see Activate MaxCompute and DataWorks.
A MaxCompute project is created in the same region as the ApsaraDB for ClickHouse cluster. For more information, see Create a MaxCompute project.
If you want to use MaxCompute as a RAM user, you must use the Alibaba Cloud account to grant permissions to the RAM user. For more information, see Prepare a RAM user.
Procedure
Create an external table in MaxCompute.
Log on to the MaxCompute console .
In the left-side navigation pane, choose .
On the Data Development page, move the pointer over the
 icon, and choose .
 In the Create Table dialog box, configure the Name parameter. In this example, maxcompute is used.
Click Create.
In the General section, configure the parameters.
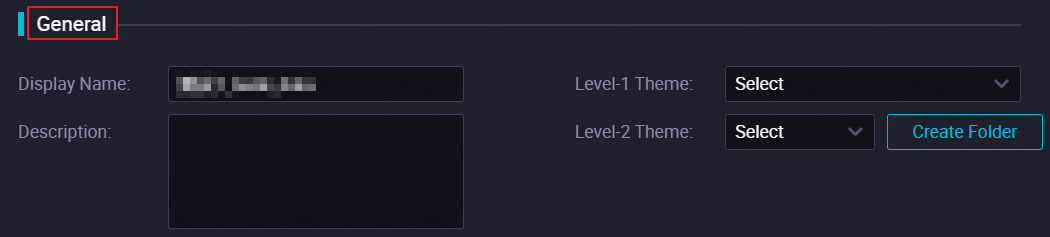
The following table describes the parameters.
Parameter
Description
Display Name
The display name of the table.
Theme
The folders that are used to store and manage the table. You can specify the level-1 and level-2 folders to store the table. The Level-1 Theme and Level-2 Theme parameters can be used to categorize tables based on business categories. You can store tables of the same business category in the same folder.
NoteThe level-1 and level-2 themes in the Workspace Tables pane of the DataStudio page help you better manage tables in folders. You can quickly find the current table in the Workspace Tables pane by theme. If no theme is available, you can create one. For information about how to create a theme, see the Create or manage folders for tables section of the "Manage settings for tables" topic.
Click DDL in the toolbar.
In the DDL dialog box, enter the following statements and click Generate Table Schema:
CREATE TABLE IF NOT EXISTS maxcompute
(
v1  INT,
v2  INT
)
PARTITIONED BY
(
    v3 STRING
);
Click Commit to Development Environment and Commit to Production Environment in sequence on the configuration page of the MaxCompute table.
Write data to the MaxCompute external table.
On the DataStudio page, click Ad Hoc Query in the left-side navigation pane.
Move the pointer over the
icon and choose . In the Create Node dialog box, configure the Path and Name parameters.
Click Confirm.
On the editing page of the node, enter the following statement to write data into the MaxCompute external table:
insert into maxcompute PARTITION (v3='2021') values (1,2),(2,3);Click the
 icon in the toolbar.
 In the Parameters dialog box, select Common scheduler resource group and click Run.
In the Estimate MaxCompute Computing Cost dialog box, check and confirm the cost in the Expense Estimate parameter, and then click Run.
Create an ApsaraDB for ClickHouse table.
Log on to the ApsaraDB for ClickHouse console.
On the Clusters page, find the cluster that you want to manage and click the cluster ID.
In the upper-right corner of the cluster details page, click Log On to Database.
Enter the following statement and click Execute(F8).
Use the following syntax to create a table:
CREATE TABLE <table_name> [on cluster default] ( 'col_name1' col_type1, 'col_name2' col_type2, ... ) ENGINE = MaxCompute('<tunnel-endpoint>', '<project-name>', '<table-name>', '<partition-spec>', '<access-key-id>', '<access-key-secret>', <read-thread-num>, '<quota>');NoteIf you use the MaxComputeRaw table engine, replace
tunnel-endpointin the preceding syntax withodps-endpoint, which indicates the VPC endpoint. For more information about how to view the VPC endpoint, see Endpoints.The following table describes the parameters.
Parameter
Description
table_nameThe name of the table.
col_name1,col_name2The names of the columns.
col_type1,col_type2The data types of the columns.
NoteThe schema type of the ApsaraDB for ClickHouse table must map the schema type of the MaxCompute table. For more information about the mappings, see the Data type mappings section in this topic.
tunnel-endpointThe Tunnel endpoint.
To ensure a smooth connection between your ApsaraDB for ClickHouse cluster and MaxCompute project, you must access MaxCompute over a VPC, and the MaxCompute project must be deployed in the same region as the ApsaraDB for ClickHouse cluster.
NoteFor more information about how to view the
Tunnel endpointof a VPC, see Endpoints.project-nameThe name of the MaxCompute project.
table-nameThe name of the MaxCompute external table.
partition-specThe partition of the MaxCompute external table.
access-key-idThe AccessKey ID that is used to access the MaxCompute project.
access-key-secretThe AccessKey secret that is used to access the MaxCompute project.
read-thread-num(Optional)The number of concurrent reads for each partition of the MaxCompute table. Default value: 1.
quota(Optional)The unit of computing resources in MaxCompute. By default, the quota is a shared quota.
Execute the following statement to create a table:
CREATE TABLE default.maxcomputetest ON CLUSTER default (
v1 Int32,
v2 Int32
) ENGINE = MaxCompute('http://dt.cn-hangzh******.aliyun-inc.com', 'ckfwt', 'maxcompute', 'v3=2021', 'LTAI****************', 'yourAccessKeySecret');
Query the ApsaraDB for ClickHouse table.
Log on to the ApsaraDB for ClickHouse console.
On the Clusters page, find the cluster that you want to manage and click the cluster ID.
In the upper-right corner of the cluster details page, click Log On to Database.
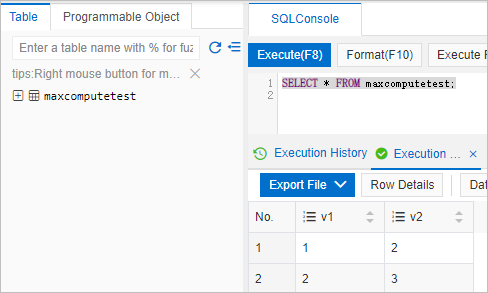
Enter a query statement and click Execute(F8).
SELECT * FROM maxcomputetest;The following result is returned.
Data type mappings
Data type in MaxCompute | Data type in ApsaraDB for ClickHouse |
Boolean | UInt8 |
Tinyint | UInt8, Int8 |
Smalllint | UInt16, Int16 |
Int | UInt32, Int32 |
Bigint | UInt64, Int64 |
Float | Float32 |
Double | Float64 |
Char | String |
Varchar | String |
Binary | String |
String | String |
Date | Date |
Datetime | Datetime |
UUID | Not supported |
INTERVAL | Not supported |
Decimal | String |
Timestamp | Not supported |
Map | Nested(Nullable(keyType), Nullable(valueType)). Only unnested Map structures are supported. For example, map<string, string> in MaxCompute maps Nested(k Nullable(String), v Nullable(String)) in ApsaraDB for ClickHouse. Note The Nested structure can contain only nullable values. Otherwise, an error occurs when you create a table. |
Array | Array(Nullable(Type)). Only unnested Array structures are supported. For example, array<int> in MaxCompute maps Array(Nullable(Int32)) in ApsaraDB for ClickHouse. Note The Array structure can contain only nullable values. Otherwise, an error occurs when you create a table. |
Struct | Tuple(Nullable(Type)). Only unnested Struct structures are supported. For example, struct<x:int, y:string> in MaxCompute maps Tuple(Nulable(Int32), Nullable(String)) in ApsaraDB for ClickHouse. Note The Tuple structure can contain only nullable values. Otherwise, an error occurs when you create a table. |