This topic describes how to use Quick Configuration to set up a Smart Access Gateway (SAG) app instance for a fast and secure connection to Alibaba Cloud.
Background
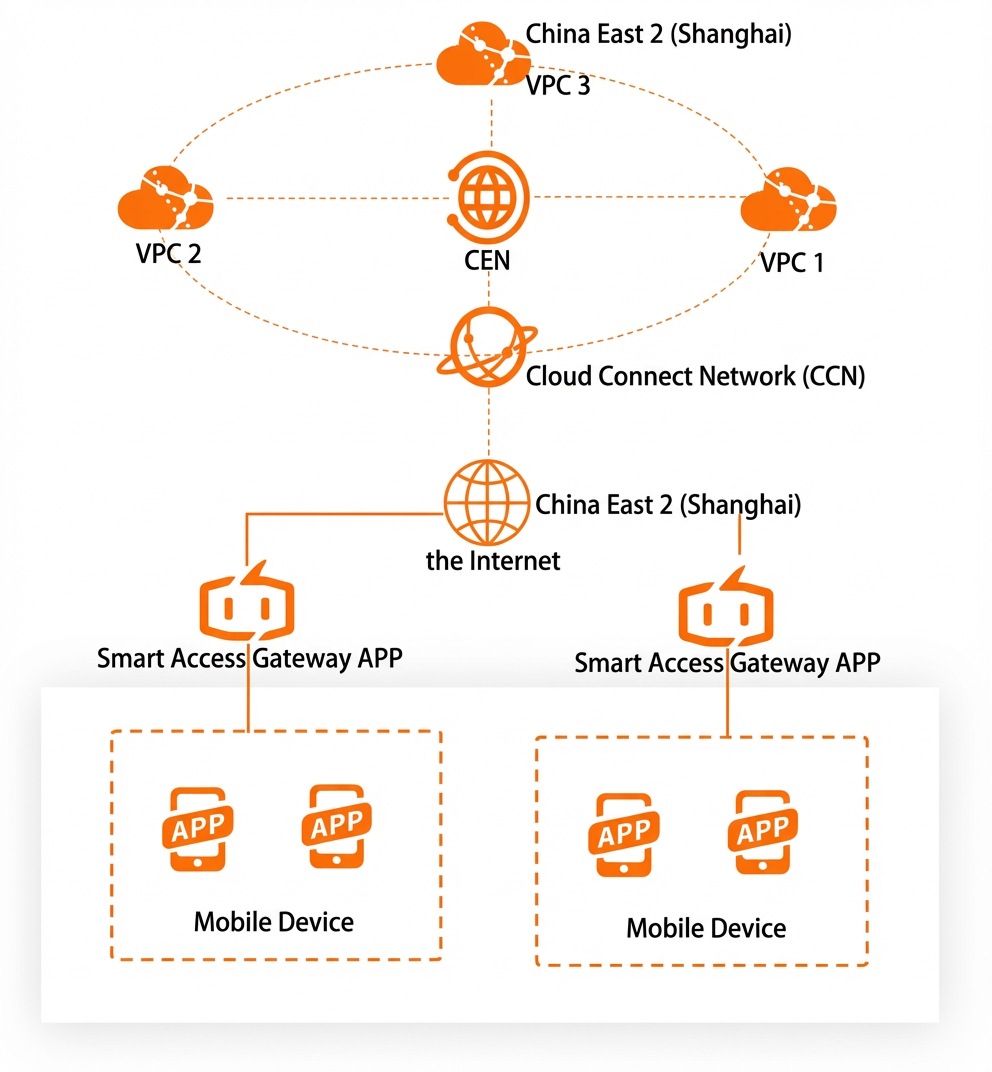
Consider the following scenario: A company has deployed application services on an Alibaba Cloud account in the China (Shanghai) region. Employees access cloud resources from the company's on-premises private network. As the company grows, remote employees need to access these cloud resources. To meet this need, the company uses the Smart Access Gateway App. The app allows remote employees to securely connect to the private network and access cloud resources from anywhere.
Procedure
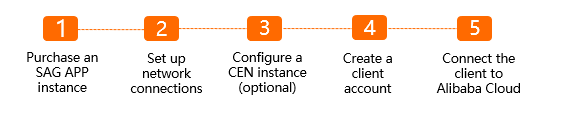
Step 1: Purchase a SAG app instance
Before you use the Smart Access Gateway app, you must purchase a Smart Access Gateway app instance. This instance allows you to centrally manage networks and clients.
- Log on to the SAG console.
- In the top navigation bar, select the target region.
- In the left-side navigation pane, choose .
- On the SAG App Instances page, click Create SAG App. Set the following parameters, click Buy Now, and complete the payment.
Parameter Description RegionRegion The region where the Smart Access Gateway client is used. In this example, China (Shanghai) is selected. Number of Client Accounts The maximum number of client accounts you can create. After you purchase a specific number of client accounts, you can create the same number of accounts. Typically, one account is created for each employee who needs to log on. This example uses the default value of 10. NoteYou can select 1 to 2,000 client accounts. Client accounts are billed based on a tiered pricing model. For more information, see Billing rules for SAG app instances.
Data plan per account Included data cannot be shared between accounts or carried over to the next month. The default value is 5 GB. Billing method for overage If an account's usage exceeds its data plan, the overage is billed on a pay-as-you-go basis. This example uses Pay-As-You-Go. Subscription Period The subscription duration for the data plan, calculated by month. Auto-renewal is supported. This example uses the default value of 1 Month. Resource Group Select the resource group to which the instance belongs. This example uses Default Resource Group.
Step 2: Configure the network
After purchasing the SAG app instance, you must configure its network settings. This includes specifying the private CIDR block for clients and associating a Cloud Connect Network (CCN) instance.
CCN is a key component of SAG. Associating your SAG app instance with a CCN instance allows clients connected to the app instance to communicate with other gateway devices attached to the same CCN instance. For more information about CCN, see What is Cloud Connect Network?.
- On the SAG App Instances page, find your new instance and click Quick Configuration in the Operation column.
- On the Network Configuration page, complete the network configuration as follows:
Parameter Description Instance Name/ID The name and ID of the Smart Access Gateway app instance that you created. Resource Group The resource group to which the Smart Access Gateway app instance belongs. CCN Choose one of the following methods to associate a CCN instance. This example uses Create CCN. - Existing CCN: If you have an existing CCN instance, select it from the drop-down list.
- Create CCN: If you do not have a CCN instance, enter a name. The system creates a CCN instance in the current region and automatically associates it with the Smart Access Gateway app instance.
Standby and Active DNS This parameter is optional. You can specify the active and standby DNS servers for clients to use when connecting to the private network. After you configure DNS, the settings are automatically pushed to the clients. This example leaves the field blank. Note- If clients use PrivateZone to connect to Alibaba Cloud, set the DNS server addresses to 100.100.2.136 and 100.100.2.138. For more information about PrivateZone, see What is PrivateZone?.
- DNS configuration is supported only on Android clients version 2.1.1 or later and macOS clients version 2.1.1 or later. For more information about clients, see Install the client.
Private CIDR Block The private CIDR block used for client connections to Alibaba Cloud. When a client connects, the system automatically assigns an available IP address from this CIDR block. Ensure the CIDR blocks do not overlap. This example uses 192.168.10.0/24. Click Add Private CIDR Block to add more CIDR blocks. You can configure up to five private CIDR blocks.
Step 3: (Optional) Associate with a CEN instance
You can associate the CCN instance with a Cloud Enterprise Network (CEN) instance. This association allows the app instance's network to communicate with cloud resources attached to the CEN instance. For more information about CEN, see What is Cloud Enterprise Network?.
- Click Next: Associate with a CEN (optional) to associate a CEN instance.
This is an optional step. If you do not need to associate a CEN instance, click Skip at the bottom of the page.
- Use one of the following methods to associate a CEN instance. This example selects an existing CEN instance to enable communication between clients and cloud resources.
- Instance Name/ID: The name and ID of the CCN instance that you created.
- Existing CEN: If you have an existing CEN instance, select it from the drop-down list.
- Create CEN: If you do not have a CEN instance, enter a name. The system creates a CEN instance and automatically associates it with the CCN instance.
Step 4: Create a client account
After configuring the network, you must create client accounts. These accounts allow users to log on to the client and connect to the private network.
| Parameter | Description |
| Username | The username for the client account. Note
|
| Email Address | The user's email address. This address is used to send login credentials to the user. |
| Static IP |
|
| Set Maximum Bandwidth | The maximum bandwidth for this account. This example uses the default value. The value can range from 1 Kbps to 20,000 Kbps. The default is 2,000 Kbps. |
| Set Password | The password for logging on to the client. |
| Maximum Bandwidth for Application Acceleration | Set the client account's maximum bandwidth for application acceleration. The unit is Kbps. Instructions
|
Step 5: Connect to the cloud
After creating the client account, download and install the client on your device. You can then use the client to connect to the private network and access your cloud resources.
- After the configuration is complete, click Download Now to view download and installation instructions. For more information, see Install the client.
- After the client is installed, log on to the client with your account credentials and connect to the private network to access cloud resources. For more information, see Connect to a private network.