This topic describes how to set up a Spark on MaxCompute development environment.
If a Windows operating system is installed, go to Set up a Windows development environment.
Prerequisites
Before you set up a Spark on MaxCompute development environment, make sure that the following software is installed in your Linux operating system:
The software version numbers and software installation paths used in this topic are for reference only. The actual software version that you must download and install differs based on your operating system.
JDK
The following sample commands show how to install JDK in a Linux operating system. The JDK package name varies based on actual situations. You can obtain the JDK package name by running the
sudo yum -y list java*command.sudo yum install -y java-1.8.0-openjdk-devel.x86_64Python
The following sample commands show how to install Python in a Linux operating system. The Python package name varies based on actual situations.
# Obtain the Python package.
sudo wget https://www.python.org/ftp/python/2.7.10/Python-2.7.10.tgz
# Decompress the Python package.
sudo tar -zxvf Python-2.7.10.tgz
# Switch to the path to which the Python package is decompressed and specify the installation path.
cd Python-2.7.10
sudo ./configure --prefix=/usr/local/python2
# Compile and install the Python package.
sudo make
sudo make install
Maven
The following sample commands show how to install Maven in a Linux operating system. The path of the Maven package varies based on actual situations.
# Obtain the Maven package.
sudo wget https://dlcdn.apache.org/maven/maven-3/3.8.7/binaries/apache-maven-3.8.7-bin.tar.gz
# Decompress the Maven package.
sudo tar -zxvf apache-maven-3.8.7-bin.tar.gz
Git
The following sample commands show how to install Git in a Linux operating system.
# Obtain the Git package.
sudo wget https://github.com/git/git/archive/v2.17.0.tar.gz
# Decompress the Git package.
sudo tar -zxvf v2.17.0.tar.gz
# Install the dependencies that are required for compiling the source code of Git.
sudo yum install curl-devel expat-devel gettext-devel openssl-devel zlib-devel gcc perl-ExtUtils-MakeMaker
# Switch to the path to which the Git package is decompressed.
cd git-2.17.0
# Compile the source code of Git.
sudo make prefix=/usr/local/git all
# Install Git in the /usr/local/git path.
sudo make prefix=/usr/local/git install
Download the Spark on MaxCompute client package and upload the package to your operating system
The Spark on MaxCompute client package is released with the MaxCompute authentication feature. This allows Spark on MaxCompute to serve as a client that submits jobs to your MaxCompute project by using the spark-submit script. MaxCompute provides release packages for Spark 1.x, Spark 2.x, and Spark 3.x. You can download these packages from the following links:
Spark-1.6.3: used to develop Spark 1.x applications.
Spark-2.3.0: used to develop Spark 2.x applications.
Spark-2.4.5: used to develop Spark 2.x applications. For more information about the precautions on using Spark 2.4.5, see Precautions on using Spark 2.4.5.
Spark-3.1.1: used to develop Spark 3.x applications. For more information about the precautions on using Spark 3.1.1, see Precautions on using Spark 3.1.1.
Upload the Spark on MaxCompute client package to your Linux operating system and decompress the package. You can go to the path in which the Spark on MaxCompute client package is located and run the following command to decompress the package:
sudo tar -xzvf spark-2.3.0-odps0.33.0.tar.gzConfigure environment variables
The commands that are used to configure environment variables in this section can be executed only by users with the administrator permissions.
You must configure environment variables in the CLI of your Linux operating system. The following content describes how to configure the environment variables and provides related information.
Configure Java environment variables.
Obtain the Java installation path. Sample commands:
# If you use yum to install Java, Java is installed in the /usr path by default. You can run the following command to query the Java installation path. If you use a custom installation path, the actual path prevails.
whereis java
ls -lrt /usr/bin/java
ls -lrt /etc/alternatives/java

# The following result is returned. In the result, /usr/lib/jvm/java-1.8.0-openjdk-1.8.0.322.b06-1.1.al7.x86_64 is the Java installation path.
/etc/alternatives/java -> /usr/lib/jvm/java-1.8.0-openjdk-1.8.0.322.b06-1.1.al7.x86_64/jre/bin/java
Edit Java environment variables. Sample commands:
# Edit the configuration file for environment variables.
vim /etc/profile

# Press i to enter the edit mode and add environment variables to the end of the configuration file.
# Set JAVA_HOME to the actual Java installation path.
export JAVA_HOME=/usr/lib/jvm/java-1.8.0-openjdk-1.8.0.322.b06-1.1.al7.x86_64
export CLASSPATH=.:$JAVA_HOME/lib/dt.jar:$JAVA_HOME/lib/tools.jar
export PATH=$JAVA_HOME/bin:$PATH
# Press the Esc key to exit the edit mode and enter :wq to close the configuration file.

# Run the following command to make the modification take effect:
source /etc/profile

# Check whether the Java environment variables are successfully configured.
java -version
# The following result is returned:
openjdk version "1.8.0_322"
OpenJDK Runtime Environment (build 1.8.0_322-b06)
OpenJDK 64-Bit Server VM (build 25.322-b06, mixed mode)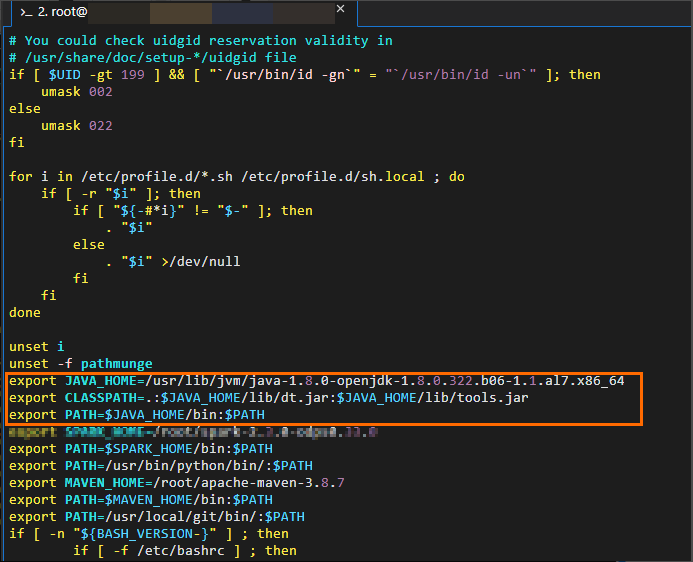
Configure Spark environment variables.
Obtain the path to which the Spark on MaxCompute client package is decompressed. The following figure shows that the path is
/home/spark-2.3.0-odps0.33.0. The decompression path and package name vary based on actual situations.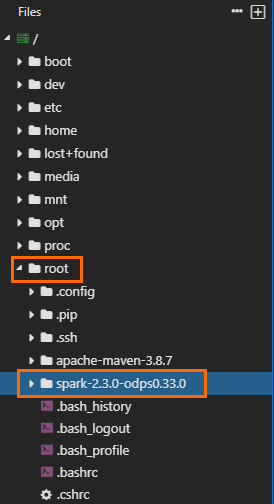
Edit Spark environment variables. Sample commands:
# Edit the configuration file for environment variables.
vim /etc/profile
# Press i to enter the edit mode and add environment variables to the end of the configuration file.
# Set SPARK_HOME to the actual path to which the Spark on MaxCompute client package is decompressed.
export SPARK_HOME=/home/spark-2.3.0-odps0.33.0
export PATH=$SPARK_HOME/bin:$PATH
# Press the Esc key to exit the edit mode and enter :wq to close the configuration file.

# Run the following command to make the modification take effect:
source /etc/profile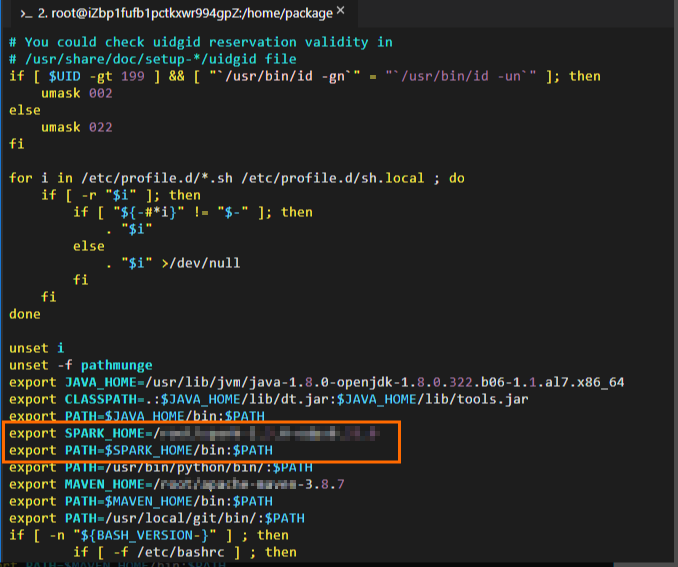
Configure Python environment variables.
If you use PySpark, you must configure Python environment variables.
Obtain the Python installation path. Sample command:

Edit Python environment variables. Sample commands:
# Edit the configuration file for environment variables.
vim /etc/profile

# Press i to enter the edit mode and add environment variables to the end of the configuration file.
# Set PATH to the actual Python installation path.
export PATH=/usr/bin/python/bin/:$PATH
# Press the Esc key to exit the edit mode and enter :wq to close the configuration file.

# Run the following command to make the modification take effect:
source /etc/profile

# Check whether the Python environment variables are successfully configured.
python --version
# The following result is returned:
Python 2.7.5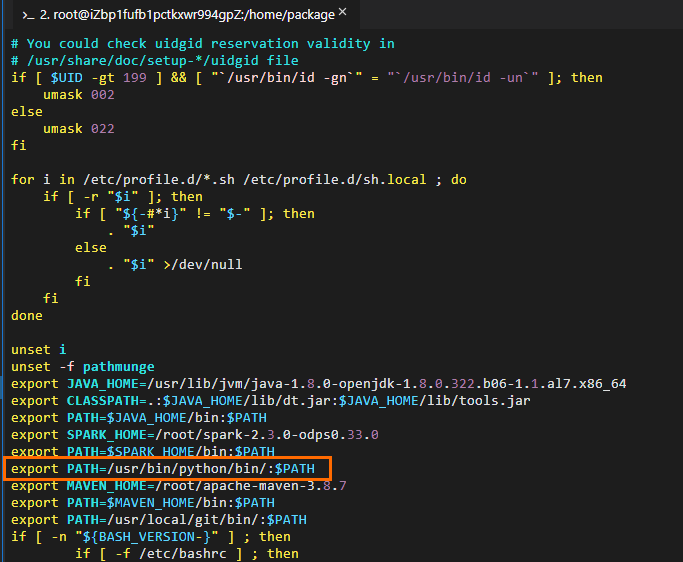
Configure Maven environment variables.
Obtain the path to which the Maven package is decompressed. The following figure shows that the path is
/home/apache-maven-3.8.7. The decompression path and package name vary based on actual situations.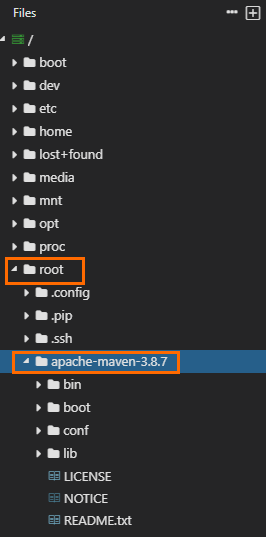
Edit Maven environment variables. Sample commands:
# Edit the configuration file for environment variables.
vim /etc/profile

# Press i to enter the edit mode and add environment variables to the end of the configuration file.
# Set MAVEN_HOME to the actual path to which the Maven package is decompressed.
export MAVEN_HOME=/home/apache-maven-3.8.7
export PATH=$MAVEN_HOME/bin:$PATH
# Press the Esc key to exit the edit mode and enter :wq to close the configuration file.
# Run the following command to make the modification take effect:
source /etc/profile

# Check whether the Maven environment variables are successfully configured.
mvn -version
# The following result is returned:
Apache Maven 3.8.7 (9b656c72d54e5bacbed989b64718c159fe39b537)
Maven home: /home/apache-maven-3.8.7
Java version: 1.8.0_322, vendor: Red Hat, Inc., runtime: /usr/lib/jvm/java-1.8.0-openjdk-1.8.0.322.b06-1.1.al7.x86_64/jre
Default locale: en_US, platform encoding: UTF-8
OS name: "linux", version: "4.19.91-25.1.al7.x86_64", arch: "amd64", family: "unix"
Configure Git environment variables.
Obtain the Git installation path. Sample commands:
whereis git
Edit Git environment variables. Sample commands:
# Edit the configuration file for environment variables.
vim /etc/profile

# Press i to enter the edit mode and add environment variables to the end of the configuration file. # Set PATH to the actual Git installation path.
export PATH=/usr/local/git/bin/:$PATH
# Press the Esc key to exit the edit mode and enter :wq to close the configuration file.

# Run the following command to make the modification take effect:
source /etc/profile

# Check whether the Git environment variables are successfully configured.
git --version
# The following result is returned:
git version 2.24.4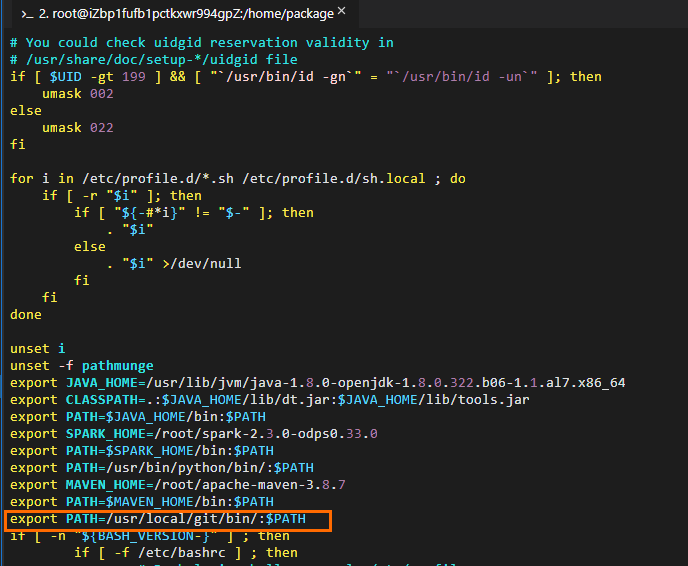
Configure the spark-defaults.conf file
If you use the Spark on MaxCompute client for the first time, rename the spark-defaults.conf.template file in the conf folder of the decompression path of the Spark on MaxCompute client package as spark-defaults.conf. Then, configure the information in the file. If you do not rename the file, the configuration cannot take effect. Sample commands:
# Switch to the path to which the Spark on MaxCompute client package is decompressed and go to the conf folder. The actual path prevails.
cd /home/spark-2.3.0-odps0.33.0/conf

# Rename the spark-defaults.conf.template file.
mv spark-defaults.conf.template spark-defaults.conf

# Edit the spark-defaults.conf file.
vim spark-defaults.conf
# Press i to enter the edit mode and add the following configuration to the end of the configuration file.
spark.hadoop.odps.project.name = <MaxCompute_project_name>
spark.hadoop.odps.access.id = <AccessKey_id>
spark.hadoop.odps.access.key = <AccessKey_secret>
spark.hadoop.odps.end.point = <Endpoint>   # The endpoint that is used to connect the Spark on MaxCompute client to your MaxCompute project. You can modify the endpoint based on your business requirements. For more information, see Endpoint.
# For Spark 2.3.0, set spark.sql.catalogImplementation to odps. For Spark 2.4.5, set spark.sql.catalogImplementation to hive.
spark.sql.catalogImplementation={odps|hive}
# Retain the following configurations:
spark.hadoop.odps.task.major.version = cupid_v2
spark.hadoop.odps.cupid.container.image.enable = true
spark.hadoop.odps.cupid.container.vm.engine.type = hyper
spark.hadoop.odps.moye.trackurl.host = http://jobview.odps.aliyun.comMaxCompute_project_name: the name of the MaxCompute project that you want to access.
This parameter specifies the name of your MaxCompute project instead of the DataWorks workspace to which the MaxCompute project corresponds. You can log on to the MaxCompute console. In the top navigation bar, select a region. In the left-side navigation pane, choose Workspace > Projects to view the name of the MaxCompute project.
AccessKey_id: the AccessKey ID that is used to access the MaxCompute project.
You can obtain the AccessKey ID from the AccessKey Pair page.
AccessKey_secret: the AccessKey secret that corresponds to the AccessKey ID.
You can obtain the AccessKey secret from the AccessKey Pair page.
Endpoint: the public endpoint of the region where your MaxCompute project resides.
For more information about the public endpoint of each region, see Endpoints in different regions (Internet).
VPC_endpoint: the VPC endpoint of the region where your MaxCompute project resides.
For more information about the VPC endpoint of each region, see Endpoints in different regions (VPC).
Other configuration parameters are required for special scenarios and features. For more information, see Spark on MaxCompute configuration details.
Prepare a project
Spark on MaxCompute provides a demo project template. We recommend that you download and copy the template to develop your application.
In the demo project, the dependency scope for Spark on MaxCompute is provided. Do not change this scope. Otherwise, the job that you submit may not run as expected.
Prepare a project in a Linux operating system.
Download the Spark 1.x template and compile the template.
git clone https://github.com/aliyun/MaxCompute-Spark.git
cd MaxCompute-Spark/spark-1.x
mvn clean package
Download the Spark 2.x template and compile the template.
git clone https://github.com/aliyun/MaxCompute-Spark.git
cd MaxCompute-Spark/spark-2.x
mvn clean package
Download the Spark 3.x template and compile the template.
git clone https://github.com/aliyun/MaxCompute-Spark.git
cd MaxCompute-Spark/spark-3.x
mvn clean package
After you run the preceding commands, if an error message appears, indicating that the environment configurations are invalid, follow the preceding instructions to check the configurations. If any invalid configurations are found, modify the configurations.
Configure dependencies
In the Spark on MaxCompute project that you prepared, configure the dependencies. Sample commands:
Configure the dependencies that are required for accessing tables in your MaxCompute project.
The Spark-1.x template is used.
# Go to the spark-1.x folder.
cd MaxCompute-Spark/spark-1.x

# Edit the POM file to add the odps-spark-datasource dependency.
<dependency>
  <groupId>com.aliyun.odps</groupId>
  <artifactId>odps-spark-datasource_2.10</artifactId>
  <version>3.3.8-public</version>
</dependency>
The Spark-2.x template is used.
# Go to the spark-2.x folder.
cd MaxCompute-Spark/spark-2.x

# Edit the POM file to add the odps-spark-datasource dependency.
<dependency>
    <groupId>com.aliyun.odps</groupId>
    <artifactId>odps-spark-datasource_2.11</artifactId>
    <version>3.3.8-public</version>
</dependency>
Configure the dependency that is required for accessing Object Storage Service (OSS).
If your job needs to access OSS, add the following dependency:
<dependency>
    <groupId>com.aliyun.odps</groupId>
    <artifactId>hadoop-fs-oss</artifactId>
    <version>3.3.8-public</version>
</dependency>
For more information about the dependencies that are required when the Spark-1.x, Spark-2.x, or Spark-3.x template is used, see Spark-1.x pom, Spark-2.x pom, or Spark-3.x pom.
Reference external files
If you develop the following types of Spark jobs, you must reference external files:
Spark jobs that need to read data from specific configuration files.
Spark jobs that require additional resource packages or third-party libraries such as JAR files or Python libraries.
In practical application, you must upload external files before you reference the files. You can upload external files by using one of the following methods:
Method 1: Upload external files by using Spark parameters.
Spark on MaxCompute supports the following parameters that are defined by Apache Spark:
--jars,--py-files,--files, and--archives. You can configure these parameters to upload external files when you submit jobs. When you run the jobs, these external files are uploaded to your working directories.Use the spark-submit script to upload files on the Spark on MaxCompute client.
Note--jars: This parameter specifies the JAR packages that you want to upload to the current working directories of the driver and each executor. Package names are separated by commas (,). These JAR packages are added to the classpaths of the driver and each executor. You can use"./your_jar_name"in the configurations of Spark jobs to specify these packages. This is the case in Apache Spark.--filesand--py-files: The two parameters specify the common files or Python files that you want to upload to the current working directories of the driver and each executor. File names are separated by commas (,). You can use"./your_file_name"in the configurations of Spark jobs to specify these files. This is the case in Apache Spark.--archives: This parameter is slightly different from the parameter defined by Apache Spark. Configure this parameter in thexxx#yyyformat and separate file names with commas (,). After you configure the --archives parameter, the archive files that you specify, such as ZIP files, are decompressed to the subdirectories of the current working directories of the driver and each executor. For example, if this parameter is set toxx.zip#yy, you must use"./yy/xx/"to reference the content in the archive file. If this parameter is set toxx.zip, you must use"./xx.zip/xx/"to reference the content in the archive file. If you need to use"./xxx/"to decompress the archive file directly to the current working directory, you must use thespark.hadoop.odps.cupid.resourcesparameter.
Use DataWorks to add the resources that are required by a job. For more information, see Create and use MaxCompute resources.
NoteIn the DataWorks console, you can upload files with a size of up to 200 MB. If the size of files that you want to upload exceeds 200 MB, you must use the MaxCompute client to upload these files as MaxCompute resources and add these resources to the DataStudio page in the DataWorks console. For more information about MaxCompute resources, see Manage MaxCompute resources.
Method 2: Upload files as MaxCompute resources.
Spark on MaxCompute provides the
spark.hadoop.odps.cupid.resourcesparameter. This parameter allows you to directly reference resources in MaxCompute. When you run a job, resources that are referenced are uploaded to your working directories. To upload files as MaxCompute resources, perform the following steps:Log on to the MaxCompute client and upload files as resources to your MaxCompute project. The maximum size of a file that you can upload is 500 MB.
Add the
spark.hadoop.odps.cupid.resourcesparameter to the configurations of your Spark job. This parameter specifies the MaxCompute resources that are required for running the Spark job. Configure this parameter in the<projectname>.<resourcename>format. If you need to reference multiple files, separate the file names with commas (,). The following configuration shows an example.spark.hadoop.odps.cupid.resources=public.python-python-2.7-ucs4.zip,public.myjar.jarThe specified resource file is downloaded to the current working directories of the driver and each executor. By default, the downloaded file is named in the
<projectname>.<resourcename>format.You can also rename the file in the
<projectname>.<resourcename>:<newresourcename>format. The following configuration shows an example.spark.hadoop.odps.cupid.resources=public.myjar.jar:myjar.jarImportantThe spark.hadoop.odps.cupid.resources parameter takes effect only after you configure this parameter in the spark-defaults.conf file or in the DataWorks console. This parameter does not take effect if this parameter is written in code.
After you upload files by using one of the preceding methods, you can reference external files in code. The following code shows an example:
val targetFile = "File name"
val file = Source.fromFile(targetFile)
for (line <- file.getLines)
    println(line)
file.close
Conduct SparkPi smoke testing
After you complete the preceding operations, conduct smoke testing to check the end-to-end connectivity of Spark on MaxCompute. For example, you can run the following commands to conduct SparkPi smoke testing for a Spark 2.x application:
# /path/to/MaxCompute-Spark Configure a valid path for the compiled JAR package of the application.
cd $SPARK_HOME
bin/spark-submit \
--class com.aliyun.odps.spark.examples.SparkPi \
--master yarn \
--deploy-mode cluster \
/path/to/your/spark-examples_2.11-1.0.0-SNAPSHOT-shaded.jar

# If the following log information is displayed, smoke testing is successful.
19/06/11 11:57:30 INFO Client:
         client token: N/A
         diagnostics: N/A
         ApplicationMaster host: 11.222.166.90
         ApplicationMaster RPC port: 38965
         queue: queue
         start time: 1560225401092
         final status: SUCCEEDED
Notes on running Spark on MaxCompute in local mode by using IntelliJ IDEA
In most cases, code is run in cluster mode after local debugging is successful. However, Spark on MaxCompute allows you to run code in local mode by using IntelliJ IDEA. When you run code in local mode by using IntelliJ IDEA, take note of the following points:
Specify the spark.master parameter in the code.
val spark = SparkSession
      .builder()
      .appName("SparkPi")
      .config("spark.master", "local[4]") // The code can run after you set spark.master to local[N]. N indicates the number of concurrent Spark jobs.
      .getOrCreate()
Add the following dependency of the Spark on MaxCompute client in IntelliJ IDEA.
<dependency>
    <groupId>org.apache.spark</groupId>
    <artifactId>spark-core_${scala.binary.version}</artifactId>
    <version>${spark.version}</version>
    <scope>provided</scope>
</dependency>
In the pom.xml file, the scope parameter is set to provided. This setting may cause the "NoClassDefFoundError" error when you run the code.
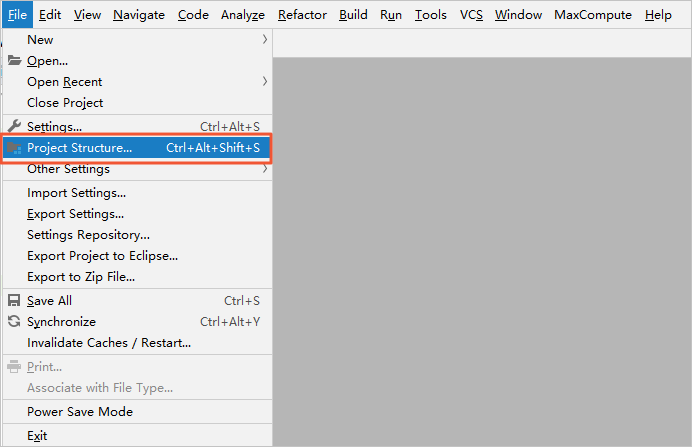
Exception in thread "main" java.lang.NoClassDefFoundError: org/apache/spark/sql/SparkSession$
    at com.aliyun.odps.spark.examples.SparkPi$.main(SparkPi.scala:27)
    at com.aliyun.odps.spark.examples.Spa. r. kPi.main(SparkPi.scala)
Caused by: java.lang.ClassNotFoundException: org.apache.spark.sql.SparkSession$
    at java.net.URLClassLoader.findClass(URLClassLoader.java:381)
    at java.lang.ClassLoader.loadClass(ClassLoader.java:424)
    at sun.misc.Launcher$AppClassLoader.loadClass(Launcher.java:335)
    at java.lang.ClassLoader.loadClass(ClassLoader.java:357)
    ... 2 more
You can perform the following steps to manually add the directory specified by the --jars parameter on Spark on MaxCompute to the project template of IntelliJ IDEA. This way, the configuration
scope=providedcan be retained and the "NoClassDefFoundError" error is not returned when you run the code in local mode by using IntelliJ IDEA.In the main menu bar of IntelliJ IDEA, choose File > Project Structure….
On the Project Structure page, click Modules in the left-side navigation pane. Then, select the resource package, and click the Dependencies tab for the resource package.
On the Dependencies tab, click the plus sign (+) in the lower-left corner and select JARs or directories… to add the directory specified by the --jars parameter on Spark on MaxCompute.
The spark-defaults.conf file cannot be directly referenced when you run the code in local mode. You must manually configure related parameters in the code.
If you submit jobs by using the spark-submit script, the system reads the configurations from the spark-defaults.conf file. If you submit jobs in local mode, you must manually configure related parameters in the code. The following code shows how to use Spark SQL to read data from MaxCompute tables in local mode.
val spark = SparkSession
      .builder()
      .appName("SparkPi")
      .config("spark.master", "local[4]") // The code can run after you set spark.master to local[N]. N indicates the number of concurrent Spark jobs.
      .config("spark.hadoop.odps.project.name", "****")
      .config("spark.hadoop.odps.access.id", "****")
      .config("spark.hadoop.odps.access.key", "****")
      .config("spark.hadoop.odps.end.point", "http://service.cn.maxcompute.aliyun.com/api")
      .config("spark.sql.catalogImplementation", "odps")
      .getOrCreate()
Precautions on using Spark 2.4.5
Use Spark 2.4.5 to submit jobs
Submit a job in a Yarn cluster. For more information, see Cluster mode.
Set the
spark.hadoop.odps.spark.versionparameter to spark-2.4.5-odps0.33.0 in the DataWorks console. If the Spark version of exclusive resource groups in DataWorks is not updated to Spark 2.4.5, you can use shared resource groups to schedule jobs or contact the MaxCompute technical support team to update the Spark version.
Changes in using Spark 2.4.5
If you submit jobs in a Yarn cluster, you must run the
export HADOOP_CONF_DIR=$SPARK_HOME/confcommand to add the SPARK_HOME environment variable.If you perform debugging in local mode, you must create a file named odps.conf in the
$SPARK_HOME/confpath and add the following configurations to the file:odps.project.name = odps.access.id = odps.access.key = odps.end.point =
Changes in the parameter settings of Spark 2.4.5
spark.sql.catalogImplementation: This parameter is set tohive.spark.sql.sources.default: This parameter is set tohive.spark.sql.odps.columnarReaderBatchSize: specifies the number of rows from which the vectorized reader reads data at a time. Default value: 4096.spark.sql.odps.enableVectorizedReader: specifies whether to enable the vectorized reader. Default value: True.spark.sql.odps.enableVectorizedWriter: specifies whether to enable the vectorized writer. Default value: True.spark.sql.odps.split.size: This parameter can be used to adjust the concurrency of data reading operations on MaxCompute tables. By default, this parameter is set to 256 for each partition. Unit: MB.
Precautions on using Spark 3.1.1
Use Spark 3.1.1 to submit jobs
Submit a job in a Yarn cluster. For more information, see Cluster mode.
If you want to submit Spark jobs of version 3.1.1 and the jobs are written in Scala or Java, you can add the following configurations to the spark-defaults.conf file:
spark.hadoop.odps.cupid.resources = public.__spark_libs__3.1.1-odps0.33.0.zip,[projectname].[Main JAR Package],[projectname].[Other JAR Package] spark.driver.extraClassPath = ./public.__spark_libs__3.1.1-odps0.33.0.zip/* spark.executor.extraClassPath = ./public.__spark_libs__3.1.1-odps0.33.0.zip/*NoteIf you want to submit Spark jobs of version 3.1.1, you must specify all required resources in the spark.hadoop.odps.cupid.resources parameter. The required resources include the main JAR package. Otherwise, the related Java class may fail to be found.
You cannot submit PySpark jobs by using the preceding methods.
Changes in using Spark 3.1.1
If you submit jobs in a Yarn cluster, you must run the
export HADOOP_CONF_DIR=$SPARK_HOME/confcommand to add the SPARK_HOME environment variable.If you submit PySpark jobs in a Yarn cluster, you must add the following configurations in the spark-defaults.conf file to use Spark for Python 3:
spark.hadoop.odps.cupid.resources = public.python-3.7.9-ucs4.tar.gz
spark.pyspark.python = ./public.python-3.7.9-ucs4.tar.gz/python-3.7.9-ucs4/bin/python3
If you perform debugging in local mode, you must perform the following operations:
You must create an odps.conf file in the
$SPARK_HOME/confdirectory and add the following configurations to the file:odps.project.name = odps.access.id = odps.access.key = odps.end.point =You must add
spark.hadoop.fs.defaultFS = file:///to the code. Sample code:val spark = SparkSession .builder() .config("spark.hadoop.fs.defaultFS", "file:///") .enableHiveSupport() .getOrCreate()
Changes in the parameter settings of Spark 3.1.1
spark.sql.defaultCatalog: This parameter is set toodps.spark.sql.catalog.odps: This parameter is set toorg.apache.spark.sql.execution.datasources.v2.odps.OdpsTableCatalog.spark.sql.sources.partitionOverwriteMode: This parameter is set todynamic.spark.sql.extensions: This parameter is set toorg.apache.spark.sql.execution.datasources.v2.odps.extension.OdpsExtensions.spark.sql.odps.enableVectorizedReader: specifies whether to enable the vectorized reader. Default value: True.spark.sql.odps.enableVectorizedWriter: specifies whether to enable the vectorized writer. Default value: True.spark.sql.catalog.odps.splitSizeInMB: This parameter can be used to adjust the concurrency of data reading operations on MaxCompute tables. By default, this parameter is set to 256 for each partition. Unit: MB.