This topic provides an example on how to implement role-based single sign-on (SSO) from Active Directory Federation Services (AD FS) to Alibaba Cloud. In the example, AD FS is deployed on an Elastic Compute Service (ECS) instance that runs Windows Server 2012 R2, AD FS is the identity provider (IdP), and Alibaba Cloud is the service provider (SP).
Background information
An enterprise uses Active Directory (AD) to manage users and AD FS to configure enterprise applications such as Alibaba Cloud. After role-based SSO is configured, an AD administrator can control user access to the resources of Alibaba Cloud accounts by user group. In this example, the enterprise has Alibaba Cloud accounts, Account 1 and Account 2, and AD user groups, Aliyun-<account-id>-ADFS-Admin and Aliyun-<account-id>-ADFS-Reader. A user named Alice belongs to these groups. The enterprise wants to implement role-based SSO from AD FS to Account 1 and Account 2.
<account-id> indicates the ID of Account 1 or Account 2. Therefore, the user Alice belongs to four user groups. The group whose name contains Admin has the Admin permission on Account 1 or Account 2. The group whose name contains Reader has the Reader permission on Account 1 or Account 2.
The configuration of Microsoft AD described in this topic is for reference only and helps you understand the configuration procedure of SSO logon to Alibaba Cloud. Alibaba Cloud does not provide consultation services for the configuration of Microsoft AD. For more information, see Build an AD domain on a Windows instance.
Process
The following figure shows the process of role-based SSO.
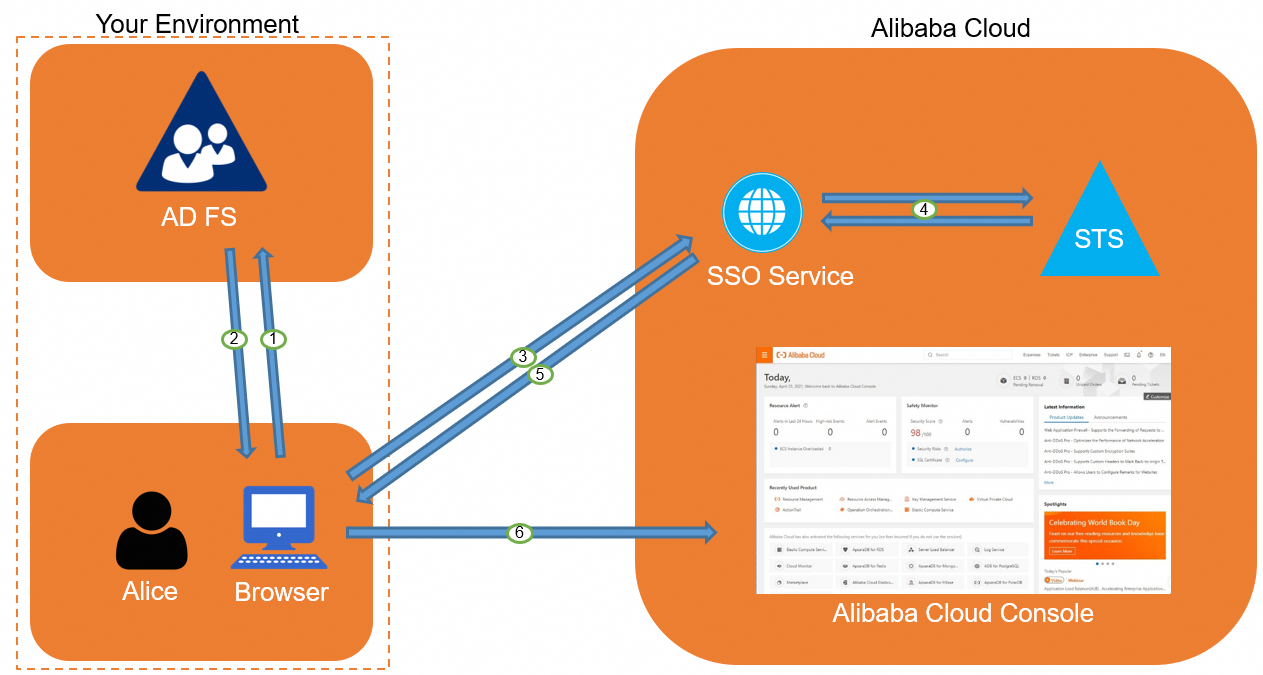
After an AD administrator completes the configurations of role-based SSO, the user Alice can log on to the Alibaba Cloud Management Console based on the process shown in the figure. For more information, see Overview.
The process shows that users can be authenticated without the need to provide Alibaba Cloud usernames or passwords during logon.
Step 1: Configure AD FS as a trusted SAML IdP in Alibaba Cloud
Log on to the Resource Access Management (RAM) console of Alibaba Cloud. Create an IdP named ADFS and upload a metadata file. You can obtain the metadata file of AD FS from
https://<ADFS-server>/federationmetadata/2007-06/federationmetadata.xml.Note<ADFS-server> indicates the domain name or IP address of your AD FS server.
For more information, see Configure the SAML settings of Alibaba Cloud for role-based SSO.
NoteIf the size of the IdP metadata file exceeds the upper limit, you can delete the content in the
<fed:ClaimTypesRequested>and<fed:ClaimTypesOffered>sections.Create two RAM roles named ADFS-Admin and ADFS-Reader for Account 1. When you create the RAM roles, select IdP as the type of trusted entity and ADFS as the trusted IdP. Then, attach the
AdministratorAccesspolicy to the ADFS-Admin role and theReadOnlyAccesspolicy to the ADFS-Reader role.For more information, see Create a RAM role for a trusted IdP.
Repeat the preceding steps to create the same IdP and two RAM roles for Account 2. Then, attach the
AdministratorAccesspolicy to the ADFS-Admin role and theReadOnlyAccesspolicy to the ADFS-Reader role.
After you complete the configurations, Account 1 and Account 2 trust the information about user identities and roles. The information is included in Security Assertions Markup Language (SAML) requests sent from your AD FS server.
Step 2: Configure Alibaba Cloud as a trusted SAML SP in AD FS
In AD FS, a SAML SP is a relying party. To configure Alibaba Cloud as a trusted SAML SP in AD FS, perform the following steps:
In the top navigation bar of Server Manager, choose Tools > AD FS Management.
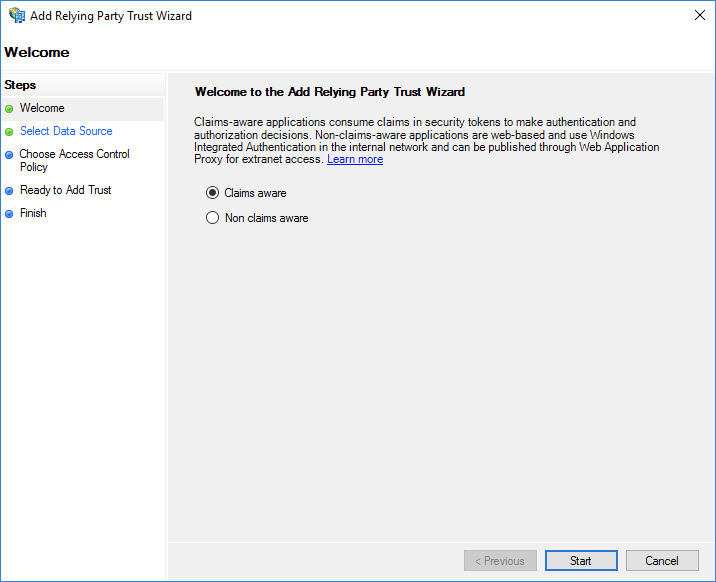
Right-click Relying Parties and select Add Relying Party Trust.
Configure the SAML SP metadata file of Alibaba Cloud for the relying party. You can obtain the metadata file from the following URL:
https://signin.alibabacloud.com/saml-role/sp-metadata.xml.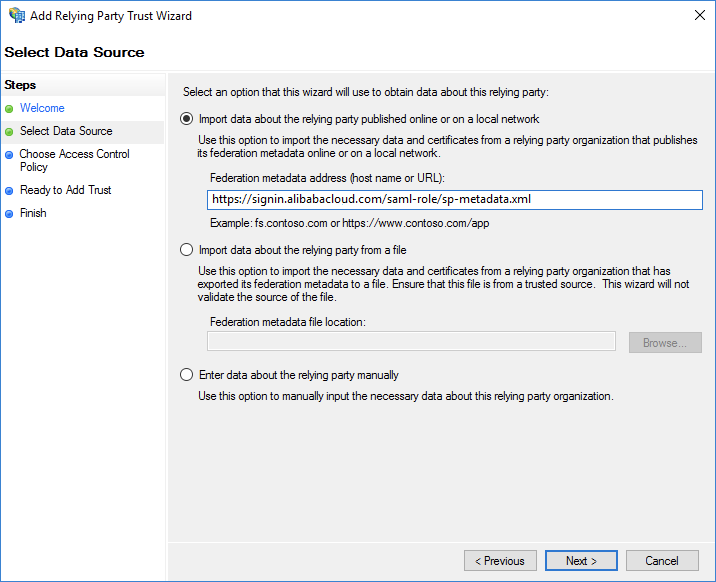
Complete the wizard as prompted.
Step 3: Configure SAML assertion attributes for the Alibaba Cloud SP
The SAML assertion that is issued by AD FS must contain the NameID, Role, and RoleSessionName attributes. AD FS provides these attributes by using issuance transform rules.
NameIDPerform the following steps to set the
NameIDattribute in the SAML assertion to the Windows account name of a user in AD:Right-click the display name of the relying party and select Edit Claim Issuance Policy.
Click Issuance Transform Rules to add a rule.
NoteAn issuance transform rule indicates how to transform a known user attribute and issue it as an attribute in the SAML assertion. If you want to issue the Windows account name of a user in AD as
NameID, you must create an issuance transform rule.Set Claim rule template to Transform an Incoming Claim.
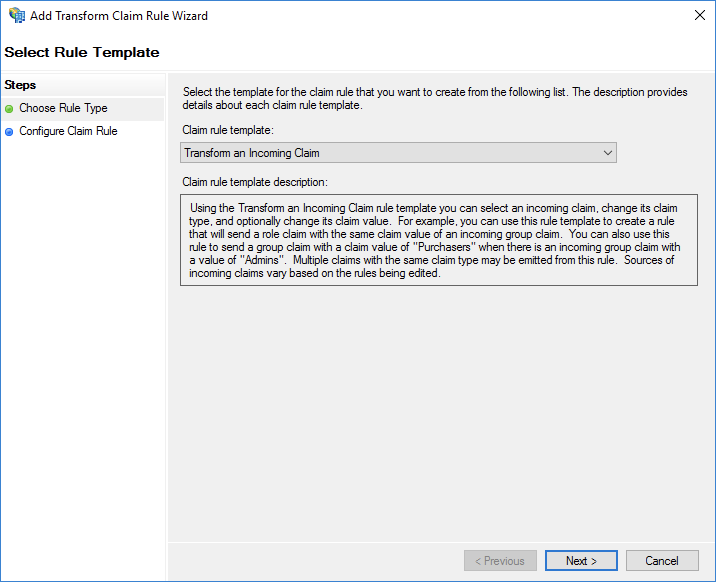
Configure the following parameters and click Finish.
Set Claim rule name to NameID.
Set Incoming claim type to Windows account name.
Set Outgoing claim type to Name ID.
Set Outgoing name ID format to Persistent Identifier.
Select Pass through all claim values.
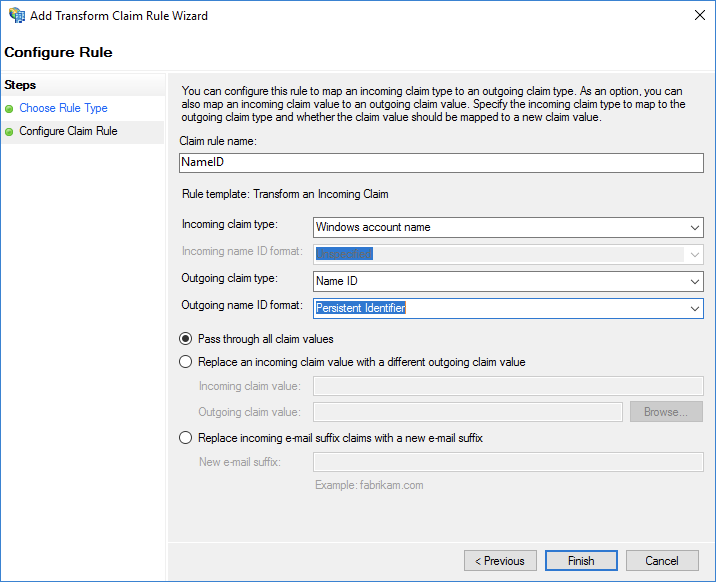
After you complete the configurations, AD FS sends the
NameIDattribute in the format required by Alibaba Cloud. The following code shows an example:<NameID Format="urn:oasis:names:tc:SAML:2.0:nameid-format:persistent"> YourDomain\rolessouser </NameID>
RoleSessionNamePerform the following steps to set the
RoleSessionNameattribute in the SAML assertion to the User Principal Name (UPN) of a user in AD:In the Issuance Transform Rules dialog box, click Add Rule.
Set Claim rule template to Send LDAP Attributes as Claims.
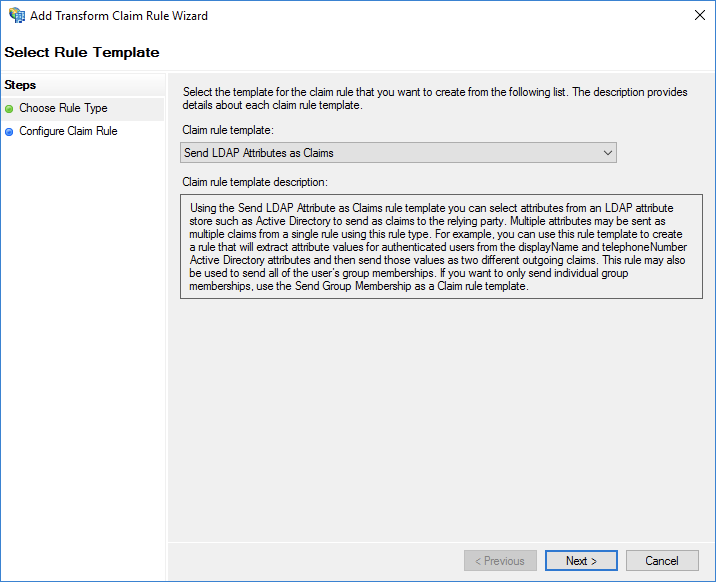
Configure the following parameters and click Finish.
Set Claim rule name to RoleSessionName.
Set Attribute store to Active Directory.
Select User-Principal-Name in the LDAP Attribute column. You can also use a different option, such as Email, based on your business requirements.
Enter
https://www.aliyun.com/SAML-Role/Attributes/RoleSessionNamein the Outgoing Claim Type column.
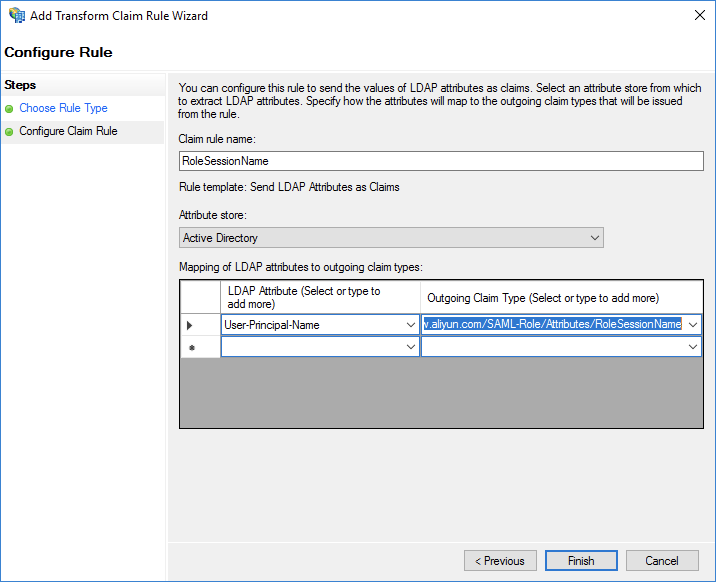
After you complete the configurations, AD FS sends the
RoleSessionNameattribute in the format required by Alibaba Cloud. The following code shows an example:<Attribute Name="https://www.aliyun.com/SAML-Role/Attributes/RoleSessionName"> <AttributeValue>rolessouser@example.com<AttributeValue> </Attribute>RolePerform the following steps to configure a custom attribute and set its value to the name of an Alibaba Cloud RAM role that is associated with the AD group of a user:
In the Issuance Transform Rules dialog box, click Add Rule.
Set Claim rule template to Send Claims Using a Custom Rule and click Next.
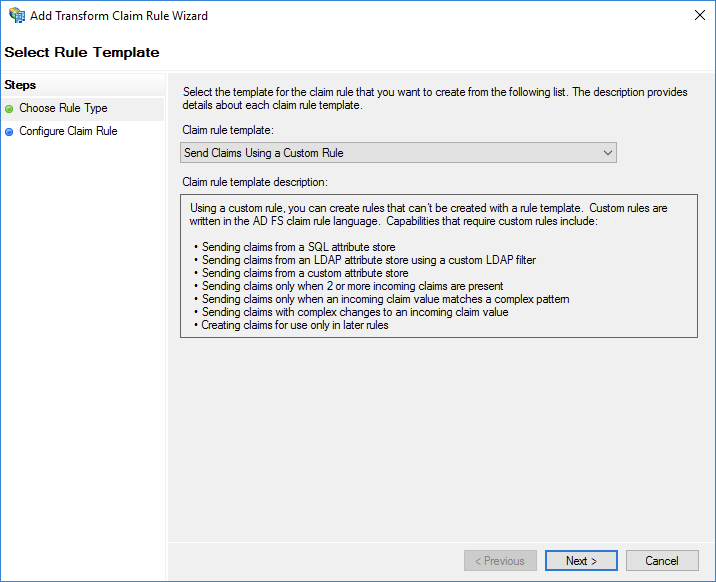
Configure the following parameters and click Finish.
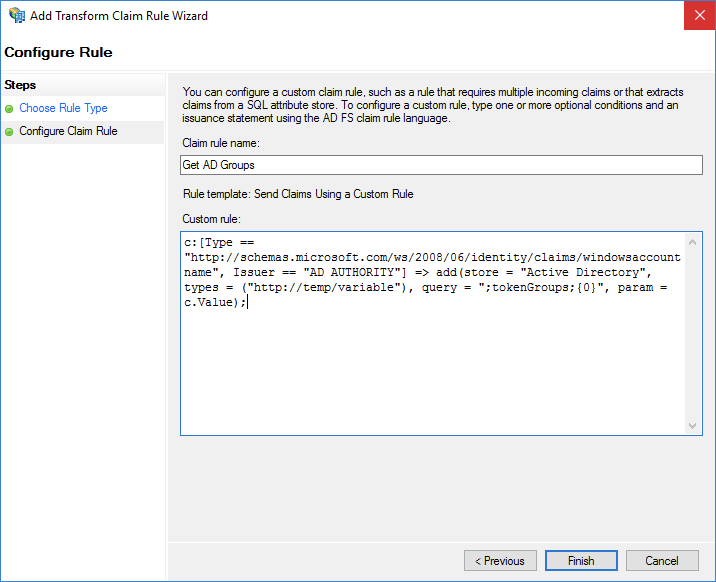
Set Claim rule name to Get AD Groups.
In the Custom rule field, enter the required information. Set this parameter based on the following example:
c:[Type =="http://schemas.microsoft.com/ws/2008/06/identity/claims/windowsaccountname", Issuer == "AD AUTHORITY"] => add(store = "Active Directory",types = ("http://temp/variable"), query = ";tokenGroups;{0}", param =c.Value);
 Note
NoteThis rule is used to obtain the AD group to which the user belongs. The rule is saved in the http://temp/variable intermediate variable.
In the Issuance Transform Rules dialog box, click Add Rule.
Repeat the preceding steps and click Finish.
Set Claim rule name to Role.
In the Custom rule field, enter the required information. Set this parameter based on the following example:
c:[Type == "http://temp/variable", Value =~ "(?i)^Aliyun-([\d]+)"] => issue(Type = "https://www.aliyun.com/SAML-Role/Attributes/Role",Value = RegExReplace(c.Value, "Aliyun-([\d]+)-(.+)", "acs:ram::$1:role/$2,acs:ram::$1:saml-provider/<provider-name>"));NoteSet <provider-name> to the name of the IdP that is created in Step 1: Configure AD FS as a trusted SAML IdP in Alibaba Cloud. In this example, set the name to ADFS.
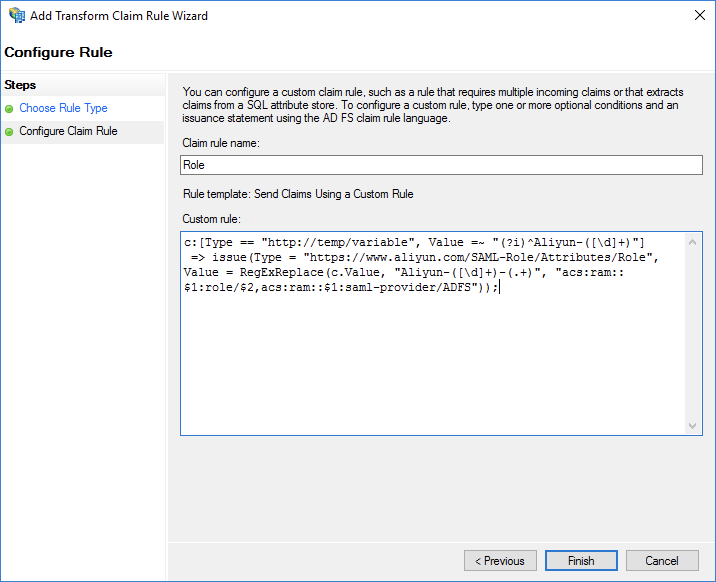
If the user belongs to the Aliyun-<account-id>-ADFS-Admin or Aliyun-<account-id>-ADFS-Reader group, a SAML attribute is generated and mapped to the ADFS-Admin or ADFS-Reader role in Alibaba Cloud based on this rule.
After you complete the configurations, your IdP returns the required part of a SAML assertion to Alibaba Cloud. The following code shows an example:
<Attribute Name="https://www.aliyun.com/SAML-Role/Attributes/Role">
    <AttributeValue>acs:ram::<account-id>:role/ADFS-Admin,acs:ram::<account-id>:saml-provider/<provider-name></AttributeValue>
</Attribute>
Verify the role-based SSO configurations
Log on to the AD FS portal for SSO at
https://<ADFS-server>/adfs/ls/IdpInitiatedSignOn.aspx. Select the Alibaba Cloud application and enter the username and password of your user.Note<ADFS-server> indicates the domain name or IP address of your AD FS server. If the URL is unavailable, run the
Set-AdfsProperties -EnableIdpInitiatedSignonPage $Truecommand in PowerShell.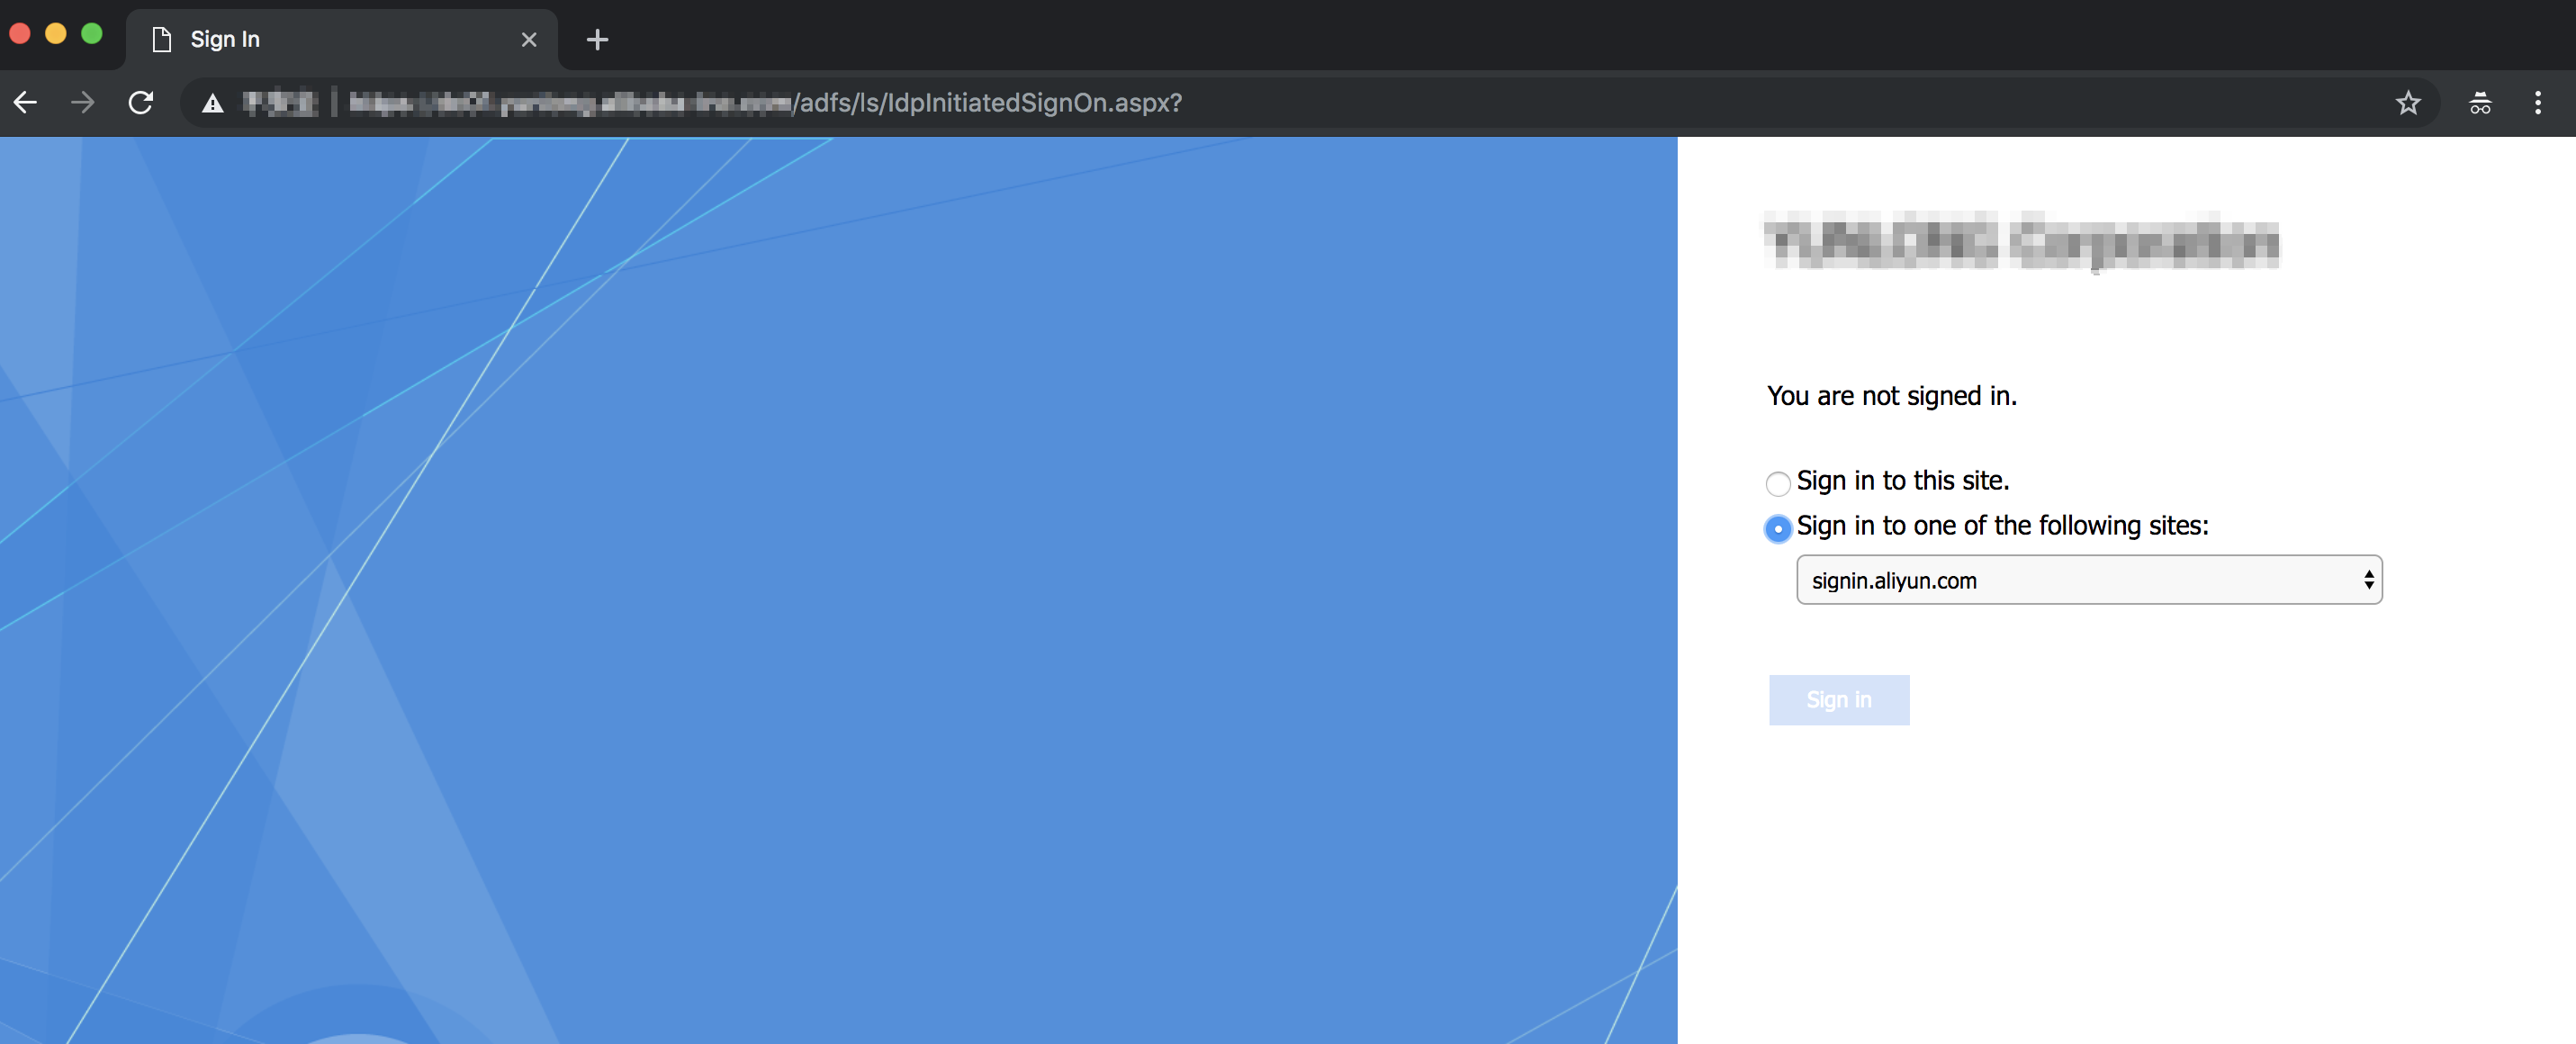
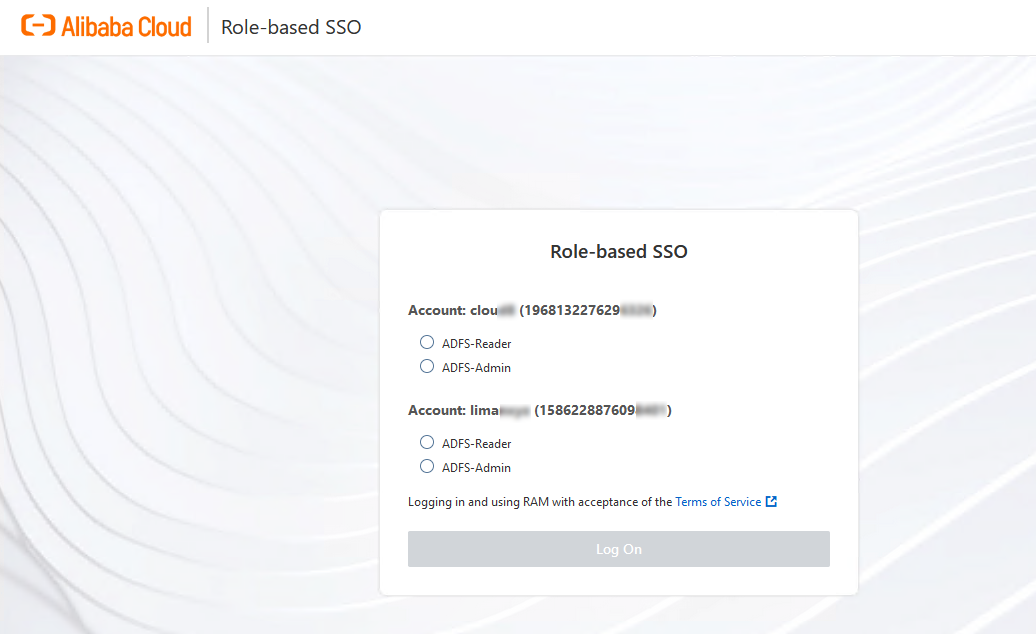
On the Role-based SSO page of Alibaba Cloud, select the RAM role that you want to use and click Log On.
NoteIf your user belongs to only one AD group, the user corresponds to only one RAM role in Alibaba Cloud. In this case, you can log on to the Alibaba Cloud Management Console without the need to select a RAM role.