Manual deployment
50
https://www.aliyun.com/solution/tech-solution/rapidly-deploy-dify-to-accelerate-ai-application-development
Overview
Dify lets you quickly build AI applications without coding. However, a local Dify deployment is limited by fixed hardware specifications and lacks business elasticity. Dify Cloud does not support custom development and lacks operations and maintenance (O&M) capabilities. Alibaba Cloud Container Service for Kubernetes (ACK) provides high-performance elastic computing resources. It supports rapid elastic scaling and multi-zone deployment. It also offers out-of-the-box logging, monitoring, and load balancing capabilities. This lets you upgrade your Dify application to a production-grade system without any modifications.
Benefits
|
Local Dify deployment |
Dify Cloud |
ACK Dify deployment |
|
|
Flexible scaling |
|
|
|
|
Suitable for custom development |
|
|
|
|
Suitable for production environments |
|
|
|
|
One-stop monitoring and O&M |
|
|
|
Workflow
-
Deploy Dify
Use ACK to quickly deploy a private, high-availability version of Dify (version 1.11.4) for production.
-
Build an AI application with Dify
Experience the powerful features of Dify by building an AI assistant for customer service.
Use your Alibaba Cloud account for the following operations to ensure that you have full permissions for the related products.
Architecture
After you deploy with the default settings, the Dify runtime environment on Alibaba Cloud is configured as shown in the following figure. You can modify the configuration based on your resources, but the final setup should be similar to the one shown.

The architecture includes the following infrastructure and cloud services:
-
One Virtual Private Cloud (VPC): A private network built on the cloud for resources such as Elastic Compute Service (ECS) instances and ACK clusters.
-
Two vSwitches: Connect resources, such as ECS instances and ACK clusters, to the same network. This enables communication between them and provides basic network segmentation and isolation.
-
One security group: Restricts inbound and outbound network traffic for ECS instances within the VPC.
-
One Server Load Balancer (SLB) instance: Provides load balancing for Dify. It distributes traffic to different backend servers to increase the service throughput of the application.
-
One Tair (Redis OSS-compatible) instance: Provides a cache service for Dify.
-
One Tablestore instance (multi-zone disaster recovery): Provides a vector search service for Dify and supports 2 or 3 zones by default.
-
One ApsaraDB RDS for PostgreSQL instance: Provides a relational database service for Dify.
-
One Apsara File Storage NAS (NAS) file system: Stores data for Dify's internal applications.
-
Container Service for Kubernetes (ACK): Used to deploy the Dify platform and related applications.
Deploy Dify
45
Quickly deploy a high-availability version of Dify to a production environment.
Deploy Dify
1. Create a VPC and vSwitches
2. Create a security group
3. Create a Tair (Redis OSS-compatible) instance
Create one Tair (Redis OSS-compatible) instance to provide a high-performance cache service for Dify.
-
Log on to the Tair (Redis OSS-compatible) console. In the navigation pane on the left, click Instances. In the top navigation bar, select the Singapore region, and then click Create Instance. Configure the instance with the following settings and follow the on-screen instructions.
Use the default values for the parameters that are not mentioned.
-
Product: Select Redis Open-Source Edition.
-
Billing Method: Select Pay-As-You-Go.
-
Deployment Mode: Select Cloud-native.
-
Region: Select Singapore.
-
Zone Settings: Select Dual-zone Deployment. Set the primary zone to Zone A and the secondary zone to Zone B.
-
VPC: Select the VPC that you created in the previous step, VPC_SGP.
-
VSwitch: Select the vSwitch that you created in the previous step, vsw_001.
-
Major Version: Select Redis 6.0.
-
Architecture: Select Non-cluster.
-
Shard Specifications: Select 4 GB.
-
Instance Name: Enter a name for the instance.
-
Set Password: Select Now, and then enter the access password for the instance.
The Redis password used by Dify can only contain uppercase letters, lowercase letters, and numbers. Do not use other characters.
-
-
Go to the Tair (Redis OSS-compatible) console and click Instances in the navigation pane on the left. After the instance status changes to Running, click the target instance ID to go to the Instance Information page. In the navigation pane on the left, click Whitelist Settings.
-
In the list, find the default whitelist and click Modify on the right. Set Whitelist to
192.168.0.0/16.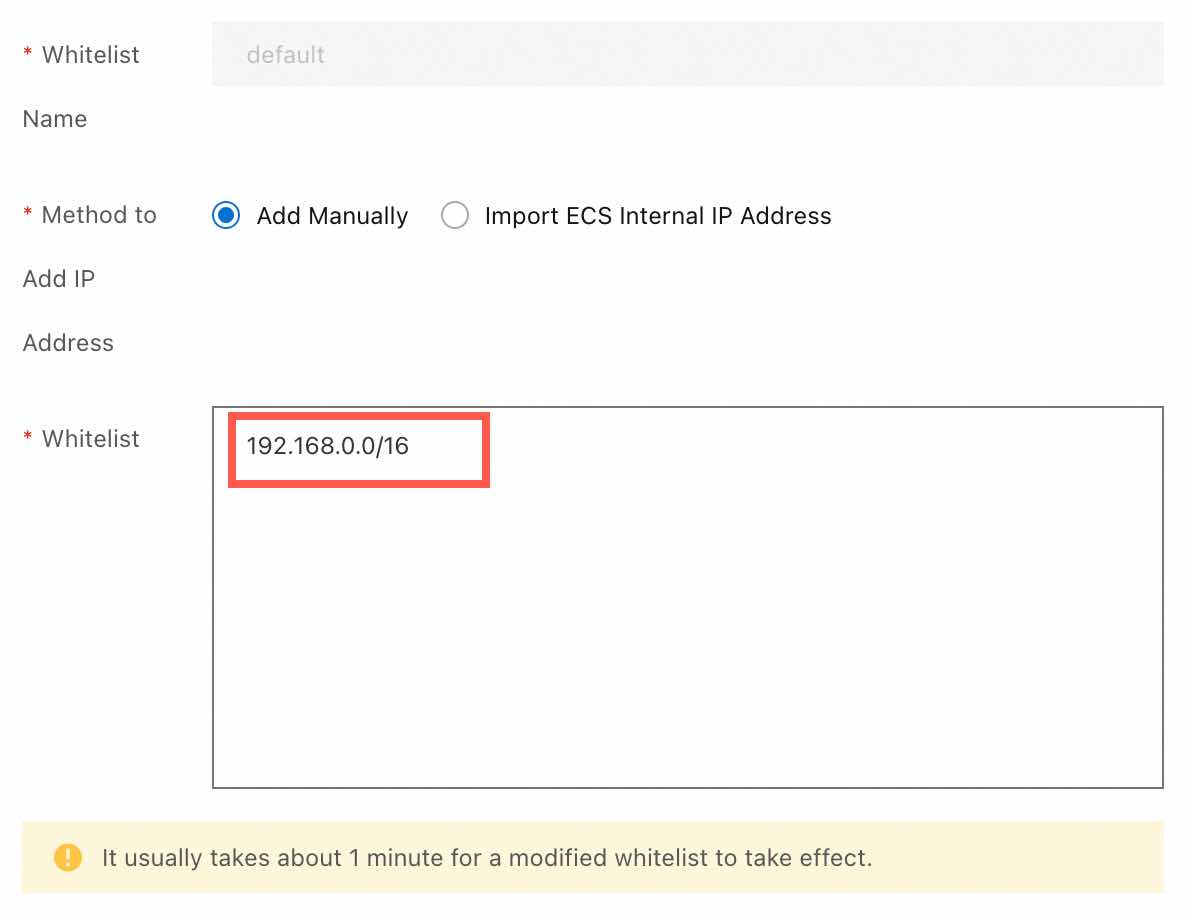
-
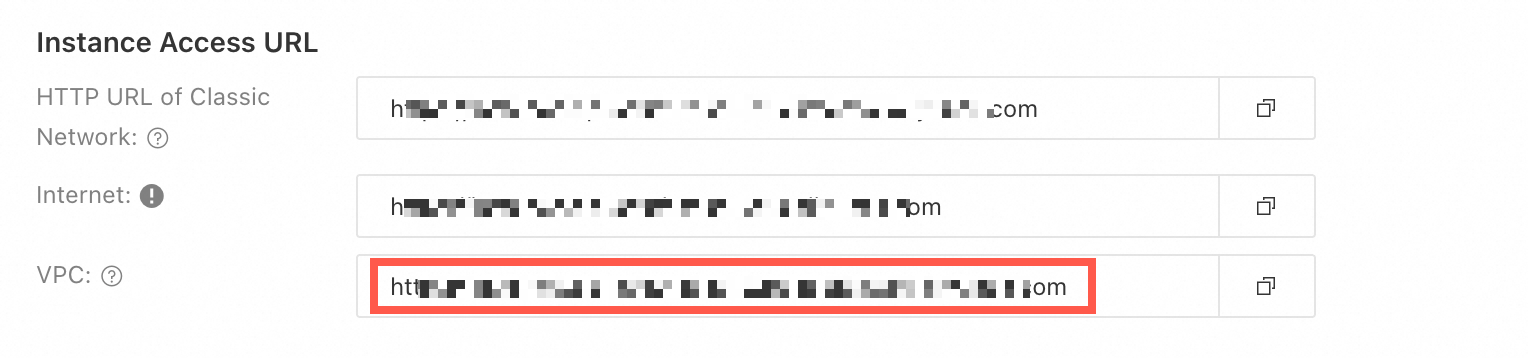
On the Instance Information page, in the Connection Information section, find the instance's VPC endpoint. This endpoint will be used later.
4. Create a Tablestore instance
Create one Tablestore instance to provide a high-performance vector search service for Dify.
-
Log on to the Tablestore console. In the top navigation bar, select the Singapore region, and click Create Instance.
If this is your first time using Tablestore, follow the on-screen instructions to activate and authorize the service.
-
In the Billing Method dialog box, select CU Mode (formerly On-demand Mode). Create the instance with the following settings and follow the on-screen instructions.
Use the default values for the parameters that are not mentioned.
-
Region: Select Singapore.
-
Instance Name: Enter difydb.
-
Instance Type: Select Compute-optimized.
-
Redundancy Type: Select Zone-redundant Storage.
-
-
After you create the instance, click the instance name to find and record its VPC endpoint. This endpoint will be used later.
5. Create an ApsaraDB RDS for PostgreSQL instance
6. Create an ACK managed cluster
7. Deploy Dify
Follow these steps to deploy Dify in ACK.
-
In the navigation pane on the left of the ACK console, click Clusters. In the top navigation bar, select the Singapore region. Find the dify-prod cluster and click its name to go to the Cluster Information page.
-
In the navigation pane on the left, choose , and then click Create. Follow the wizard to configure the Basic Information and Parameter Settings.
-
Basic Information:
-
Application Name: Enter ack-dify.
-
Namespace: Select default.
-
Source: Select Marketplace.
-
Chart: Search for and select ack-dify.
After you click Next, if a dialog box appears, click Yes to use the default chart namespace, dify-system.
-
-
Parameter Settings:
-
Chart Version: Select 1.1.21 (Dify version 1.11.4).
-
Modify the Parameters as described below:
-
Configure the worker: Set the number of worker replicas to 2 and remove its resource limits.

-
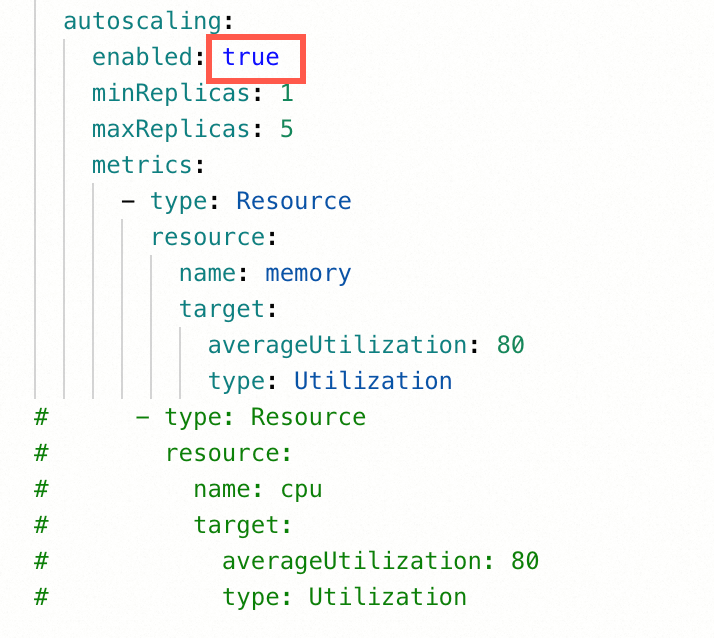
Enable autoscaling: Enable autoscaling to automatically adjust the number of replicas based on the load.
-
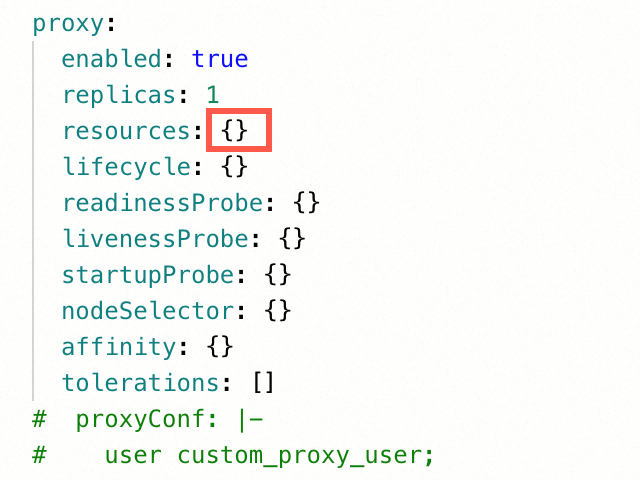
Configure the proxy: Remove the resource limits for the proxy.
-
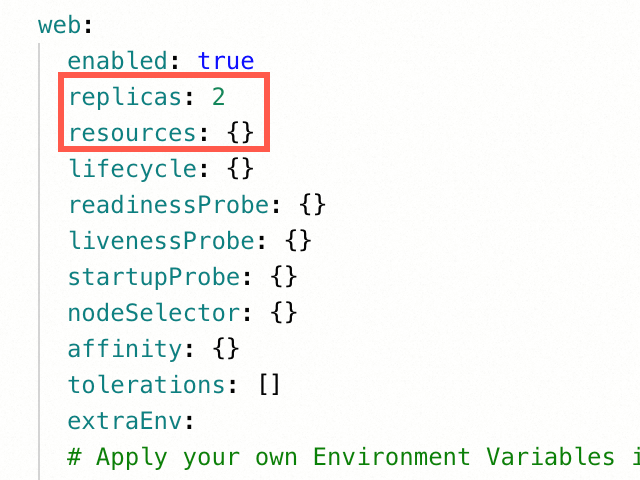
Configure the web: Set the number of web replicas to 2 and remove its resource limits.
-
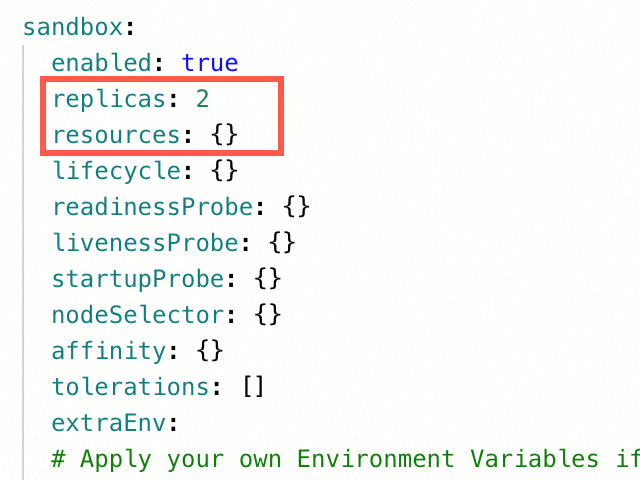
Configure the sandbox: Set the number of sandbox replicas to 2 and remove its resource limits.
-
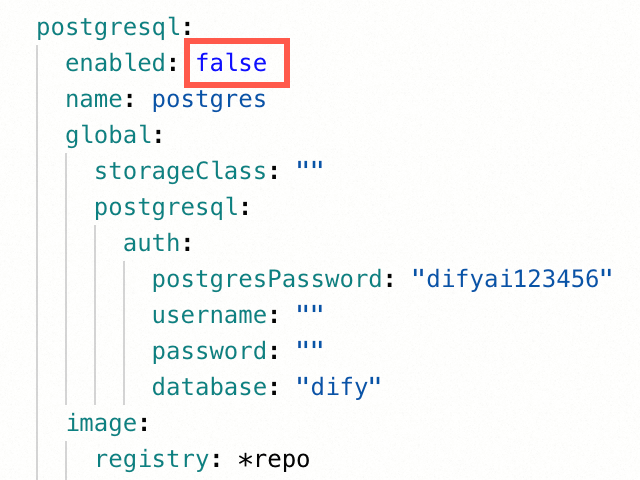
Disable test environment PostgreSQL: Disable the PostgreSQL container for the test environment.
-
Disable test environment weaviate: Disable the weaviate container for the test environment.

-
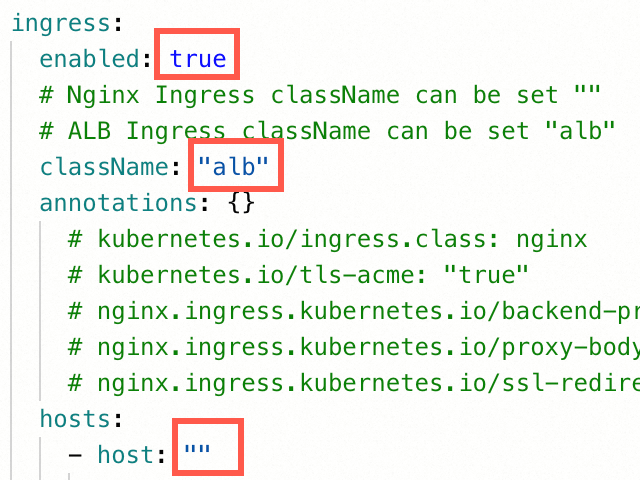
Enable Ingress: Enable Ingress (using Alibaba Cloud ALB as the Ingress controller) and forward all requests without a specified Host to Dify. This lets you access Dify from the public network.
-
Disable test environment Redis: Disable the Redis container for the test environment.
-
Configure RDS for PostgreSQL: Replace the placeholders
<>in the following configuration with your actual values.externalPostgres: enabled: true username: "<The username of the RDS for PostgreSQL account that you created>" password: "<The password for the RDS for PostgreSQL account that you created>" address: "<The endpoint of the RDS for PostgreSQL instance that you created, for example, pgm-bp1***4lt.pg.rds.aliyuncs.com>" port: 5432 dbName: "<The name of the RDS for PostgreSQL database that you created>" database: api: "<The name of the RDS for PostgreSQL database that you created>" pluginDaemon: "dify_plugin" maxOpenConns: 20 maxIdleConns: 5 -
Configure Tair (Redis OSS-compatible): Replace the placeholders
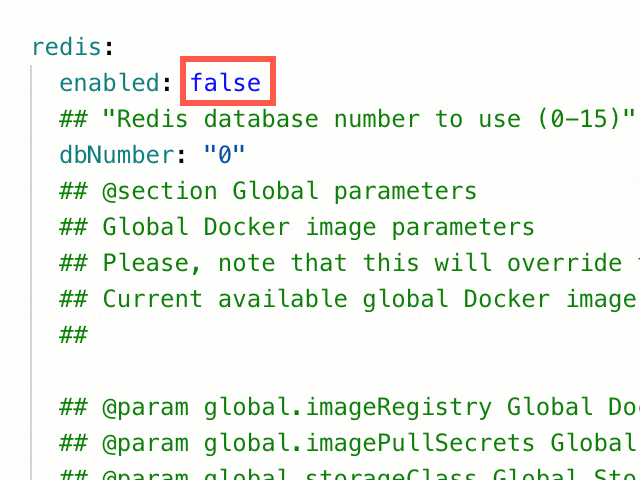
<>in the following configuration with your actual values.externalRedis: enabled: true host: "<The internal endpoint of the Tair instance that you created, for example, r-bp1***qrl.redis.rds.aliyuncs.com>" port: 6379 username: "default" password: "<The password for the Tair instance that you created>" useSSL: false dbNumber: "0" -
Configure Tablestore: Replace the placeholders
<>in the following configuration with actual values. Learn how to obtain an AccessKey pair.externalTablestore: enabled: true endpoint: "<The VPC endpoint of the Tablestore instance that you created>" instanceName: "<The instance alias or name of the Tablestore instance that you created>" accessKeyId: "<The AccessKey ID of your Alibaba Cloud account>" accessKeySecret: "<The AccessKey secret of your Alibaba Cloud account>"
-
-
-
-
Click OK to start deploying Dify. In the navigation pane on the left, choose . Switch the namespace to dify-system. When the status of ack-dify changes to Deployed, the deployment is complete.
NoteDify deployment takes about 1 minute.
8. Initialize Dify
Create a Dify application
Next, you can use an E-commerce assistant as an example to create the following two types of advanced applications on Dify:
Build an AI assistant for e-commerce customer service: Focuses on handling common user inquiries and uses an AI model to provide intelligent responses, helping users quickly obtain information and resolve simple issues.
Build an AI assistant for e-commerce customer service with retrieval-augmented generation (RAG): By integrating an internal corporate knowledge base, this assistant aims to improve the accuracy and contextual relevance of its answers, providing users with more reliable solutions.
Clean up resources
5
If you do not need to create Dify applications later, clean up the resources to avoid unnecessary fees.
Before you start cleaning up, carefully check all the created resources to ensure that you do not accidentally delete resources from your production environment.
Delete the NAS file system.
NoteWhen you install the ack-dify application in ACK using Helm, a NAS file system is automatically created. You must delete this resource to avoid incurring fees.
Log on to the ACK console. On the Clusters page, find the target ACK cluster instance and click Cluster Name to go to the Cluster Information page.
In the navigation pane on the left, choose . Find the CNFS whose storage type is nas and copy the name from the Storage Name column.
Log on to the NAS console. In the navigation pane on the left, click . In the list, find the target file system based on the Storage Name from the previous step. Then, in the Actions column, choose
 > Delete. In the panel that appears, perform the operations in the following order.
Delete all mount targets: In the Mount Target list, click Delete in the Actions column for each row and follow the on-screen instructions to complete the deletion.
Disable and empty the recycle bin: In the Recycle Bin section, click Disable and Empty on the right and follow the on-screen instructions.
Delete the file system: Click Delete in the lower-right corner of the panel and follow the on-screen instructions to complete the deletion.
Release the ACK cluster:
Log on to the ACK console. On the Clusters page, find the ACK cluster that you want to release and choose in the Actions column.
Choose More > Delete in the Actions column to release the cluster. By default, the ALB instance (cluster Ingress) is not deleted. You must select it from the menu that appears.
The ECS instance is automatically released along with the ACK cluster. You can log on to the ECS console to check whether the ECS instance is released on the Instances page. If it is not released, choose
> Release in the Actions column to release it.
Release the ALB instance:
Log on to the ALB console. On the Instances page, find the instance that you want to release and choose
> Release in the Actions column. Releases the Tair (Redis OSS-compatible) instance:
Log on to the Tair (Redis OSS-compatible) console. On the Instances page, find the instance that you want to release and choose
> Release in the Actions column. -
Release the Tablestore instance:
For more information, see Release a CU mode instance.
Release the ApsaraDB RDS for PostgreSQL instance:
Log on to the ApsaraDB RDS console. In the left-side navigation pane, click Instances. On the Instances page, find the instance that you want to release and choose More > Release Instance in the Actions column.
Delete the security group:
Log on to the ECS console. On the Security Groups page, find the security group that you want to delete and click Delete in the Operation column.
Delete the vSwitch:
Log on to the VPC console. On the vSwitch page, find the vSwitch that you want to delete and click Delete in the Actions column.
Delete the VPC:
Log on to the VPC console. On the VPC page, find the VPC that you want to delete and click Delete in the Actions column.
One-click deployment
20
https://www.aliyun.com/solution/tech-solution/rapidly-deploy-dify-to-accelerate-ai-application-development
Overview
Dify lets you quickly build AI applications without coding. However, a local Dify deployment is limited by fixed hardware specifications and lacks business elasticity. Dify Cloud does not support custom development and lacks operations and maintenance (O&M) capabilities. Alibaba Cloud Container Service for Kubernetes (ACK) provides high-performance elastic computing resources. It supports rapid elastic scaling and multi-zone deployment. It also offers out-of-the-box logging, monitoring, and load balancing capabilities. This lets you upgrade your Dify application to a production-grade system without any modifications.
Benefits
|
Local Dify deployment |
Dify Cloud |
ACK Dify deployment |
|
|
Flexible scaling |
|
|
|
|
Suitable for custom development |
|
|
|
|
Suitable for production environments |
|
|
|
|
One-stop monitoring and O&M |
|
|
|
Workflow
-
Deploy Dify
Use ACK to quickly deploy a private, high-availability version of Dify (version 1.11.4) for production.
-
Build an AI application with Dify
Experience the powerful features of Dify by building an AI assistant for customer service.
Use your Alibaba Cloud account for the following operations to ensure that you have full permissions for the related products.
Architecture
The following figure shows the default Dify running environment on Alibaba Cloud after deployment. You can customize the configuration based on your resources, but the final setup should resemble the architecture shown in the figure.
The architecture includes the following infrastructure and cloud services:
-
One VPC: A private network built on the cloud for ECS instances and ACK clusters.
-
Two vSwitches: Connect resources, such as ECS instances and ACK clusters, to the same network. This enables communication between them and provides basic network segmentation and isolation.
-
One security group: Restricts inbound and outbound network traffic for ECS instances within the VPC.
-
One SLB instance: Provides load balancing for Dify. It distributes traffic to different backend servers to increase the service throughput of the application.
-
One Tair (Redis OSS-compatible) instance: Provides a cache service for Dify.
-
One Tablestore instance (multi-zone disaster recovery): Provides a vector search service for Dify and supports 2 or 3 zones by default.
-
One ApsaraDB RDS for PostgreSQL instance: Provides a relational database service for Dify.
-
Object Storage Service (OSS): Stores data for Dify's internal applications.
-
ACK: Used to deploy the Dify platform and related applications.
Deploy Dify
30
Use one-click deployment to deploy a high-availability version of Dify to a production environment.
Deploy Dify
-
Go to the Compute Nest Dify service creation page and follow the instructions to create a service instance. You can use the default values for the configuration items that are not mentioned.
-
Select Template: Select High-availability Edition.
In the Dependency Check section, if the status is Abnormal, follow the on-screen instructions to activate the service and grant permissions. After you are done, return to the current page and click the
-
Service Instance Name: Enter dify-prod.
-
Region: Select Singapore.
This topic uses the Singapore region as an example.
-
Billing Method: Select Pay-As-You-Go.
-
Kubernetes Configuration:
Create one ACK managed cluster to deploy the Dify platform and related applications.
-
Worker Node Instance Type: Search for and select
ecs.u1-c1m2.xlarge.If the instance type is sold out, select a specification with 4 vCPU and 8 GiB of memory or higher.
-
Instance Password: The logon password for the root account of the ACK nodes. Save the password in a secure location after you set it.
-
Number of Nodes: Enter 2.
-
-
PostgreSQL Database Configuration:
Create one ApsaraDB RDS for PostgreSQL instance to provide a high-performance relational database service for Dify.
-
PostgreSQL Instance Type: Search for and select the instance type
pg.n4m.2c.2m.If the instance type is sold out, select a specification with 2 cores and 8 GB of memory or higher.
-
PostgreSQL Database Account Name: Create an RDS for PostgreSQL database account for Dify to use.
-
PostgreSQL Database Password: Enter the password for the created RDS for PostgreSQL database account.
-
-
Redis Database Configuration:
Create one Tair (Redis OSS-compatible) instance to provide a high-performance cache service for Dify.
-
Redis Instance Password: Enter the access password for the Redis instance.
-
-
Tablestore Configuration:
Create one Tablestore instance to provide a high-performance vector search service for Dify.
-
Tablestore Instance Type: Select Compute-optimized Instance.
-
-
Basic Configuration:
This solution uses a dual-zone design. Deploying cloud resources in multiple zones helps avoid failures in a single zone.
-
Select Existing/New VPC: Select New VPC.
-
Zone: For Zone 1, select Zone A. For Zone 2, select Zone B.
If the above zones are not available, you can select other zones.
-
-
-
After you complete the configuration, click Next: Confirm Order. The system displays an estimated cost for the resources. After you confirm the cost, click Create Now.
In the Dependency Check section, if any item is Abnormal, follow the on-screen instructions to create roles and grant permissions. Once complete, return to the current page and click
 Recheck until all statuses are
  .Note
.NoteCluster creation takes about 15 minutes.
-
After the instance status changes to Deployed, the system generates a public access link: Dify Endpoint. Click the link to access Dify.
Create a Dify application
Next, you can use an E-commerce assistant as an example to create the following two types of advanced applications on Dify:
Build an AI assistant for e-commerce customer service: Focuses on handling common user inquiries and uses an AI model to provide intelligent responses, helping users quickly obtain information and resolve simple issues.
Build an AI assistant for e-commerce customer service with retrieval-augmented generation (RAG): By integrating an internal corporate knowledge base, this assistant aims to improve the accuracy and contextual relevance of its answers, providing users with more reliable solutions.
Clean up resources
5
If you do not need to create Dify applications later, clean up the resources to avoid unnecessary fees.
Before you start cleaning up, carefully check all the created resources to ensure that you do not accidentally delete resources from your production environment.
-
Release the Tablestore instance:
For more information, see Release a CU mode instance.
-
Release all new Dify-related cloud resources that were created during this Compute Nest deployment:
Log on to the Compute Nest console. In the navigation pane on the left, select Service Instances. Find the target instance, click Delete in the Actions column, and follow the on-screen instructions to release the instance.