×
Community Blog The Ultimate Guide to WonderClip: Transforming Storyboard Scripts into Cinematic Video Stories

The Ultimate Guide to WonderClip: Transforming Storyboard Scripts into Cinematic Video Stories

Discover how to use WonderClip to turn your storyboard scripts into engaging video stories. Step-by-step guide, AI features, and pro tips inside!

Have you ever stared at a brilliant storyboard script, only to feel overwhelmed by the sheer amount of time, budget, and technical skill required to bring it to life on screen?

In the fast-paced world of digital content, the gap between ideation and production has always been a major bottleneck. But the rise of generative AI has changed the game. Enter WonderClip, a revolutionary AI-powered platform designed specifically to bridge the divide between pre-production and final output.

With WonderClip, you can seamlessly transform a written storyboard script into a fully realized, engaging video story in a fraction of the time it takes using traditional methods.

In this comprehensive guide, we will dive deep into what WonderClip is, why it is a game-changer for creators, and provide a detailed step-by-step tutorial on how to turn your storyboard script into a captivating video story.

What is WonderClip?

WonderClip is an advanced AI video creation tool that automates the video production pipeline. While traditional editors require you to manually source footage, cut clips, and sync audio, WonderClip acts as an intelligent co-creator.

Its standout feature is the Storyboard-to-Video Engine. Instead of just generating random clips, WonderClip analyzes your storyboard script—reading both the dialogue and the visual cues—and generates corresponding video scenes, characters, transitions, and voiceovers that perfectly match your narrative vision.

Why Choose WonderClip for Video Stories?

  1. Context-Aware AI: It doesn’t just match keywords; it understands the mood, pacing, and visual context of your script.
  2. End-to-End Automation: From generating visuals to adding AI voiceovers and dynamic captions, it handles the heavy lifting.
  3. Visual Consistency: It helps maintain visual and narrative consistency across different scenes, which is crucial for storytelling.
  4. Accessibility: It democratizes video production, allowing writers and marketers to create high-quality video stories without needing a Hollywood budget or advanced editing skills.

Step-by-Step Guide: From Storyboard Script to Video Story

Ready to bring your script to life? Here is the detailed workflow for using WonderClip to create your video story.

Step 1: Login with Your Alibaba Cloud Account

WonderClip is powered by the robust infrastructure of Alibaba Cloud, ensuring high-speed processing and secure data handling. To get started:
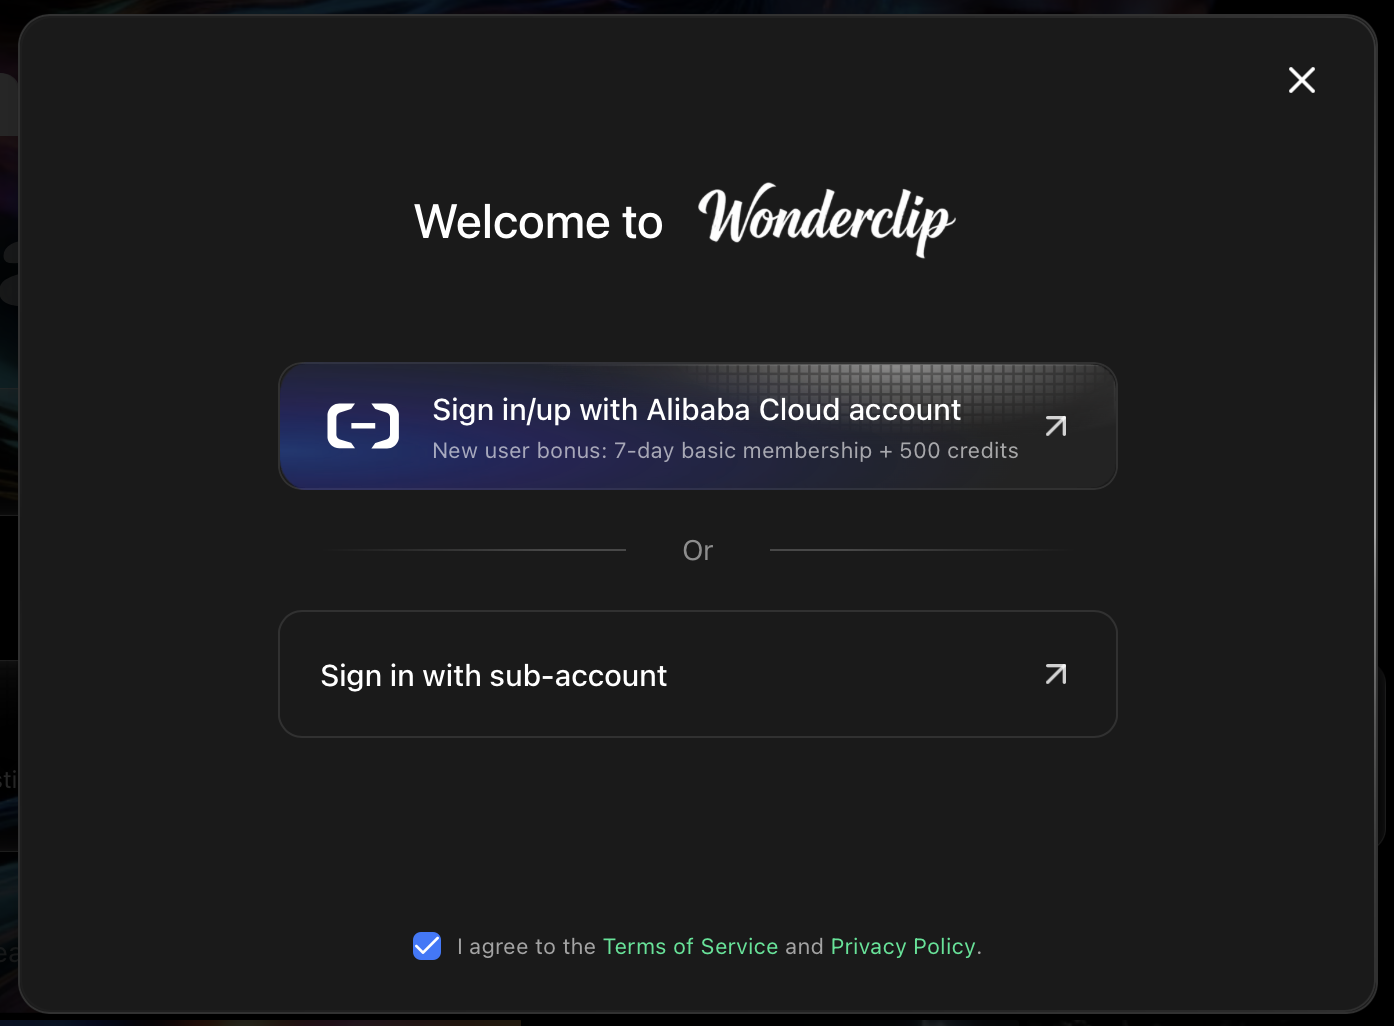
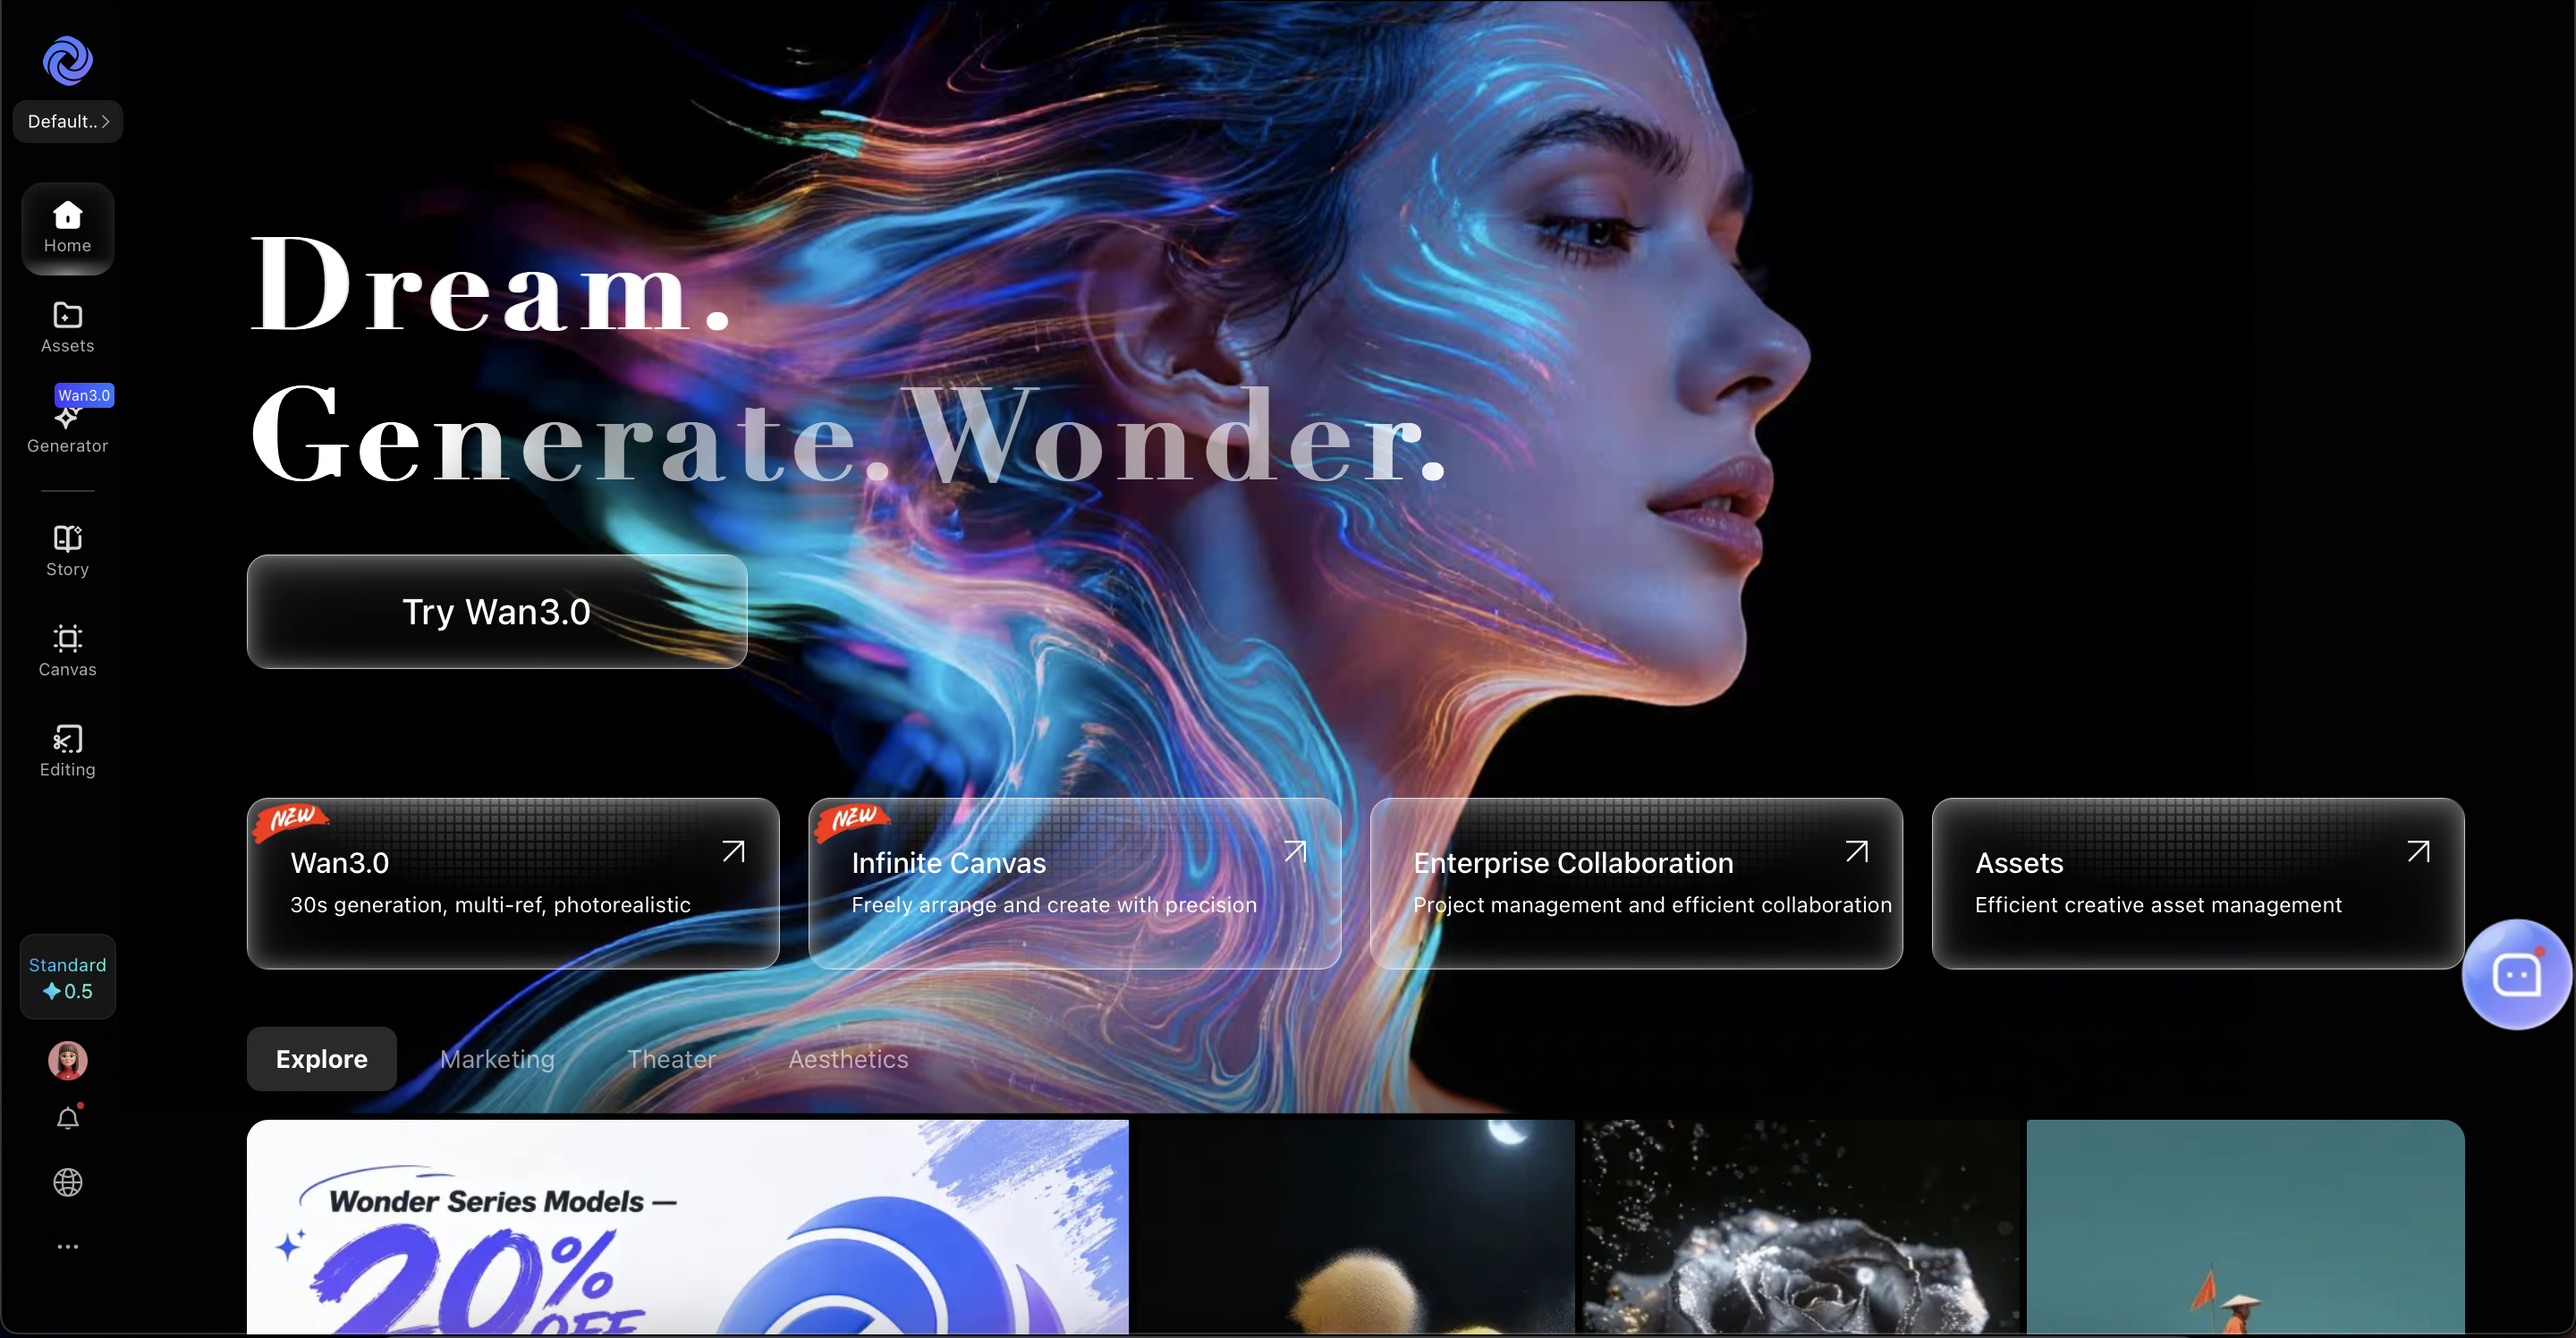
  1. Navigate to the WonderClip official website or dashboard [wonderclip.ai]()
  2. Click on the "Sign In" or "Get Started" button.
  3. Select the option to Login with Alibaba Cloud. Screenshot_2026_08_31_at_22_36_32
  4. Enter your Alibaba Cloud credentials (Account ID/Email and Password). If you don’t have an account yet, you will be prompted to register for one.
  5. Once authenticated, you will be redirected to the WonderClip workspace, ready to create your first project. Screenshot_2026_08_31_at_22_43_32

Step 2: Navigate to the Story Section

After selecting your creation mode:

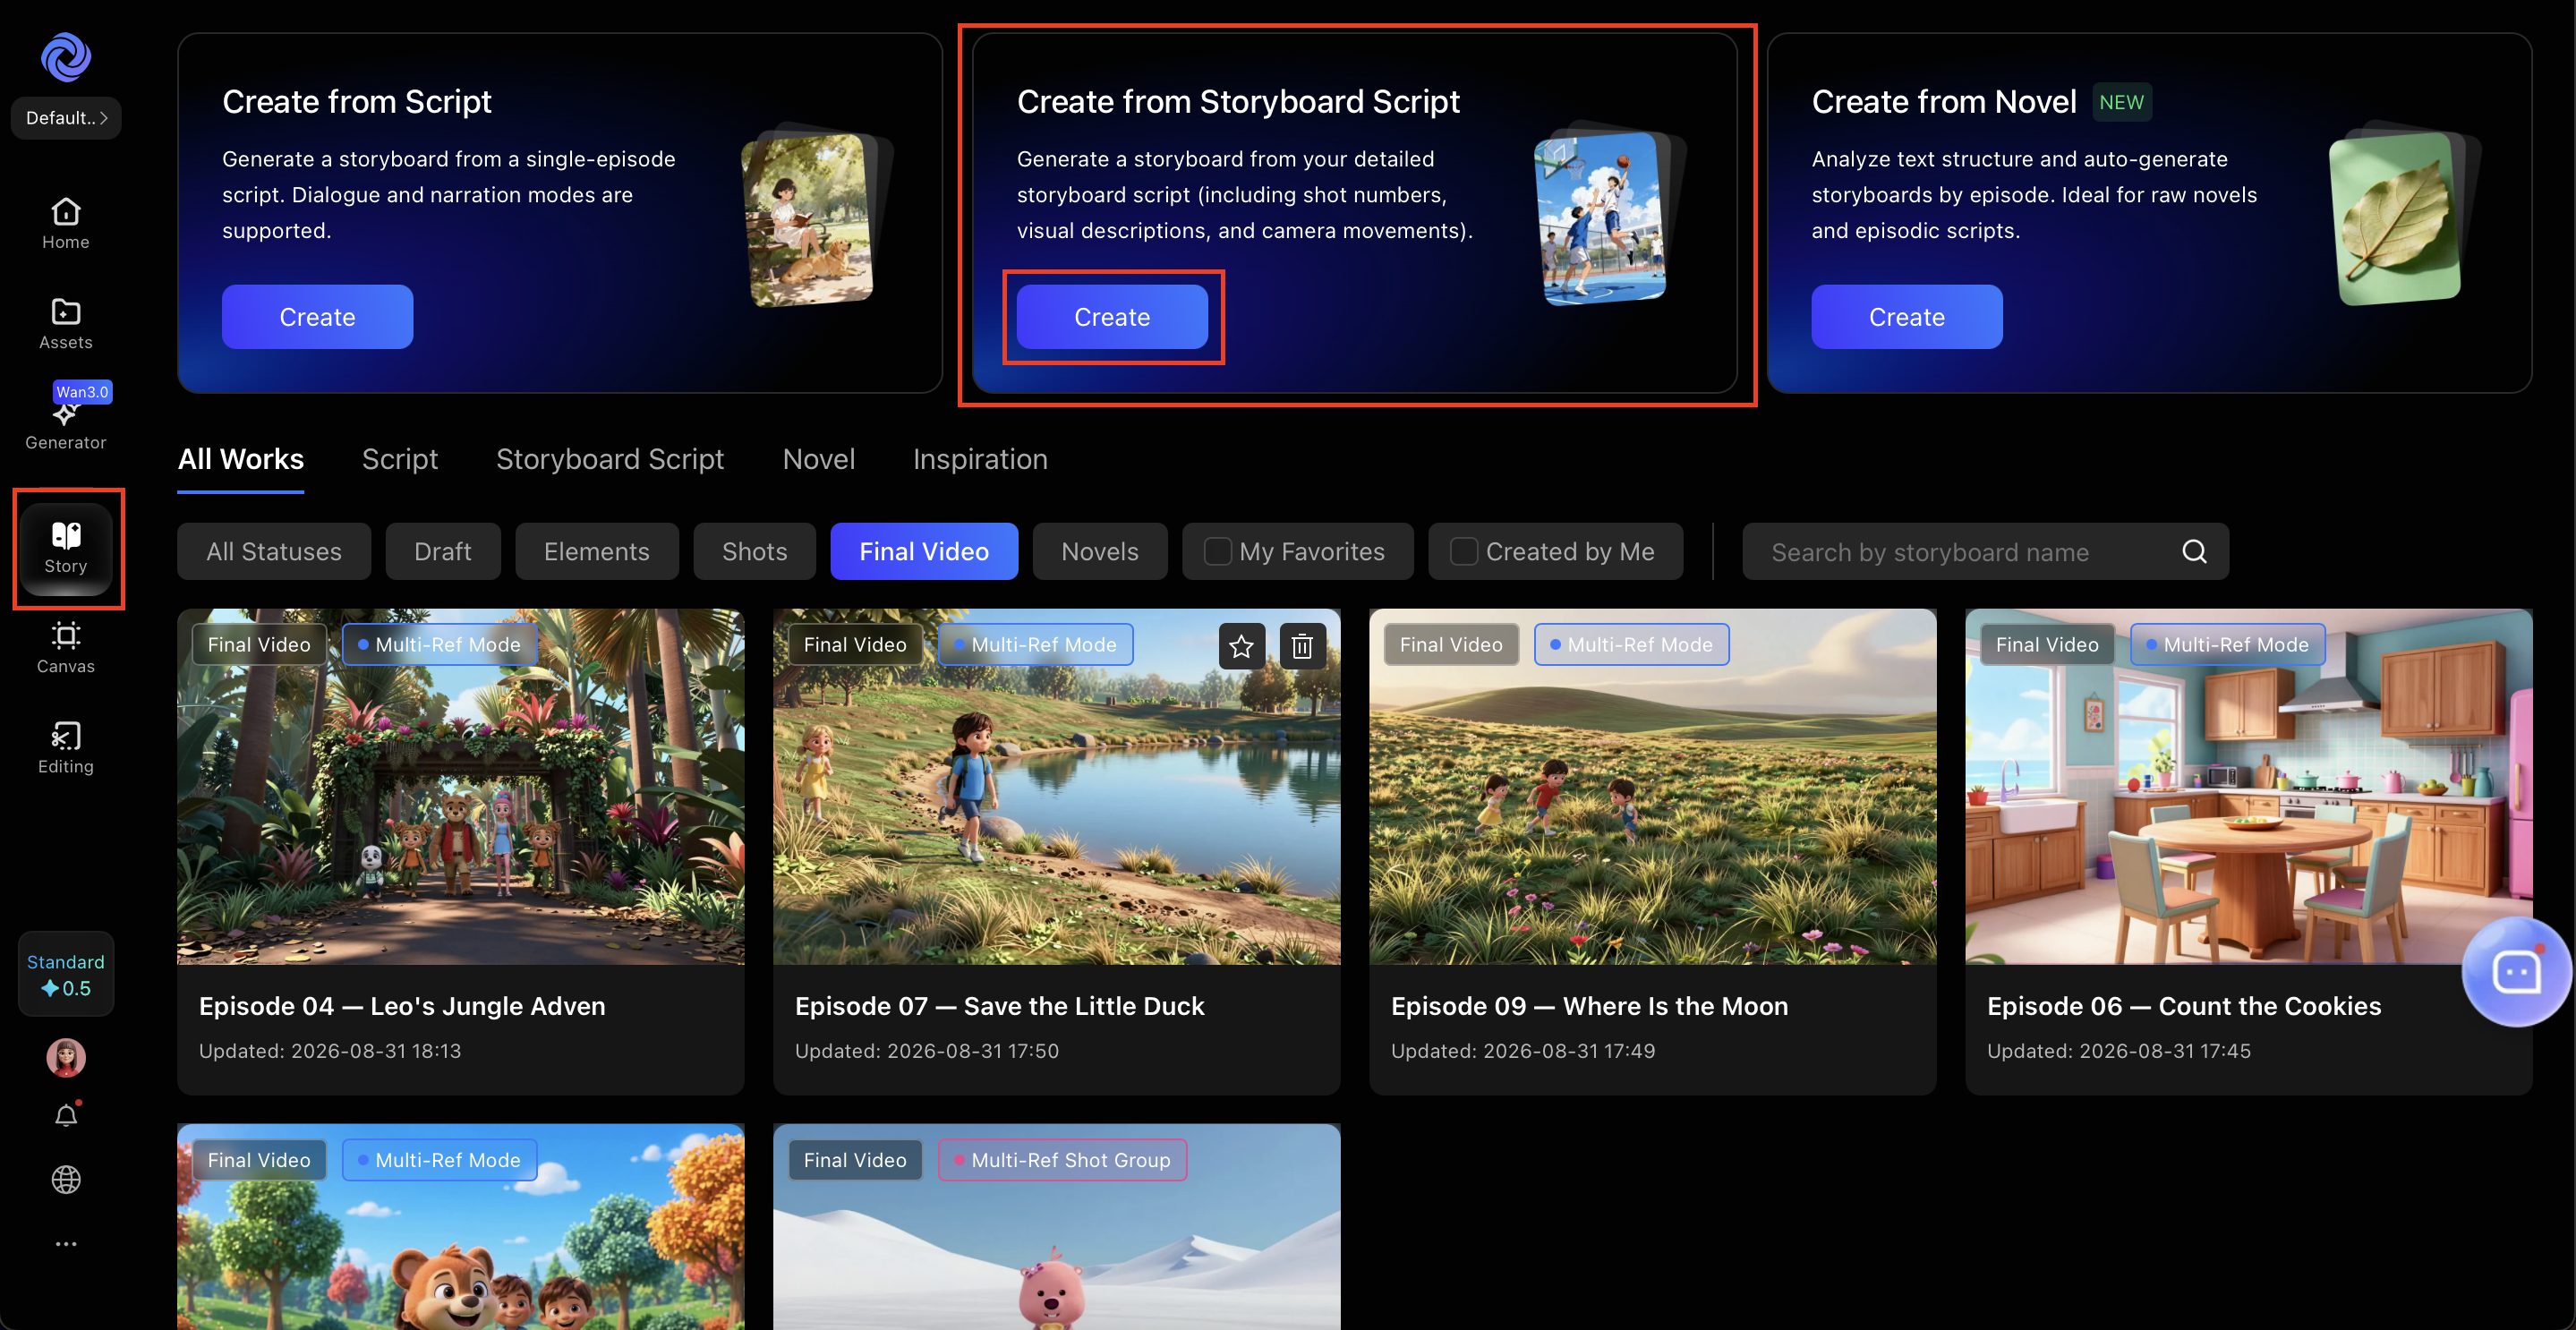
  1. Look at the left sidebar navigation menu.
  2. Click on "Story" (marked with a film/storyboard icon).
  3. This will take you to your Story workspace where you can manage all your storyboard projects.
  4. You'll see tabs like "All Works", "Script", "Storyboard Script", "Novel", and "Inspiration". Screenshot_2026_08_31_at_22_45_50

Step 3: Select "Create from Storyboard Script"

Once you're logged in, you'll see the main creation dashboard with three options:

  1. Create from Script - For single-episode scripts with dialogue and narration
  2. Create from Storyboard Script - For detailed storyboard scripts (including shot numbers, visual descriptions, and camera movements)
  3. Create from Novel - For analyzing text structure and auto-generating storyboards by episode

Step 4: Upload Your Storyboard Script and Configure Settings

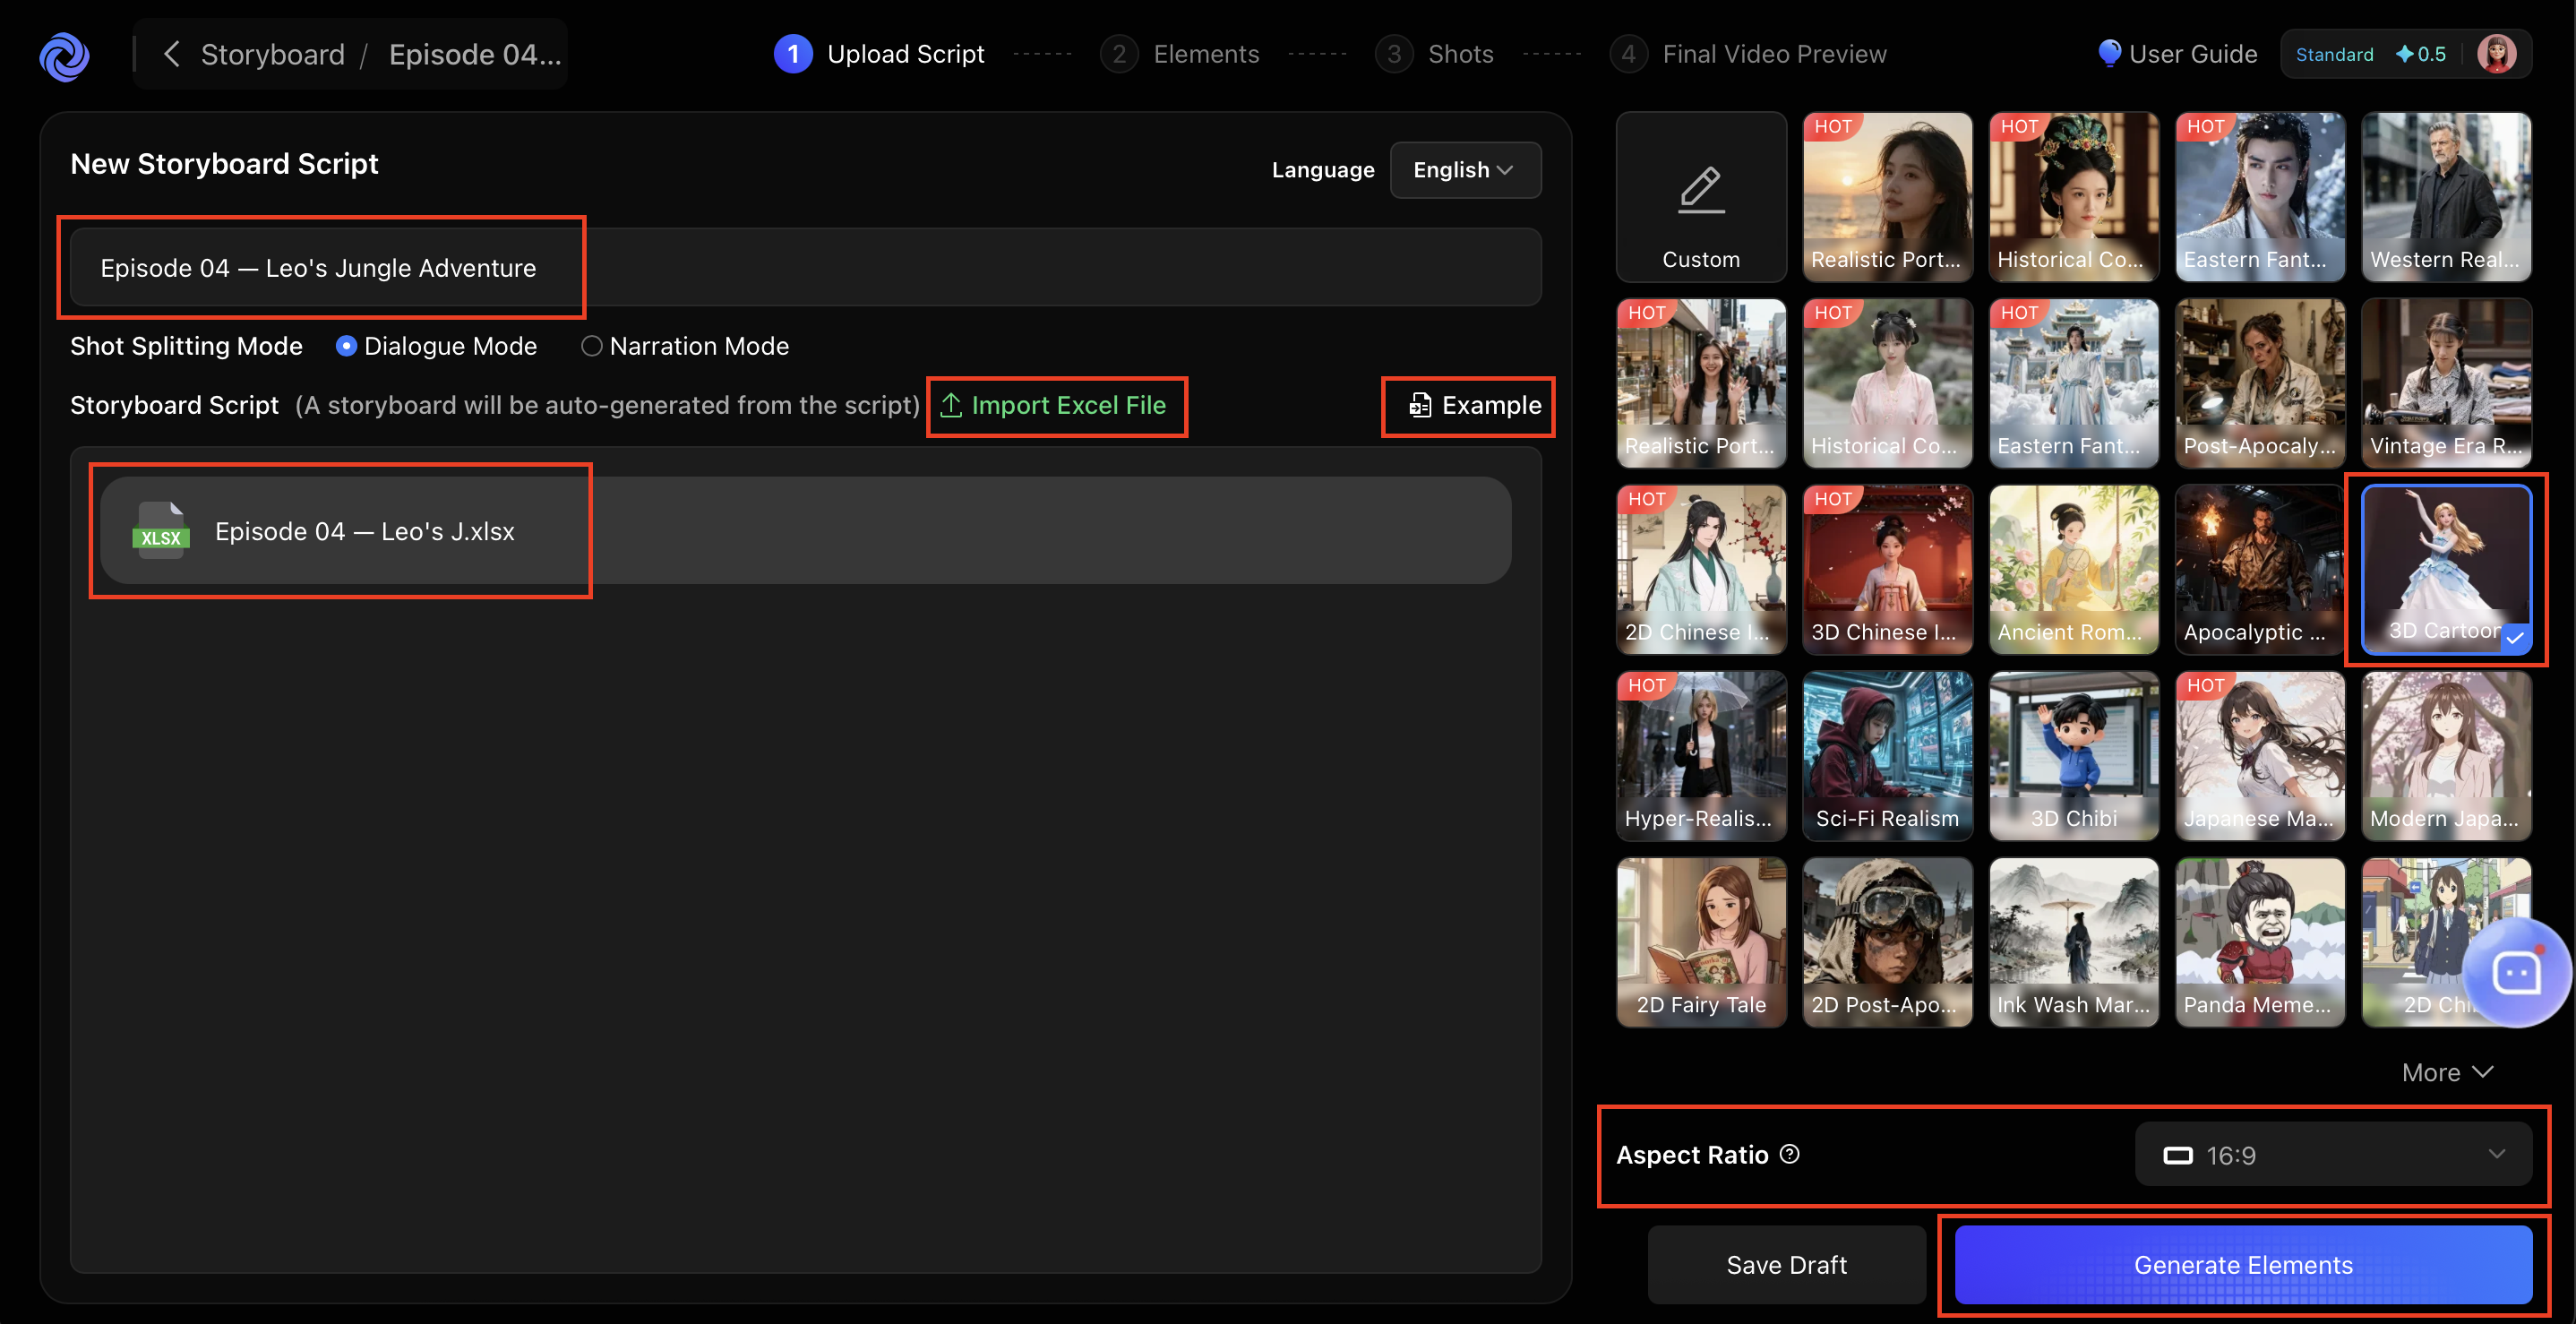
This is where the magic begins. You'll be taken to the "New Storyboard Script" page, which is Step 1: Upload Script in the workflow (Upload Script → Elements → Shots → Final Video Preview).

Here's how to configure your project:

4.1 Set Your Project Title and Language

  1. Project Title: Enter a descriptive name for your episode in the title field (e.g., "Episode 04 — Leo's Jungle Adventure").
  2. Language: Select the language of your script from the dropdown menu (e.g., English, Chinese, etc.).

4.2 Choose Shot Splitting Mode

WonderClip offers two modes for how the AI will break down your script into individual shots:

  1. Dialogue Mode (Recommended for character-driven stories): The AI splits shots based on character dialogue exchanges.
  2. Narration Mode (Recommended for documentary or voiceover-driven stories): The AI splits shots based on narration blocks.

Select the mode that best fits your storytelling style.

4.3 Import Your Storyboard Script

You have two options for inputting your script:

  1. Use Example: Click the "Example" button to load a sample storyboard script. This is perfect for beginners who want to see how a properly formatted script looks before writing their own.
  2. Import Excel File: Click the "Import Excel File" button to upload your pre-written storyboard script in .xlsx format. This is ideal if you've already prepared your script in a spreadsheet with shot numbers, visual descriptions, dialogue, and camera movements. Screenshot_2026_08_31_at_23_11_34
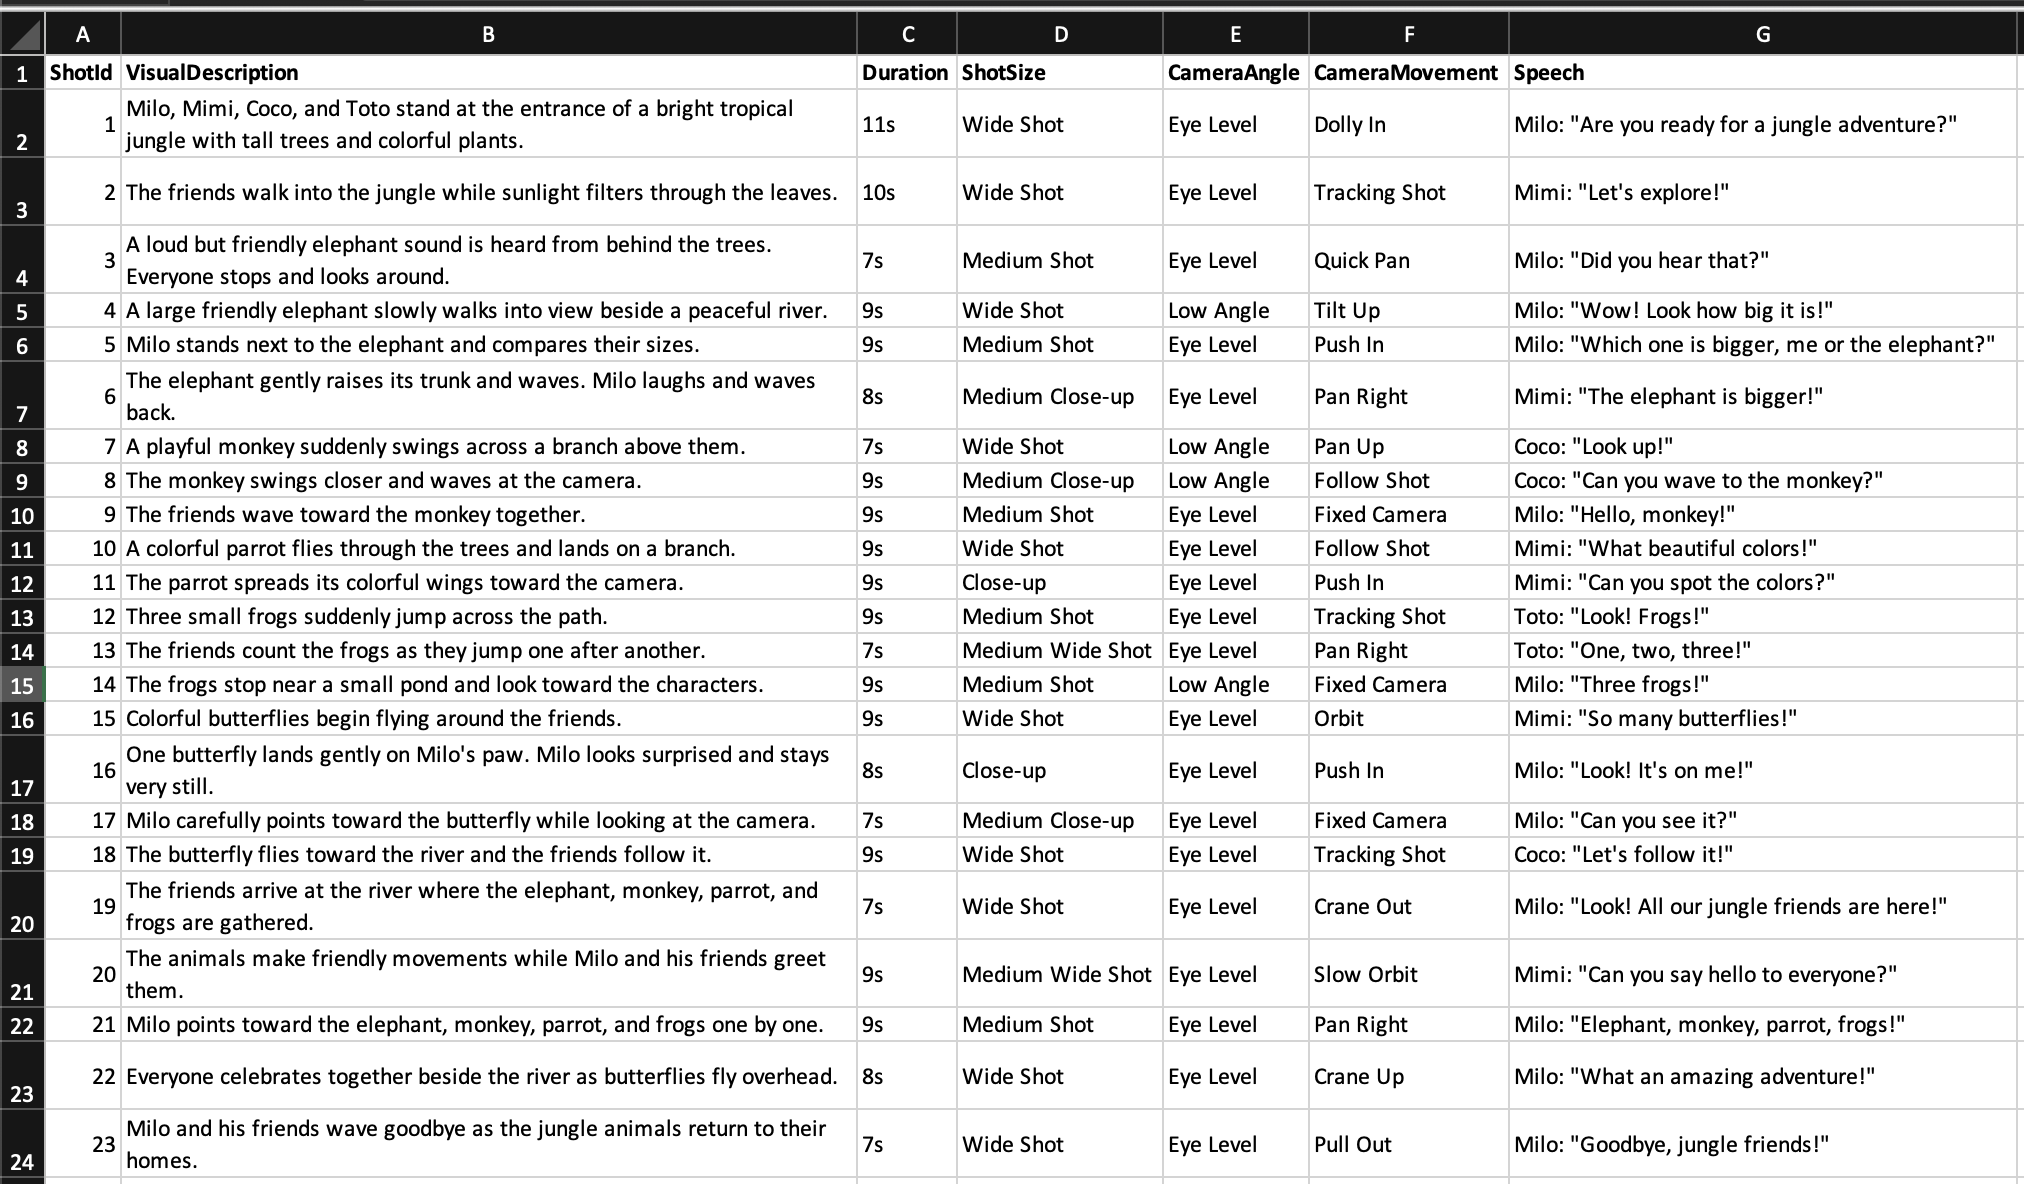
  3. Once uploaded, your Excel file (e.g., "Episode 04 — Leo's J.xlsx") will appear in the script area, and WonderClip will auto-generate a storyboard from it.

4.4 Select Visual Style

On the right side of the screen, you'll see a grid of visual style presets. Choose the one that best matches your story's aesthetic:

Click on your preferred style to select it (a blue checkmark will appear on the selected style).

4.5 Set Aspect Ratio

At the bottom right, choose your Aspect Ratio:

  1. 16:9 - Standard landscape format (ideal for YouTube, TV, and desktop viewing)
  2. 9:16 - Vertical format (ideal for TikTok, Instagram Reels, YouTube Shorts)
  3. Other ratios may also be available depending on your project needs.

4.6 Generate Elements

Once everything is configured:

  1. Click "Save Draft" if you want to save your progress and come back later.
  2. Click "Generate Elements" to let WonderClip's AI analyze your script and generate the visual elements, characters, and scenes for your storyboard.

Screenshot_2026_08_31_at_22_49_56

Step 5: Review and Refine Generated Elements

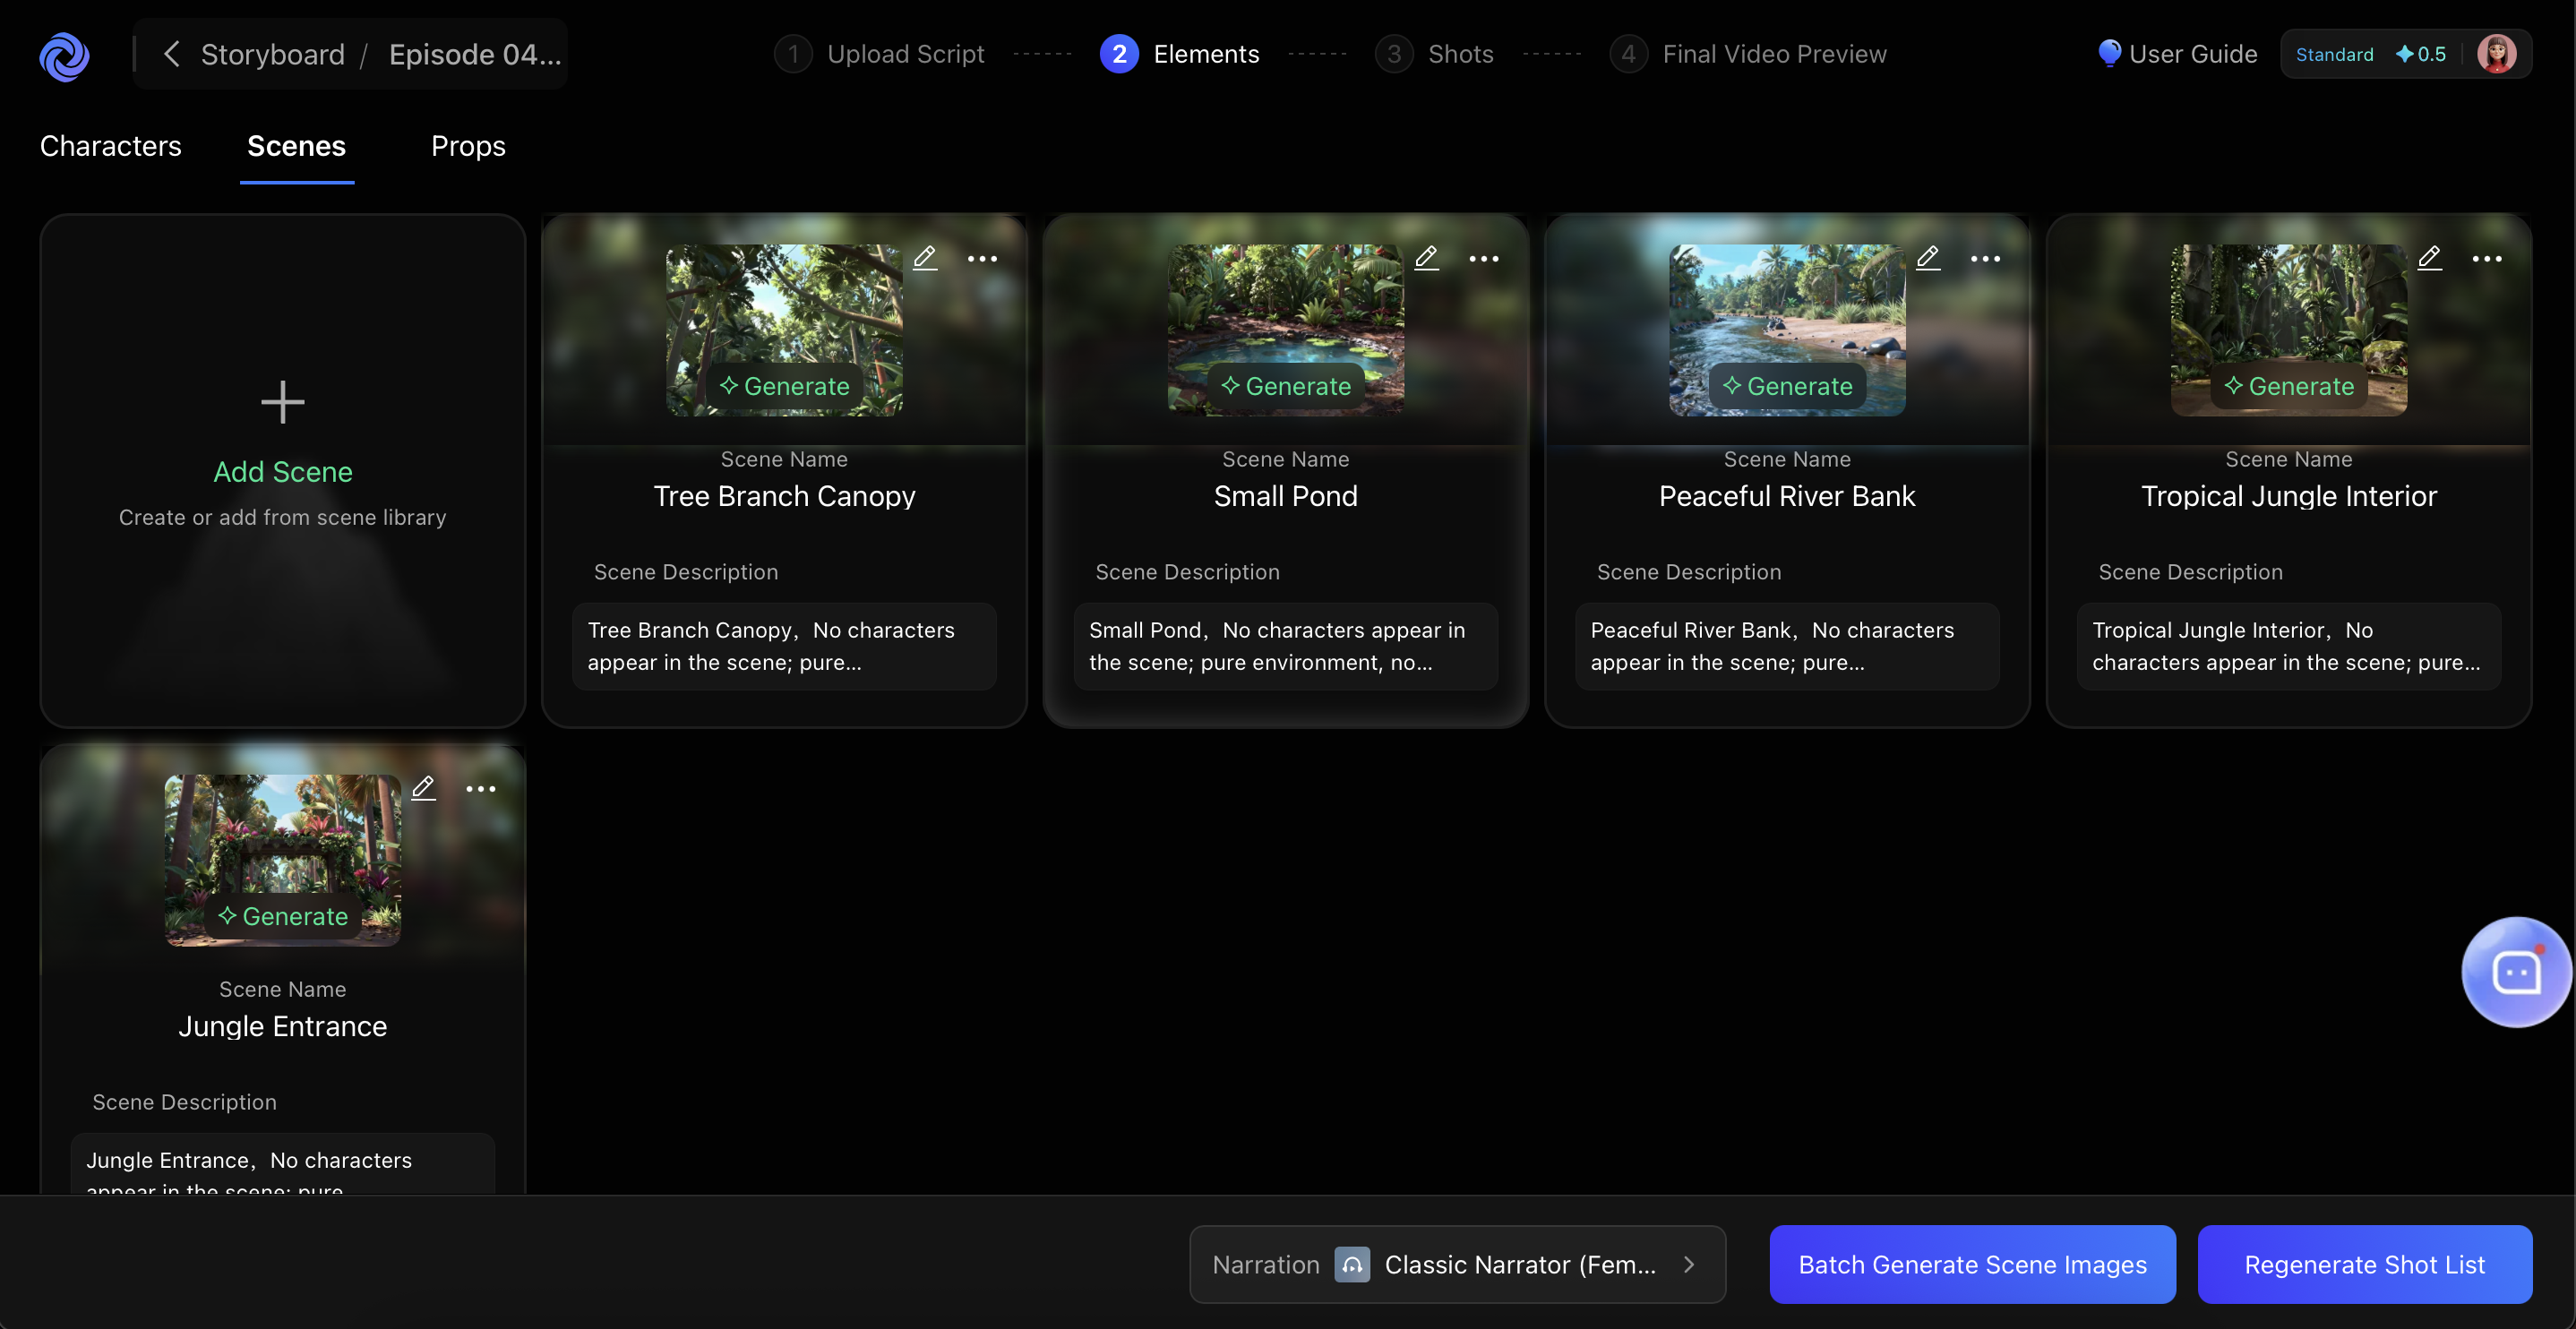
After clicking "Generate Elements," you'll move to Step 2: Elements in the workflow.
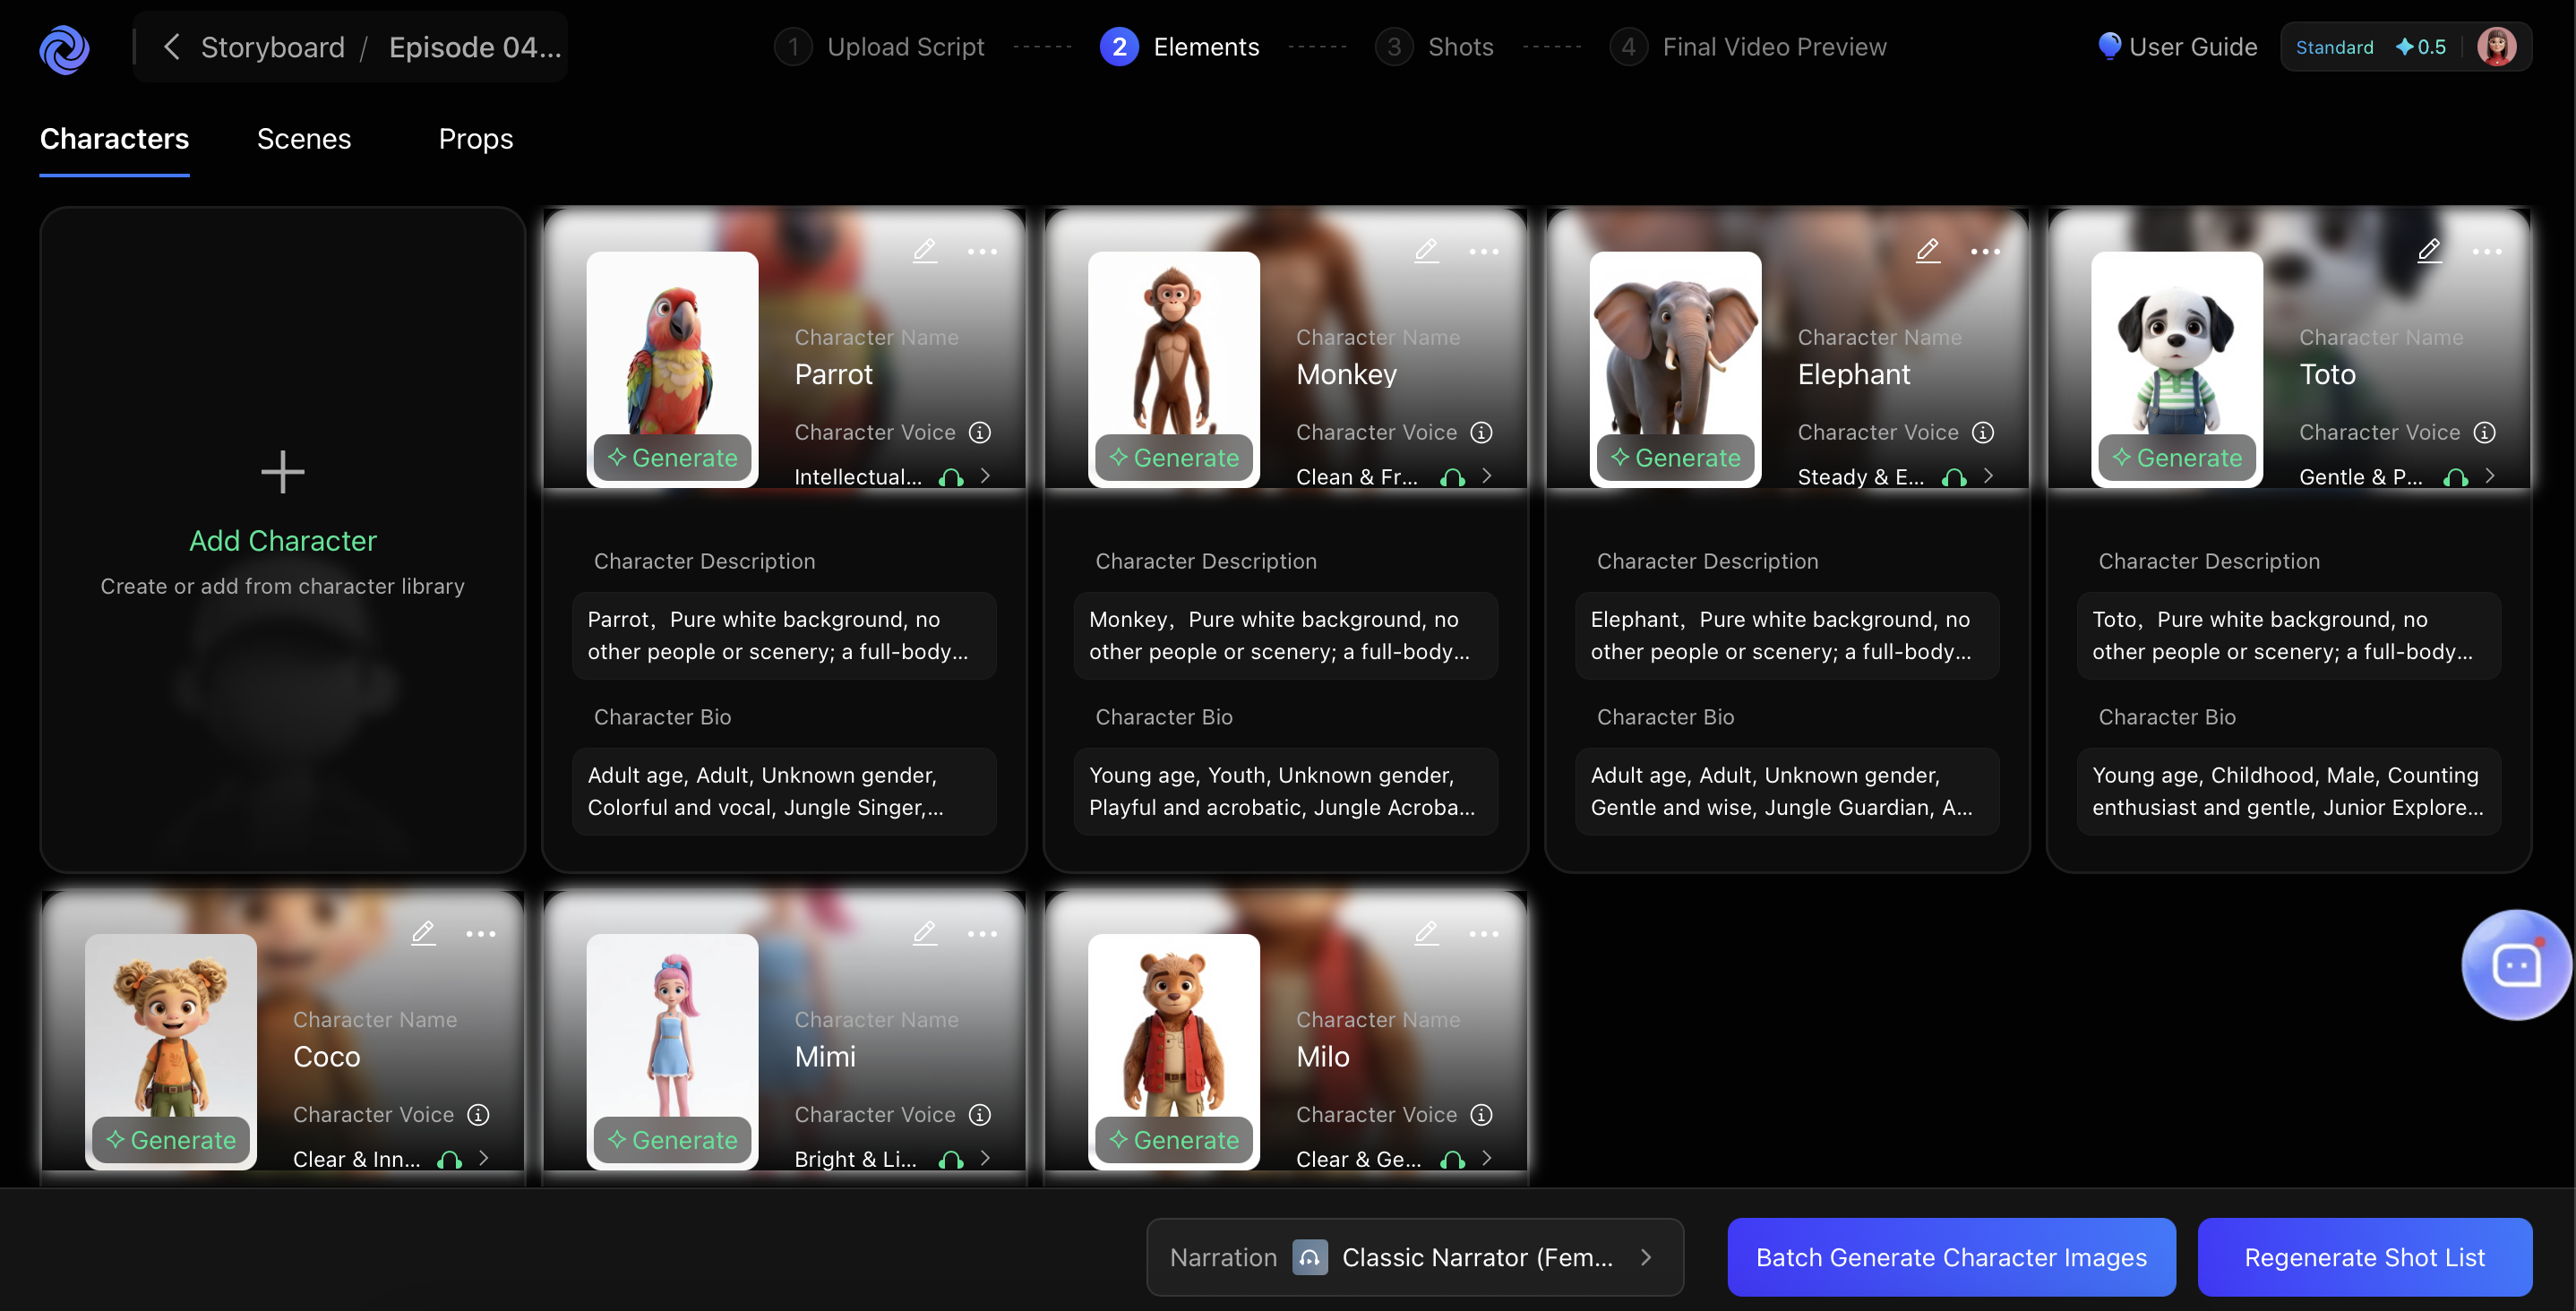
  1. Character Elements: Review the AI-generated character designs. Ensure they match your vision. Screenshot_2026_08_31_at_23_04_50
  2. Scene Elements: Check the background and environment designs for each location in your story. Screenshot_2026_08_31_at_23_05_07
  3. Refine and Regenerate: If any element doesn't match your vision, you can:
    -Click on the element to edit its prompt

-Regenerate it with a new description
-Swap it with a different asset from the library

  1. Character Consistency: Use the "Multi-Ref Mode" to lock character designs across multiple shots, ensuring your protagonist looks the same throughout the episode.

Step 6: Generate and Edit Shots

Once you're satisfied with the elements, proceed to Step 3: Shots.
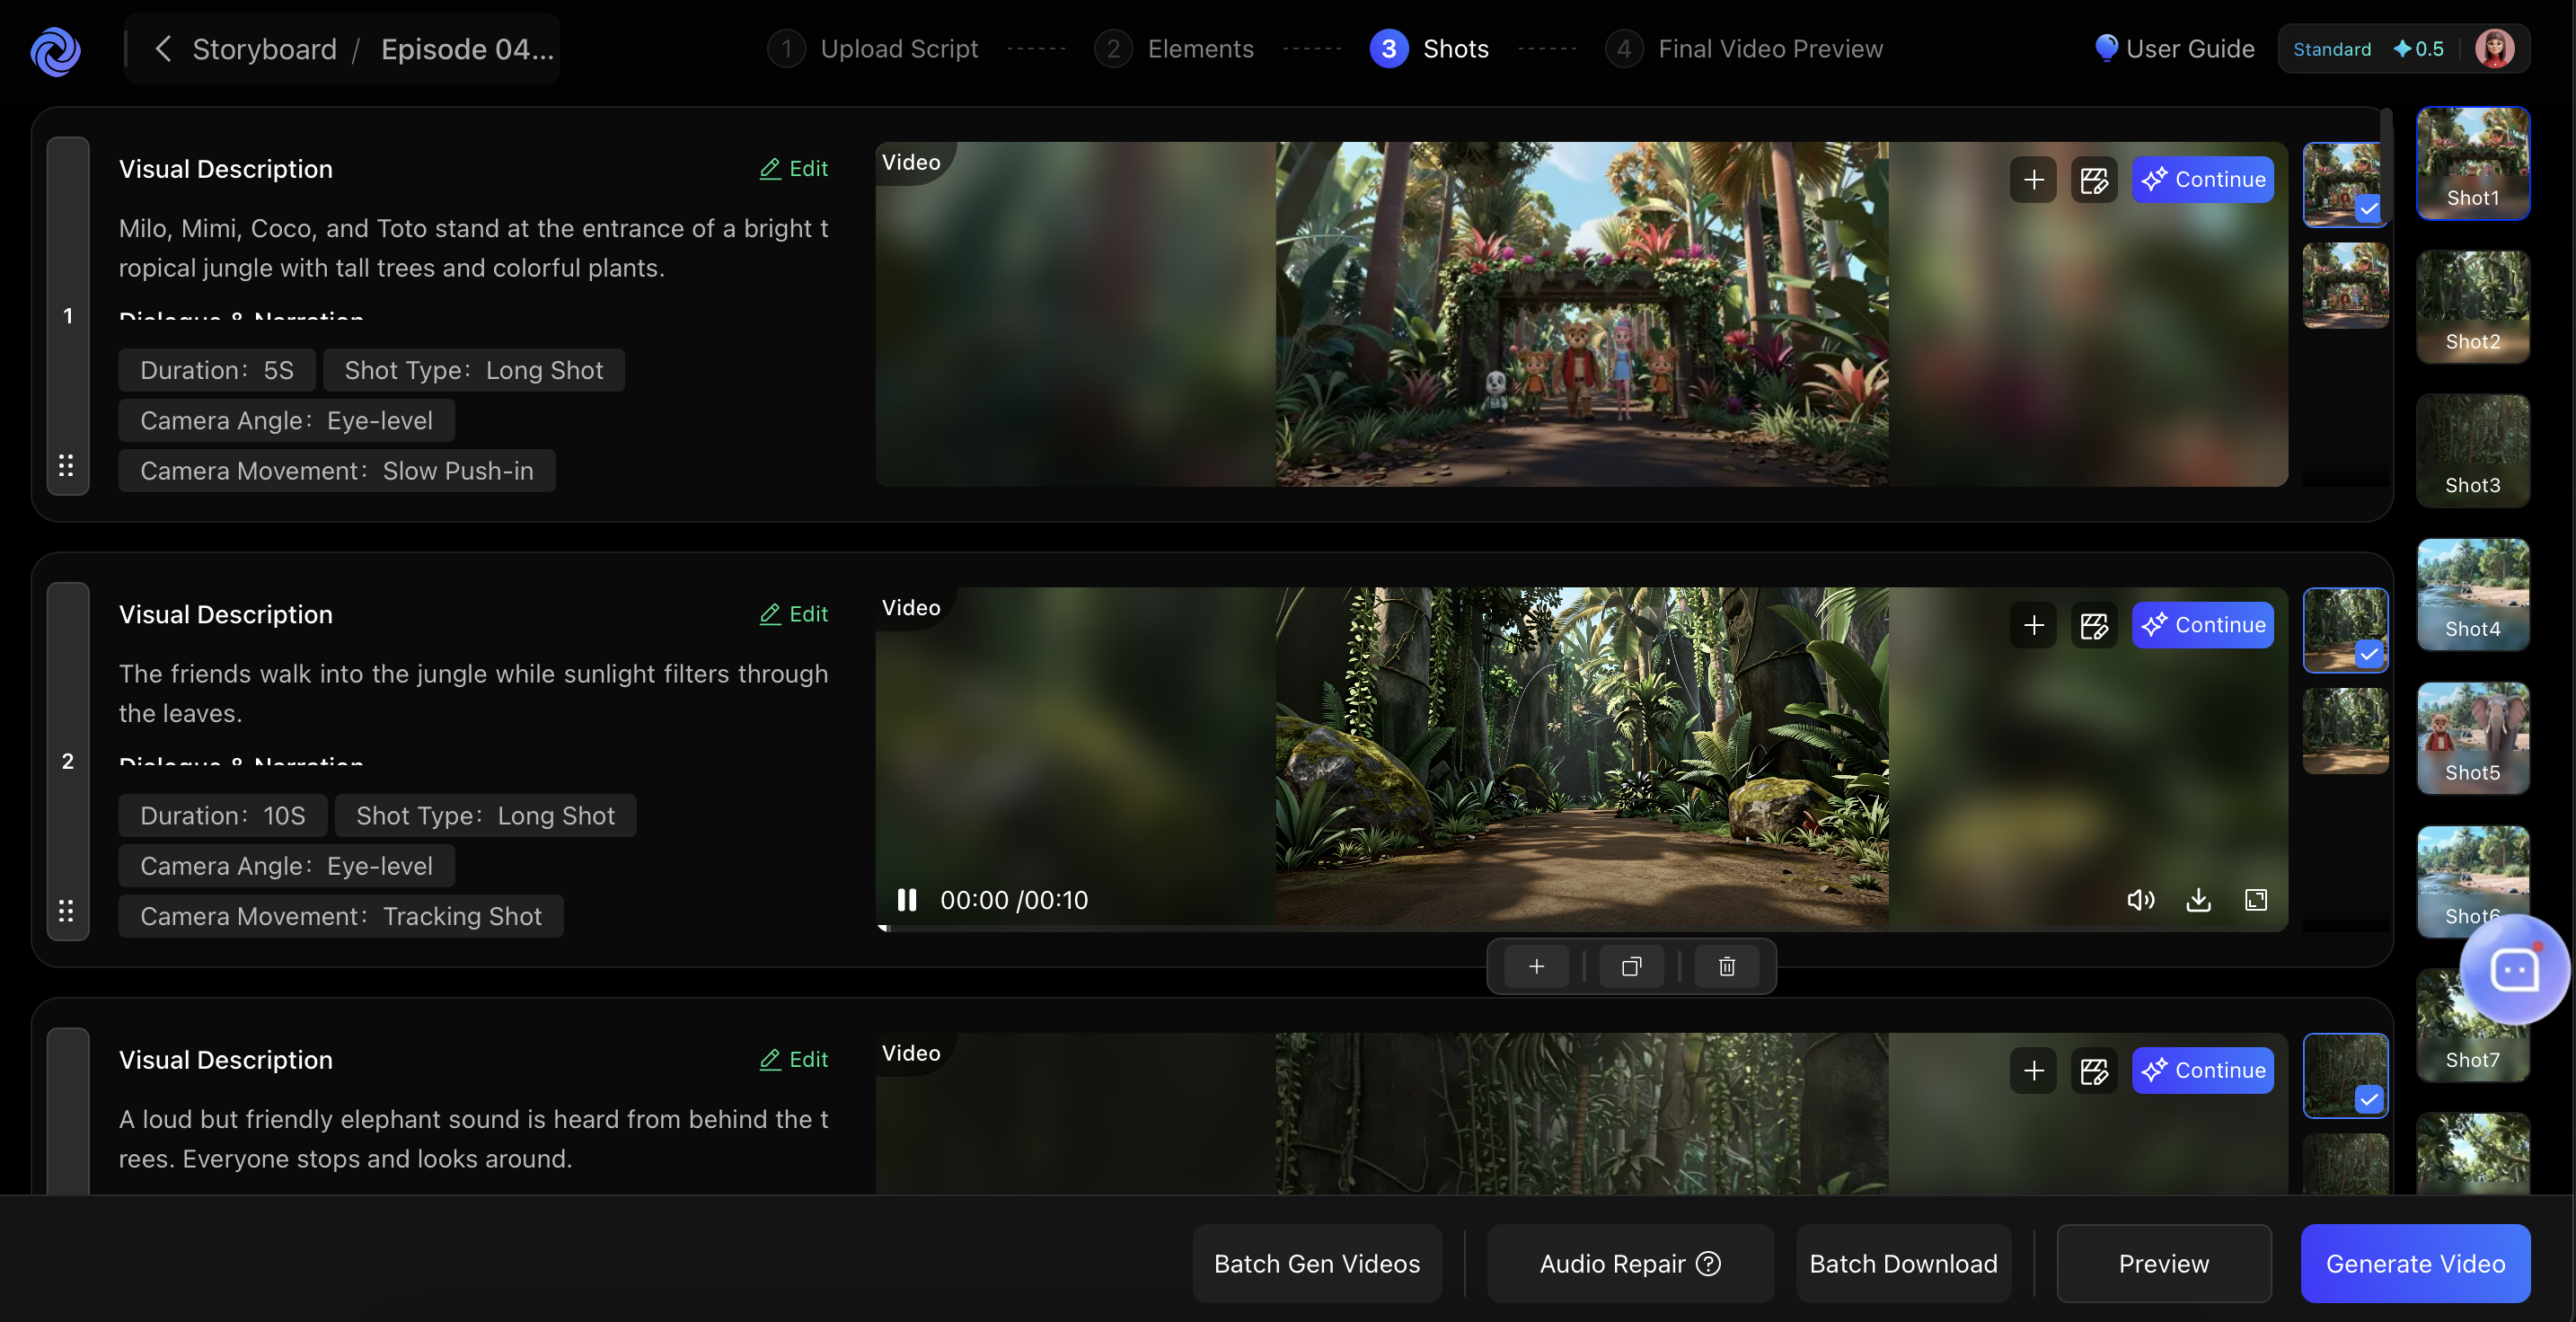
  1. Shot Breakdown: WonderClip will automatically generate individual video shots based on your storyboard script, shot numbers, and camera movement descriptions. Screenshot_2026_08_31_at_23_09_41
  2. Review Each Shot: Play through each generated shot to check:
    -Camera angles and movements (close-up, wide shot, pan, zoom, etc.)

-Character actions and expressions
-Scene composition and lighting

  1. Edit Shots: For any shot that needs adjustment:
    -Modify the prompt to regenerate the shot

-Adjust the duration
-Swap with alternative generated versions
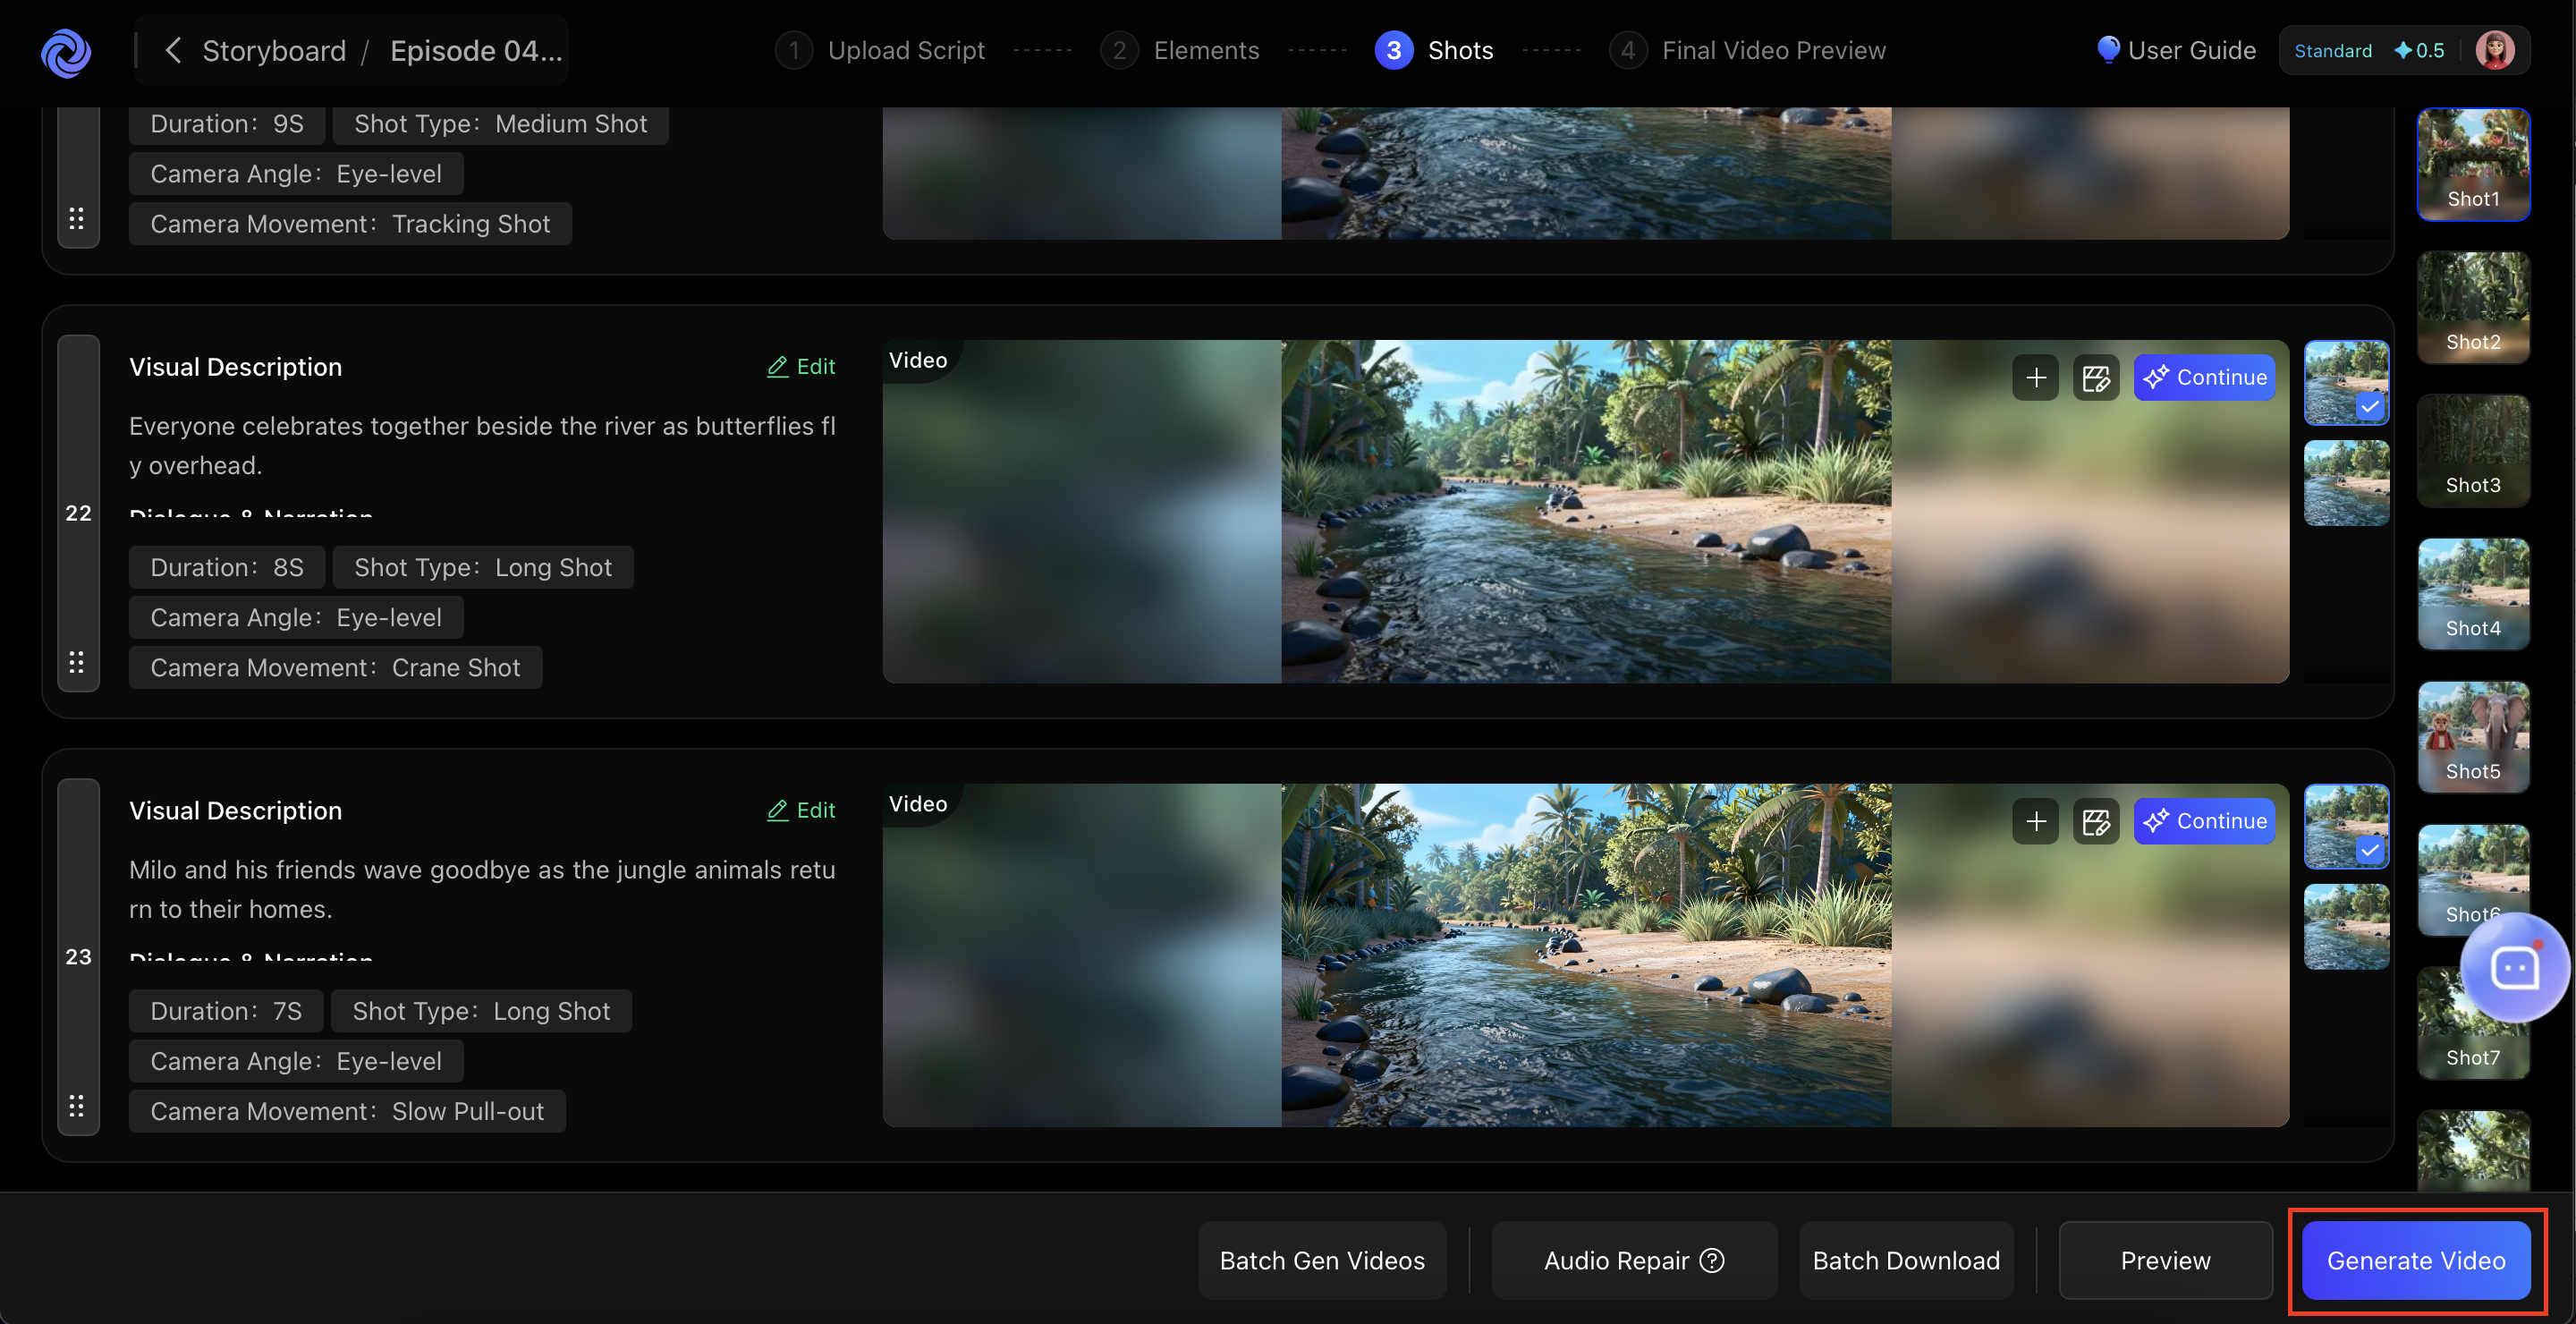
  1. Add Transitions: Apply smooth transitions between shots to create a cohesive flow. Screenshot_2026_08_31_at_23_12_33

Step 7: Final Video Preview and Export

Once all shots are refined, proceed to Step 4: Final Video Preview.

  1. Full Preview: Watch the entire video from start to finish. Check for:
    -Lip-sync accuracy (if using talking avatars)

-Audio balance between voiceover, music, and SFX
-Visual flow and transition smoothness
-Overall pacing and storytelling impact
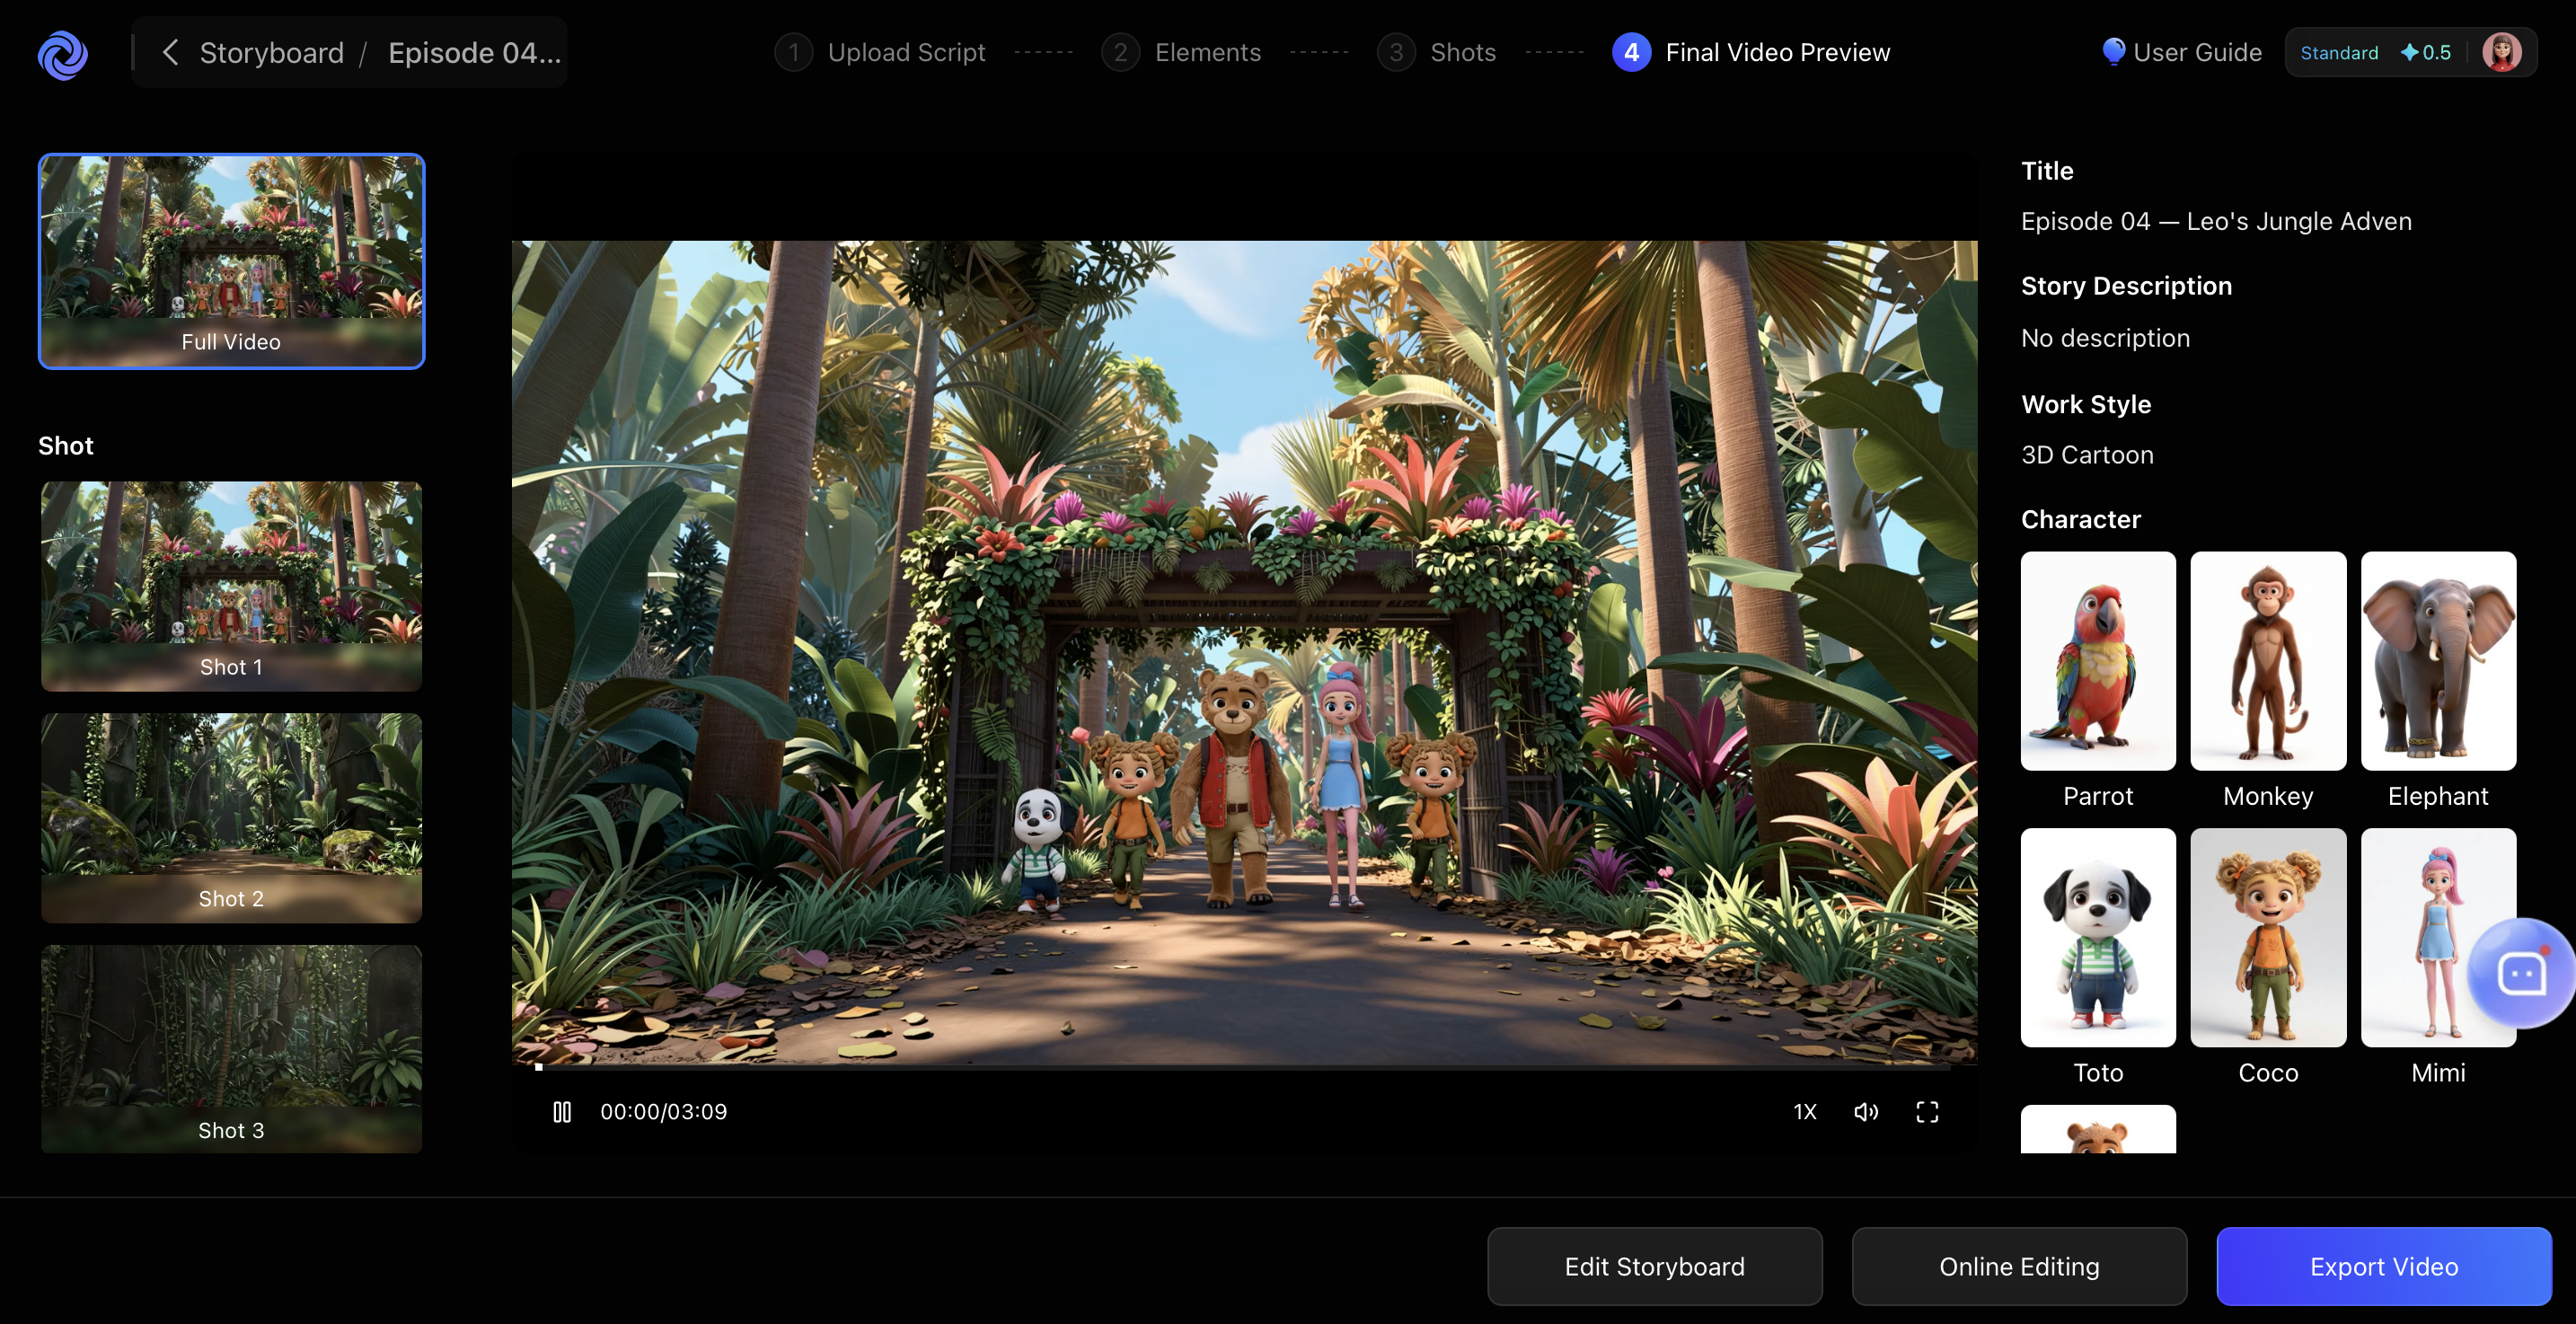
  1. Dynamic Captions: Enable auto-captions and choose a dynamic, animated text style that highlights keywords to keep viewers engaged.
  2. Color Grading & Filters: Apply a global filter or color grade to ensure all scenes share a cohesive, cinematic look.
  3. Export Settings: Click "Export". Choose your resolution (1080p or 4K) and frame rate (30fps or 60fps). Screenshot_2026_08_31_at_23_13_43
  4. Publish: Once rendered, download the file or use WonderClip's direct integration to publish it straight to YouTube, TikTok, or Instagram.

Conclusion

The transition from a written storyboard script to a fully produced video used to be a monumental task requiring a whole production crew. With WonderClip, that barrier has been completely dismantled.

By leveraging AI to interpret your visual cues, generate stunning scenes, and sync professional audio, WonderClip allows you to focus on what truly matters: the story. Whether you are a marketer looking to scale content, an indie filmmaker prototyping a short film, or a creator building a narrative on social media, WonderClip is the ultimate tool to turn your words into visual magic.

Pro Tips for Maximizing WonderClip

  1. Use the "Character Lock" Feature: If your story features a specific protagonist, use WonderClip's character consistency tools to ensure the AI generates the same character design across multiple scenes.
  2. Show, Don't Just Tell: In your script, describe the action rather than just the dialogue. Instead of writing "He was sad," write "He stares blankly at the rain hitting the window, a single tear falling." The AI translates physical actions into visuals much better than abstract emotions.
  3. Leverage Multi-Ref Mode: Use the "Multi-Ref Mode" to maintain visual consistency across related shots and episodes, especially for series content.
  4. Use Excel Import for Efficiency: Prepare your storyboard scripts in Excel format with clear columns for shot numbers, visual descriptions, dialogue, and camera movements. This makes the import process seamless and organized.
  5. Choose the Right Shot Splitting Mode: Use Dialogue Mode for character-driven narratives and Narration Mode for documentary-style or voiceover-heavy content.
  6. Leverage B-Roll Prompts: If the main AI video generation feels too static, use the prompt box to request specific B-roll (e.g., "cinematic drone shot of a cyberpunk city at night") to overlay during dialogue-heavy sections.

Ready to see your storyboard come to life? Log in to wonderclip.ai with your Alibaba Cloud account, select "Create from Storyboard Script," upload your Excel file, and start creating your next masterpiece today!

0 1 0
Share on

Muhamad Miftah

8 posts | 0 followers

You may also like

Comments

Muhamad Miftah

8 posts | 0 followers

Related Products