By Hang Yin
In the preceding articles Manage End-to-end Traffic Based on Alibaba Cloud Service Mesh (1): Traffic Lanes in Strict Mode and Manage End-to-end Traffic Based on Alibaba Cloud Service Mesh (2): Traffic Lanes in Loose Mode, we introduce the concept of traffic lanes, the scheme of using traffic lanes for end-to-end grayscale management, and the traffic lanes in strict mode and loose mode provided by Alibaba Cloud Service Mesh (ASM). This article introduces a traffic lane scenario in loose mode based on the auto-instrumentation scheme of OpenTelemetry. It achieves flexible end-to-end grayscale management for cloud-native applications running in Kubernetes clusters without any business code transformation.
Traffic lanes isolate multiple services in a cloud-native application into multiple independent runtime environments based on their service versions (or other features).
In strict mode, each traffic lane contains all the services on the trace of the application with no requirements for the application.
In loose mode, you only need to create one lane that contains all the services on the trace. That is called the baseline lane. Other lanes are not required to contain all the services on the trace. When services in one lane call each other, if the service to be called does not exist in the lane, requests are forwarded to the same service in the baseline lane. When the service to be called becomes available in the lane, requests are forwarded back to the lane. Although the traffic lane in loose mode can achieve flexible end-to-end grayscale, it requires the application to contain a request header that can be passed through in the entire trace (link pass-through request header).
Alibaba Cloud Service Mesh (ASM) has provided a new loose-mode traffic lane scheme based on baggage pass-through. It can achieve the flexible grayscale of lane services without modifying the business code.
OpenTelemetry is a project of the Cloud Native Computing Foundation (CNCF). It is closely connected with other CNCF projects, such as Kubernetes, Prometheus, and Envoy, and they jointly form the foundation of the cloud-native technology ecosystem. Due to its rich functionality and wide applicability, OpenTelemetry has established its leadership in the industry. It is adopted by more and more enterprises and developers as a core component for building and maintaining observability platforms.
The baggage is a standard developed and promoted by OpenTelemetry for passing context information across the distributed system trace. It is embodied as a request header named baggage, which contains context information stored in the form of key-value pairs, for example:
baggage: userId=alice,serverNode=DF%2028,isProduction=falseYou can use the SDK provided by OpenTelemetry to pass the baggage request header in the service trace, and then the customized context information on the entire service link. When a service is deployed in a Kubernetes cluster, auto-instrumentation of OpenTelemetry Operator provides the service with the baggage pass-through capability without modifying the business code. For more information about baggage, please refer to baggage.
Based on the baggage pass-through, Alibaba Cloud Service Mesh (ASM) provides a traffic lane in loose mode that can be achieved without modifying the code and augments the routing strategy of the traffic lane to support the routing of different lanes based on the traffic weight policy. This article first uses auto-instrumentation of OpenTelemetry to reference the pass-through baggage request header for the service. Next, create three lanes in loose mode and route different lanes based on the traffic weight strategy.
apiVersion: networking.istio.io/v1beta1
kind: Gateway
metadata:
 name: ingressgateway
  namespace: istio-system
spec:
  selector:
    istio: ingressgateway
  servers:
    - port:
        number: 80
        name: http
        protocol: HTTP
      hosts:
- '*'This section describes how to add baggage pass-through capability for services in the Kubernetes cluster through auto-instrumentation of OpenTelemetry Operator.
1. Deploy OpenTelemetry Operator
a) Use kubectl to connect to the Kubernetes cluster added by the ASM instance. Run the following command to create the opentelemetry-operator-system namespace:
kubectl create namespace opentelemetry-operator-systemb) Run the following command to use Helm to install OpenTelemetry Operator in the opentelemetry-operator-system namespace. (If you have not installed Helm, please refer to Install Helm to Install the Helm Command-line Tool.)
helm repo add open-telemetry https://open-telemetry.github.io/opentelemetry-helm-charts
helm install \
    --namespace=opentelemetry-operator-system \
    --version=0.46.0 \
    --set admissionWebhooks.certManager.enabled=false \
    --set admissionWebhooks.certManager.autoGenerateCert=true \
    --set manager.image.repository="registry-cn-hangzhou.ack.aliyuncs.com/acs/opentelemetry-operator" \
    --set manager.image.tag="0.92.1" \
    --set kubeRBACProxy.image.repository="registry-cn-hangzhou.ack.aliyuncs.com/acs/kube-rbac-proxy" \
    --set kubeRBACProxy.image.tag="v0.13.1" \
    --set manager.collectorImage.repository="registry-cn-hangzhou.ack.aliyuncs.com/acs/opentelemetry-collector" \
    --set manager.collectorImage.tag="0.97.0" \
    --set manager.opampBridgeImage.repository="registry-cn-hangzhou.ack.aliyuncs.com/acs/operator-opamp-bridge" \
    --set manager.opampBridgeImage.tag="0.97.0" \
    --set manager.targetAllocatorImage.repository="registry-cn-hangzhou.ack.aliyuncs.com/acs/target-allocator" \
    --set manager.targetAllocatorImage.tag="0.97.0" \
    --set manager.autoInstrumentationImage.java.repository="registry-cn-hangzhou.ack.aliyuncs.com/acs/autoinstrumentation-java" \
    --set manager.autoInstrumentationImage.java.tag="1.32.1" \
    --set manager.autoInstrumentationImage.nodejs.repository="registry-cn-hangzhou.ack.aliyuncs.com/acs/autoinstrumentation-nodejs" \
    --set manager.autoInstrumentationImage.nodejs.tag="0.49.1" \
    --set manager.autoInstrumentationImage.python.repository="registry-cn-hangzhou.ack.aliyuncs.com/acs/autoinstrumentation-python" \
    --set manager.autoInstrumentationImage.python.tag="0.44b0" \
    --set manager.autoInstrumentationImage.dotnet.repository="registry-cn-hangzhou.ack.aliyuncs.com/acs/autoinstrumentation-dotnet" \
    --set manager.autoInstrumentationImage.dotnet.tag="1.2.0" \
    --set manager.autoInstrumentationImage.go.repository="registry-cn-hangzhou.ack.aliyuncs.com/acs/opentelemetry-go-instrumentation" \
    --set manager.autoInstrumentationImage.go.tag="v0.10.1.alpha-2-aliyun" \
    opentelemetry-operator open-telemetry/opentelemetry-operator
c) Run the following command to check whether the opentelemetry-operator runs properly.
kubectl get pod -n opentelemetry-operator-systemExpected output:
NAME READY   STATUS    RESTARTS   AGE
opentelemetry-operator-854fb558b5-pvllj   2/2     Running   0          1m
2. Configure auto-instrumentation
a) Create an instrumentation.yaml file with the following content.
apiVersion: opentelemetry.io/v1alpha1
kind: Instrumentation
metadata:
 name: demo-instrumentation
spec:
  propagators:
    - baggage
  sampler:
    type: parentbased_traceidratio
    argument: "1"
b) Run the following command to declare auto-instrumentation in the default namespace.
kubectl apply -f instrumentation.yamlNote: Best practices for the OpenTelemetry framework also include deploying OpenTelemetry Collector to collect observable data. This article demonstrates baggage link pass-through achieved by auto-instrumentation of OpenTelemetry. It does not include the steps to deploy OpenTelemetry Collector.
1. Enable automatic injection of Siedcar mesh proxy for the default namespace. For more information, please refer to Enable Automatic Injection of Sidecar Proxy.
For more information about automatic injection, please refer to Configure a Sidecar Injection Strategy.
2. Create a mock.yaml file with the following content.
apiVersion: v1
kind: Service
metadata:
 name: mocka
  labels:
    app: mocka
    service: mocka
spec:
  ports:
  - port: 8000
    name: http
  selector:
    app: mocka
---
apiVersion: apps/v1
kind: Deployment
metadata:
  name: mocka-v1
  labels:
    app: mocka
    version: v1
spec:
  replicas: 1
  selector:
    matchLabels:
      app: mocka
      version: v1
      ASM_TRAFFIC_TAG: v1
  template:
    metadata:
      labels:
        app: mocka
        version: v1
        ASM_TRAFFIC_TAG: v1
      annotations:
        instrumentation.opentelemetry.io/inject-java: "true"
        instrumentation.opentelemetry.io/container-names: "default"
    spec:
      containers:
      - name: default
        image: registry-cn-hangzhou.ack.aliyuncs.com/acs/asm-mock:v0.1-java
        imagePullPolicy: IfNotPresent
        env:
        - name: version
          value: v1
        - name: app
          value: mocka
        - name: upstream_url
          value: "http://mockb:8000/"
        ports:
        - containerPort: 8000
---
apiVersion: v1
kind: Service
metadata:
  name: mockb
  labels:
    app: mockb
    service: mockb
spec:
  ports:
  - port: 8000
    name: http
  selector:
    app: mockb
---
apiVersion: apps/v1
kind: Deployment
metadata:
  name: mockb-v1
  labels:
    app: mockb
    version: v1
spec:
  replicas: 1
  selector:
    matchLabels:
      app: mockb
      version: v1
      ASM_TRAFFIC_TAG: v1
  template:
    metadata:
      labels:
        app: mockb
        version: v1
        ASM_TRAFFIC_TAG: v1
      annotations:
        instrumentation.opentelemetry.io/inject-java: "true"
        instrumentation.opentelemetry.io/container-names: "default"
    spec:
      containers:
      - name: default
        image: registry-cn-hangzhou.ack.aliyuncs.com/acs/asm-mock:v0.1-java
        imagePullPolicy: IfNotPresent
        env:
        - name: version
          value: v1
        - name: app
          value: mockb
        - name: upstream_url
          value: "http://mockc:8000/"
        ports:
        - containerPort: 8000

---
apiVersion: v1
kind: Service
metadata:
  name: mockc
  labels:
    app: mockc
    service: mockc
spec:
  ports:
  - port: 8000
    name: http
  selector:
    app: mockc
---
apiVersion: apps/v1
kind: Deployment
metadata:
  name: mockc-v1
  labels:
    app: mockc
    version: v1
spec:
  replicas: 1
  selector:
    matchLabels:
      app: mockc
      version: v1
      ASM_TRAFFIC_TAG: v1
  template:
    metadata:
      labels:
        app: mockc
        version: v1
        ASM_TRAFFIC_TAG: v1
      annotations:
        instrumentation.opentelemetry.io/inject-java: "true"
        instrumentation.opentelemetry.io/container-names: "default"
    spec:
      containers:
      - name: default
        image: registry-cn-hangzhou.ack.aliyuncs.com/acs/asm-mock:v0.1-java
        imagePullPolicy: IfNotPresent
        env:
        - name: version
          value: v1
        - name: app
          value: mockc
        ports:
        - containerPort: 8000
---
apiVersion: apps/v1
kind: Deployment
metadata:
  name: mocka-v2
  labels:
    app: mocka
    version: v2
spec:
  replicas: 1
  selector:
    matchLabels:
      app: mocka
      version: v2
      ASM_TRAFFIC_TAG: v2
  template:
    metadata:
      labels:
        app: mocka
        version: v2
        ASM_TRAFFIC_TAG: v2
      annotations:
        instrumentation.opentelemetry.io/inject-java: "true"
        instrumentation.opentelemetry.io/container-names: "default"
    spec:
      containers:
      - name: default
        image: registry-cn-hangzhou.ack.aliyuncs.com/acs/asm-mock:v0.1-java
        imagePullPolicy: IfNotPresent
        env:
        - name: version
          value: v2
        - name: app
          value: mocka
        - name: upstream_url
          value: "http://mockb:8000/"
        ports:
        - containerPort: 8000
---
apiVersion: apps/v1
kind: Deployment
metadata:
  name: mockb-v2
  labels:
    app: mockb
    version: v2
spec:
  replicas: 1
  selector:
    matchLabels:
      app: mockb
      version: v2
      ASM_TRAFFIC_TAG: v2
  template:
    metadata:
      labels:
        app: mockb
        version: v2
        ASM_TRAFFIC_TAG: v2
      annotations:
        instrumentation.opentelemetry.io/inject-java: "true"
        instrumentation.opentelemetry.io/container-names: "default"
    spec:
      containers:
      - name: default
        image: registry-cn-hangzhou.ack.aliyuncs.com/acs/asm-mock:v0.1-java
        imagePullPolicy: IfNotPresent
        env:
        - name: version
          value: v2
        - name: app
          value: mockb
        - name: upstream_url
          value: "http://mockc:8000/"
        ports:
        - containerPort: 8000

---
apiVersion: apps/v1
kind: Deployment
metadata:
  name: mockc-v2
  labels:
    app: mockc
    version: v2
spec:
  replicas: 1
  selector:
    matchLabels:
      app: mockc
      version: v2
      ASM_TRAFFIC_TAG: v2
  template:
    metadata:
      labels:
        app: mockc
        version: v2
        ASM_TRAFFIC_TAG: v2
      annotations:
        instrumentation.opentelemetry.io/inject-java: "true"
        instrumentation.opentelemetry.io/container-names: "default"
    spec:
      containers:
      - name: default
        image: registry-cn-hangzhou.ack.aliyuncs.com/acs/asm-mock:v0.1-java
        imagePullPolicy: IfNotPresent
        env:
        - name: version
          value: v2
        - name: app
          value: mockc
        ports:
        - containerPort: 8000
---
apiVersion: apps/v1
kind: Deployment
metadata:
  name: mocka-v3
  labels:
    app: mocka
    version: v3
spec:
  replicas: 1
  selector:
    matchLabels:
      app: mocka
      version: v3
      ASM_TRAFFIC_TAG: v3
  template:
    metadata:
      labels:
        app: mocka
        version: v3
        ASM_TRAFFIC_TAG: v3
      annotations:
        instrumentation.opentelemetry.io/inject-java: "true"
        instrumentation.opentelemetry.io/container-names: "default"
    spec:
      containers:
      - name: default
        image: registry-cn-hangzhou.ack.aliyuncs.com/acs/asm-mock:v0.1-java
        imagePullPolicy: IfNotPresent
        env:
        - name: version
          value: v3
        - name: app
          value: mocka
        - name: upstream_url
          value: "http://mockb:8000/"
        ports:
        - containerPort: 8000
---
apiVersion: apps/v1
kind: Deployment
metadata:
  name: mockb-v3
  labels:
    app: mockb
    version: v3
spec:
  replicas: 1
  selector:
    matchLabels:
      app: mockb
      version: v3
      ASM_TRAFFIC_TAG: v3
  template:
    metadata:
      labels:
        app: mockb
        version: v3
        ASM_TRAFFIC_TAG: v3
      annotations:
        instrumentation.opentelemetry.io/inject-java: "true"
        instrumentation.opentelemetry.io/container-names: "default"
    spec:
      containers:
      - name: default
        image: registry-cn-hangzhou.ack.aliyuncs.com/acs/asm-mock:v0.1-java
        imagePullPolicy: IfNotPresent
        env:
        - name: version
          value: v3
        - name: app
          value: mockb
        - name: upstream_url
          value: "http://mockc:8000/"
        ports:
        - containerPort: 8000

---
apiVersion: apps/v1
kind: Deployment
metadata:
  name: mockc-v3
  labels:
    app: mockc
    version: v3
spec:
  replicas: 1
  selector:
    matchLabels:
      app: mockc
      version: v3
      ASM_TRAFFIC_TAG: v3
  template:
    metadata:
      labels:
        app: mockc
        version: v3
        ASM_TRAFFIC_TAG: v3
      annotations:
        instrumentation.opentelemetry.io/inject-java: "true"
        instrumentation.opentelemetry.io/container-names: "default"
    spec:
      containers:
      - name: default
        image: registry-cn-hangzhou.ack.aliyuncs.com/acs/asm-mock:v0.1-java
        imagePullPolicy: IfNotPresent
        env:
        - name: version
          value: v3
        - name: app
          value: mockc
        ports:
        - containerPort: 8000
For each instance service Pod, two annotations, instrumentation.opentelemetry.io/inject-java: "true" and instrumentation.opentelemetry.io/container-names: "default", are added to declare that the instance service is implemented in Java language, and require OpenTelemetry Operator to automatically instrument the container named default.
3. Run the following command to deploy the instance service.
kubectl apply -f mock.yamlBased on the auto-instrumentation mechanism of OpenTelemetry, the deployed service Pod is automatically able to pass baggage in the trace.
1. Create a lane group.
a) Log on to the ASM console, and select Service Mesh > Mesh Management in the left-hand navigation bar.
b) On the Mesh Management page, click the name of the target instance and select Traffic Management Center > Traffic Lane in the left-hand navigation bar.
c) On the Traffic Lane page, click Create a Lane Group. In the Create a Lane Group panel, set the parameters and click OK.
| Parameter | Usage Notes |
| Name of Lane Group | The configuration of this sample is test. |
| Ingress Gateway | Select ingressgateway. |
| Lane Mode | Select the loose mode. |
| Context Pass-through Mode of the Trace | Select pass-through baggage and enter x-asm-prefer-tag in the lower part of the routing request header. |
| Lane Service | Select the desired Kubernetes cluster and the default namespace. Then, select mocka, mockb, and mockc in the service list, and click the icon  to add the desired services to the selected section. to add the desired services to the selected section. |
Create s1, s2, and s3 lanes and bind the lanes to v1, v2, and v3.
a) In the Traffic Rule Definition section of the Traffic Lane page, click Create Swimlanes.
b) In the Create Swimlanes dialog box, set the parameters and click OK.
| Parameter | Usage Notes |
| Lane Name | The three lanes are configured as s1, s2, and s3 respectively. |
| Configure Service Tag |
Label Key: Set as ASM_TRAFFIC_TAG. Label Value: The three lanes are configured as v1, v2, and v3 respectively. |
| Add Service |
Lane s1: Select mocka(default), mockb(default), and mockc(default). Lane s2: Select mocka(default) and mockc(default). Lane s3: Select mockb(default). |
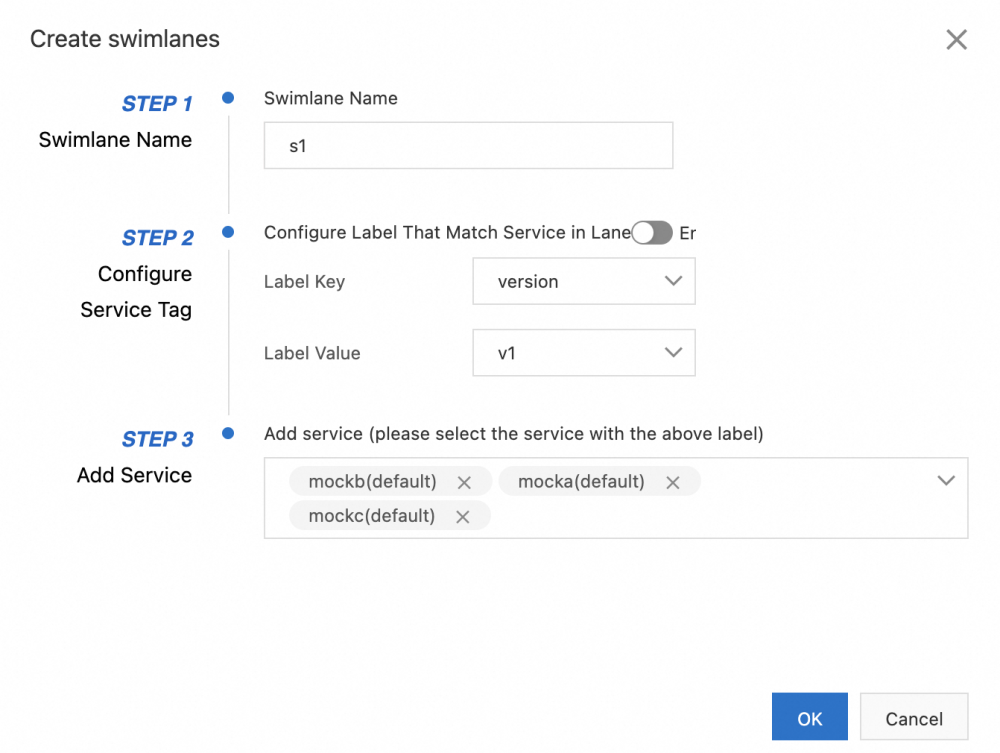
The following figure shows how to create the lane s1:

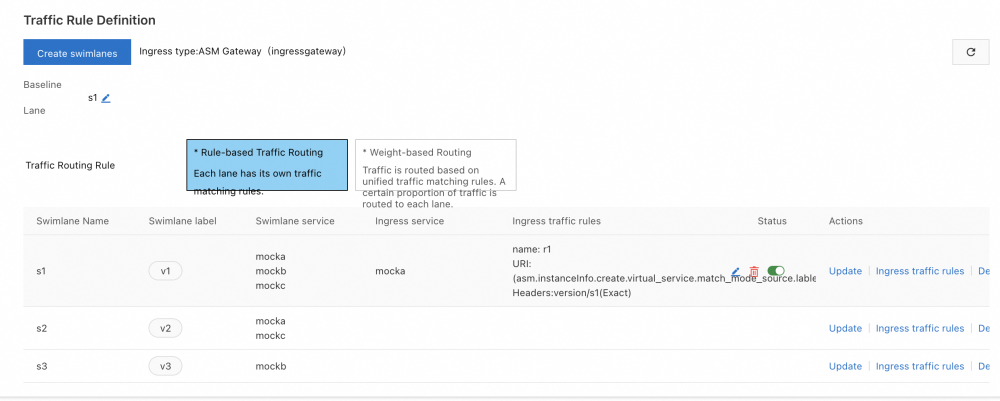
After the three lanes are created, you can view them in the Traffic Rule Definition section, as shown in the following figure. By default, the first lane you create in the lane group is set as the baseline lane. However, you can change the baseline lane. When traffic is destined for services that do not exist in the other lanes, requests are forwarded to the baseline lane according to the fallback mechanism. For more information about how to change the baseline lane, please refer to Change the Baseline Lane.

After the three lanes are created, DestinationRule and VirtualService corresponding to the lane rule are generated for each service in the lane group. You can view Traffic Management Center > Target Rules or Virtual Service in the left-hand navigation bar of the console. For example, the following DestinationRule and VirtualService are automatically created for mocka service.
apiVersion: networking.istio.io/v1beta1
kind: DestinationRule
metadata:
 labels:
    asm-system: 'true'
    provider: asm
    swimlane-group: test
  name: trafficlabel-dr-test-default-mocka
  namespace: istio-system
spec:
  host: mocka.default.svc.cluster.local
  subsets:
    - labels:
        ASM_TRAFFIC_TAG: v1
      name: s1
    - labels:
        ASM_TRAFFIC_TAG: v2
      name: s2


apiVersion: networking.istio.io/v1beta1
kind: VirtualService
metadata:
 labels:
    asm-system: 'true'
    provider: asm
    swimlane-group: test
  name: trafficlabel-vs-test-default-mocka
  namespace: istio-system
spec:
  hosts:
    - mocka.default.svc.cluster.local
  http:
    - match:
        - headers:
            x-asm-prefer-tag:
              exact: s1
      route:
        - destination:
            host: mocka.default.svc.cluster.local
            subset: s1
          fallback:
            target:
              host: mocka.default.svc.cluster.local
              subset: s1
    - match:
        - headers:
            x-asm-prefer-tag:
              exact: s2
      route:
        - destination:
            host: mocka.default.svc.cluster.local
            subset: s2
          fallback:
            target:
              host: mocka.default.svc.cluster.local
              subset: s1
    - match:
        - headers:
            x-asm-prefer-tag:
              exact: s3
      route:
        - destination:
            host: mocka.default.svc.cluster.local
            subset: s3
          fallback:
            target:
              host: mocka.default.svc.cluster.local
              subset: s1
3. Set unified routing rules based on weight.
a) In the Traffic Rule Definition section on the Traffic Lane page, click Weight-based Traffic Routing in the Traffic Routing Strategy section.
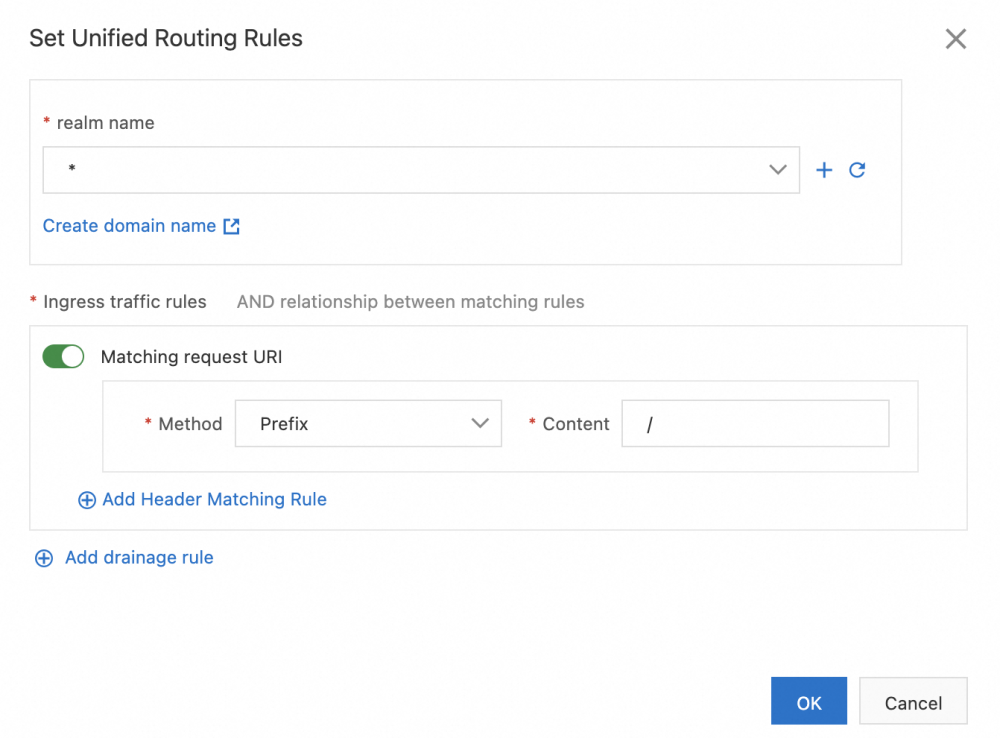
b) In the Set Unified Routing Rules dialog box, set the parameters and click OK. This article takes /mock as the entrance corresponding to the lane service API as an example to set unified routing rules for the three lanes.
| Parameter | Usage Notes |
| Domain Name | The configuration is *. |
| Matching Request URI | Configure the method to be prefix and the content to be /. |
The following figure shows an example of setting unified routing rules:

4. Set the routing weight of the three lanes. It determines the proportion of traffic sent to each lane.
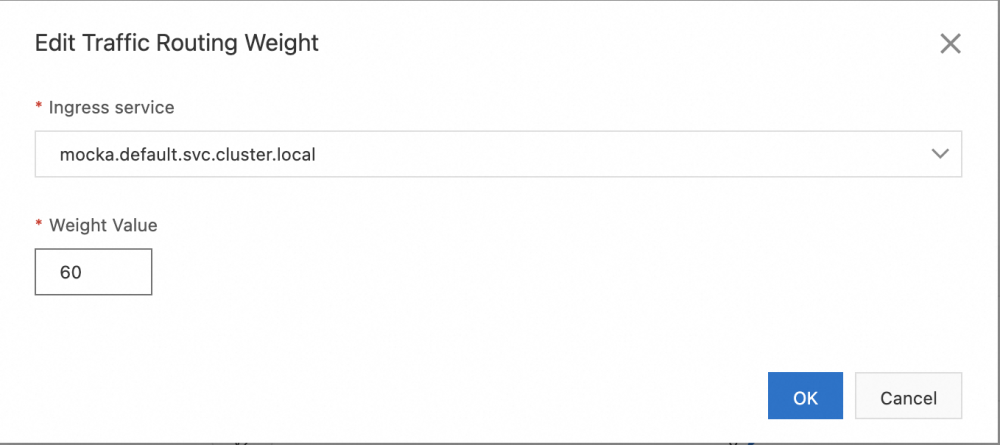
a) In Traffic Lane the page's Traffic Rule Definition area, in each lane of the Routing Weight column, click to the right of the number  button, in the Edit Traffic Routing Weight dialog box, set the parameter, and then click OK.
| Parameter | Usage Notes |
| Ingress Service | All three lanes are configured as mocka.default.svc.cluster.local. |
| Weight Value | • For lane s1, the configuration is 60. • For lane s2, the configuration is 20. • For lane s3, the configuration is 20. |
The following figure shows an example of how to edit traffic routing weights:

1. Obtain the IP address of the ASM gateway. For more information, please refer to Obtain the Address of the ASM Gateway.
2. Run the following command to set environment variables. xxx.xxx.xxx.xxx is the IP address obtained in the proceeding step.
export ASM_GATEWAY_IP=xxx.xxx.xxx.xxx3. Verify that the end-to-end grayscale function takes effect.
a) Run the following command to view the access effect of the three lanes.
for i in {1..100}; do curl http://${ASM_GATEWAY_IP}/mock ; echo ''; sleep 1; done;Expected output:
-> mocka(version: v1, ip: 192.168.0.193)-> mockb(version: v1, ip: 192.168.0.1)-> mockc(version: v1, ip: 192.168.0.190)
-> mocka(version: v1, ip: 192.168.0.193)-> mockb(version: v3, ip: 192.168.0.2)-> mockc(version: v1, ip: 192.168.0.190)
-> mocka(version: v1, ip: 192.168.0.193)-> mockb(version: v1, ip: 192.168.0.1)-> mockc(version: v1, ip: 192.168.0.190)
-> mocka(version: v1, ip: 192.168.0.193)-> mockb(version: v1, ip: 192.168.0.1)-> mockc(version: v1, ip: 192.168.0.190)
-> mocka(version: v2, ip: 192.168.0.184)-> mockb(version: v1, ip: 192.168.0.1)-> mockc(version: v2, ip: 192.168.0.189)
-> mocka(version: v1, ip: 192.168.0.193)-> mockb(version: v1, ip: 192.168.0.1)-> mockc(version: v1, ip: 192.168.0.190)
-> mocka(version: v2, ip: 192.168.0.184)-> mockb(version: v1, ip: 192.168.0.1)-> mockc(version: v2, ip: 192.168.0.189)
-> mocka(version: v1, ip: 192.168.0.193)-> mockb(version: v1, ip: 192.168.0.1)-> mockc(version: v1, ip: 192.168.0.190)
-> mocka(version: v1, ip: 192.168.0.193)-> mockb(version: v1, ip: 192.168.0.1)-> mockc(version: v1, ip: 192.168.0.190)
-> mocka(version: v1, ip: 192.168.0.193)-> mockb(version: v3, ip: 192.168.0.2)-> mockc(version: v1, ip: 192.168.0.190)
-> mocka(version: v1, ip: 192.168.0.193)-> mockb(version: v1, ip: 192.168.0.1)-> mockc(version: v1, ip: 192.168.0.190)
-> mocka(version: v1, ip: 192.168.0.193)-> mockb(version: v1, ip: 192.168.0.1)-> mockc(version: v1, ip: 192.168.0.190)
-> mocka(version: v2, ip: 192.168.0.184)-> mockb(version: v1, ip: 192.168.0.1)-> mockc(version: v2, ip: 192.168.0.189)
-> mocka(version: v1, ip: 192.168.0.193)-> mockb(version: v1, ip: 192.168.0.1)-> mockc(version: v1, ip: 192.168.0.190)
-> mocka(version: v1, ip: 192.168.0.193)-> mockb(version: v1, ip: 192.168.0.1)-> mockc(version: v1, ip: 192.168.0.190)
-> mocka(version: v2, ip: 192.168.0.184)-> mockb(version: v1, ip: 192.168.0.1)-> mockc(version: v2, ip: 192.168.0.189)
-> mocka(version: v1, ip: 192.168.0.193)-> mockb(version: v3, ip: 192.168.0.2)-> mockc(version: v1, ip: 192.168.0.190)
-> mocka(version: v1, ip: 192.168.0.193)-> mockb(version: v1, ip: 192.168.0.1)-> mockc(version: v1, ip: 192.168.0.190)
-> mocka(version: v2, ip: 192.168.0.184)-> mockb(version: v1, ip: 192.168.0.1)-> mockc(version: v2, ip: 192.168.0.189)
-> mocka(version: v2, ip: 192.168.0.184)-> mockb(version: v1, ip: 192.168.0.1)-> mockc(version: v2, ip: 192.168.0.189)
-> mocka(version: v1, ip: 192.168.0.193)-> mockb(version: v1, ip: 192.168.0.1)-> mockc(version: v1, ip: 192.168.0.190)
-> mocka(version: v1, ip: 192.168.0.193)-> mockb(version: v1, ip: 192.168.0.1)-> mockc(version: v1, ip: 192.168.0.190)
-> mocka(version: v1, ip: 192.168.0.193)-> mockb(version: v1, ip: 192.168.0.1)-> mockc(version: v1, ip: 192.168.0.190)
-> mocka(version: v1, ip: 192.168.0.193)-> mockb(version: v3, ip: 192.168.0.2)-> mockc(version: v1, ip: 192.168.0.190)
-> mocka(version: v1, ip: 192.168.0.193)-> mockb(version: v1, ip: 192.168.0.1)-> mockc(version: v1, ip: 192.168.0.190)
-> mocka(version: v1, ip: 192.168.0.193)-> mockb(version: v1, ip: 192.168.0.1)-> mockc(version: v1, ip: 192.168.0.190)
-> mocka(version: v1, ip: 192.168.0.193)-> mockb(version: v3, ip: 192.168.0.2)-> mockc(version: v1, ip: 192.168.0.190)
-> mocka(version: v2, ip: 192.168.0.184)-> mockb(version: v1, ip: 192.168.0.1)-> mockc(version: v2, ip: 192.168.0.189)
-> mocka(version: v1, ip: 192.168.0.193)-> mockb(version: v3, ip: 192.168.0.2)-> mockc(version: v1, ip: 192.168.0.190)
-> mocka(version: v1, ip: 192.168.0.193)-> mockb(version: v1, ip: 192.168.0.1)-> mockc(version: v1, ip: 192.168.0.190)
-> mocka(version: v1, ip: 192.168.0.193)-> mockb(version: v3, ip: 192.168.0.2)-> mockc(version: v1, ip: 192.168.0.190)
-> mocka(version: v2, ip: 192.168.0.184)-> mockb(version: v1, ip: 192.168.0.1)-> mockc(version: v2, ip: 192.168.0.189)
-> mocka(version: v1, ip: 192.168.0.193)-> mockb(version: v1, ip: 192.168.0.1)-> mockc(version: v1, ip: 192.168.0.190)
-> mocka(version: v1, ip: 192.168.0.193)-> mockb(version: v1, ip: 192.168.0.1)-> mockc(version: v1, ip: 192.168.0.190)
-> mocka(version: v1, ip: 192.168.0.193)-> mockb(version: v1, ip: 192.168.0.1)-> mockc(version: v1, ip: 192.168.0.190)
-> mocka(version: v1, ip: 192.168.0.193)-> mockb(version: v1, ip: 192.168.0.1)-> mockc(version: v1, ip: 192.168.0.190)
-> mocka(version: v1, ip: 192.168.0.193)-> mockb(version: v1, ip: 192.168.0.1)-> mockc(version: v1, ip: 192.168.0.190)
-> mocka(version: v1, ip: 192.168.0.193)-> mockb(version: v1, ip: 192.168.0.1)-> mockc(version: v1, ip: 192.168.0.190)Based on the expected output, traffic is sent to the lanes s1, s2, and s3 in a ratio of about 6:2:2, with s1 as the baseline lane. If a specific version of a service does not exist in the trace, the corresponding service in the lane s1 is called.
This article briefly discusses the scenarios and schemes for achieving end-to-end traffic grayscale management by using traffic lanes. In addition, it reviews the traffic lanes in strict mode and loose mode provided by Alibaba Cloud Service Mesh (ASM), and their advantages and challenges. Next, it introduces a non-intrusive traffic lane in loose mode based on the baggage pass-through capability proposed by OpenTelemetry community. This type of traffic lane has low intrusiveness to business code while maintaining the flexibility of the loose mode. Meanwhile, this article also introduces a new weight-based traffic routing strategy. It can distribute matched traffic to different traffic lanes in a preset ratio based on unified traffic matching rules.
ApsaraMQ Copilot for RocketMQ: A Health Manager of Message Data Integration Link

212 posts | 13 followers
FollowAlibaba Cloud Native - January 18, 2024
Alibaba Cloud Native - January 23, 2024
Alibaba Cloud Community - August 9, 2024
Alibaba Cloud Community - January 26, 2024
Alibaba Container Service - January 14, 2025
Xi Ning Wang(王夕宁) - August 17, 2023

212 posts | 13 followers
Follow Alibaba Cloud Service Mesh
Alibaba Cloud Service Mesh (ASM) is a fully managed service mesh platform that is compatible with Istio.
Learn More Function Compute
Alibaba Cloud Function Compute is a fully-managed event-driven compute service. It allows you to focus on writing and uploading code without the need to manage infrastructure such as servers.
Learn More Cloud-Native Applications Management Solution
Accelerate and secure the development, deployment, and management of containerized applications cost-effectively.
Learn More Simple Log Service
An all-in-one service for log-type data
Learn MoreMore Posts by Alibaba Cloud Native